ProtoSnap LilyPad Development Simple Hookup Guide
 jimblom
Uploading an Arduino Sketch
Once you've gotten sick of the example sketch (as-if!), you'll no-doubt be itching to write and upload you're own piece of code. So, let's get right to it.
Install Arduino
You'll need to have Arduino installed from this point forward. You can grab the most recent version of the software from Arduino's downloads page. Check out our Arduino installation guide (Windows, Mac, or Linux) for help installing the IDE. When those tutorial speak of plugging in the Arduino to installing drivers, plug in the FTDI Basic board.
Savvy? Now, open up an Arduino window. You'll be greeted by something similar to this:
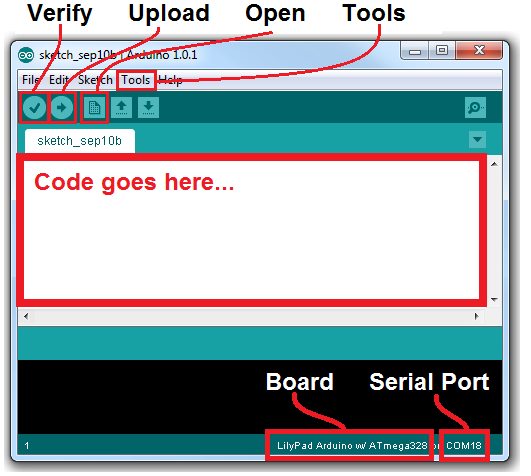
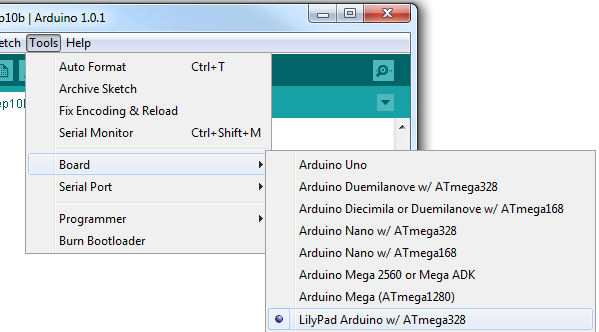
Before you can upload code, there are a few settings to make. Notice how in my picture above "Board" is correctly set as "LilyPad Arduino w/ ATmega328"? Yours is most likely not set that way. To change that, go to the Tools menu, navigate to the Boards dropdown, and select LilyPad Arduino w/ ATmega328. That tells the Arduino software what kind of board to compile code for.
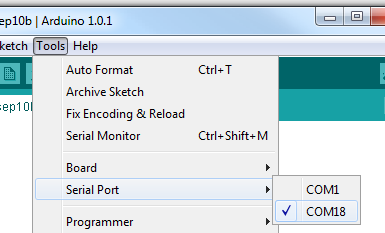
You'll also need to set the Serial Port, so Arduino knows that it's talking to your fancy new FTDI Basic board. Again go to Tools, and under Serial Port select your FTDI's port. On a Windows machine this is "COM#", on Mac your port will be "/dev/tty.usbserial###". Usually you should only have one choice available under this menu, pick that one. If you've got more than one (like me, I've got a COM1, which is my computer's ancient RS-232 port) a little trial-and-error won't hurt, or you can check for sure in the device manager.
Connect the FTDI Basic to LilyPad Arduino
Before you can upload the code, you'll need to connect the FTDI Basic to the LilyPad Arduino Simple board. There are "B" and "G" labels on the LilyPad Simple, which should line up with the "BLK" an "GRN" labels on the FTDI board. Line those up and slide the FTDI's female connector onto the mating pins.
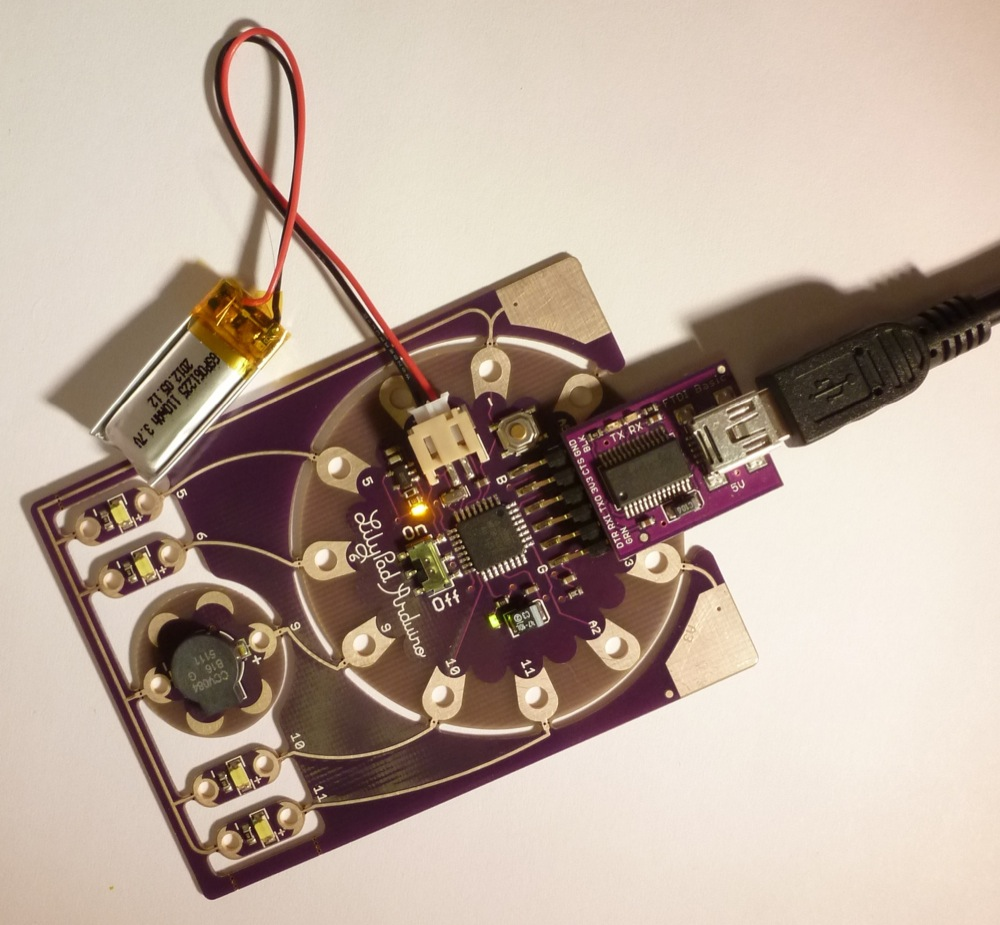
When you plug the FTDI board (assuming the battery is connected), you should see an orange LED light up, to indicate the battery is charging.
Upload Code
Sweet! Now the only missing ingredient is code. Which is quite the void, when it comes to programming recipes. Click here to download the Raygun example code we'll be using in the latter part of the tutorial (or you can copy/paste from below). Unzip that folder, and open "Raygun.ino" with Arduino.
language:c
/* RAYGUN!!! Example Code
   By: Nick Poole and Dia Campbell
       SparkFun Electronics
   Date: September 12, 2012
   License: This code is released into the open domain. Please
   use, re-use, and modify this code in any which way you
   require.

   This example code was written specifically for the ProtoSnap
   LilyPad Simple Development Board. After initializing the pins
   in setup(), this code jumps straight into making awesome,
   super-pleasant-sounding Raygun sounds. From time to time, the
   LEDs will sequentially light up (5->6->10->11).

   All sounds are labeled with an approximate onomatopoeia. You
   can move around the for() loops to make the Raygun that best
   suits you.
*/

const int buzzer = 9; //Buzzer pin
int freq; //frequency out (don't freak out)

void setup()
{
  // Set LED pins as OUTPUTs:
  pinMode(5, OUTPUT);
  pinMode(6, OUTPUT);
  pinMode(10, OUTPUT);
  pinMode(11, OUTPUT);

  // Set buzzer pin as OUTPUT:
  pinMode(buzzer, OUTPUT);
}

void loop()
{
  // BOOOOOOOOoooooooooo sound (descending) >>>>>>>>>>>>>>>>>>>>>
  // Goes from 1000 Hz to 340 Hz with 2ms delays in between
  for (int b=1000; b>340; b--)
  {
    tone(buzzer, b);
    delay(2);
  }
  // End of BOOOOOOOOoooooooooo <<<<<<<<<<<<<<<<<<<<<<<<<<<<<<<<<

  // Now call the ledZap() function. This is a function that we've
  // defined ourselves in the code below. Look under this loop to
  // see what the ledZap() function does.
  ledZap();

  // Turn the buzzer off, this must be called if the tone()
  // function was not given a duration (the 3rd paramater).
  noTone(buzzer);

  // DSIFGSIVOESRGJIOFDSJGFSD sound (white noise) >>>>>>>>>>>>>>>
  // This for loop plays 5000 random frequenices to create what
  // sounds like white noise.
  for(int i =0;i<5000;i++)
  {
    freq = random(240,1080);
    tone(buzzer, freq);
  }
  // End of DSIFGSIVOESRGJIOFDSJGFSD <<<<<<<<<<<<<<<<<<<<<<<<<<<<

  noTone(buzzer);  // Turn off the buzzer

  // WAWAWAWAWAWAWAWA sound (pacman waka) >>>>>>>>>>>>>>>>>>>>>>>
  // This set of for loops very quickly sweeps frequencies
  // down then up then down then up (10 iterations of down/up)
  for(int r=0;r<10;r++)
  {
    for(int c=1000;c>340;c--)
    {
      tone(buzzer, c);
    }
    for(int d=340;d<1000;d++)
    {
      tone(buzzer, d);
    }
  }
  // End of WAWAWAWAWAWAWAWA <<<<<<<<<<<<<<<<<<<<<<<<<<<<<<<<<<<<

  noTone(buzzer);

  ledZap();  // Zzzzzzzap

  // DSIFGSIVOESRGJIOFDSJGFSD sound (white noise) >>>>>>>>>>>>>>>
  // Same as the last DSIFGSIVOESRGJIOFDSJGFSD
  for(int i =0;i<5000;i++)
  {
    freq = random(240,1080);
    tone(buzzer, freq);
  }
  // End of DSIFGSIVOESRGJIOFDSJGFSD <<<<<<<<<<<<<<<<<<<<<<<<<<<<

  noTone(buzzer);

  // ooooOOOOBooooOOOOB sound (ascending) >>>>>>>>>>>>>>>>>>>>>>>
  // This set of for loops will twice sweep frequencies UP
  // from 340 Hz to 1000 Hz, with a small delay in between
  // each tone.
  for(int s=0;s<2;s++)
  {
    for(int g=340;g<1000;g++)
    {
      tone(buzzer,g);
      delay(2);
    }
  }
  // end of ooooOOOOBooooOOOOB <<<<<<<<<<<<<<<<<<<<<<<<<<<<<<<<<<

  noTone(buzzer);

  ledZap();  // Raygun be zapping


  // DSIFGSIVOESRGJIOFDSJGFSD sound (white noise) >>>>>>>>>>>>>>>
  // same white noise as usual.
  for(int i =0;i<5000;i++)
  {

    freq = random(240,1080);
    tone(buzzer, freq);
  }
  // End of DSIFGSIVOESRGJIOFDSJGFSD <<<<<<<<<<<<<<<<<<<<<<<<<<<<

  noTone(buzzer);

  // Now that we've reached the end of loop(), jump back up
  // to the top and do it all over again! Yay!
}

// the ledZap function quickly, and sequentially blinks
// each LED on and off. It'll blink pin 5, then 6, 10 and 11.
void ledZap()
{
  digitalWrite(5, HIGH);   // set the LED on
  delay(50);              // wait for 50ms
  digitalWrite(5, LOW);    // set the LED off
  delay(50);              // wait for 50ms

  digitalWrite(6, HIGH);   // set the LED on
  delay(50);              // wait for 50ms
  digitalWrite(6, LOW);    // set the LED off
  delay(50);              // wait for 50ms

  digitalWrite(10, HIGH);   // set the LED on
  delay(50);              // wait for 50ms
  digitalWrite(10, LOW);    // set the LED off
  delay(50);              // wait for 50ms

  digitalWrite(11, HIGH);   // set the LED on
  delay(50);              // wait for 50ms
  digitalWrite(11, LOW);    // set the LED off
  delay(50);              // wait for 50ms
}
Now, try Uploading that code, by clicking the right-pointing-arrow-icon button. Give Arduino few seconds to compile the code, and then a few more to upload. If all goes well, you should be greeted by something like this:
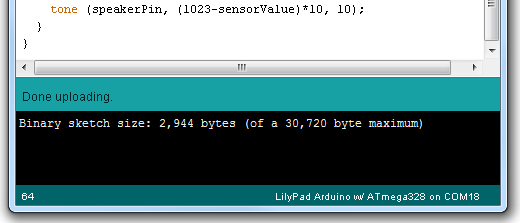
Yay! You uploaded some new code to the LilyPad Arduino Simple. As soon as the new code is uploaded, your Arduino Simple board should start running the Raygun code we'll use in the next part of the tutorial.
If you're having trouble with the upload, double check that the board and serial port are correctly set. Then, make sure the FTDI Basic board is properly plugged into the LilyPad Arduino Simple board ("B" goes to "BLK, and "G" goes to "GRN"). If you're still not having any luck, let us know in the comments below. You can also get in contact with our tech support team, who'd be happy to help.
This concludes part one of this tutorial. You've uploaded some code to the ProtoSnap (which should still be in one piece). In the remaining pages, we'll unsnap the Development Board, and break out the conductive thread to do some sewing!