Installing Arduino IDE
 bboyho,
  b_e_n
b_e_n Introduction
This tutorial will walk you through downloading, installing, and testing the Arduino software (also known as the Arduino IDE - short for Integrated Development Environment). Before you jump to the page for your operating system, make sure you've got all the right equipment.
Required Materials
To follow along with this tutorial, you will need the following materials. You may not need everything though depending on what you have. Add it to your cart, read through the guide, and adjust the cart as necessary.
- A computer (Windows, Mac, or Linux)
- An Arduino-compatible microcontroller (anything from this guide should work)
- A USB A-to-B cable, or another appropriate way to connect your Arduino-compatible microcontroller to your computer (check out this USB buying guide if you're not sure which cable to get).

Suggested Reading
If you're new to Arduino in general, you'll want to check out this tutorial to familiarize yourself with everyone's favorite microcontroller platform.
What is an Arduino?
 |
 |
 |
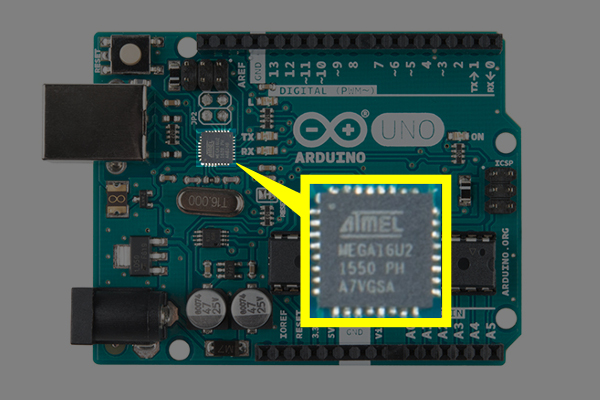
| Atmega16U2 on the Arduino Uno R3 |
FTDI on the RedBoard |
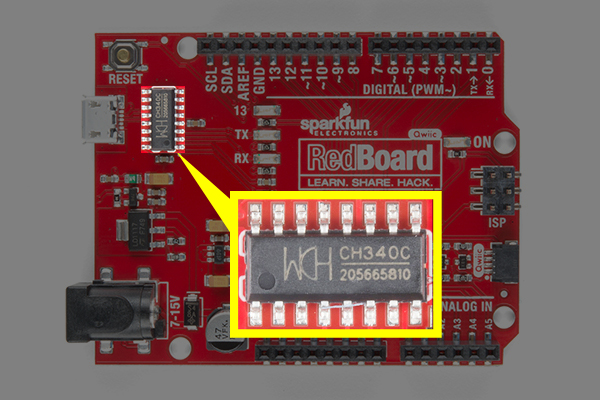
CH340 on the RedBoard Qwiic |
How to Install FTDI Drivers
How to Install CH340 Drivers
If you're ready to get started, click on the link in the column on the left that matches up with your operating system, or you can jump to your operating system here.
Downloading the Arduino IDE
You can download the Arduino IDE from their website. They have installation instructions, but we will also go over the installation process as well. Make sure you download the version that matches your operating system.
The installation procedure is fairly straightforward, but it does vary by OS. Here are some tips to help you along.
- We recommend using a computer with a full desktop operating system like Windows 7/10 (avoid Windows 8 if you can), Mac OSX, and certain flavors Linux (check the Arduino FAQ page for compatibility).
- If you are not a technical or computer savy individual and you have your choice of computers, I highly recommend using a Windows 7, 10, or 11 computer. You will usually run into the the least issues, if any, with these operating systems.
- We do NOT recommend using a Chromebook, Netbook, tablet, phone, or the Arduino Web IDE in general. You will be responsible for troubleshooting any driver or Arduino Web IDE issues.
- As of the writing of this tutorial (updated 12-14-2018), the most recent and stable release of the Arduino IDE is version 1.8.5. We recommend using that version of the Arduino IDE; you can download the previous releases here.
- Raspberry Pi users with Raspbian installed should use the Linux ARM download. We do not recommend using the command line installation. It will install the oldest release of Arduino, which is useless when it comes to installing new boards definitions or libraries.
- For additional troubleshooting tips, here is a troubleshooting guide from Arduino.
Windows
This page will show you how to install and test the Arduino software with a Windows operating system (Windows 10, Windows 7, Vista, and XP).
Go to the Arduino download page and download the latest version of the Arduino software for Windows if you have not already.
Installer
The Windows version of Arduino is offered in two options: an installer or a zip file. The installer is the easier of the two options, just download that, and run the executable file to begin the installation.

When you're prompted to install a driver during installation, select "Install". This will install drivers for Arduino specific boards (like the Uno, Nano, etc.) that you may use in the future.
ZIP
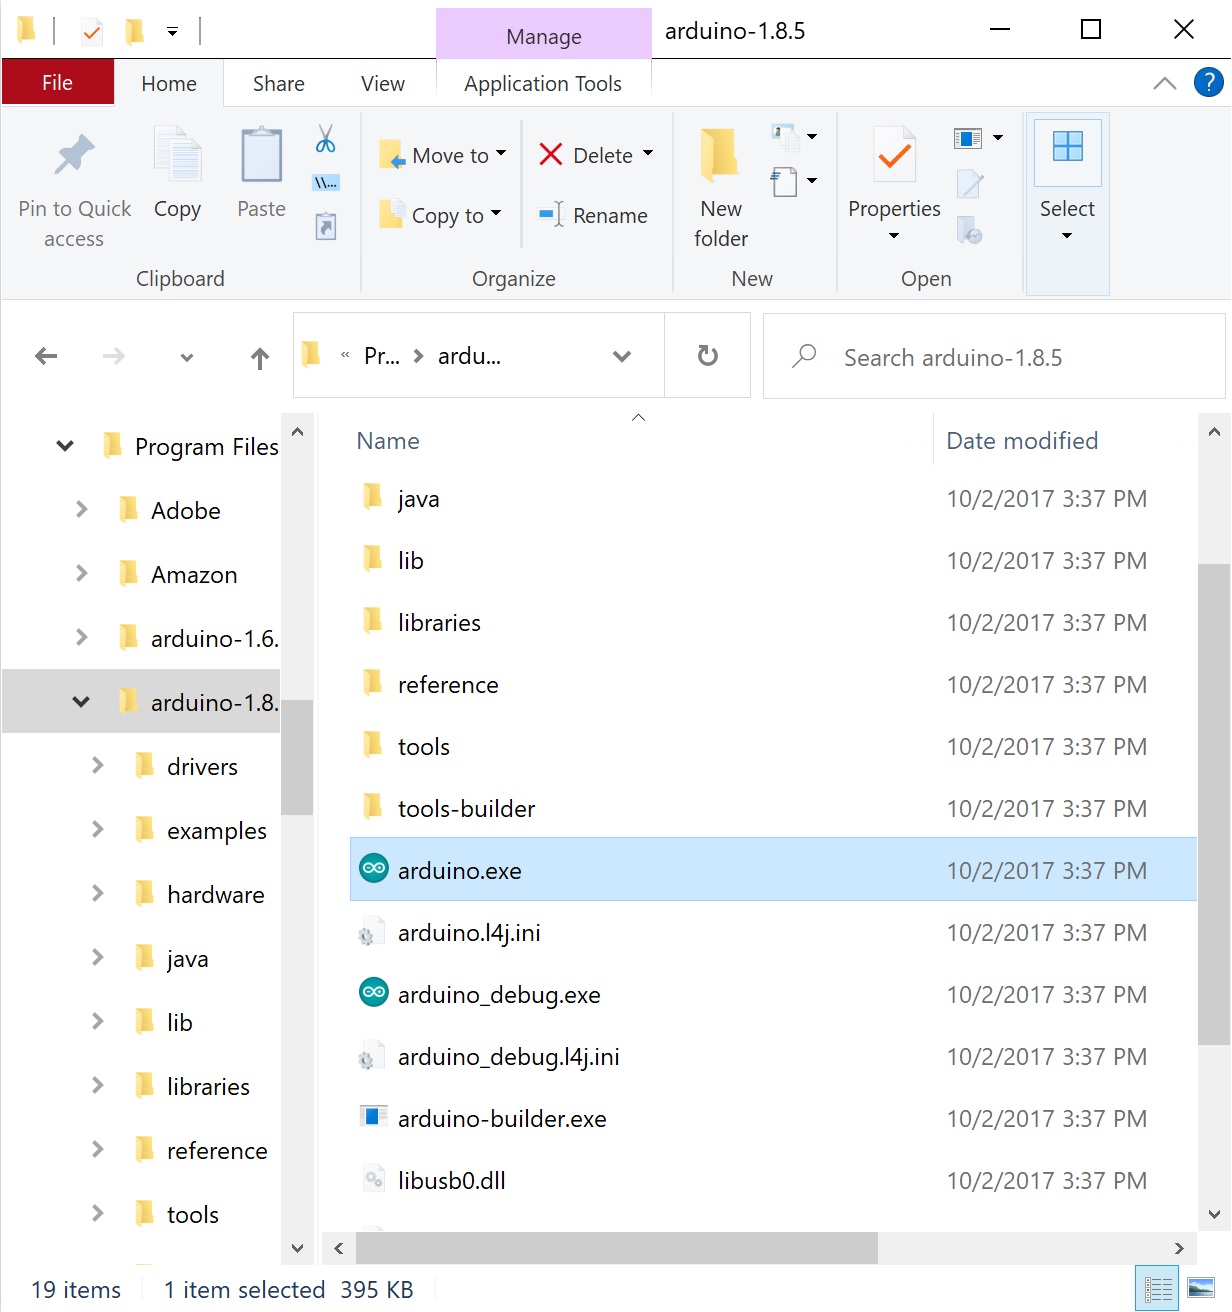
If you choose to download the zip file version of Arduino, you'll need to extract the files yourself. Don't forget which folder you extract the files into! You will need to run the executable Arduino file in the folder to start the Arduino IDE.
When the download is finished, un-zip it and open up the Arduino folder to confirm that yes, there are indeed some files and sub-folders inside. The file structure is important so don't be moving any files around unless you really know what you're doing.
Connecting Your Arduino
Power up your Arduino by connecting your Arduino board to your computer with a USB cable (or FTDI cable if you're using an Arduino Pro). You should see the an LED labeled 'ON' light up. (this diagram shows the placement of the power LED on the UNO).
Drivers for Arduino Uno on Windows
To install the drivers for the Arduino Uno, you will need to plug in your board to your computer's USB port. Once the board is connected, you will need to wait for Windows to begin it's driver installation process. After a few moments, the process will probably fail, despite its best efforts.
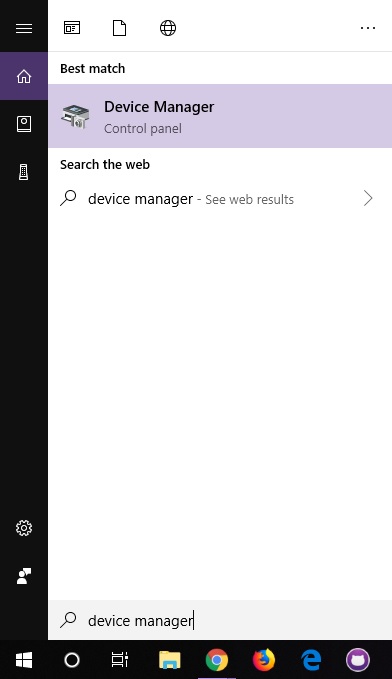
Open up a search, type in Device Manager, and hit ENTER.
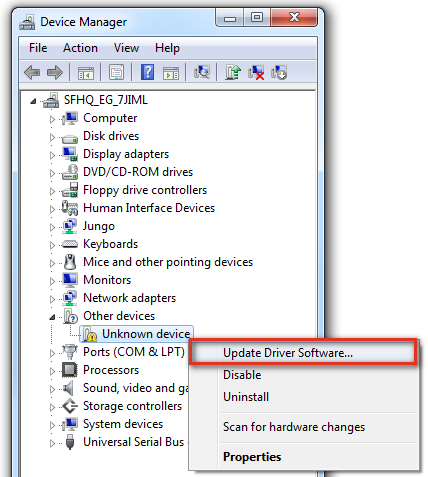
Look under Ports (COM & LPT) tree. You should see an open port named "Arduino UNO (COMxx)". If there is no COM & LPT section, look under "Other devices" for "Unknown Device. Right click on the "Arduino UNO (COMxx)" or "Unknown device" port and choose the "Update Driver Software" option.
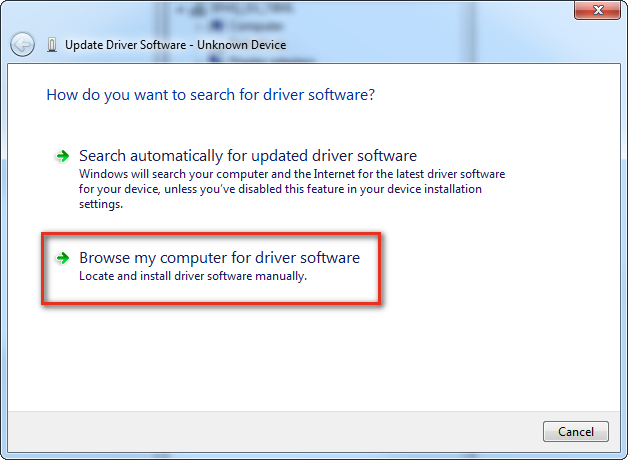
Next, choose the "Browse my computer for Driver software" option
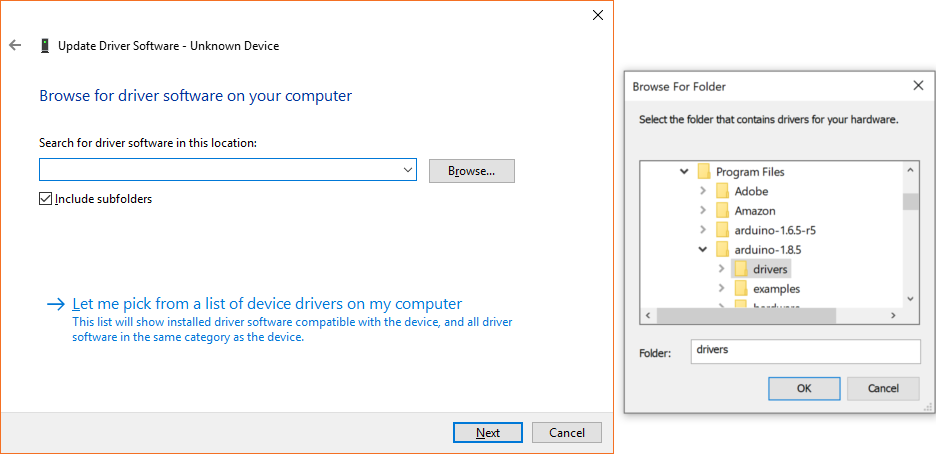
Finally, navigate to the Arduino IDE folder. This should be where you unzipped the Arduino IDE (e.g. it should be similar to the following path with a different version number: C:\Program Files\arduino-1.8.5\drivers). Depending on what version of Windows you have, you may be able to select the Uno's driver file, named "Arduino.inf", located in the "Drivers" folder (not the "FTDI USB Drivers" sub-directory). If you cannot see the *.inf file, it is probably just hidden. You can select the "drivers" folder with the "include sub-folders" option selected instead.
Windows will finish up the driver installation from there! Your computer will enumerate with a COM port. You may see a COM port number depending on what is currently saved in your computer. Try to remember what the number is when uploading. If not, you can always navigate back to the device manager and power cycle the Arduino to determine what number your Arduino enumerated on.

For earlier versions of the Arduino boards (e.g. Arduino Duemilanove, Nano, or Diecimila) check out this page for specific directions.
Drivers for RedBoard on Windows
Depending on your board, there may be different USB-to-serial converters on your board. If you are using a RedBoard you will need to go to the How to Install FTDI Drivers tutorial. If you are using the or RedBoard Qwiic, you will need to go to the How to Install CH340 Drivers tutorial. Make sure to look closely at your board and its respective hookup guide to determine USB-to-serial converter that is on board.
How to Install FTDI Drivers
How to Install CH340 Drivers
Launch and Blink!
After following the appropriate steps for your software install, we are now ready to test your first program with your Arduino board! Launch the Arduino application. If you disconnected your board, plug it back in.
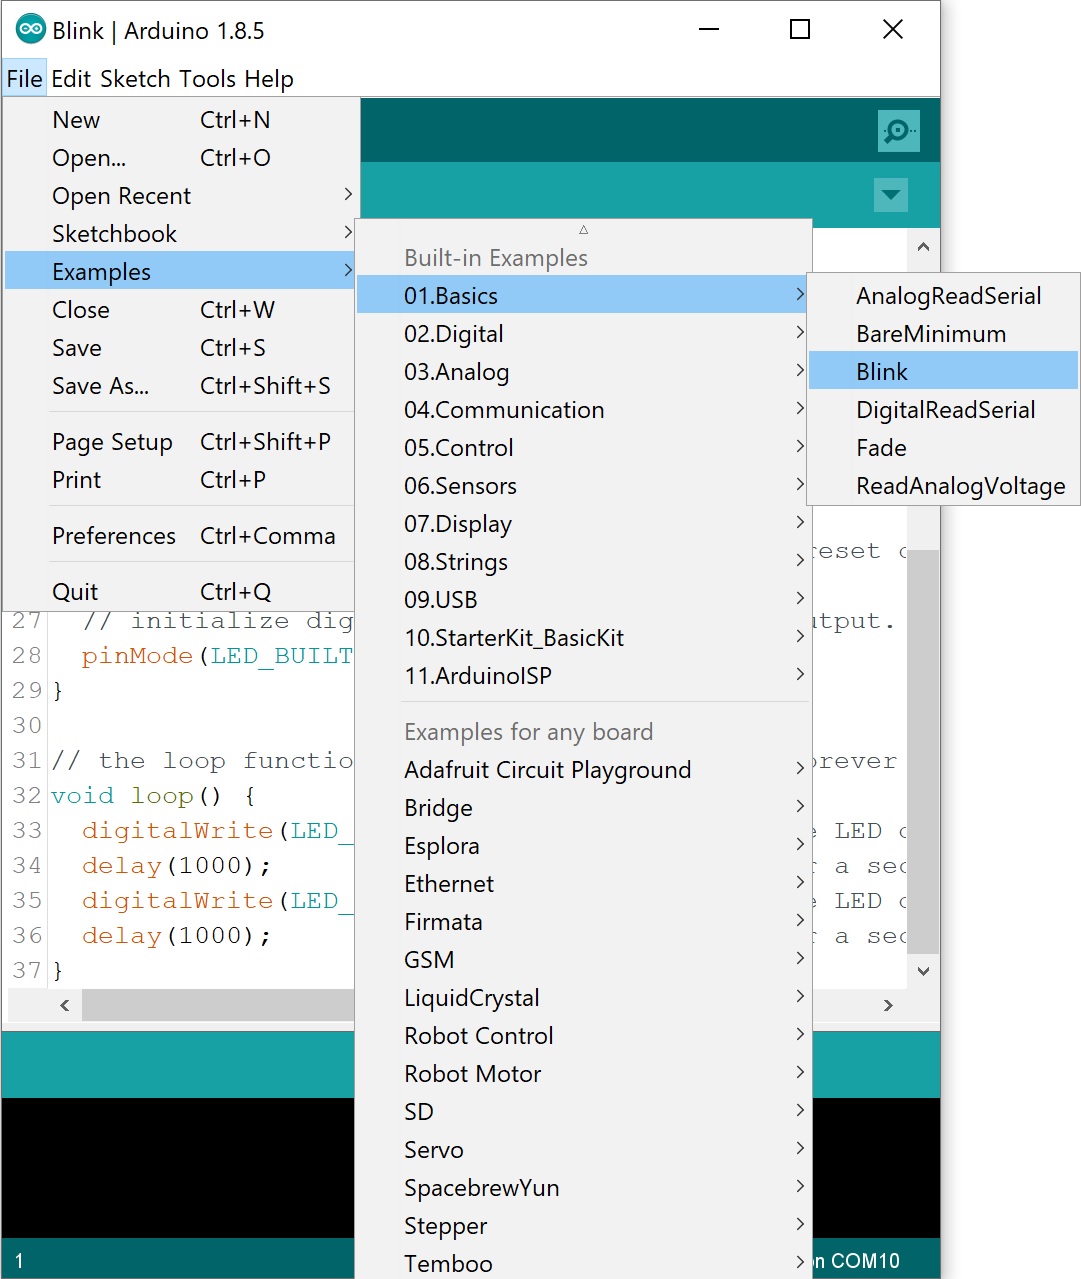
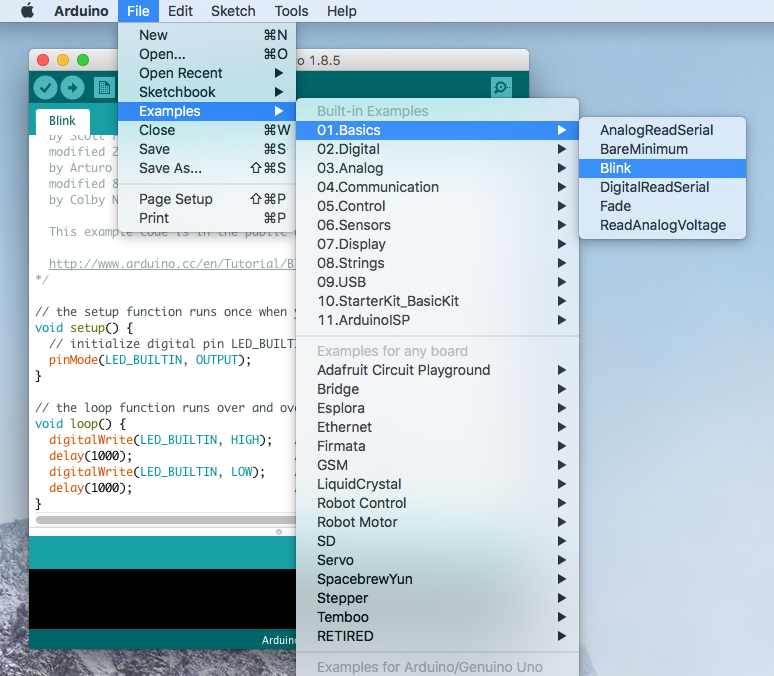
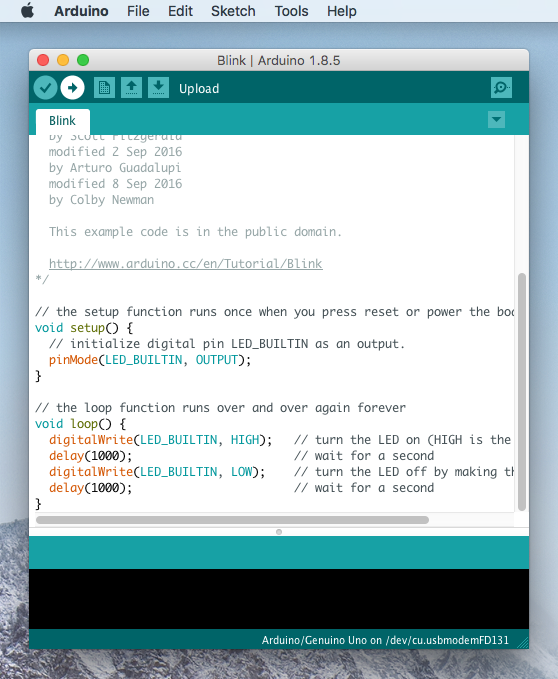
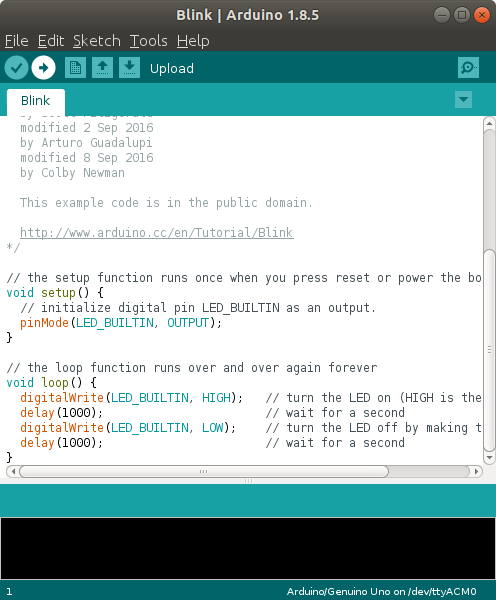
Open the Blink example sketch by going to: File > Examples > 01.Basics > Blink.
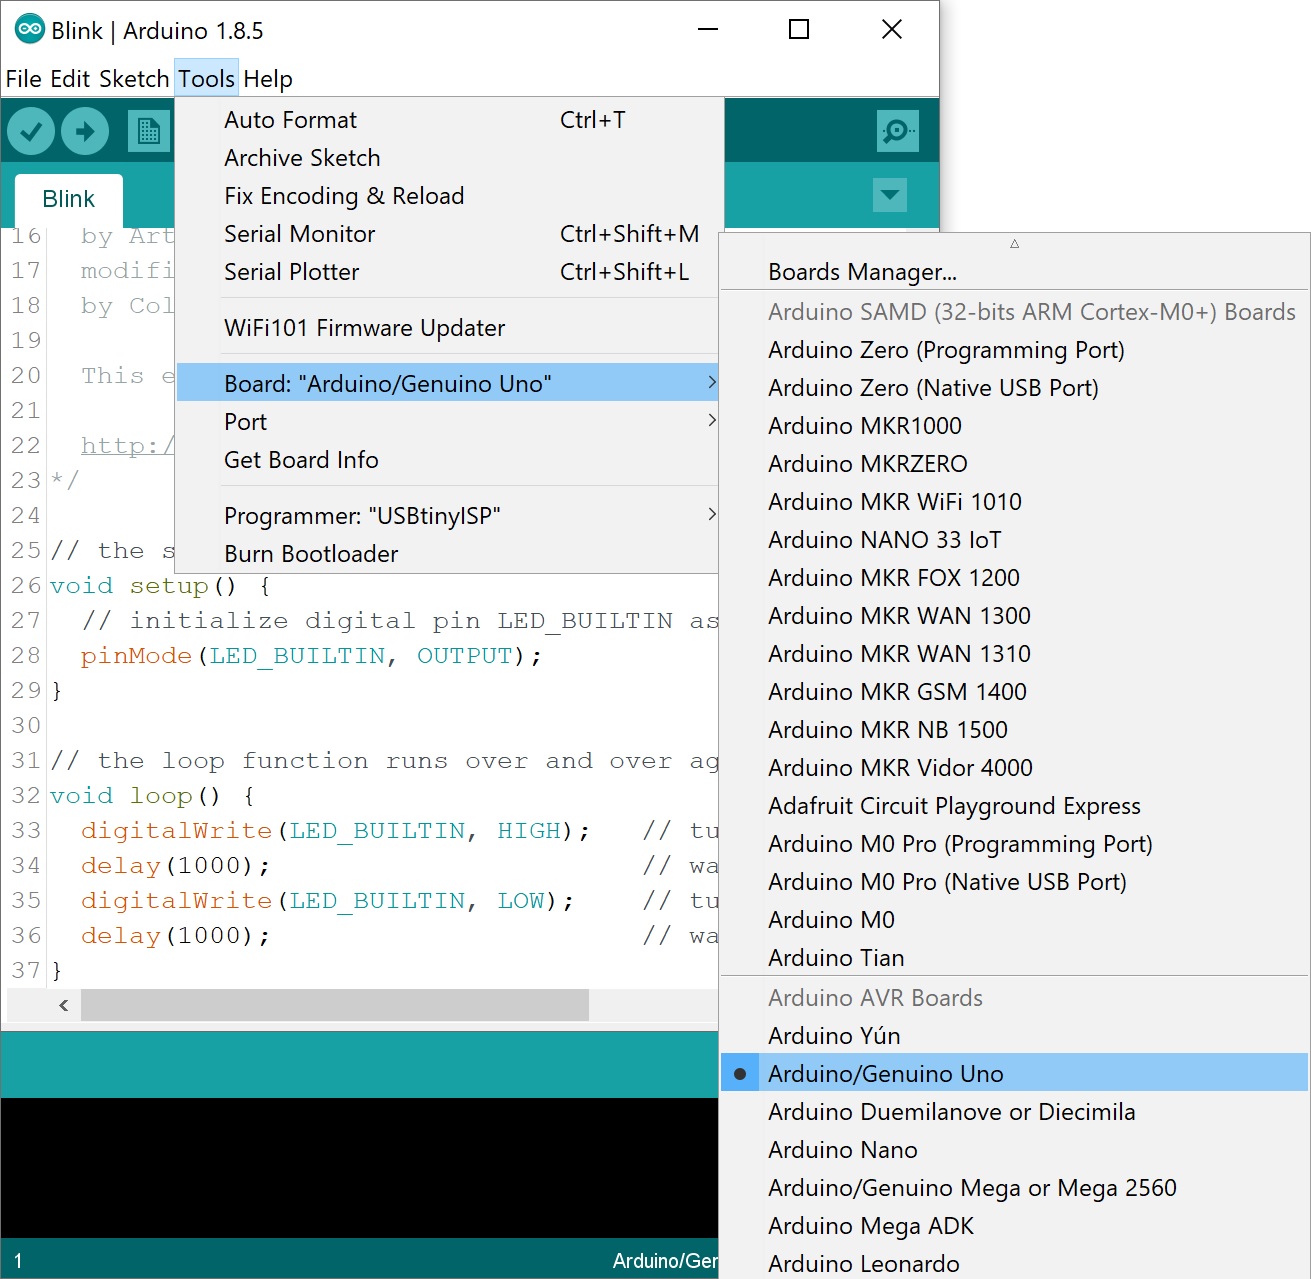
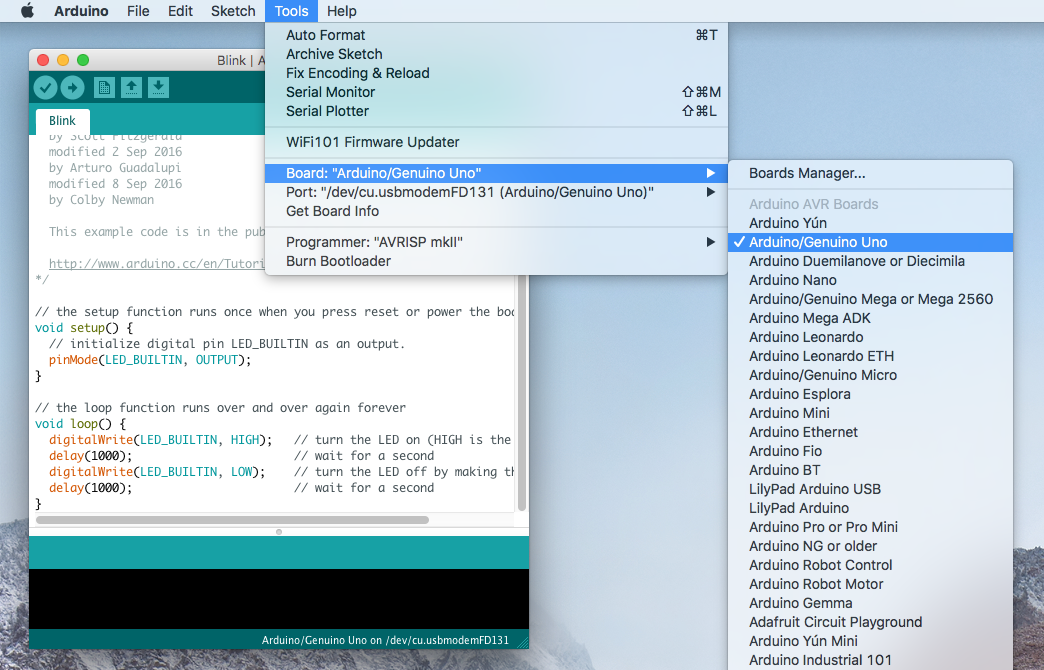
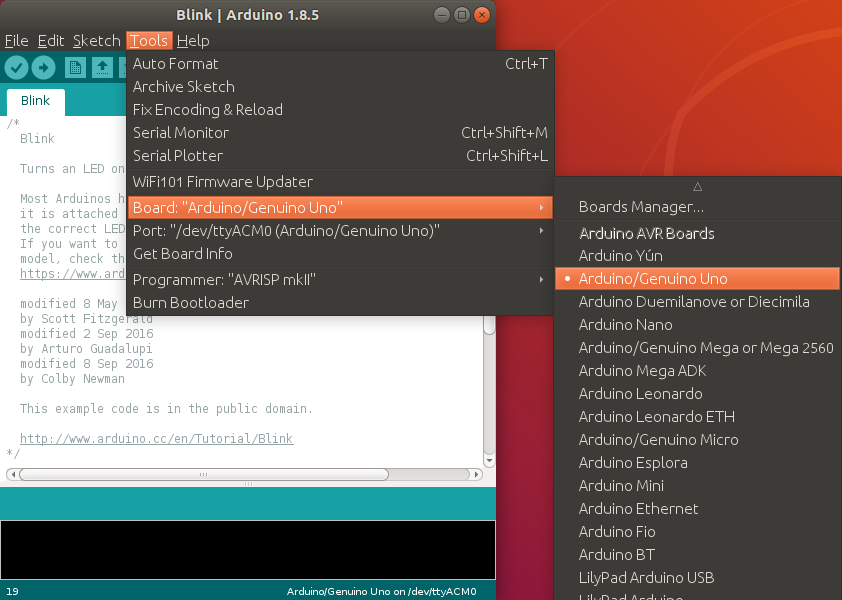
Select the type of Arduino board you're using: Tools > Board > Arduino Uno.
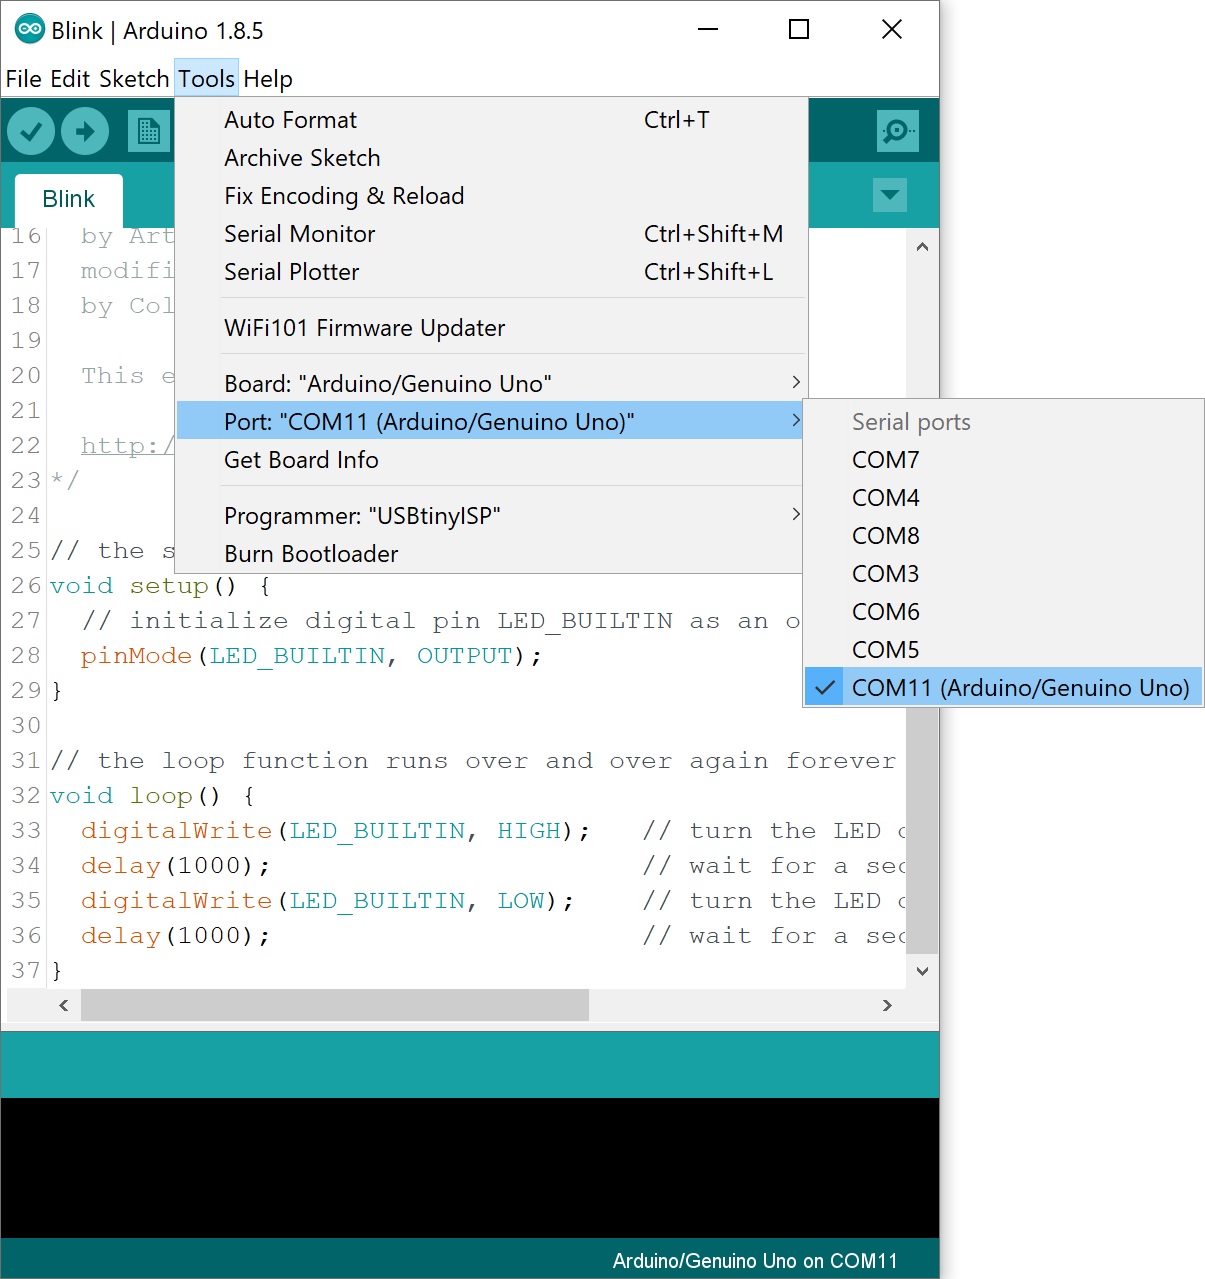
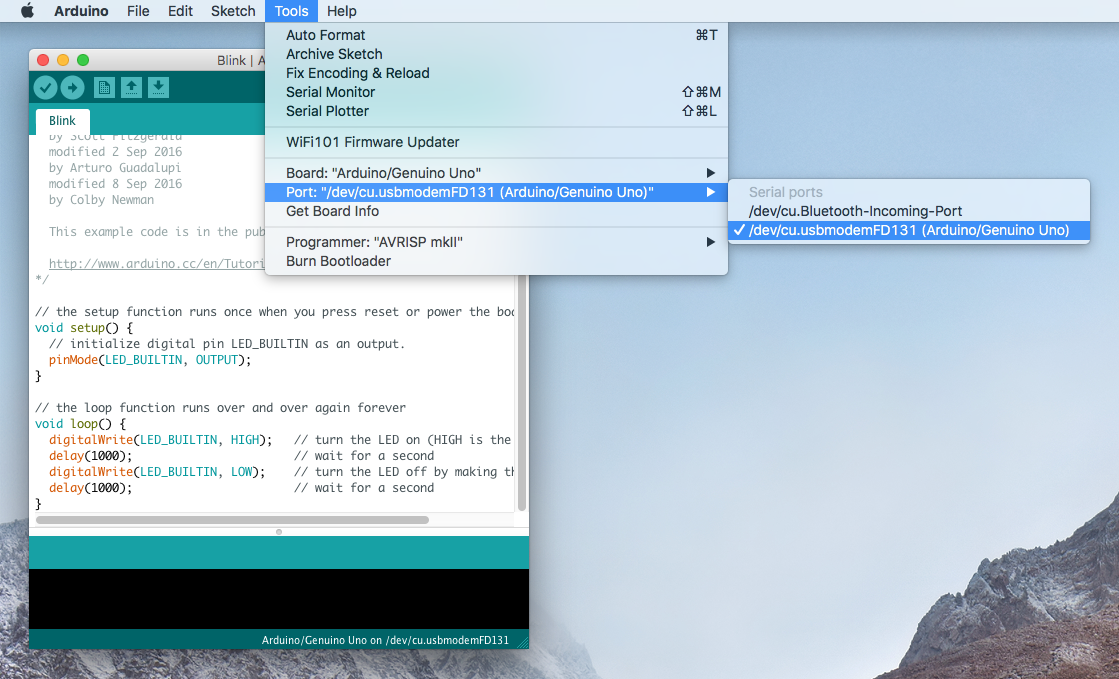
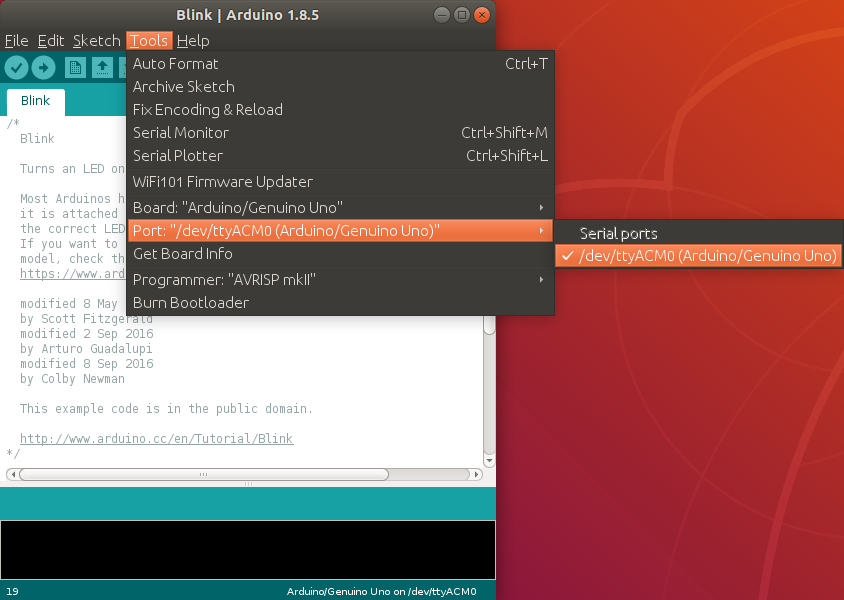
Select the serial/COM port that your Arduino is attached to: Tools > Port > COMxx. In this case it was COM11.
With your Arduino board connected, and the Blink sketch open, press the "Upload" button.

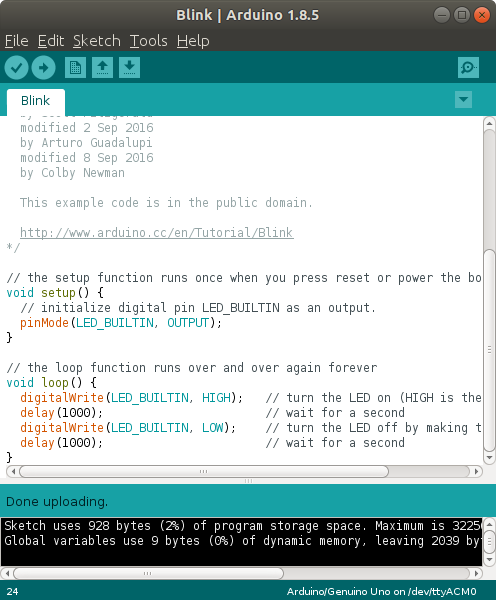
After a second, you should see some LEDs flashing on your Arduino, followed by the message "Done Uploading" in the status bar of the Blink sketch.

If everything worked, the onboard LED on your Arduino should now be blinking! You just programmed your first Arduino!
LED_BUILTIN or pin 13 to a different value before uploading.
Troubleshooting
This guide from Arduino has some more details and troubleshooting tips if you get stuck.
Mac
This page will show you how to install and test the Arduino software on a Mac computer running OSX.
Go to the Arduino download page and download the latest version of the Arduino software for Windows if you have not already.
When the download is finished your Mac should automatically un-zip the contents. This will probably in your Downloads folder.
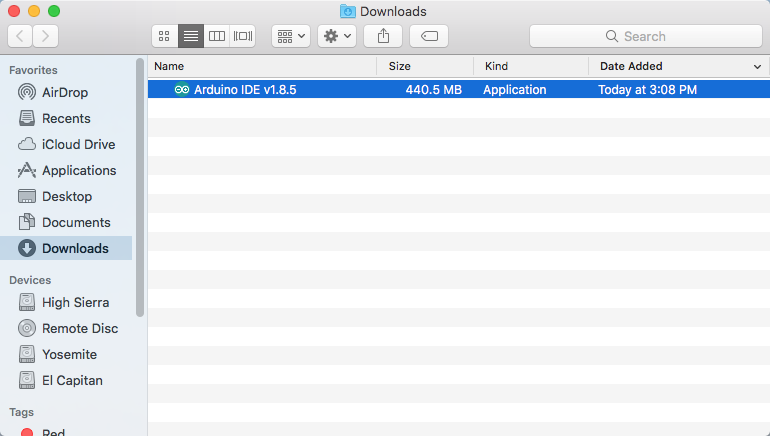
You can leave the program in the Downloads folder or move it into your Applications folder.

Connecting Your Arduino
Power up your Arduino by connecting your Arduino board to your computer with a USB cable (or FTDI cable if you're using an Arduino Pro). You should see the an LED labeled 'ON' light up. (this diagram shows the placement of the power LED on the UNO).
Drivers for Arduino Uno on Mac
For the Arduino Uno, you do not need to install drivers for Mac! You can skip on down and try uploading a blink sketch!
Drivers for RedBoard on Mac
Depending on your board, there may be different USB-to-serial converters on your board. If you are using a RedBoard you will need to go to the How to Install FTDI Drivers tutorial. If you are using the or RedBoard Qwiic, you will need to go to the How to Install CH340 Drivers tutorial. Make sure to look closely at your board and its respective hookup guide to determine USB-to-serial converter that is on board.
How to Install FTDI Drivers
How to Install CH340 Drivers
Launch and Blink!
After following the appropriate steps for your software install, we are now ready to test your first program with your Arduino board!
Launch the Arduino application wherever the program is located. If you disconnected your board, plug it back in.
Open the Blink example sketch by going to: File > Examples > 01.Basics > Blink.
Select the type of Arduino board you're using: Tools > Board > Arduino Uno.
Select the serial port that your Arduino is attached to: Tools > Port > xxxxxx. It'll probably look something like "/dev/tty.usbmodemfd131" or "/dev/tty.usbserial-131" but probably with a different number. In this case, it was /dev/cu.usbmodemFD131.
With your Arduino board connected and the Blink sketch open, press the "Upload" button.
After a second, you should see some LEDs flashing on your Arduino, followed by the message "Done Uploading" in the status bar of the Blink sketch.
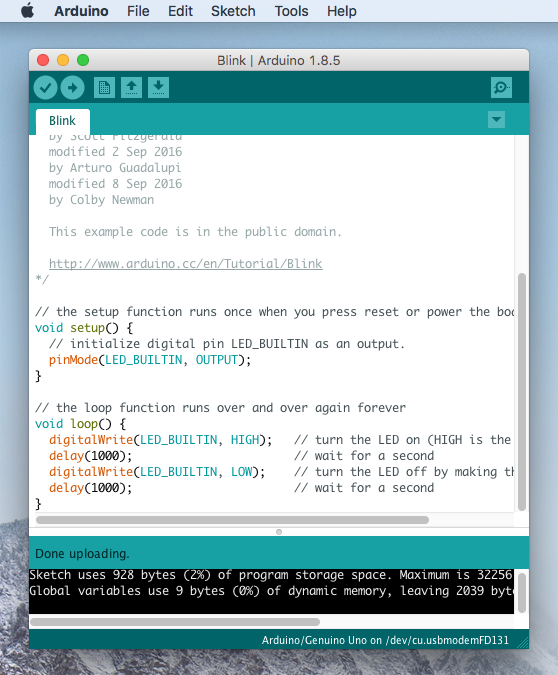
If everything worked, the onboard LED on your Arduino should now be blinking! You just programmed your first Arduino!
LED_BUILTIN or pin 13 to a different value before uploading.
Troubleshooting
If you're having problems, check out this troubleshooting guide from Arduino.
Linux
If you are a Linux user, you probably know that there are many different distribution 'flavors' of Linux out there. Unsurprisingly, installing Arduino is slightly different for many of these distributions. Luckily, the Arduino community has done an excellent job of providing instructions for most of the popular versions. Click on the link below that covers your flavor of Linux:
- ArchLinux
- Debian
- Fedora
- Gentoo
- MEPIS
- Mint
- openSUSE
- Puppy
- Pussy
- Slackware
- Ubuntu
- Xandros (Debian derivative) on Asus Eee PC
If the above directions did not work for you, or you don't see your distribution, try this catch-all guide.
You can go to the download page and download the latest version of Arduino for Linux (there are 32-bit and 64-bit versions available) when your system is properly set up.
Connecting Your Arduino
Power up your Arduino by connecting your Arduino board to your computer with a USB cable (or FTDI cable if you're using an Arduino Pro). You should see the an LED labeled 'ON' light up. (this diagram shows the placement of the power LED on the UNO).
ZIP
uname -ax86_64, this indicates that it is a 64-bit OS.
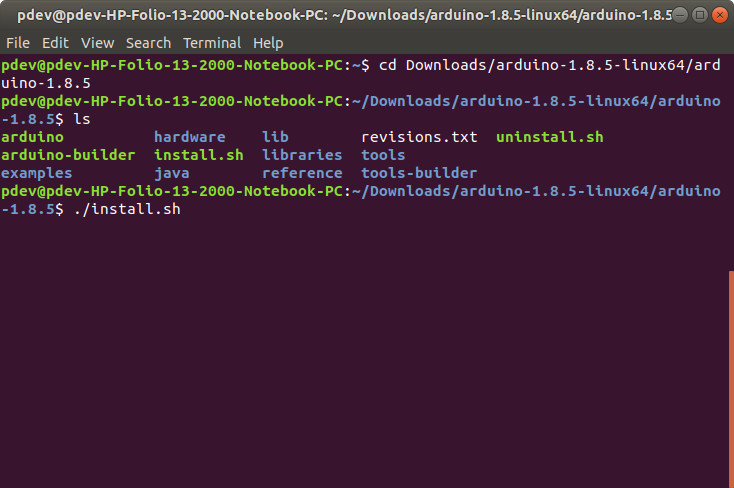
Once you download the zip file version of Arduino, you'll need to extract the files yourself. Don't forget which folder you extract the files into! Once downloaded, open a serial terminal and navigate to the Arduino program folder that was unzipped using the cd command and the folder path. In this case, we downloaded Arduino IDE v1.8.5, 64-bit version for the Ubuntu distribution. The path and folders may be different depending on the version that is downloaded. You may need to use the ls command to navigate.
language:bash
cd /Downloads/arduino-1.8.5-linux64/arduino-1.8.5
Once you are in the Arduino program folder, you'll need to enter the following command in the terminal window to install.
language:bash
./install.sh
At this point, your terminal window will probably look like the following.
When finished, the Arduino IDE will be installed on the desktop!
Drivers for RedBoard on Linux
For the Arduino Uno, you do not need to install drivers for Linux! You may need to change the COM port permissions which will be explained further below. You can skip on down and try uploading a blink sketch!
Drivers for RedBoard on Linux
Depending on your board, there may be different USB-to-serial converters on your board. If you are using a RedBoard you will need to go to the How to Install FTDI Drivers tutorial. If you are using the or RedBoard Qwiic, you will need to go to the How to Install CH340 Drivers tutorial. Make sure to look closely at your board and its respective hookup guide to determine USB-to-serial converter that is on board.
How to Install FTDI Drivers
How to Install CH340 Drivers
Launch and Blink!
After following the appropriate steps for your software install, we are now ready to test your first program with your Arduino board!
Launch the Arduino application. If you disconnected your board, plug it back in.
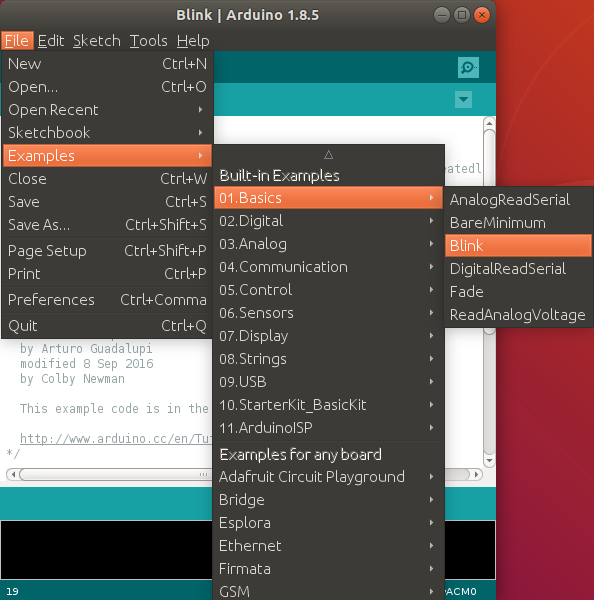
Open the Blink example sketch by going to: File > Examples > 01.Basics > Blink.
Select the type of Arduino board you're using: Tools > Board > Arduino Uno.
Select the serial port that your Arduino is attached to: Tools > Port > xxxxxx (it'll probably look something like "/dev/ttyACM0" but probably with a different number)
With your Arduino board connected and the Blink sketch open, press the "Upload" button.
After a second, you should see some LEDs flashing on your Arduino, followed by the message "Done Uploading" in the status bar of the Blink sketch.
avrdude: ser_open(): can't open device "/dev/ttyACM0" Permission denied Problem uploading to board.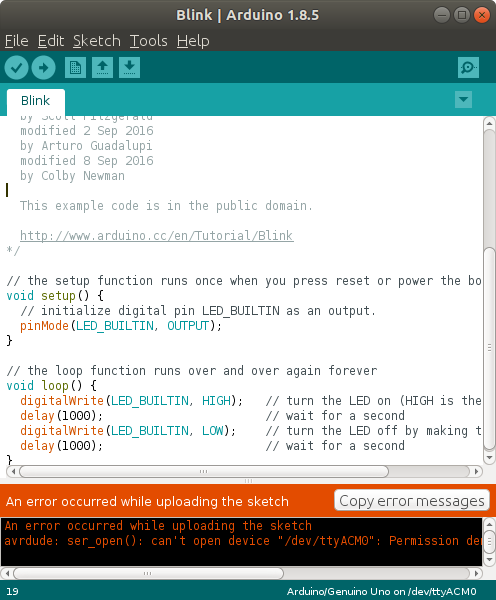
Try adjusting the permissions by opening a terminal window.
ls -l /dev/ttyACM*crw-rw---- 1 root dialout 188, 0 Jul 30 14:14 /dev/ttyACM0sudo usermod -a -G dialout <username>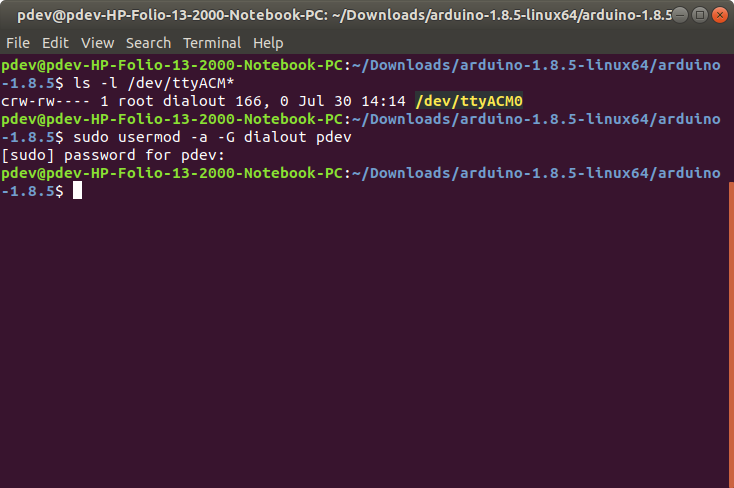
You'll need to restart your Linux for the changes to take effect. Since we are already in the terminal window, type the following command to restart your computer. Of course, you can use the GUI as well to restart if you prefer.
sudo rebootIf everything worked, the onboard LED on your Arduino should now be blinking! You just programmed your first Arduino!
LED_BUILTIN or pin 13 to a different value before uploading.
Troubleshooting
The Arduino Playground Linux section is a great resource for figuring out any problems with your Arduino installation.
Board Add-Ons with Arduino Board Manager
With Arduino v1.6.4+, a new boards manager feature makes it easy to add third-party boards (like the SparkFun RedBoard, Digital Sandbox, and RedBot) to the Arduino IDE.
To start, highlight and copy (CTRL + C / CMD + C) the text below for the boards manager URL. You'll need this to configure Arduino.
language:bash
https://raw.githubusercontent.com/sparkfun/Arduino_Boards/main/IDE_Board_Manager/package_sparkfun_index.json
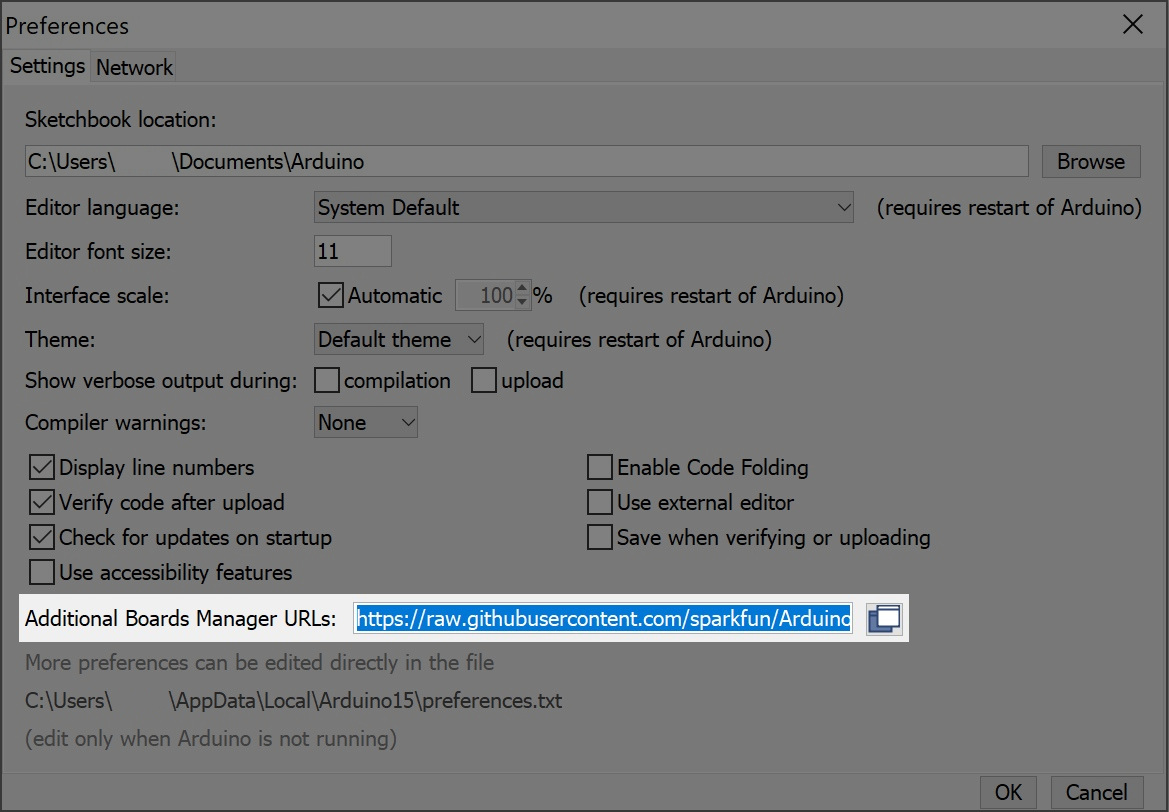
master" and changed the default to "main". SparkFun has followed this move as well. If you're unable to see a particular board inside of Arduino it may be that you are using the older "master" link. As a result, you will only see the previous changes on the old master branch. Please change to the 'main' json url listed above and all should be well.
Open up Arduino:
- Configure the Boards Manager
- For Windows and Linux, head to File > Preferences > Additional Boards Manager URLs and paste (CTRL + V / CMD + V) the link
- For Macs, head to Arduino > Preferences > Additional Boards Manager URLs and paste (CTRL + V / CMD + V) the link
- Click on Tools > Board > Boards Manager...
- Select the Type as "Contributed" from the drop down menu.
- Click on the SparkFun AVR Boards and then click Install.
That's it! Boards are all installed. This also gives you access to all of our library files as well through the built-in Library Manager tool in Arduino. Looking for more information about adding other custom boards? Check out the the following tutorial to install other Arduino cores.
Installing Board Definitions in the Arduino IDE
Resources and Going Further
Now that you've got the Arduino software installed on your system and tested it with your Arduino board successfully, you're ready for your next steps into the world of embedded electronics. If you want to learn about some of the concepts that will help you build your projects, check out some of the following tutorials:
Installing an Arduino Library
How to Power a Project
Choosing an Arduino for Your Project
Or check out the some of the Adventures in Science videos focused on Arduino.
Looking for the right Arduino?
Check out our Arduino Comparison Guide! We've compiled every Arduino development board we carry, so you can quickly compare them to find the perfect one for your needs.
If you'd rather jump right in to building something, check out these links to projects here on learn as well as some other places to find Arduino-based projects:
- Arduino Project Hub
- WorkBench: SparkFun
- Instructables: Arduino
- Hackster.io: Arduino
- The ITP Physical Computing Wiki
- Make: Projects
Or any of our tutorials tagged with Arduino.