MIDI Shield Hookup Guide
Firmware Foundations
Arduino Compatible I/O
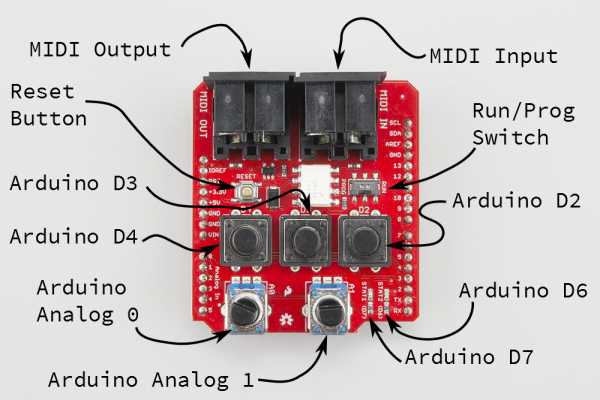
The MIDI shield features the MIDI circuitry, plus a few extra input and output devices. It has three pushbuttons, two potentiometers, and two LEDs.
These devices are legended with their pin assignments, and can be interfaced using standard Arduino functions.
- The pushbuttons are on D2, D3, and D4. To use them, enable the corresponding pins as inputs with pullup
pinMode(<pin number>, INPUT_PULLUP);and read them withdigitalRead(<pin number>);. The inputs are active low - they will normally read as a logicHIGH, goingLOWwhile the button is pressed. - The potentiometers are connected to A0 and A1. You can read them using
analogRead(<pin number>). - Finally, the LEDs are on D6 (Green) and D7 (Red). The outputs are enabled using
pinMode(<pin number>, OUTPUT), and set usingdigitalWrite(<pin number>, <HIGH or LOW>). Like the buttons, these are active low -- writing HIGH turns the LED off.
You can find a quick example sketch to test the buttons, pots and LEDs in the MIDI Shield GitHub Repository.
Arduino Library Install
Note: This example assumes you are using the latest version of the Arduino IDE on your desktop. If this is your first time using Arduino, please review our tutorial on installing the Arduino IDE.
We'll be using the following libraries as the basis for the following examples. We'll discuss some specifics of its application in each example. If you have not previously installed an Arduino library, please check out our installation guide.
Installing an Arduino Library
Arduino MIDI Library
If you've read the implementation section of our MIDI tutorial, then you've seen that generating and parsing MIDI messages can be a little tricky. Thankfully, Franky at Forty Seven Effects has written a stable and flexible MIDI library for Arduino, which he has released under the MIT license.
The library handles the communication aspects of MIDI, allowing you to send and receive MIDI commands. It implements the communication layer, but it does not make any implications about how the library is applied. It is a suitable basis for almost any type of MIDI device, from simple message filters and splitters, to complex applications like synthesizers, sequencers, and drum machines.
The library is robust and flexible, with some well-designed features.
- It can use hard or soft serial ports -- you don't need to lose
Serial.print()for debugging when you use it. - It can handle MIDI in Omni mode or be set to a specific channel.
- You can enable a soft-thru feature, which merges incoming bytes with the output, when you don't have a hardware thru port available.
- It uses a object-oriented template instantion, which allows you to declare multiple MIDI ports on the same device, as you might do in a merger or splitter.
- You can enable or disable some more esoteric features, like sending running status and implicit note off, or using a nonstandard baud rate.
You can obtain this library through the Arduino Library Manager. Do a search for "midi" and scroll down the results to find the "MIDI Library by Forty Seven Effects." To manually install the library, download the files from GitHub repository. Unzip them, and put the contents of the ...\src folder into your Arduino library path. On the author's PC, the library was placed in C:\Users\author\Documents\Arduino\libraries\MIDI. You can also download the repo with the link below.
There is also extensive documentation in Doxygen format, including several sample applications.
MsTimer2 Library
The examples also use the MsTimer 2 library. You can obtain this library through the Arduino Library Manager. Do a search for "mstimer" to find "MsTimer2 by Javier Valencia." To manually install the library, download the files from GitHub repository. You can also download the repo with the link below.
