MicroMod WiFi Function Board - DA16200 Hookup Guide
Contributors:
Ell C
Example 2: Connecting to WiFi
Let's check out the WiFi with a simple example to grab the time.
Copy and paste the code below into a fresh Arduino sketch.
language:c
/******************************************************************************
  Example_02 WiFi Communcation

  Connect WiFi using the provided network credentials
  Talk to NTP server to set the current date/time
  Update the time to the correct time zone
  Print the current time approx. once every second

  Development environment specifics:
  IDE: Arduino 1.8.13
  Hardware Platform: MicroMod Artemis Processor, Single MicroMod Main Board

  Hardware Connections:
  Connect the MicroMod Processor Board to the Processor M2 Connector of the Main Board
  Connect the MicroMod DA16200 Function Board to the Function M2 Connector of the Main Board

  G0      --> RTC_PWR_KEY
  4       --> PWR_EN
  3.3V    --> 3.3V
  GND     --> GND

  This program is distributed in the hope that it will be useful,
  but WITHOUT ANY WARRANTY; without even the implied warranty of
  MERCHANTABILITY or FITNESS FOR A PARTICULAR PURPOSE. See the
  GNU General Public License for more details.

  You should have received a copy of the GNU General Public License
  along with this program.  If not, see <http://www.gnu.org/licenses/>.
******************************************************************************/
#define PWR_EN 4
#define RTC_PWR_KEY G0

String wifiSSID = "SSID";
String wifiPass = "PASSWORD";

int timezoneOffset = 0; //The hours offset from UTC (Mountain time is -6 for daylight savings, and -7 for standard)

void setup() {
  Serial.begin(115200);
  Serial1.begin(115200);

  //Enable DA16200 Module RTC power block
  pinMode(RTC_PWR_KEY,OUTPUT);
  digitalWrite(RTC_PWR_KEY,HIGH);

  Serial.println("DA16200 AT Command Example: Connecting to WiFi\n");

  //Listen for ready message ("+INIT:DONE")
  byte count = 0;
  String msg = "";
  while(count<20)
  {
    while(Serial1.available())
    {
      msg += char(Serial1.read());
    }
    if(msg.length() > 5) break;
    count++;
    delay(100);
  }
  msg = msg.substring(3,msg.length()); //Remove NULL,CR,LF characters from response

  if(msg.length()>5)
  {
    Serial.println("Expecting: \"INIT:DONE,(0 or 1)");
    Serial.println("Received: " + msg);
  }
  else
  {
    Serial.println("Failed to receive initialization message.\n" \
                   "Make sure you're using the correct baud rate.\n");
    while(1);
  }

  //Configure module for STA mode
  Serial.println("Sending:AT+WFMODE=0");
  Serial1.println("AT+WFMODE=0");

  //Wait for "OK" response
  while(1)
  {
    msg = "";
    while(Serial1.available())
    {
      msg += char(Serial1.read());
      delay(1);
    }
    Serial.print(msg);
    if(msg.length() > 1) break;
  }

  //Apply a software reset to finish changing the mode
  Serial.println("Sending:AT+RESTART");
  Serial1.println("AT+RESTART");

  //Wait for "OK" response
  while(1)
  {
    msg = "";
    while(Serial1.available())
    {
      msg += char(Serial1.read());
      delay(1);
    }
    Serial.print(msg);
    if(msg.length() > 1) break;
  }

  //Listen for ready message ("+INIT:DONE") after the reset is finished
  count = 0;
  msg = "";
  while(count<20)
  {
    while(Serial1.available())
    {
      msg += char(Serial1.read());
    }
    if(msg.length() > 5) break;
    count++;
    delay(100);
  }

  Serial.println(count);
  Serial.println(msg);
  msg = msg.substring(3,msg.length()); //Remove NULL,CR,LF characters from response

  if(msg.length()>5)
  {
    Serial.println("Expecting: \"INIT:DONE,(0 or 1)");
    Serial.println("Received: " + msg);
  }
  else
  {
    Serial.println("Failed to receive initialization message.\n" \
                   "Continuing anyway...\n");
  }

  //Connect to WiFi using the provided credentials
  Serial.println("Sending:AT+WFJAPA=" + wifiSSID + "," + wifiPass);
  Serial1.println("AT+WFJAPA=" + wifiSSID + "," + wifiPass);

  Serial.println("Waiting for connection response...");
  while(1)
  {
    msg = "";
    while(Serial1.available())
    {
      msg += char(Serial1.read());
      delay(1);
    }

    if(msg.length() > 10)
    {
      Serial.print("Response:");
      Serial.println(msg);
      break;
    }
  }

  msg = msg.substring(3,msg.length()); //Remove NULL,CR,LF characters from response

  //If connection to AP is successful, response will be WFJAP:1,SSID,IP_ADDRESS, or WJAP:0 if failed
  if(msg.startsWith("WFJAP:1"))
  {
      //Talk to NTP server to get the current time, along with how often to get time sync
      Serial.println("Sending:AT+NWSNTP=1,pool.ntp.org,86400");
      Serial1.println("AT+NWSNTP=1,pool.ntp.org,86400");

      //Wait for "OK" response
      while(1)
      {
        String msg = "";
        while(Serial1.available())
        {
          msg += char(Serial1.read());
          delay(1);
        }
        Serial.print(msg);
        if(msg.length() > 1) break;
      }

      //Provides the correct UTC offset for the current time
      Serial.println("Sending:AT+TZONE="+String(timezoneOffset*3600));
      Serial1.println("AT+TZONE="+String(timezoneOffset*3600));

      //Wait for "OK" response
      while(1)
      {
        String msg = "";
        while(Serial1.available())
        {
          msg += char(Serial1.read());
          delay(1);
        }
        Serial.print(msg);
        if(msg.length() > 1) break;
      }
  }
  else
  {
    Serial.println("Connection unsucessful :(\n\n" \
                   "Make sure the WiFi credentials are correct, and the module is in the station mode");
    while(1);
  }
}

void loop() {
  //Get the current time
  Serial.println("Sending:AT+TIME");
  Serial1.println("AT+TIME");

  while(Serial1.available())
  {
    Serial.print(char(Serial1.read()));
    delay(1);
  }

  delay(1000);
}
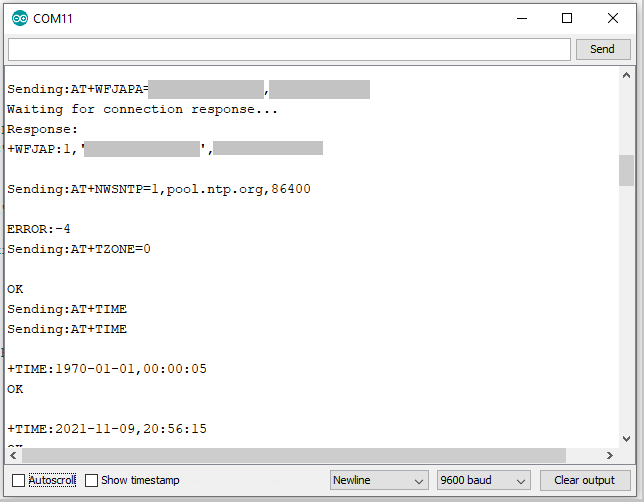
Set your Board and Serial Port, and then upload the sketch to your Arduino. Then open the serial monitor. Make sure your baud rate is set to 9600. You'll begin to see output.