LilyPad ProtoSnap Plus Activity Guide
 MikeGrusin,
  Gella
Gella 
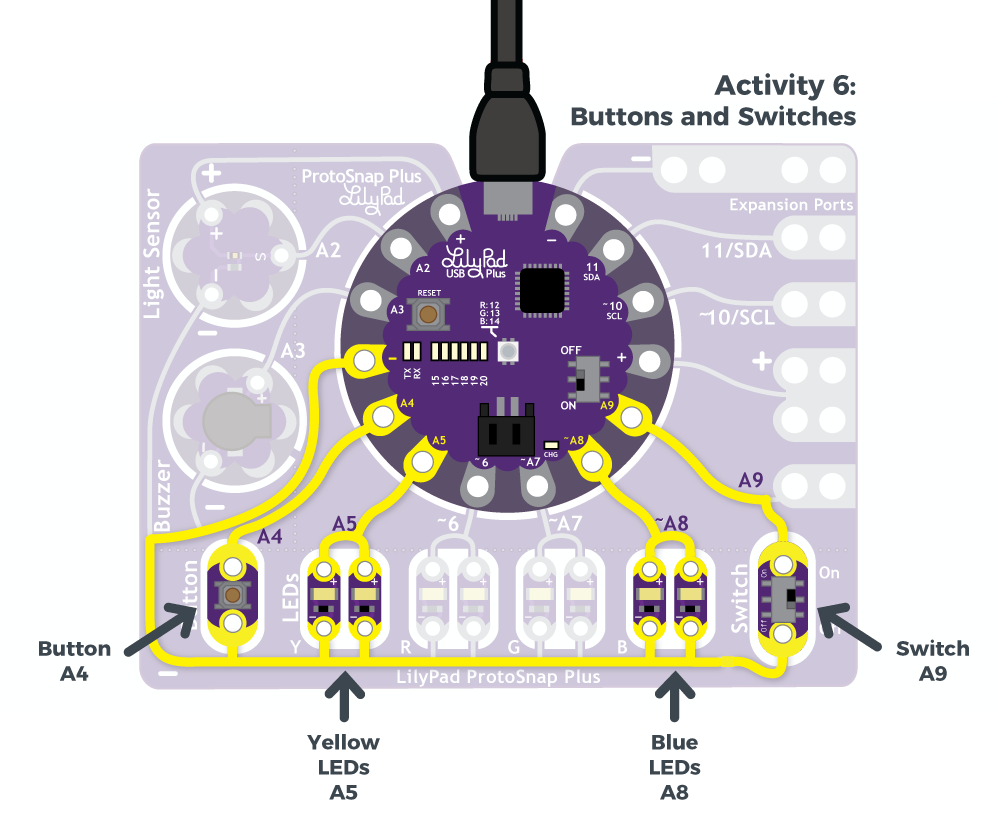
6: Buttons and Switches
In the activities thus far, you have been using outputs - components that receive a signal or power from the LilyPad USB Plus and send information (light and sound) to the world. In the next few activities, we will start to receive input from the world using buttons and sensors to affect the LilyPad boards on the ProtoSnap Plus.
LilyPad Boards Used in This Activity
- LilyPad USB Plus
- LilyPad Button
- Yellow LilyPad LEDs
- Blue LilyPad LEDs
- LilyPad Slide Switch
A switch is type of component that controls current flow in a circuit. The LilyPad Slide Switch is an example of a maintained switch, meaning its state remains the same until changed. The board has a small switch labeled ON/OFF; when the toggle is moved to the ON position, the two sew tabs on the switch are connected, allowing current to flow through and close the circuit. When moved to OFF, parts inside the switch move away from each other and open the circuit (disconnecting it).
What is a Button?
The LilyPad Button Board is a special type of switch called a momentary switch - it is only active when an action is applied. When you press the button in the middle of the board, it connects the two sew tabs and allows current to flow through. When you let go of the button, the connection is opened again, and the button springs back into place.
Learn more about how buttons and switches work and the different types you can use in Switch Basics.
New Concepts Introduced in This Activity
Digital Input
Just as digital outputs have two states, ON or OFF (HIGH or LOW in code), digital inputs also have two states. We'll use a special function called digitalRead() to check if the button has been pressed or if the switch has been flipped when attached to a sew tab on the LilyPad USB Plus.
Internal Pull-up Resistors
A pull-up resistor is a small circuit that holds the voltage HIGH (3.3V) on a pin until a button is pressed, pulling the voltage LOW (0V). The most common place you will see a pull-up resistor is when working with buttons. A pull-up resistor keeps the button in one state until it is pressed. The LilyPad USB Plus has built-in pull-up resistors, which we will use in code.
Variables for State Change
In Fading LEDs, the for() loop set a variable that was changed during the program. In this activity, you'll read the state of a button or switch to a variable to hold its state for later use in your program.
If Statements
In the Fading LEDs example, we explored a specialized function, the for() loop. In this activity, we'll use another function called an If Statement that will check if a state is true or false. Then we will make decisions based on the reading it receives. If/else functions are a way to start adding behavior based on input in your code, whereas the for() loop example created some automation. As you learn more specialized functions in Arduino (or write your own), your programs will become more complex and able to execute more complicated commands and interactions.
Example Code
To open the code, go to:
File > Examples > LilyPadProtoSnapPlus > LPP_06_Button
You can also copy and paste the following code into the Arduino IDE. Hit upload, and see what happens!
language:c
/*
LilyPad ProtoSnap Plus Activity 6: Buttons and Switches
SparkFun Electronics
https://www.sparkfun.com/products/14346

Explore digital input and program flow control using the button and switch

Follow the tutorial at:
https://learn.sparkfun.com/tutorials/lilypad-protosnap-plus-activity-guide#6-buttons-and-switches

This code is released under the MIT License (http://opensource.org/licenses/MIT)

******************************************************************************/

// Create integer variables for the pins we'll be using

int buttonPin = A4;
int switchPin = A9;

int buttonLED = A5;
int switchLED = A8;

void setup()
{
  // Initialize the button and switch pins as inputs with pullups.
  // Pullups keep the inputs from "floating" when a switch or button is open / unpressed.

  pinMode(buttonPin, INPUT_PULLUP);
  pinMode(switchPin, INPUT_PULLUP);

  // Initialize the LED pins as outputs:

  pinMode(buttonLED, OUTPUT);
  pinMode(switchLED, OUTPUT);
}

void loop()
{
  // This code will read the positions of the button and switch,
  // then use the "if" command to make LEDs follow these states.

  // Create variables to store the button and switch input values:

  int buttonState;
  int switchState;

  // Read and save the states of the button and switch:

  buttonState = digitalRead(buttonPin);
  switchState = digitalRead(switchPin);

  // The if-else statement lets you do different things based on different inputs:

  // The button will read as LOW when it's pressed

  if (buttonState == LOW) // Check to see if buttonState is LOW (pressed)
  {
    digitalWrite(buttonLED,HIGH); // If buttonState is LOW (pressed), turn on the LED
  }
  else
  {
    digitalWrite(buttonLED,LOW); // If buttonState is HIGH (unpressed), turn off the LED
  }

  if (switchState == LOW) // Check to see if switchState is LOW (switch is on)
  {
    digitalWrite(switchLED,HIGH); // If switchState is LOW (on), turn on the LED
  }
  else
  {
    digitalWrite(switchLED,LOW); // If switchState is HIGH (off), turn off the LED
  }
}
What You Should See
When you press the LilyPad Button, the yellow pair of LEDs will turn on. When the button is released, they will turn off. When you slide the LilyPad Slide Switch to the ON position, the blue pair of LEDs will turn on and remain on until the switch is set to the OFF position.
Understanding Your Program
Program Overview
- Check to see if the button is pressed. a. If it is, turn buttonLED ON. b. If it isn’t, turn buttonLED OFF.
- Check to see if the switch is set to ON. a. If it is, turn switchLED ON. b. If it isn’t, turn switchLED OFF.
Code to Note
| Code | Description |
|---|---|
pinMode(buttonpin, INPUT_PULLUP);
pinMode(switchpin, INPUT_PULLUP);
|
Internal Pull-Up Resistor:In this program, we are setting the sew tab and pin attached to it as an input instead of output. However, with buttons and switches, they can give strange readings when disconnected electrically from a circuit (called 'floating'), so we'll use an internal pull-up resistor built into the LilyPad USB Plus, chosen by theINPUT_PULLUP option. |
int buttonstate;int switchstate; |
Variables to Store States:In Fading LEDs, we used a variable that changed over time in thefor() Loop, in this program we will use variables to store the state of the button and switch each time the program takes a reading with digitalRead(). |
buttonstate = digitalRead(buttonpin);switchstate = digitalRead(switchpin); |
Digital Input:Unlike the analog and digital output functions used in prior activities, the input functiondigitalRead() only needs one parameter - the pin it is checking. The function checks to see if an input pin is reading HIGH (3.3V) or LOW (0V). It returns a TRUE (1) or FALSE (0) depending on the reading.
This code uses the digital read function twice, once to check the state of the button and assign that value to the buttonstate variable and again to check the state of the switch and store that in the switchstate variable. |
if(logic statement) {code to be run if the logic statement is true}else {code to be run if the logic statement is false
} |
If/else Statements:Theif/else statement lets your code react to the world by running one set of code when a logic (conditional) statement in the round brackets is true and another set of code when the statement is false. For example, this example uses two if statements - one checks the button and turns the yellow LEDs on when pressed, and the second checks the switch and turns the blue LEDs on when it is set to the ON position.Read more about if/else statments on Arduino Reference. |
buttonstate == LOWswitchstate == LOW |
Comparison Operators:In Arduino, the equals sign (=) is used to assign values. In situations where you want to compare two values, a comparison operator for 'is equal to' == is used. You can also use: != (not equal to)< (is less than)> (is greater than)<= (is less than or equal to)>= (is greater than or equal to) |
Coding Challenges
Can you adapt the code so that the opposite actions happen (when the button is pressed it turns the LEDs off and when the switch is off it sets the LEDs on)?
Try creating a light pattern that displays on the row of LilyPad LEDs when the switch is set to ON.
Can you adapt the Play a Tune example to include an on/off switch to control whether the song plays or not?