LilyPad ProtoSnap Plus Activity Guide
3: Custom Color Mixing
In this program, you will continue mixing colors with the RGB LED, but use a new function to change the brightness of each channel in relation to each other. Adjusting the brightness of the red, green, and blue LEDs within the RGB will allow you to create a new range of values and color combinations.
LilyPad Boards Used in This Activity
- LilyPad USB Plus
- LilyPad USB Plus’s built-in RGB LED
- Red LilyPad LEDs
- Green LilyPad LEDs
- Blue LilyPad LEDs
New Concepts Introduced in This Activity
Analog Output (Pulse Width Modulation)
Up until this point, you have been controlling LEDs by setting them to one of two states: HIGH (ON) or LOW (OFF). This is great for blinking, but what about adjusting the brightness of your LEDs? This is where analog output comes in handy. Your LilyPad USB Plus can mimic a range of brightness on the LEDs by using pulse width modulation. The microcontroller on the LilyPad USB Plus can switch voltage to the sew tabs on and off so quickly that it appears to your eyes as if more or less voltage is being provided to an LED. For example, by changing the percent of time that a pin is on, from 0 percent (always off) to 100 percent (always on), you can create the appearance of a range of brightnesses. This percentage is called a duty cycle.
Color Mixing Continued
In the last example, you created basic primary and secondary colors by turning the red, green, and blue channels on or off with different combinations. In this activity, you'll create tertiary colors by combining the three color channels at 50% brightness levels. There are actually millions of color combinations available using RGB LEDs once you begin experimenting with adjusting the brightness/saturation of each. This example will cover a set of twelve tertiary colors.
Example Code
To open the code, go to:
File > Examples > LilyPadProtoSnapPlus > LPP_03_CustomColorMixing
You can also copy and paste the following code into the Arduino IDE. Hit upload, and see what happens!
language:c
/*
LilyPad ProtoSnap Plus Activity 3: Custom Color Mixing
SparkFun Electronics
https://www.sparkfun.com/products/14346

Expand your color options using analogWrite and the RGB (Red Green Blue) LED

Follow the tutorial at:
https://learn.sparkfun.com/tutorials/lilypad-protosnap-plus-activity-guide#3-custom-color-mixing

This code is released under the MIT License (http://opensource.org/licenses/MIT)

******************************************************************************/

// The LilyPad USB Plus has a built-in RGB (Red / Green / Blue) LED.
// In this activity we'll use analogWrite to control the brightness of the three LEDs.
// Here we'll create a rainbow of tertiary colors by adding a 50%-brightness option.

// Create integer variables for our LED pins:

// The built-in LED:

int RGB_red = 12;
int RGB_green = 13;
int RGB_blue = 14;

// The colored LEDs along the bottom edge of the board:

int redLED = 6;
int greenLED = A7;
int blueLED = A8;

void setup() {

// Make all of our LED pins outputs:

  pinMode(RGB_red, OUTPUT);
  pinMode(RGB_green, OUTPUT);
  pinMode(RGB_blue, OUTPUT);
  pinMode(redLED, OUTPUT);
  pinMode(greenLED, OUTPUT);
  pinMode(blueLED, OUTPUT);
}

void loop()
{
  // In this code we'll step through twelve rainbow colors (primary, secondary, tertiary).

  // Unlike digitalWrite, which can be only HIGH (on) or LOW (off),
  // analogWrite lets you smoothly change the brightness from 0 (off) to 255 (fully on).
  // When analogWrite is used with the RGB LED, you can create millions of colors!

  // In the analogWrite functions:
  // 0 is off
  // 128 is halfway on (used for the tertiary colors)
  // 255 is full brigthness.

  // Red

  analogWrite(RGB_red,255);
  analogWrite(RGB_green,0);
  analogWrite(RGB_blue,0);

  analogWrite(redLED,255);
  analogWrite(greenLED,0);
  analogWrite(blueLED,0);
  delay(1000);

  // Orange

  analogWrite(RGB_red,255);
  analogWrite(RGB_green,128);
  analogWrite(RGB_blue,0);

  analogWrite(redLED,255);
  analogWrite(greenLED,128);
  analogWrite(blueLED,0);
  delay(1000);

  // Yellow

  analogWrite(RGB_red,255);
  analogWrite(RGB_green,255);
  analogWrite(RGB_blue,0);

  analogWrite(redLED,255);
  analogWrite(greenLED,255);
  analogWrite(blueLED,0);
  delay(1000);

  // Chartruese

  analogWrite(RGB_red,128);
  analogWrite(RGB_green,255);
  analogWrite(RGB_blue,0);

  analogWrite(redLED,128);
  analogWrite(greenLED,255);
  analogWrite(blueLED,0);
  delay(1000);

  // Green

  analogWrite(RGB_red,0);
  analogWrite(RGB_green,255);
  analogWrite(RGB_blue,0);

  analogWrite(redLED,0);
  analogWrite(greenLED,255);
  analogWrite(blueLED,0);
  delay(1000);

  // Spring Green

  analogWrite(RGB_red,0);
  analogWrite(RGB_green,255);
  analogWrite(RGB_blue,128);

  analogWrite(redLED,0);
  analogWrite(greenLED,255);
  analogWrite(blueLED,128);
  delay(1000);

  // Cyan

  analogWrite(RGB_red,0);
  analogWrite(RGB_green,255);
  analogWrite(RGB_blue,255);

  analogWrite(redLED,0);
  analogWrite(greenLED,255);
  analogWrite(blueLED,255);
  delay(1000);

  // Azure

  analogWrite(RGB_red,0);
  analogWrite(RGB_green,128);
  analogWrite(RGB_blue,255);

  analogWrite(redLED,0);
  analogWrite(greenLED,128);
  analogWrite(blueLED,255);
  delay(1000);

  // Blue

  analogWrite(RGB_red,0);
  analogWrite(RGB_green,0);
  analogWrite(RGB_blue,255);

  analogWrite(redLED,0);
  analogWrite(greenLED,0);
  analogWrite(blueLED,255);
  delay(1000);

  // Violet

  analogWrite(RGB_red,128);
  analogWrite(RGB_green,0);
  analogWrite(RGB_blue,255);

  analogWrite(redLED,128);
  analogWrite(greenLED,0);
  analogWrite(blueLED,255);
  delay(1000);

  // Magenta

  analogWrite(RGB_red,255);
  analogWrite(RGB_green,0);
  analogWrite(RGB_blue,255);

  analogWrite(redLED,255);
  analogWrite(greenLED,0);
  analogWrite(blueLED,255);
  delay(1000);

  // Rose

  analogWrite(RGB_red,255);
  analogWrite(RGB_green,0);
  analogWrite(RGB_blue,128);

  analogWrite(redLED,255);
  analogWrite(greenLED,0);
  analogWrite(blueLED,128);
  delay(1000);

}
What You Should See
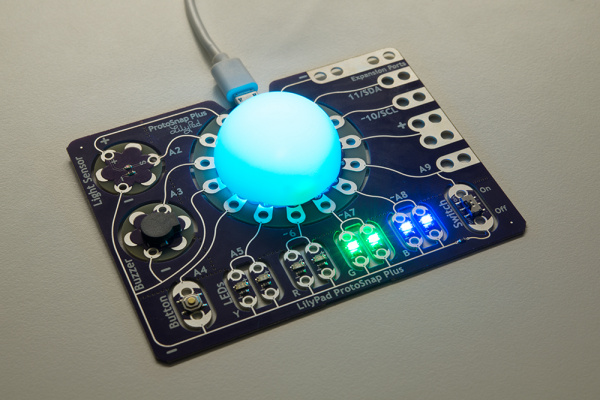
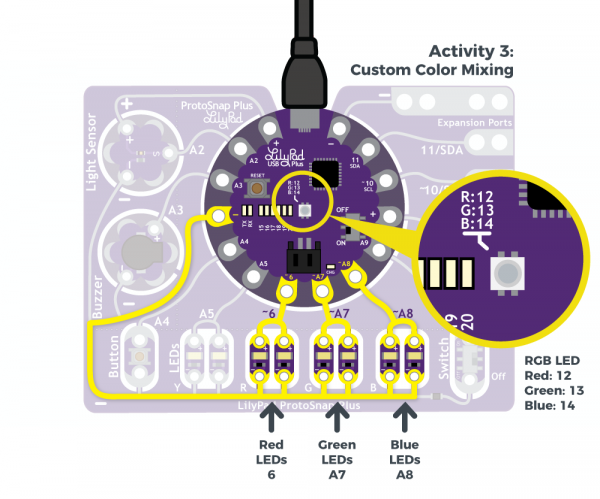
After uploading your code the RGB LED will step through a rainbow sequence of red, orange, yellow, chartruese, green, spring green, cyan, azure, blue, violet, magenta, and rose, repeatedly. To better showcase these color combinations, the code also turns on the colored LED pairs at the bottom of the LilyPad ProtoSnap Plus to coordinate with the RGB channels.
In this example we are turning the LEDs on or off, at full brightness they can be a bit harsh on your eyes. To better showcase the color mixes and tone down the harshness of the light, hold a piece of paper or translucent plastic (white bottle caps or ping pong balls work well) over the LED to diffuse the light. A dab of hot glue on top of the LED will also help diffuse it a bit.

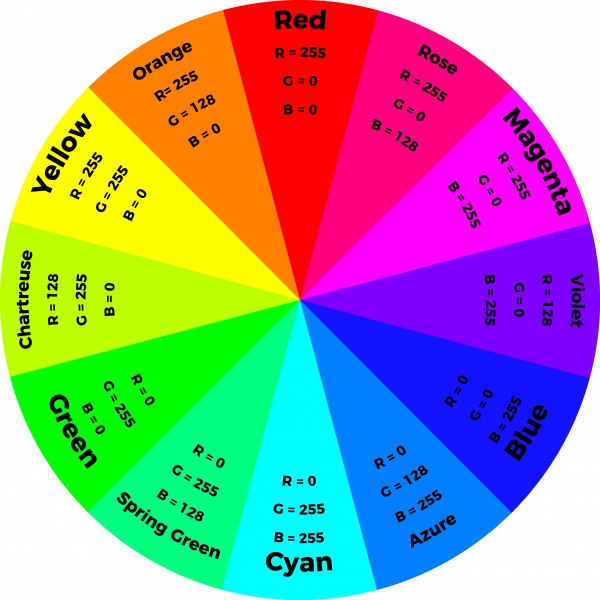
By adjusting the brightness of each LED in the RGB LED individually, we open up a much wider range of color options to display than the previous activity. In fact, there are many more combinations than we show in the example code. The image below shows a chart of the tertiary colors the example program creates by stepping down the LEDs to half brightness, creating a rainbow with more color transitions than the Basic Color Mixing example. By using analog output to adjust the brightness of each color channel individually, the RGB LED can display almost any color you can choose from a color picker - if you are familiar with RGB sliders in a graphics program, you'll recognize the 0-255 values used in this code.
Understanding Your Program
Program Overview
- Display red:
R: 100%, G: 0%, B: 0%
Wait 1 second. - Display orange:
R: 100%, G: 50%, B: 0%
Wait 1 second. - Display yellow:
R: 100%, G: 100%, B: 0%
Wait 1 second. - Display chartruese:
R: 50%, G: 100%, B: 0%
Wait 1 second. - Display green:
R: 0%, G: 100%, B: 0%
Wait 1 second. - Display spring green:
R: 0%, G: 100%, B: 50%
Wait 1 second. - Display cyan:
R: 0%, G: 100%, B: 100%
Wait 1 second. - Display azure:
R: 0%, G: 50%, B: 100%
Wait 1 second. - Display blue:
R: 0%, G: 0%, B: 100%
Wait 1 second. - Display violet:
R: 50%, G: 0%, B: 100%
Wait 1 second. - Display magenta:
R: 100%, G: 0%, B: 100%
Wait 1 second. - Display rose:
R: 100%, G: 0%, B: 50%
Wait 1 second. - Repeat.
Code to Note
| Code | Description |
|---|---|
analogWrite(RGB_red,255);analogWrite(RGB_green,0);analogWrite(RGB_blue,0);analogWrite(redLED,255);analogWrite(greenLED,0);analogWrite(blueLED,0); |
Analog Write:Notice that likedigitalWrite(), the analog function takes two pieces of information - the pin it is controlling and a state to set that pin to. The analogWrite() function outputs a voltage between 0 and 3.3V on a pin, with this range divided into 255 steps, where digital output only had HIGH or LOW. This example uses three values to mix the rainbow of tertiary colors: 0 (OFF), 128 (50% brightness), and 255 (100% brightness). You can use any value between 0 and 255 when you begin to experiment with mixing your own colors. |
Coding Challenges
Try using a color picker to find the R, G, and B values for an interesting color and use that in your program.
Try creating your own rainbow light patterns using different values for the color mixes.

