IR Control Kit Hookup Guide
Contributors:
 jimblom,
  bboyho
jimblom, bboyho 
Example 1: IR Remote Control Values
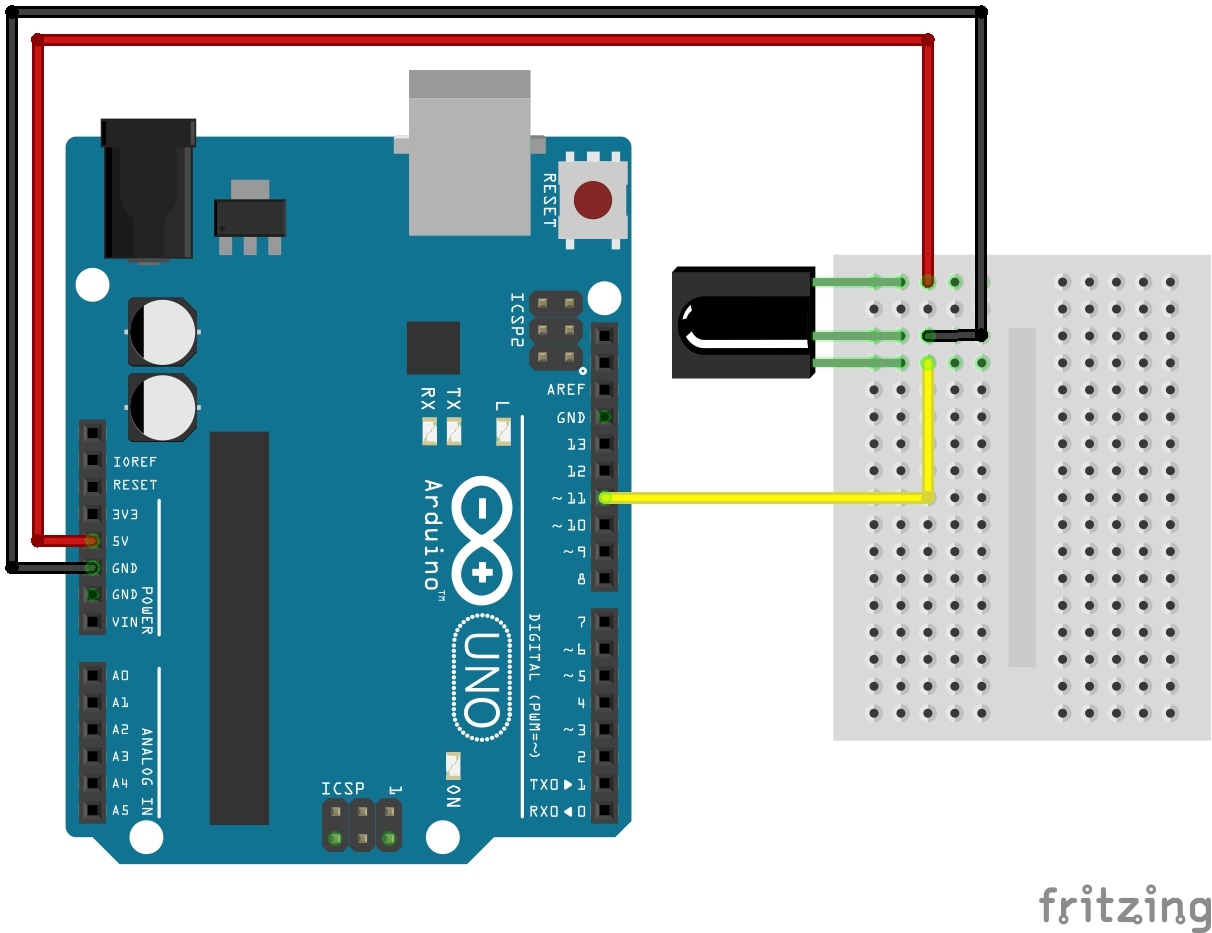
Circuit Diagram
Ready to start hooking everything up? Check out the circuit diagram below to connect the components together.
Reading IR Remote Control Values
Copy and paste the below code into your Arduino IDE. Then upload it to your Arduino to view the values associated with each button.
language:c
/*
  SparkFun Electronics 2013
  Modified by: Ho Yun "Bobby" Chan on 8/6/2018
  Playing with Infrared Remote Control
  Description: By pressing on one of the SparkFun infrared remote
  control's buttons, the serial monitor will output the associated
  hex value when a signal is received by an IR receiver.

  If using with the IR Receiver Breakout (SEN-8554):
  Supply voltage of 2.5V to 5.5V
    Attach
    OUT: To pin 11 on Arduino
    GND: GND
    VCC: 5V

  If using with the IR Receiver Diode (SEN-10266):
  Supply voltage of 2.5V to 5.5V
    Attach
    OUT: To pin 11 on Arduino
    GND: GND
    VS: 5V

  Note: This is based on Ken Shirriff's code found on GitHub.
  Make sure to install the library:
  https://github.com/shirriff/Arduino-IRremote/

  Note: This code also works with cheap remotes. If you want to look
  at the individual timing of the bits, use this code:
  http://www.arduino.cc/playground/Code/InfraredReceivers
*/

#include <IRremote.h>

int RECV_PIN = 11;
IRrecv irrecv(RECV_PIN);
decode_results results;

//------------------------------------------------------------
//Codes for Infrared Remote Control
//COM-11759 https://www.sparkfun.com/products/retired/11759
//Note: Uncomment out this section if you are using this w/ the older remote.

/*
#define POWER 0x10EFD827
#define A 0x10EFF807
#define B 0x10EF7887
#define C 0x10EF58A7
#define UP 0x10EFA05F
#define DOWN 0x10EF00FF
#define LEFT 0x10EF10EF
#define RIGHT 0x10EF807F
#define SELECT 0x10EF20DF
*/
//------------------------------------------------------------
//Codes for Infrared Remote Control
//COM-14865 https://www.sparkfun.com/products/14865
//Note: Comment out this section if you are using this w/ the older remote.

#define POWER 0x00FF629D
#define A 0x00FF22DD
#define B 0x00FF02FD
#define C 0x00FFC23D
#define UP 0x00FF9867
#define DOWN 0x00FF38C7
#define LEFT 0x00FF30CF
#define RIGHT 0x00FF7A85
#define SELECT 0x00FF18E7

//------------------------------------------------------------

void setup()
{
  Serial.begin(9600);
  irrecv.enableIRIn(); // Start the receiver
}

void loop()
{
  if (irrecv.decode(&results))
  {
    if (results.value == POWER)
    {
      Serial.println("POWER");
    }
    else if (results.value == A)
    {
      Serial.println("A");
    }
    else if (results.value == B)
    {
      Serial.println("B");
    }
    else if (results.value == C)
    {
      Serial.println("C");
    }
    else if (results.value == UP)
    {
      Serial.println("UP");
    }
    else if (results.value == DOWN)
    {
      Serial.println("DOWN");
    }
    else if (results.value == LEFT)
    {
      Serial.println("LEFT");
    }
    else if (results.value == RIGHT)
    {
      Serial.println("RIGHT");
    }
    else if (results.value == SELECT)
    {
      Serial.println("SELECT");
    }
    else {
      Serial.println("IR RECV Code Value Not Defined or Button was Held Down");
    }

    Serial.print("IR RECV Code = 0x ");
    Serial.println(results.value, HEX);
    irrecv.resume();
  }
}
Open a serial monitor at a 9600 baud. Press the buttons on the IR remote to see the associated button values. If you have an older version of the IR remote control or received one outside of our catalog, make sure to update the code to reflect the corresponding button presses. Simply comment/uncomment the code for the remote or update the values for the remote that you are using. Now that we can read the button presses, we can control your project with IR!