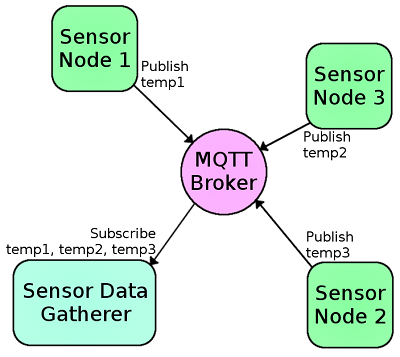
Introduction to MQTT
 Alex the Giant
 Introduction
In this tutorial, you'll learn everything you need to know about the MQTT messaging protocol, why you would want to use it, and how it's implemented. In a nutshell, MQTT uses your existing Internet home network to send messages to your IoT devices and respond to those messages.
Brief History
MQTT (Message Queuing Telemetry Transport) is a publish/subscribe messaging protocol that works on top of the TCP/IP protocol. The first version of the protocol was developed by Andy Stanford-Clark of IBM and Arlen Nipper of Cirrus Link in 1999. What makes MQTT faster than say sending HTTP requests with your IoT device is MQTT messages can be as small as 2 bytes, whereas HTTP requires headers which contains a lot of information that other devices might not care about. Also, if you have multiple devices waiting for a request with HTTP, you'll need to send a POST action to each client. With MQTT, when a server receives information from one client, it will automatically distribute that information to each of the interested clients.
Required Materials
To follow along with the example in this tutorial, you will need the following pieces of hardware. You may not need everything though depending on what you have. Add it to your cart, read through the guide, and adjust the cart as necessary.
Optional Materials
Depending on your setup, you may also need the following.

Suggested Reading
If you aren't familiar with the following concepts, we recommend checking out these tutorials before continuing.
Raspberry Pi 3 Starter Kit Hookup Guide
ESP32 Thing Hookup Guide
Getting Started with the Raspberry Pi Zero Wireless
How to Use Remote Desktop on the Raspberry Pi with VNC
The Basics
Before you learn how to build a MQTT network, it will help to understand some of the jargon that's used and how each piece fits together to create your network.
- Broker - The broker is the server that distributes the information to the interested clients connected to the server.
- Client - The device that connects to broker to send or receive information.
- Topic - The name that the message is about. Clients publish, subscribe, or do both to a topic.
- Publish - Clients that send information to the broker to distribute to interested clients based on the topic name.
- Subscribe - Clients tell the broker which topic(s) they're interested in. When a client subscribes to a topic, any message published to the broker is distributed to the subscribers of that topic. Clients can also unsubscribe to stop receiving messages from the broker about that topic.
- QoS - Quality of Service. Each connection can specify a quality of service to the broker with an integer value ranging from 0-2. The QoS does not affect the handling of the TCP data transmissions, only between the MQTT clients. Note: In the examples later on, we'll only be using QoS 0.
- 0 specifies at most once, or once and only once without requiring an acknowledgment of delivery. This is often refered to as fire and forget.
- 1 specifies at least once. The message is sent multiple times until an acknowledgment is received, known otherwise as acknowledged delivery.
- 2 specifies exactly once. The sender and receiver clients use a two level handshake to ensure only one copy of the message is received, known as assured delivery.
How MQTT Works
As mentioned in the introduction, MQTT is a publish/subcribe messaging protocol. Clients will connect to the network, which can subscribe or publish to a topic. When a client publishes to a topic, the data is sent to the broker, which then is distributed to all the clients that are subscribed to that topic.
Topics are arranged in a directory-like structure. A topic might be "LivingRoom", or "LivingRoom/Light" if you have multiple clients within that parent topic. The subscriber client will listen for incoming messages from the subscribed topic and react to what was published to that topic, such as "on" or "off". Clients can subscribe to one topic and publish to another as well. If the client subscribes to "LivingRoom/Light", it might also want to publish to another topic like "LivingRoom/Light/State" so that other clients can monitor the state of that light.
Now that we understand the theory of how MQTT works, lets build a quick and easy example with a Raspberry Pi and ESP32 Thing boards to see it working in action. We'll start by setting up the broker and running a quick test to make sure it's working correctly.
Setting Up the Broker
There's a large collection of MQTT brokers available that can run from a remote server, or locally, both on your office machine as well as a dedicated computer like a Raspberry Pi. In the example used in this tutorial, we're going to use a Raspberry Pi connected to our local network running a free and open-source broker called Mosquitto.
Setting up Mosquitto is simple, just open your terminal and enter:
language:bash
sudo apt-get install mosquitto -y
Once installed, we'll want to make sure our broker is working by correctly by creating a test client from the Pi to listen to a topic. We'll do this by installing the mosquitto clients:
language:bash
sudo apt-get install mosquitto mosquitto-clients -y
Once the clients have been installed, we'll subscribe to the topic "test_topic" by entering:
language:bash
mosquitto_sub -t "test_topic"
We're telling mosquitto we'd like to subscribe to a topic by entering mosquitto_sub, and that we'd like to subscribe to a topic denoted by -t with the name test_topic. Now every time we publish to test_topic, the message sent will appear in this window.
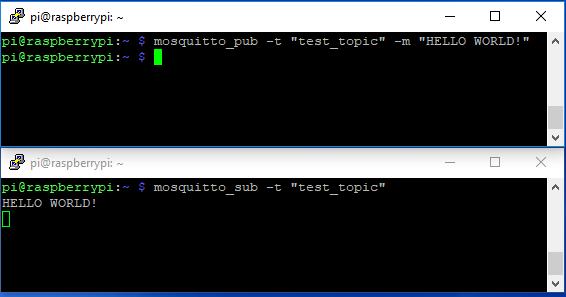
Because our terminal is listening for messages from our broker, we'll need to open a second terminal window to publish messages to. Once opened, we'll publish to test_topic with the following command:
language:bash
mosquitto_pub -t "test_topic" -m "HELLO WORLD!"
Just like before, we use the -t to denote the topic, but this time we're adding a message to publish to the topic by using mosquitto_pub and using -m to denote the message to we'd like to publish. Once we hit enter, we should see our message appear on subscriber terminal window as shown below. You can replace that text with any string you'd like after -m to send your message to all of the clients subscribed to test_topic.
Setting Up the Clients
Now that we know our broker is up and running it's time to add our clients. We're going to create two clients, the first will publish to the topic "room/light" with a message of "on" or "off" every time we push a button. The second client will subscribe to "room/light" and respond to the message by turning an LED on or off.
Publish Client - Switch
To create the switch, we're going to use an ESP32 Thing. To get MQTT working on an ESP we'll need to install a library called PubSubClient, which you can download from the link below:
Once installed, open Arduino and paste in the code below. Just make sure to fill in the WiFi credentials for your router and the IP address of your Raspberry Pi broker. Once the ESP32 connects to the network, it waits for the button to be pressed. Once pushed, the ESP32 will publish the command to the topic "room/light".
language:c
/******************************************************************************
MQTT_Switch_Example.ino
Example for controlling a light using an MQTT switch
by: Alex Wende, SparkFun Electronics

This sketch connects the ESP32 to a MQTT broker and subcribes to the topic
room/light. When the button is pressed, the client will toggle between
publishing "on" and "off".
******************************************************************************/

#include <WiFi.h>
#include <PubSubClient.h>

const char *ssid =  "-----";   // name of your WiFi network
const char *password =  "-----"; // password of the WiFi network

const byte SWITCH_PIN = 0;           // Pin to control the light with
const char *ID = "Example_Switch";  // Name of our device, must be unique
const char *TOPIC = "room/light";  // Topic to subcribe to

IPAddress broker(192,168,1,-); // IP address of your MQTT broker eg. 192.168.1.50
WiFiClient wclient;

PubSubClient client(wclient); // Setup MQTT client
bool state=0;

// Connect to WiFi network
void setup_wifi() {
  Serial.print("\nConnecting to ");
  Serial.println(ssid);

  WiFi.begin(ssid, password); // Connect to network

  while (WiFi.status() != WL_CONNECTED) { // Wait for connection
    delay(500);
    Serial.print(".");
  }

  Serial.println();
  Serial.println("WiFi connected");
  Serial.print("IP address: ");
  Serial.println(WiFi.localIP());
}

// Reconnect to client
void reconnect() {
  // Loop until we're reconnected
  while (!client.connected()) {
    Serial.print("Attempting MQTT connection...");
    // Attempt to connect
    if (client.connect(ID)) {
      Serial.println("connected");
      Serial.print("Publishing to: ");
      Serial.println(TOPIC);
      Serial.println('\n');

    } else {
      Serial.println(" try again in 5 seconds");
      // Wait 5 seconds before retrying
      delay(5000);
    }
  }
}

void setup() {
  Serial.begin(115200); // Start serial communication at 115200 baud
  pinMode(SWITCH_PIN,INPUT);  // Configure SWITCH_Pin as an input
  digitalWrite(SWITCH_PIN,HIGH);  // enable pull-up resistor (active low)
  delay(100);
  setup_wifi(); // Connect to network
  client.setServer(broker, 1883);
}

void loop() {
  if (!client.connected())  // Reconnect if connection is lost
  {
    reconnect();
  }
  client.loop();

  // if the switch is being pressed
  if(digitalRead(SWITCH_PIN) == 0)
  {
    state = !state; //toggle state
    if(state == 1) // ON
    {
      client.publish(TOPIC, "on");
      Serial.println((String)TOPIC + " => on");
    }
    else // OFF
    {
      client.publish(TOPIC, "off");
      Serial.println((String)TOPIC + " => off");
    }

    while(digitalRead(SWITCH_PIN) == 0) // Wait for switch to be released
    {
      // Let the ESP handle some behind the scenes stuff if it needs to
      yield();
      delay(20);
    }
  }
}
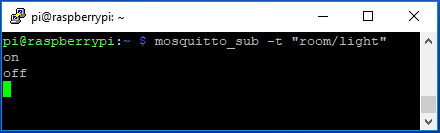
Once the code has uploaded and the ESP32 has connected to the network, we want to test to make sure the broker is working correctly and we're connected to the broker. To test this, from the terminal window of the Pi, we're going to subscribe to "room/light" with the following command:
language:bash
mosquitto_sub -t "room/light"
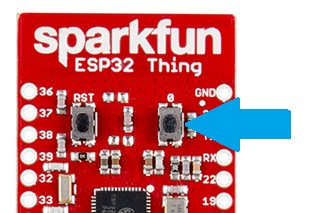
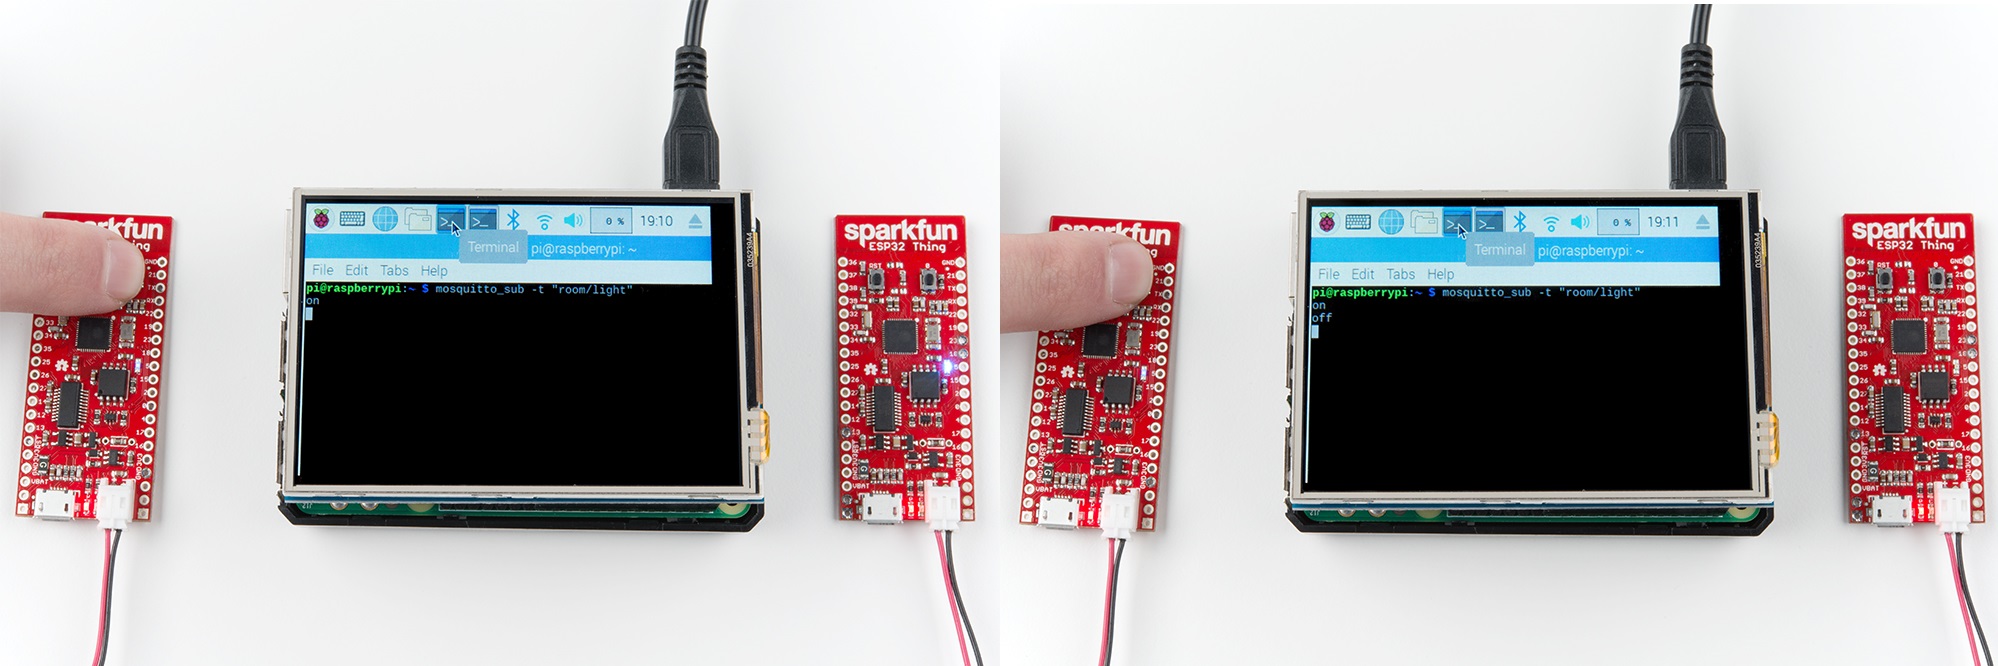
Press on the ESP32's button that is connected on GPIO pin 0.
Now when we press the button on the ESP32 connected to GPIO pin 0, we should see the on/off commands as shown below.
Subscribe Client - Light
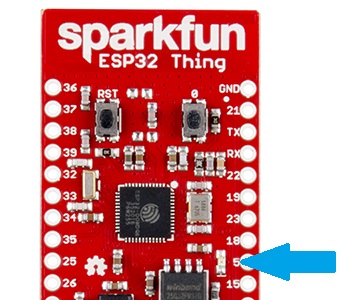
Now that the switch is connected to the broker, we need to connect a device that will react when a new message is sent to the topic. To do this, we'll need another ESP32 and control the LED connected to pin 5 as shown below. Just like before, make sure to fill in the WiFi credentials and the IP address of your Raspberry Pi broker like you did in the previous example.
language:C
/******************************************************************************
MQTT_Light_Example.ino
Example for controlling a light using MQTT
by: Alex Wende, SparkFun Electronics

This sketch connects the ESP8266 to a MQTT broker and subcribes to the topic
room/light. When "on" is recieved, the pin LIGHT_PIN is toggled HIGH.
When "off" is recieved, the pin LIGHT_PIN is toggled LOW.
******************************************************************************/

#include <WiFi.h>
#include <PubSubClient.h>

const char *ssid = "-----";   // name of your WiFi network
const char *password = "-----"; // password of the WiFi network

const byte LIGHT_PIN = 5;           // Pin to control the light with
const char *ID = "Example_Light";  // Name of our device, must be unique
const char *TOPIC = "room/light";  // Topic to subcribe to
const char *STATE_TOPIC = "room/light/state";  // Topic to publish the light state to

IPAddress broker(192,168,1,-); // IP address of your MQTT broker eg. 192.168.1.50
WiFiClient wclient;

PubSubClient client(wclient); // Setup MQTT client

// Handle incomming messages from the broker
void callback(char* topic, byte* payload, unsigned int length) {
  String response;

  for (int i = 0; i < length; i++) {
    response += (char)payload[i];
  }
  Serial.print("Message arrived [");
  Serial.print(topic);
  Serial.print("] ");
  Serial.println(response);
  if(response == "on")  // Turn the light on
  {
    digitalWrite(LIGHT_PIN, HIGH);
    client.publish(STATE_TOPIC,"on");
  }
  else if(response == "off")  // Turn the light off
  {
    digitalWrite(LIGHT_PIN, LOW);
    client.publish(STATE_TOPIC,"off");
  }
}

// Connect to WiFi network
void setup_wifi() {
  Serial.print("\nConnecting to ");
  Serial.println(ssid);

  WiFi.begin(ssid, password); // Connect to network

  while (WiFi.status() != WL_CONNECTED) { // Wait for connection
    delay(500);
    Serial.print(".");
  }

  Serial.println();
  Serial.println("WiFi connected");
  Serial.print("IP address: ");
  Serial.println(WiFi.localIP());
}

// Reconnect to client
void reconnect() {
  // Loop until we're reconnected
  while (!client.connected()) {
    Serial.print("Attempting MQTT connection...");
    // Attempt to connect
    if(client.connect(ID)) {
      client.subscribe(TOPIC);
      Serial.println("connected");
      Serial.print("Subcribed to: ");
      Serial.println(TOPIC);
      Serial.println('\n');

    } else {
      Serial.println(" try again in 5 seconds");
      // Wait 5 seconds before retrying
      delay(5000);
    }
  }
}

void setup() {
  Serial.begin(115200); // Start serial communication at 115200 baud
  pinMode(LIGHT_PIN, OUTPUT); // Configure LIGHT_PIN as an output
  delay(100);
  setup_wifi(); // Connect to network
  client.setServer(broker, 1883);
  client.setCallback(callback);// Initialize the callback routine
}

void loop() {
  if (!client.connected())  // Reconnect if connection is lost
  {
    reconnect();
  }
  client.loop();
}
Find the built-in LED connected to GPIO pin 5 on the second ESP32 Thing.
Once the second ESP32 connects to the network, it will automatically subscribe to "room/light" and when you push the button on the first ESP32, the built-in LED connected to GPIO pin 5 on the second ESP32 should respond and turn on and off. You can also go back and change the topic to "room/light2" or even just "room" to see how (or if) the device responds with the new topic.
Resources and Going Further
Hopefully, this tutorial has given you a starting point to integrate MQTT in your home automation project. Instead of turning a LED on or off, you could take it a step further and connect our IoT Power Relay to the ESP32 to control your AC powered devices.
A tool not mentioned in this tutorial is Home Assistant. With Home Assistant you can control a wide array for commercial smart home devices, including MQTT. This means that with Home Assistant you can create your own MQTT devices that can easily control your existing smart home devices, but stay tuned for a tutorial about that in the future. In the mean time, there's a blog post about MQTT and Home Assistant using an ESP8266 and Raspberry Pi which can be found here:
For more information about MQTT, check out some of the links below:
- Wikipedia Article on MQTT
- MQTT Official Documentation
- Mosquitto Documentation and API Reference
- GitHub Arduino Library: PubSubClient
Need some inspiration for your next project? Check out some of these related tutorials:
SparkFun Blocks for Intel® Edison - Dual H-Bridge
Photon Battery Shield Hookup Guide
ESP32 LoRa 1-CH Gateway, LoRaWAN, and the Things Network
Hookup Guide for the SparkFun RedBoard Artemis ATP
Interested in learning more about WiFi?
Get a background in how WiFi works as well as the hardware available to help you connect your project wirelessly.
Take me there!