How to Use Remote Desktop on the Raspberry Pi with VNC
 Shawn Hymel
 Introduction
If you like the idea of a headless computer setup for your Raspberry Pi (i.e. one without a keyboard, mouse, or monitor) but want access to the full graphical desktop, then you're in luck! By using a Virtual Network Computing (VNC) program, you can access a remote desktop over the network!
For schools and individuals that need to use the full desktop for certain applications (Scratch, creating your own graphical interface, etc.), using a VNC client to access your Raspberry Pi might be the way to go.
The good news is that Raspbian (the recommended Raspberry Pi operating system) comes with RealVNC installed by default. The bad news is that we need to enable it using some other means.
Required Materials
To follow along with this tutorial, you will need a Raspberry Pi, power supply, and micro SD card. Note that no monitor, keyboard, or mouse is required!
Optional Materials
All that being said, you can also use a keyboard, mouse, and monitor to enable the VNC server. Once you have enabled it, you will not need these accessories any more (unless you really want them).

SmartiPi Touch
PRT-14059Suggested Reading
If you aren't familiar with the following concepts, we recommend checking out these tutorials before continuing.
Serial Terminal Basics
Raspberry Pi 3 Starter Kit Hookup Guide
Getting Started with the Raspberry Pi Zero Wireless
Flashing the OS
The Raspberry Pi has several operating systems available for use, and beginners are often encouraged to use NOOBS to install the default Raspbian image. This guide will show you how to configure a headless version of Raspbian to be used with VNC. To do so, we'll be following along with parts of the Headless Raspberry Pi Setup tutorial, but note that we'll be using full Raspbian instead of Raspbian Lite, as we need the Linux X server that comes installed on the full version.
To start, download the latest version of Raspbian.
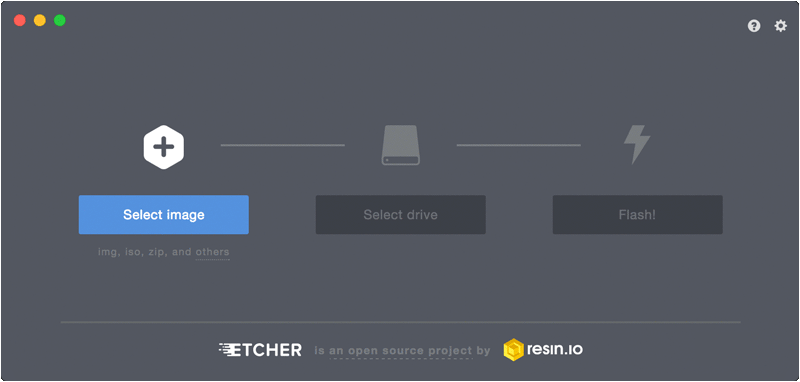
To flash the image to your SD card, we recommend the program Etcher. Download and install it. Plug your SD card into your computer (using a microSD USB Reader if necessary), and run Etcher. Select your OS image file (no need to unzip it! just select your downloaded .zip file in Etcher), select your SD card reader, and click the Flash! button.
Enable VNC
You will need to interact with your Pi in order to turn on the VNC server. To do this, you have several options:
- Connect a keyboard, mouse, and monitor. Click the Terminal icon on the top left of the desktop to open a terminal window.
- Follow these instructions to open a terminal window over a Serial connection.
- Follow these instructions to open a terminal window using SSH over Ethernet
- Follow these instructions to open a terminal window using SSH over WiFi
(Optional) Install RealVNC
By default, Raspbian should come with a VNC server (RealVNC) installed. If you are using another operating system, you might need to install RealVNC. With most flavors of Debian (e.g. Raspbian is built on top of Debian), you should be able to use apt-get to install RealVNC. In a terminal, enter the following:
language:shell
sudo apt-get update
sudo apt-get install real-vnc-server
sudo apt-get install real-vnc-client
Enable the VNC Server
You will need to go into the Raspberry Pi configuration tool to turn on the VNC server:
language:shell
sudo raspi-config
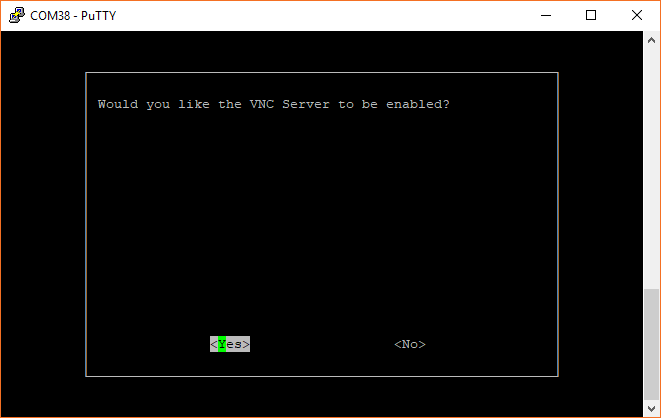
Select Interfacing Option, and then select VNC. On the next screen, select Yes, and press enter to save the changes.
Feel free to make any other changes you might like, including setting a new password and changing the keyboard layout.
Back in the raspi-config homescreen, press right arrow twice to select Finish and press enter.
Use VNC Over a Local Network
If your host computer is on the same local network (e.g. connected to the same WiFi or Ethernet network), then you can make a direct VNC connection to your Raspberry Pi. This method has several up sides: it's the easier option, does not require signing up for a RealVNC account, and can be done on a closed network (i.e. one not connected to the Internet). The down side is that you must be on the same network to access your Pi (i.e. physically connected or through a VPN). This is a known as a direct connection.
If you want to to access your Raspberry Pi over the Internet, then see the next section.
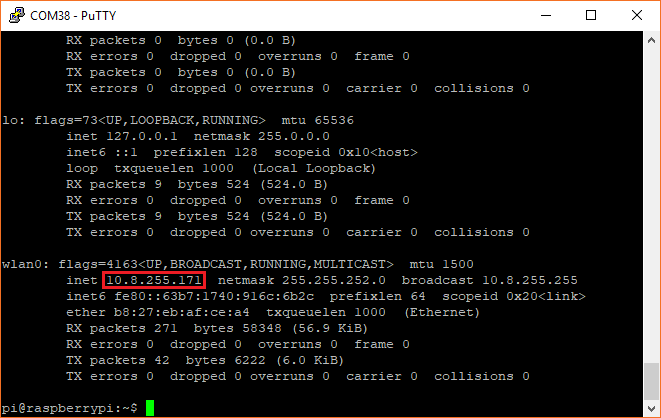
Still in your Raspberry Pi's terminal, enter the following command:
language:shell
ifconfig
Copy down the Raspberry Pi's IP address, which is given as a series of 4 numbers next to inet. If you are connected over WiFi, this will appear under the wlan0 settings. If you are connected over Ethernet, this will appear under the eth0 settings.
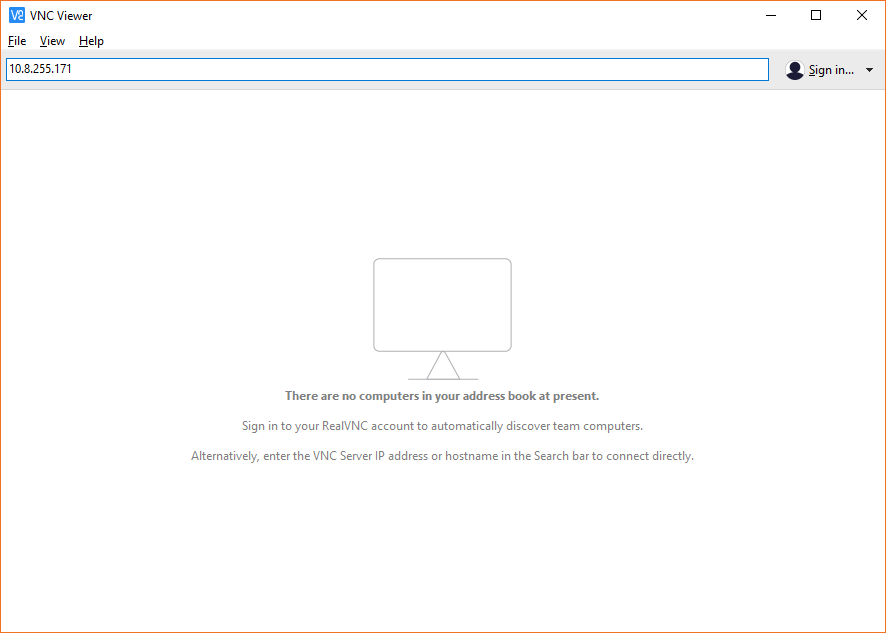
On your host computer, head to the RealVNC Viewer downloads page to download the VNC client (known as VNC Viewer) for your operating system. Install it, accepting all the defaults.
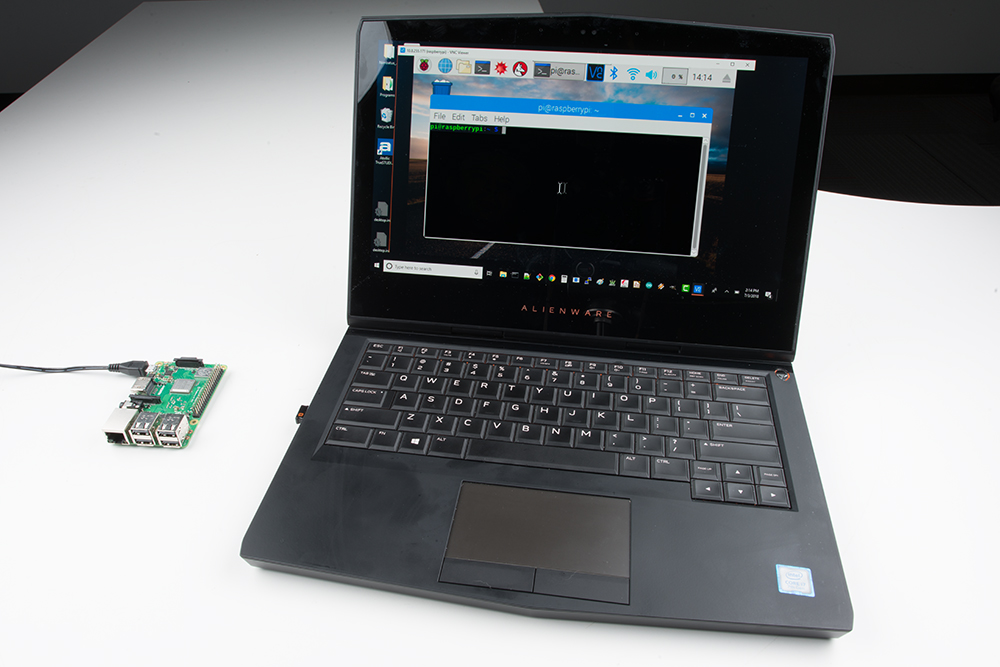
Open VNC Viewer. At the top address bar, enter the IP address of the Raspberry Pi (once again, make sure your host computer and Pi are on the same network!).
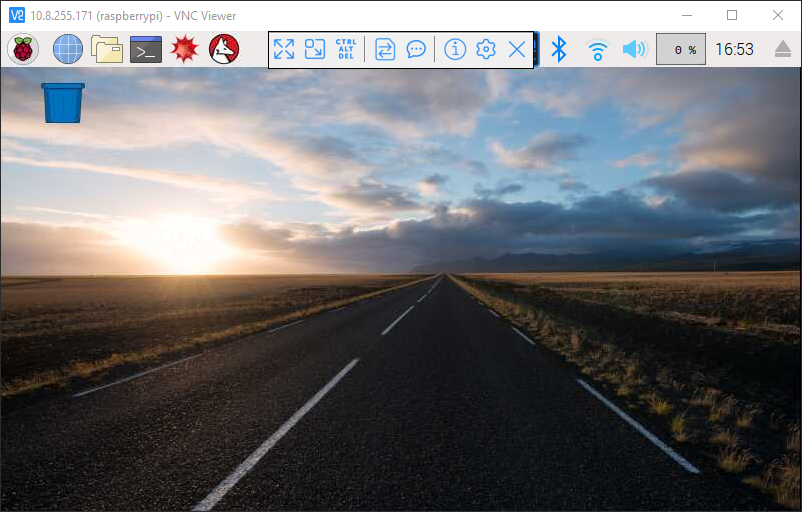
Press enter, and click Continue when warned that "VNC Server not recognized." You should be prompted with an Authentication window. If you did not change the login username and password for your Pi, your default login credentials are:
- Username: pi
- Password: raspberry
Once you successfully authenticate, you should be presented with your Raspberry Pi's graphical desktop. Now, you can do everything remotely as if you were sitting in front of your Pi with a keyboard, mouse, and monitor! If you hover your mouse over the top part of the window, you should see a drop-down box appear, giving you access to the various RealVNC settings, including closing the session.
Use VNC Over the Internet
Using remote desktop on a local network is likely to offer a much faster and smoother experience, however, you can't necessarily guarantee you will have access to that network directly. Luckily, RealVNC allows us to log in to our computer over the Internet!
The other good news is that we don't have to go through the process of finding our Pi's IP address.
Sign Up for a RealVNC Account
To start, sign up for an account (or sign in, if you already have one) on RealVNC's site here. Head to your Account page, and click Activate under the Home version of VNC Connect.

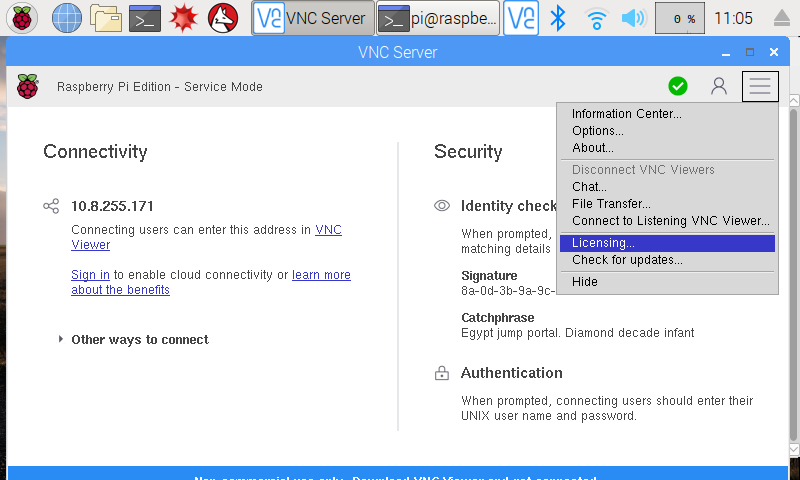
Enable VNC Cloud Connection on the Pi
Assuming you have VNC enabled on the Pi, click on the VNC logo in the top-right portion of the desktop. This will open the RealVNC settings window. In the top-right part of that window, click on the properties button, and select Licensing....
Leave Sign in to your RealVNC account selected, and click Next.

Enter your RealVNC email and password, and click Sign In. On the next screen, change the connectivity method to Direct and cloud connectivity.
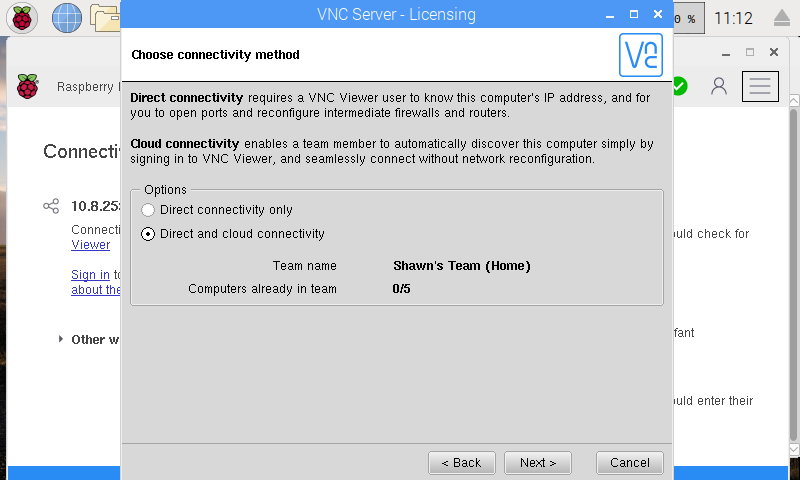
Click Next. Review the settings and click Apply. If you get a pop-up warning you that permissions were granted without asking for a password, click Close. On the next screen, click Done.
Remotely Control the Raspberry Pi
On your host machine, download and install the RealVNC viewer. Open the application, and click the Sign in button in the top-right. Enter your email and password, and click Sign in.
On the right side, you should see an address book (previously used connections) and something showing your "Team" (computers available for a VNC cloud connection). Click on your Team, and you should see your VNC-ready Raspberry Pi listed.
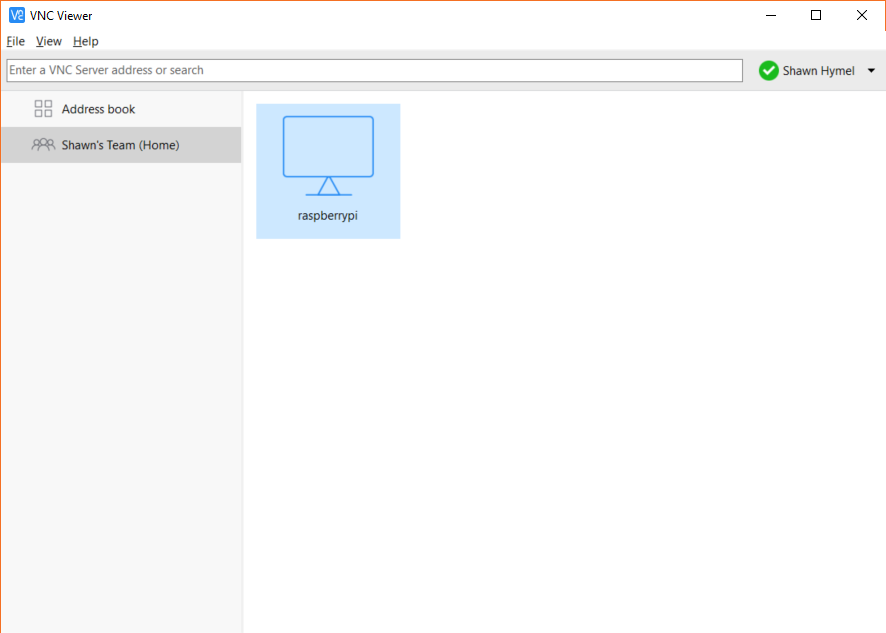
Double-click on your Raspberry Pi to connect to it. You should see a pop-up window explaining that the VNC server on your Raspberry Pi has been verified. Click Continue. You should be prompted with an Authentication window. If you did not change the login username and password for your Pi, your default login credentials are:
- Username: pi
- Password: raspberry
Once you have been authenticated, you should be presented with your Raspberry Pi's desktop. If you hover of the top part of the window, a drop-down should appear, giving you access to various settings for RealVNC, including a button to close the session.
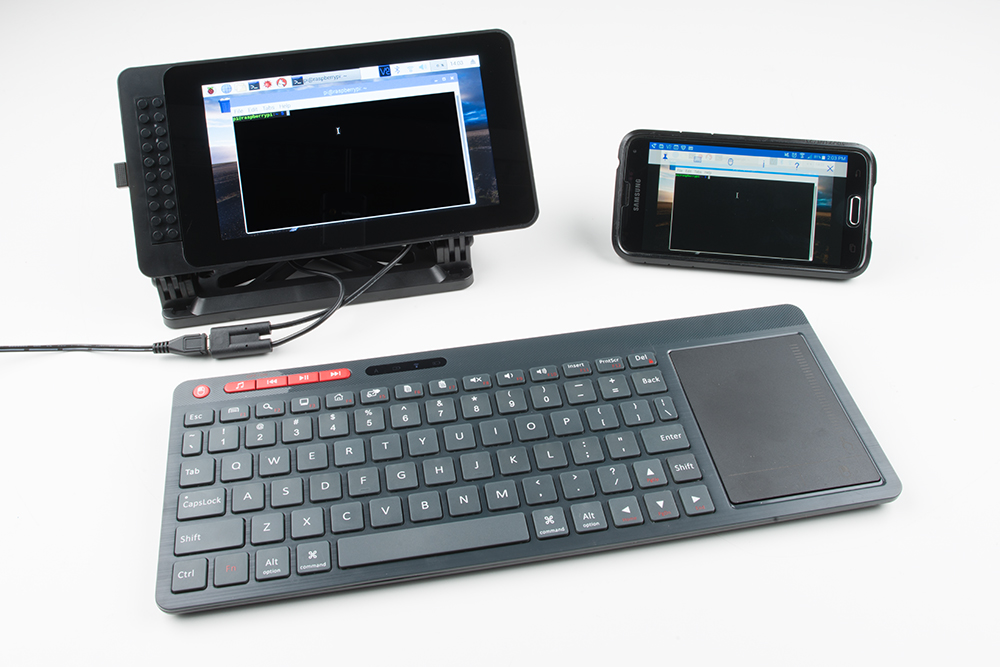
Another slick feature is the ability to control your Raspberry Pi from your smartphone or tablet! Download the VNC Viewer app from the iTunes store or Google Play. Open the app, sign in, and connect to your Raspberry Pi!
Resources and Going Further
If you would like to dig deeper into the details of RealVNC, we recommend looking at its docs page.
While RealVNC comes pre-installed on Raspbian, there are other Linux-based VNC applications out there that you could try. Here are some alternatives:
If you don't have any sort of network access for your Raspberry Pi, you can have your Pi host its own network by becoming a WiFi access point! This will allow you to connect to your Pi from another computer via SSH, VNC, etc. without relying on other networking equipment (e.g. routers).
Setting up a Raspberry Pi 3 as an Access Point
Ready to develop some Python programs on your Pi? Our Getting Started guide will walk you through writing your own Python code to control hardware:
Python Programming Tutorial: Getting Started with the Raspberry Pi
Looking for some inspiring Raspberry Pi projects? We recommend checking out these tutorials: