Headless Raspberry Pi Setup
 Shawn Hymel
 Introduction
A "headless" computer is one that operates without a monitor, keyboard, or mouse. The Raspberry Pi works great as an inexpensive computer that can help people learn to program and create fun, interesting projects (without many repercussions if you break something--just reflash the SD card!). The one downside is that as a computer (as opposed to a microcontroller), it requires a monitor, keyboard, and mouse to work, which can quickly increase the costs of acquiring the necessary components.
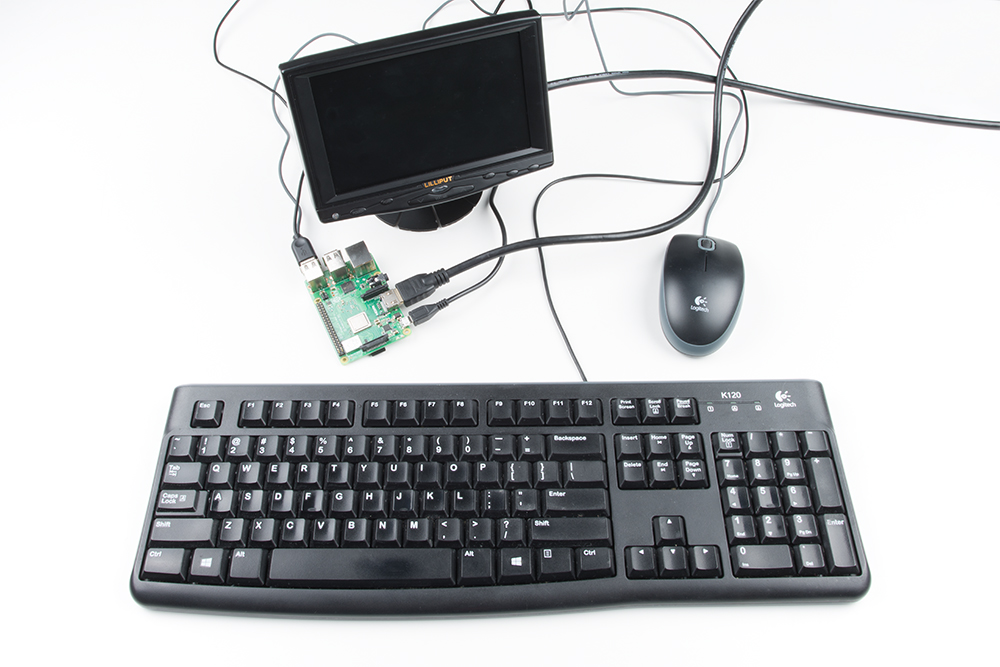
The Raspberry Pi can be extremely useful for projects that do not require a monitor, keyboard, or mouse. The downside is that setting up the Pi to connect to the Internet, expand the filesystem, and run code generally requires these computer accessories.
This tutorial will show you three different ways you can configure your Raspberry Pi without the need for a monitor, keyboard, or mouse.
- Serial Terminal - This requires extra hardware in the form of a serial-to-USB adapter, but it is by far the most robust way to connect, as you are not relying on any network setup.
- Ethernet with Static IP Address - This method requires a Linux operating system to change some files on the Raspberry Pi image. You can give the Raspberry Pi a static IP address and then use an Ethernet cable (or WiFi) to log in.
- WiFi with DHCP - You will need to have access to your router to find your Raspberry Pi's IP address in order to log in via SSH. As a result, this may not be the best option in school or office environments.
Certainly, there are more ways to connect to the Raspberry Pi. These show three common approaches to get you started interacting with a headless operating system on the Pi.
Required Materials
To follow along with this tutorial, you will need a Raspberry Pi, power supply, and micro SD card. Note that no monitor, keyboard, or mouse is required! Any extra hardware needed will be listed in the specific section.
Suggested Reading
If you aren't familiar with the following concepts, we recommend checking out these tutorials before continuing.
Serial Terminal Basics
Raspberry Pi 3 Starter Kit Hookup Guide
Getting Started with the Raspberry Pi Zero Wireless
Flashing the OS
The Raspberry Pi has several options available for operating systems. It's often recommended that beginners start with NOOBS, as that walks the user through the necessary steps of installing an operating system. However, it usually requires a monitor to see the selection process, so we'll be creating an image of Raspbian manually. Additionally, we'll be using Raspbian Lite, which saves us space and time by not including the desktop (i.e. the graphical interface). Because we're creating a headless image, we'll be doing everything through the command line!
To start, download the latest version of Raspbian Lite.
Unzip the .zip file using your program of choice. You should have a 2018-03-13-raspbian-stretch-lite.img file in a new folder.
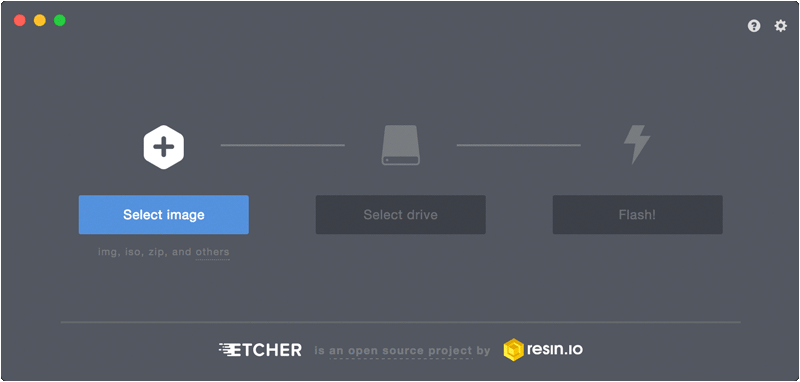
To flash the image to your SD card, we recommend the program Etcher. Download and install it. Plug your SD card into your computer (using a microSD USB Reader if necessary), and run Etcher. It will walk you through selecting the OS image file, selecting your SD card reader, and then flashing it.
Once that's done, you will need to make a choice: how do you want to interact with your Raspberry Pi? Without a monitor, keyboard, and mouse, you have a few choices:
- Serial Terminal - Requires extra hardware
- SSH with a Static IP Address - Requires Linux to modify files on the SD card
- SSH with a Dynamic IP Address - Requires access to your router to find the Raspberry Pi's IP address
Serial Terminal
If you would like to access your Raspberry Pi using the least amount of software work, you will need some extra hardware. Two of the pins on the Raspberry Pi offer transmit and receive data for serial communication. With a small change to a file on the boot sector of the SD card, a command line terminal will be broadcast over this serial line, and you can enter commands to control Linux, write programs, etc.
If the other methods do not work to gain access to your Raspberry Pi or you lose your video out signal, using the serial terminal is a great way to see if your Raspberry Pi is still working and to debug any problems you might have.
You will need a USB to serial converter for this to work. We recommend:
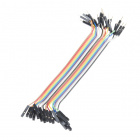
Alternatively, you could use a USB to TTL Serial Cable. Note that if you are using the Raspberry Pi Zero W, you will need to solder a header onto the GPIO port.
Enable the Serial Terminal
In versions of the Raspberry Pi after 3 (e.g. 3 Model B, 3 Model B+, Zero W), the processor contains two hardware UARTs. One is dedicated to the Bluetooth module, while the other is a less-featured "mini UART." This mini UART is broken out on pins 8 and 10 and can be used as a serial terminal into Linux.
The problem is that the mini UART's clock is tied to the variable clock speed of the graphics processing unit (GPU). We need to set a static system clock in order to use the mini UART as a serial terminal. This can potentially disable some features (e.g. overclocking or power-saving mode), but it should not affect normal operation. See here to learn more about the mini UART.
With your SD card still plugged into your computer, browse to the boot partition, and find the config.txt file.
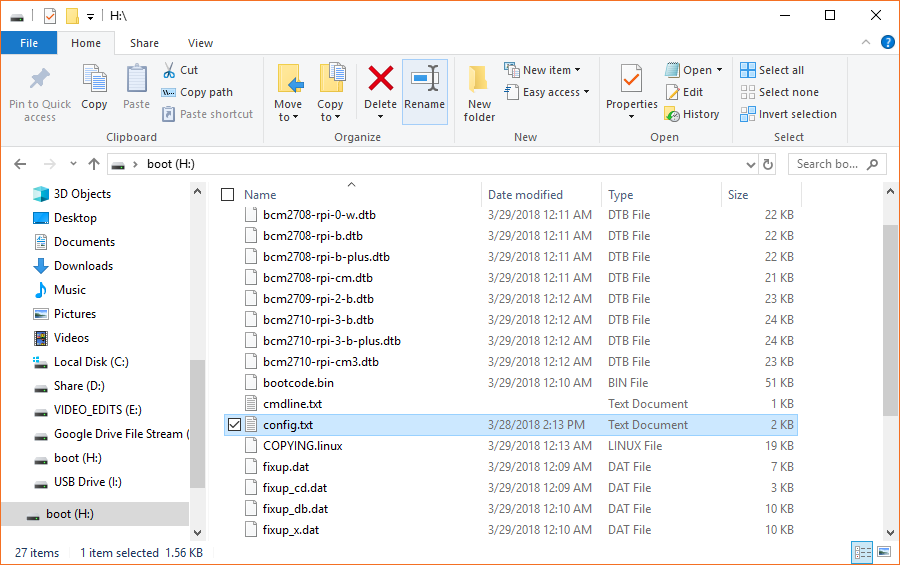
Use your text editor of choice to modify the file (on Windows, something like Notepad++ is recommended). Add
language:bash
enable_uart=1
to the end of the document.
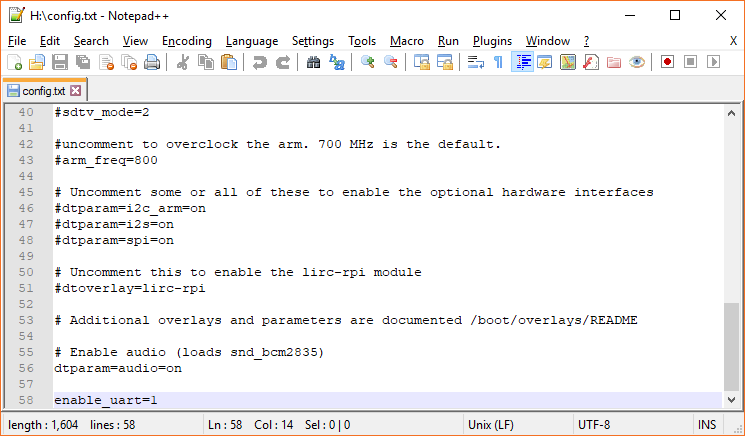
Save and exit.
Hardware Connections
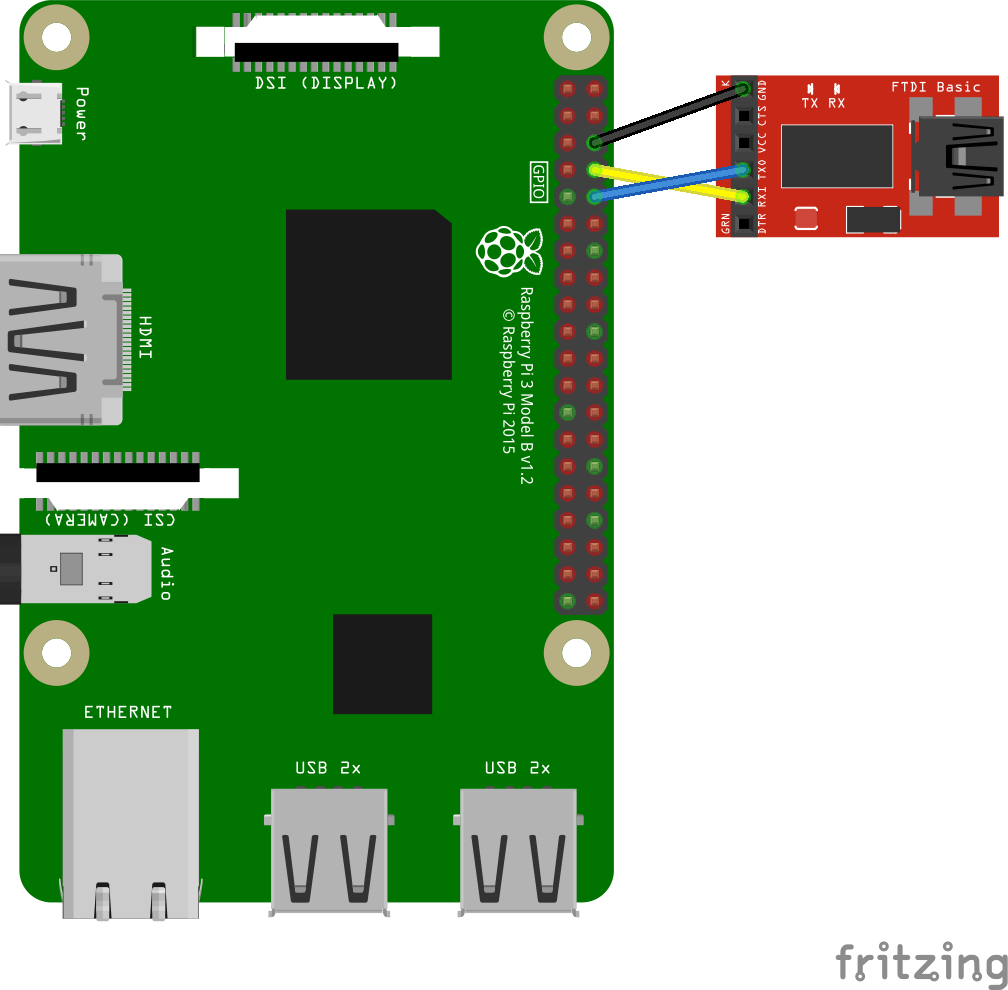
Take a look at the pinout for the Raspberry Pi 3.
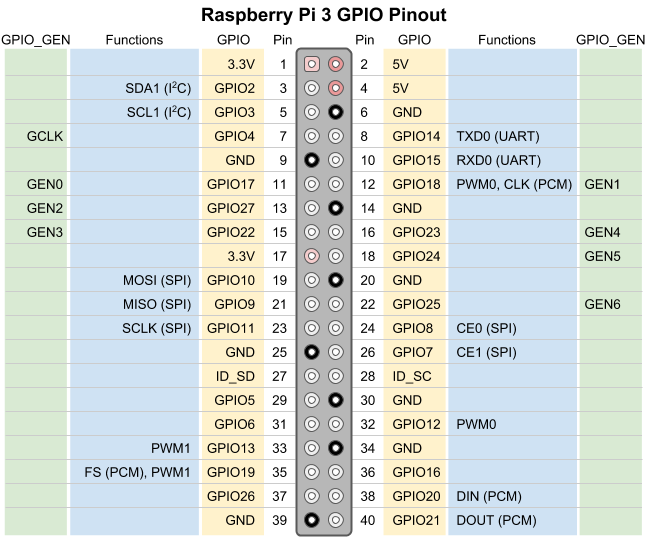
You'll see that pins 8 and 10 are connected to UART transmit (TXD) and receive (RXD), respectively. We'll need to connect GND (Raspberry Pi) to GND (USB to serial converter), TXD to RXI, and RXD to TXO. Note that we do not need to connect any power pins (3.3V or 5V).
Log In
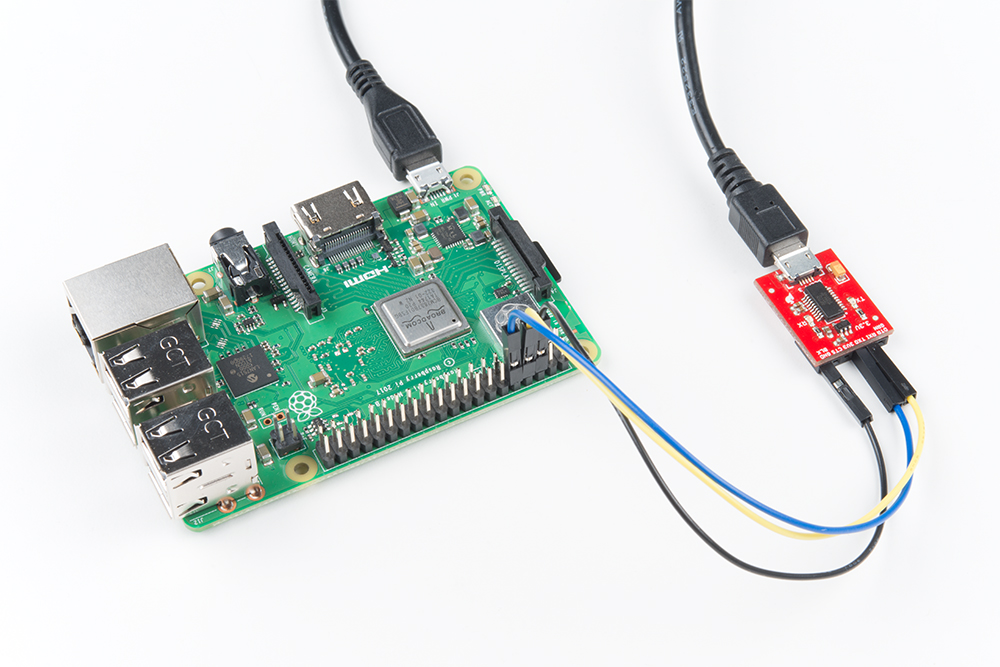
Connect the USB to serial converter to your computer, and connect the wall adapter to the Raspberry Pi's PWR (USB micro B) port.
Choose a serial terminal based on your operating system (here are some options).
If you are using Windows, you will need to know the COM port number connected to your USB to serial adapter, which can be found in the Device Manager.
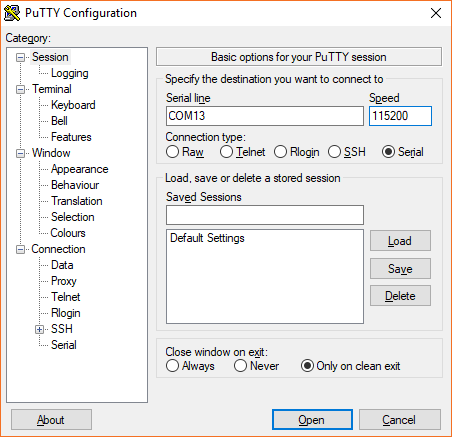
Change the settings as necessary to match the following:
- Baud rate: 115200 bps
- Data bits: 8
- Parity: None
- Stop bits: 1
- Flow Control: None
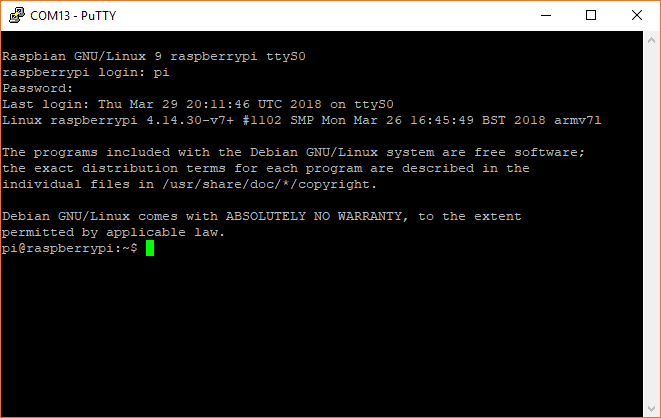
Open the connection, and press enter. You should be presented with a login prompt.

Enter the following credentials (default login):
- Username: pi
- Password: raspberry
You should be logged in at the command prompt and ready to type Linux commands!
Ethernet with Static IP Address
If you do not want to use the serial terminal or want to be able to log in to your Raspberry Pi over a network connection, you can give your Pi a static IP address, connect it to your network (or to your computer via a crossover/Ethernet cable), and log in via SSH.
Set Up Static IP Address
Plug the micro SD card (with the flashed Raspbian image) into your Linux computer. Most modern versions of Linux should automatically mount both partitions (boot and rootfs). You will need superuser privileges to edit the files on rootfs. Open a command prompt and edit /etc/dhcpcd.conf in rootfs.
Navigate to the rootfs directory (wherever your Linux distro has mounted it):
language:bash
cd /media/<USERNAME>/rootfs
Edit the dhcpcd.conf file:
language:bash
sudo nano /etc/dhcpcd.conf
Scroll down to the bottom of the file and add the following lines:
language:bash
interface eth0

static ip_address=192.168.4.2/24
static routers=192.168.4.1
static domain_name_servers=192.168.4.1
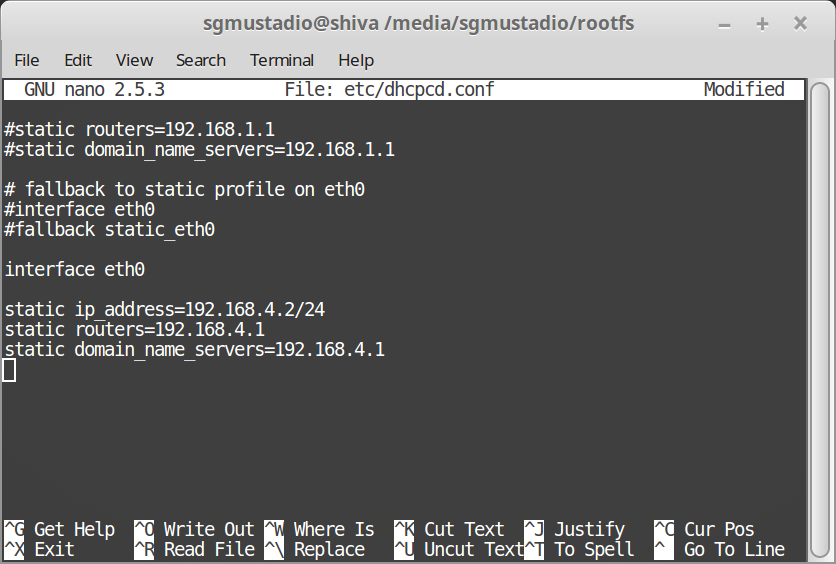
Save and exit by pressing ctrl + x and y when asked if you would like to save.
Enable SSH
In 2016, much of the Internet slowed to a crawl as a result of the IoT DDoS attack brought about by the Mirai botnet. In response to vulnerable IoT systems with default username and password logins, the Raspberry Pi Foundation decided to disable the SSH connection by default on all future releases of Raspbian. As a result, we now need to enable SSH so we can log in over a network connection. You can read more about the reasonings for this here.
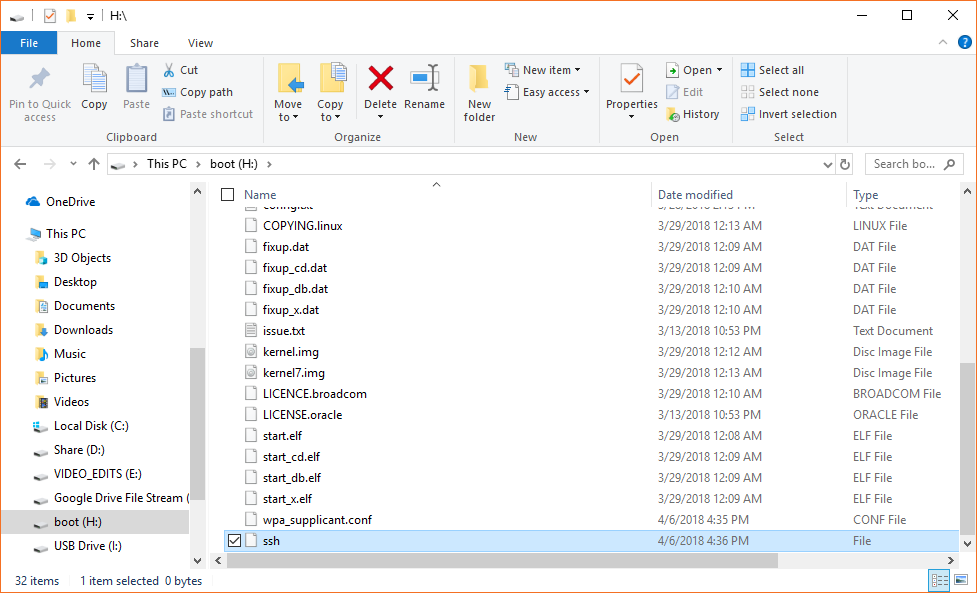
Luckily, this is easy to do. With the SD card still plugged in, navigate to the boot partition and create a blank file named "ssh" in that directory.
Still in the console, enter the following commands:
language:bash
cd ../boot
touch ssh
You should see an empty file named "ssh" appear in the root boot partition.

Unmount the SD card from your host computer and insert it into the Raspberry Pi.
Configure Your Host Computer's IP Address
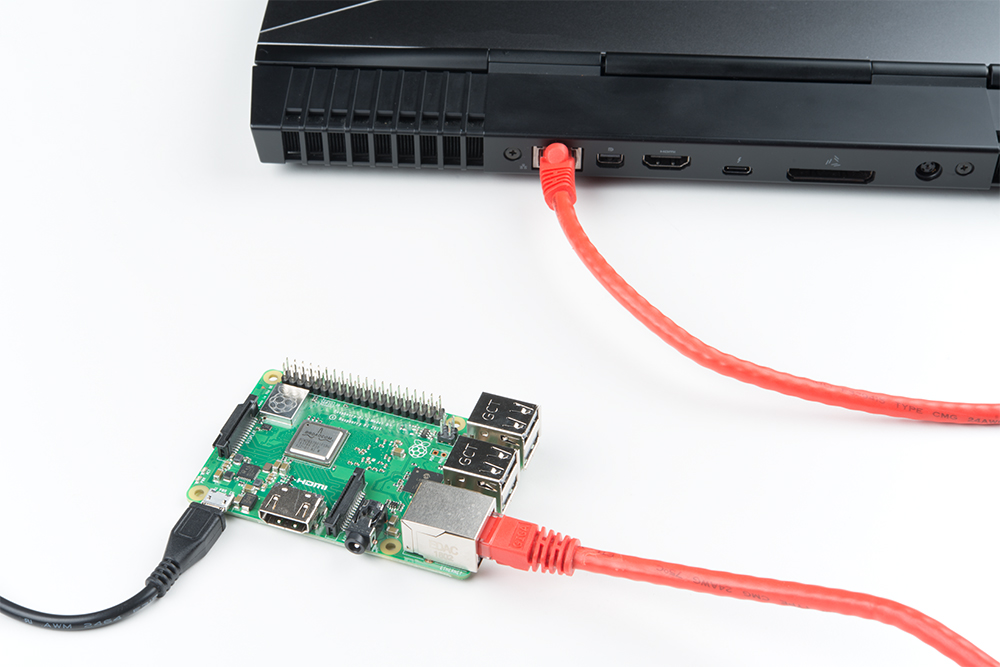
Plug an Ethernet cable into the Raspberry Pi and the other end into your computer. Technically, we should be using a crossover cable, but since the late 1990s, most computers are capable of automatically detecting and configuring for crossover.
Configure your host computer to have an Ethernet static IP address with the following properties:
language:bash
IP Address: 192.168.4.1
Subnet Mask: 255.255.255.0
Default Gateway: 192.168.4.1
Instructions to set up a static IP address for the following operating systems: Windows, Mac, Linux (Ubuntu).
Connect Over SSH
Secure Shell (SSH) gives us a terminal into an operating system over a network and encrypts the traffic, giving us a level of security. Depending on your host operating system, you have a number of options available to you.
Windows
PuTTY is an easy-to-use SSH, Telnet, and Serial terminal client. Open PuTTY, and set the Host Name to 192.168.4.2 and Port to 22.
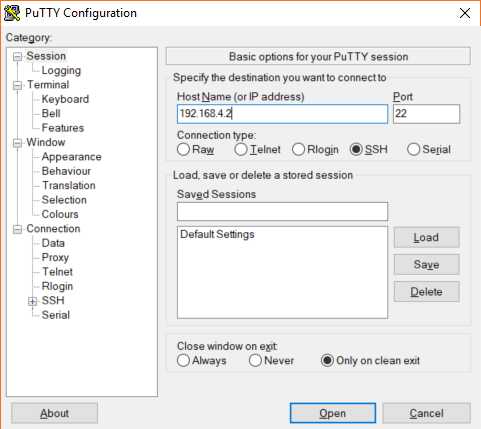
Click Open. If asked about chaching a host key, click Yes.
Mac and Linux
The easiest way to connect to another computer over SSH is to use the ssh command line tool built into most distributions of Linux and Mac OS. Simply open up a terminal and type:
language:bash
ssh 192.168.4.2
Update: Users may need to use ssh pi@<"IP Address">, where pi predefines the login username.
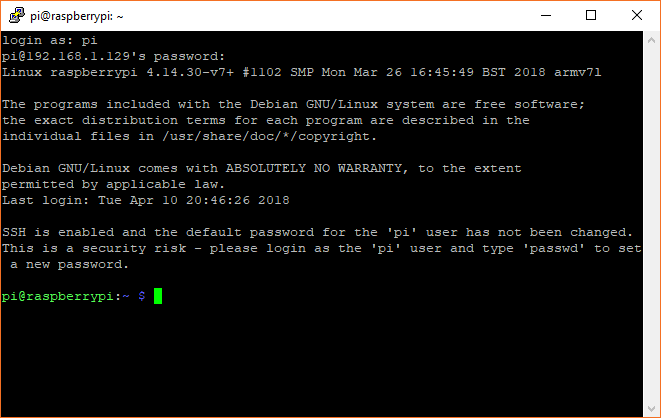
Log In
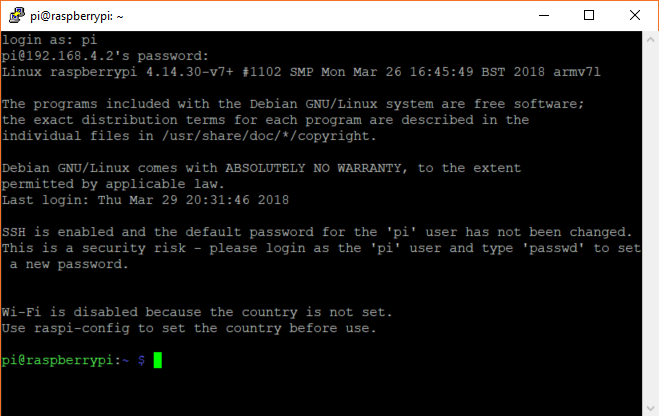
Once SSH connects, enter the default login credentials:
- Username: pi
- Password: raspberry
You should be presented with a command prompt, if all goes well.
WiFi with DHCP
If you don't want to mess with extra hardware or use Linux to modify the Raspbian filesystem, then you may want to consider having the Raspberry Pi connect to your local WiFi access point, finding its IP address, and logging in over SSH.
Enable WiFi
With the SD card plugged into your computer, navigate to the boot partition. In the root directory, create a file named wpa_supplicant.conf. The next time you boot up your Raspberry Pi, this file will automatically be moved to the /etc/wpa_supplicant/ directory in the filesystem.

Edit the file using your text editor of choice (on Windows, something like Notepad++ is recommended). Copy in the following text. Change \
language:bash
ctrl_interface=DIR=/var/run/wpa_supplicant GROUP=netdev
update_config=1
country=<YOUR TWO LETTER COUNTRY CODE>

network={
    ssid="<YOUR NETWORK NAME>"
    psk="<YOUR NETWORK PASSWORD>"
    key_mgmt=WPA-PSK
}
Save and exit.
Enable SSH
In 2016, much of the Internet slowed to a crawl as a result of the IoT DDoS attack brought about by the Mirai botnet. In response to vulnerable IoT systems with default username and password logins, the Raspberry Pi Foundation decided to disable the SSH connection by default on all future releases of Raspbian. As a result, we now need to enable SSH so we can log in over a network connection. You can read more about the reasonings for this here.
In the boot partition, simple create an empty file with the name ssh.
Unmount the SD card from your host computer and insert it into the Raspberry Pi.
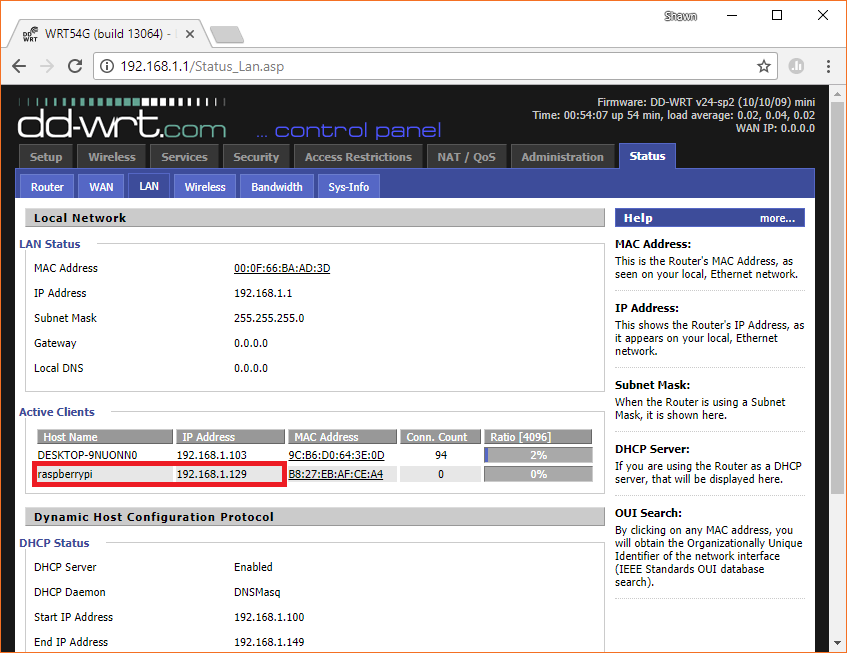
Find the Raspberry Pi's IP Address
Power on your Raspberry Pi and wait for it to connect to your WiFi network. Open up your wireless router's configuration page (for example, by typing in 192.168.1.1 into a browser window). From there, find your router's DHCP lease table and make a note of your Raspberry Pi's IP address.
Connect Over SSH
Secure Shell (SSH) gives us a terminal into an operating system over a network and encrypts the traffic, giving us a level of security. Depending on your host operating system, you have a number of options available to you.
Windows
PuTTY is an easy-to-use SSH, Telnet, and Serial terminal client. Open PuTTY, and set the Host Name to the IP address we found in the previous step and Port to 22.
Click Open. If asked about caching a host key, click Yes.
Mac and Linux
The easiest way to connect to another computer over SSH is to use the ssh command line tool built into most distributions of Linux and Mac OS. Simply open up a terminal and type:
language:bash
ssh <IP ADDRESS FROM PREVIOUS STEP>
Log In
Once SSH connects, simply enter the default login credentials:
- Username: pi
- Password: raspberry
You should be presented with a command prompt, if all goes well.
Resources and Going Further
At this point, you should be logged in to your Raspberry Pi over some kind of terminal (e.g. serial, SSH). You have the power of Linux at your fingertips! You can begin writing code and calling commands as you wish.
A good source of documentation about the Raspberry Pi is the Embedded Linux Raspberry Pi Wiki Page.
If you'd like to turn your Raspberry Pi into a WiFi access point, see this tutorial:
Setting up a Raspberry Pi 3 as an Access Point
Looking for some inspiration for your Raspberry Pi? Check out these tutorials: