Digital Sandbox Experiment Guide
 jimblom,
  bri_huang
14: Opto-Theremin (Addon)
In this experiment we'll attach a speaker to the Sandbox, and turn it into a musical instrument! By using the light sensor to control our speaker's pitch, we can create a light-controlled theremin - a non-contact, electronic musical instrument.
Note: This experiment requires the Digital Sandbox Add-On Kit, purchased separately.
Background Information
By precisely modulating a pin, the Digital Sandbox can create electronic waves which, when routed through a loudspeaker, can produce a musical tone. We can program the Sandbox to control two characteristics of musical tone: pitch and duration.
A tone's pitch is what we perceive when we think of a note as being very high (screams, forks scratching plates, etc.) versus very low (like earth-rumbling bass). The pitch of a tone is very closely related to the frequency played through a speaker. If we toggle a pin from HIGH-to-LOW then LOW-to-HIGH 440 times per second, for example, it produces a 440 Hz (hertz) frequency - a "middle A" pitch. Humans can hear frequencies ranging from 20 (low-pitch, bass) to 20,000 Hz (high-pitch, "ow, my ears").
We can also program the duration of a tone - the length of time a pitch is played. In our program we'll use the delay function to set the duration. Playing a tone with the Sandbox is very easy. Just give it a pitch and it'll start toggling the output pin for you. Much like analog output, you can set it and forget it; the tone won't stop playing until you tell it to.
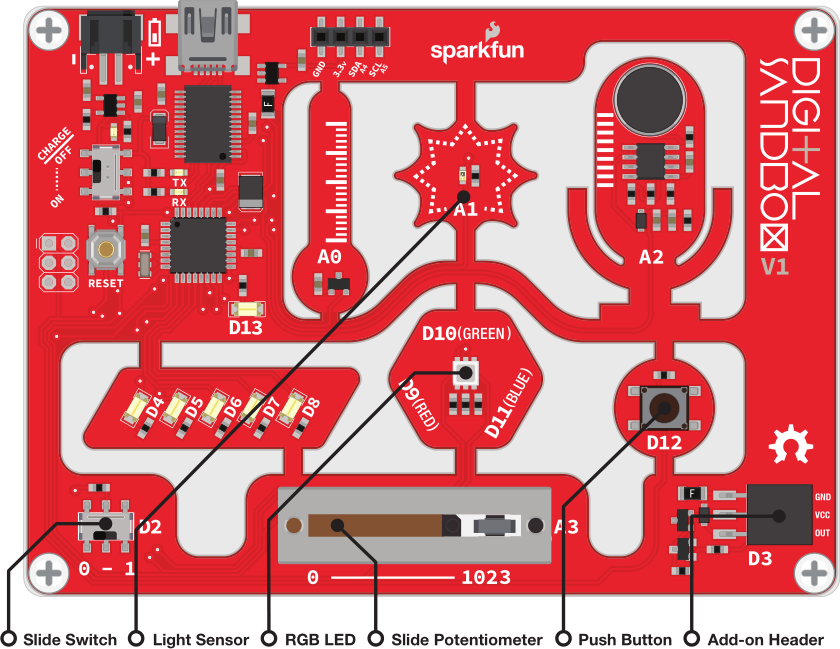
Active Parts
Code Components
This program introduces the Tone and No Tone block. Here's the full layout:
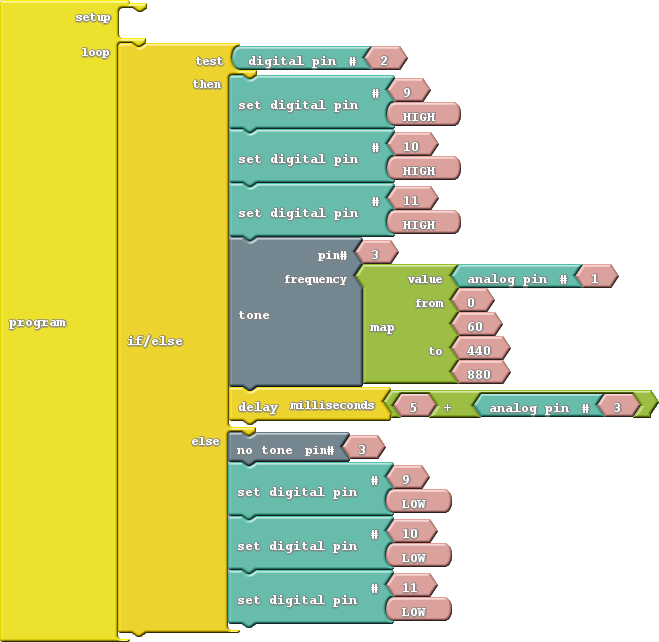
- Tone: This block takes two inputs: a pin number and a frequency. The pin number can be any digital pin, but in this case we'll use the expansion connector on pin 3. Frequency can be anything from 31 Hz to the extent of your audible range.
A tone initiated by the Tone block will go on and on until you call a No Tone block. No Tone simply halts a pin from playing a tone. Both of these blocks can be found under the Utilities bin. - Map: This handy function maps a value from one range to another. In the example above, we're taking a value (the output from A3) between zero and 60, and mapping that to a range from 440 to 880. So an analog reading of zero becomes 440, and a reading of 60 becomes 880, anything in between is relative to those two ranges. The map function can be especially useful in mapping an analog input (0-1023) to an output (0-255).
Do This
Arrange your blocks as shown in the image above, and upload to the Sandbox!
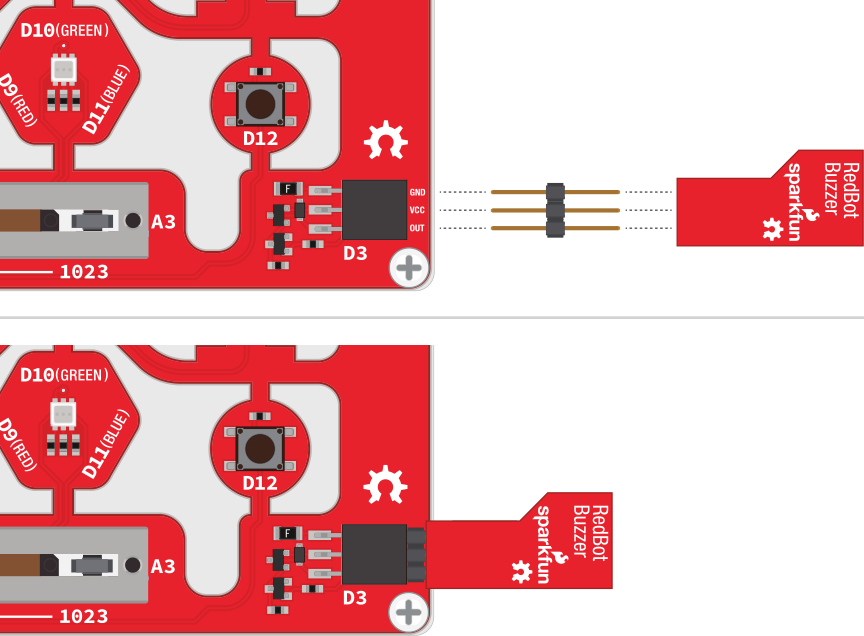
You'll also need to connect the speaker to the expansion connector. Before you can do that, you will need to break off one group of three pins from the male breakaway headers. Now, you can connector the buzzer, with the top side facing down, to the expansion connector as shown in this image:
As fun as the opto-thermin may be, the sound is considered grating by some, so the code implements a simple ON/OFF function. Slide the switch over to the "1" position to turn the opto-theremin on.
Once the theremin is on, the speaker should start making noises. Try covering the light sensor; does the pitch change? We've turned the RGB LED white, so you can try to corral the light from that to control the light sensor.
You can adjust the duration of the tone by sliding the potentiometer. Slide the pot all the way to zero to get a really fast "zapper" sound, or slide to the right to create a soothing, slow sound.
Further Explorations
- Try adding a "rest" function to your opto-theremin. Use the button to intermittently cut off the sound output.
- Instead of using the Sandbox as a musical instrument, can you program it to play a written piece of music? Using a series of tones and delays, try reproducing the chorus of your favorite song!
- Give yourself a hearing test! What's the highest frequency you can hear? Can you hear tones others can't? Can your pet hear pitches that you can't?