Digital Sandbox Experiment Guide
 jimblom,
  bri_huang
1: Exploring Blink
Now, we didn't exactly cheat in experiment zero, but the Blink block was a bit of a shortcut. What if you wanted to speed up the blinking? Or change how long it's on versus how long it's off? Or even blink something other than that wimpy little yellow LED?
Background Information
This experiment digs into the anatomy of the Blink block. We can customize an LED blink with a combination of two blocks -- Set Digital Pin and Delay Milliseconds.
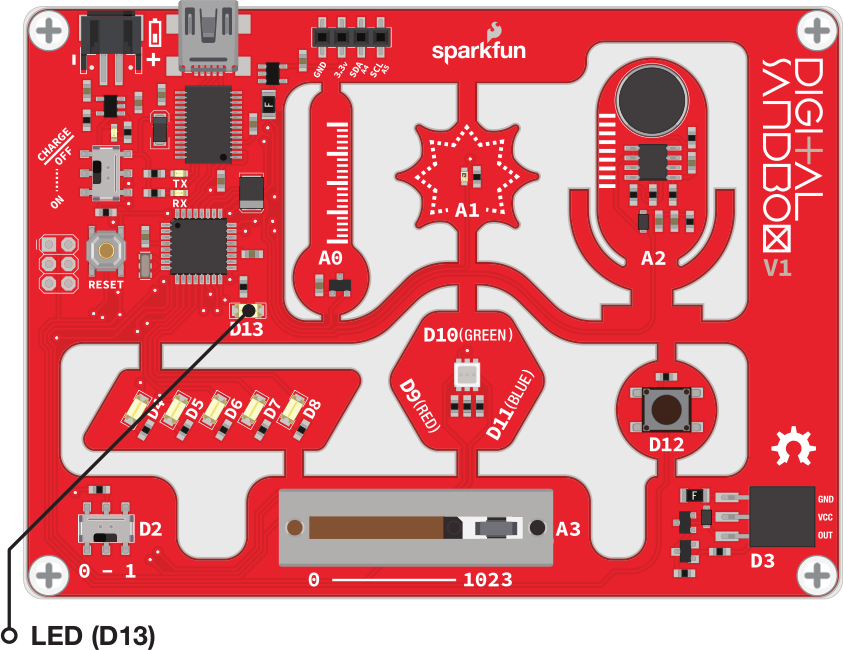
This experiment introduces the concept of digital output. We call the Sandbox's LEDs "outputs," because it's an effect that the board produces.
The term "digital" means that the output can only take one of two states: ON or OFF. We may also refer to those two opposing states as HIGH/LOW or 1/0. When an output connected to an LED is HIGH, the LED turns on. When the output is LOW, the LED turns off.
Active Parts
Code Components
Here is the set of blocks we'll use to create this drawing:
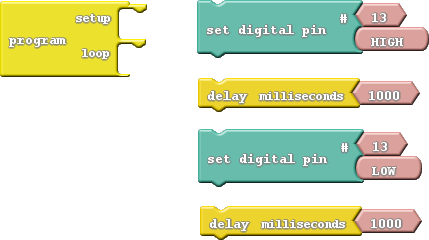
Aside from the Program block (which you should include in every drawing), there are two new blocks to be added:
- Set Digital Pin: This block sets an output to either HIGH or LOW, so it can be used to turn the LED on or off. Find this block under the Pins bin. When you drag this block over, it includes a pair of pink blocks containing "13" and "HIGH." Let's only concern ourselves with the bottom pink block for now.
- HIGH/LOW block: If you mouse over this block, a drop-down arrow will appear. Click the arrow and you can change the value of the block to either "HIGH" or "LOW." This determines which of the two states you're setting the digital output to.
- Delay Milliseconds: The Digital Sandbox runs code so fast that sometimes we need to slow it down with a delay. This block will halt the Sandbox from doing anything for a specified number of milliseconds. There are 1000 milliseconds (ms) in a second, so delaying for 1000ms will stop for one second. Find this block under the Control bin.
Do This
Organize and snap together the Set Digital Pin and Delay Milliseconds blocks so they alternate -- teal, yellow, teal, yellow. Then put the group of four blocks in the loop section of the Program block. Then Upload the code.
You should see a very familiar sight. But this time you have control over the blink rate! Adjust the value in the Delay Milliseconds block(s). What happens if you make the delays shorter? What happens if the two delays are not for the same amount of time?
The Digital Sandbox operates at 8MHz -- there's a clock in there that ticks eight million times per second. That means it can run millions of lines of code per second. Without any delays in the program, the digital output would flick on and off so fast you wouldn't be able to tell if it's actually on or off.
Further Explorations
- How short can you make the delays and still notice a blink? Ten milliseconds? One millisecond?
- What happens if you take the Delay Milliseconds block out of the program?
- While digging around for the Delay Milliseconds block, you may have discovered a Delay Microseconds block as well. What happens if you swap that in?