Basic Character LCD Hookup Guide
Arduino Examples: LiquidCrystal Library
Normally, you would need to read the HD44780 controller chip's extensive datasheet to determine how to control this display. Fortunately, the Arduino IDE comes with a built-in library called LiquidCrystal, which does all the hard work for you. We'll look at one of the ten examples provided from Arduino.
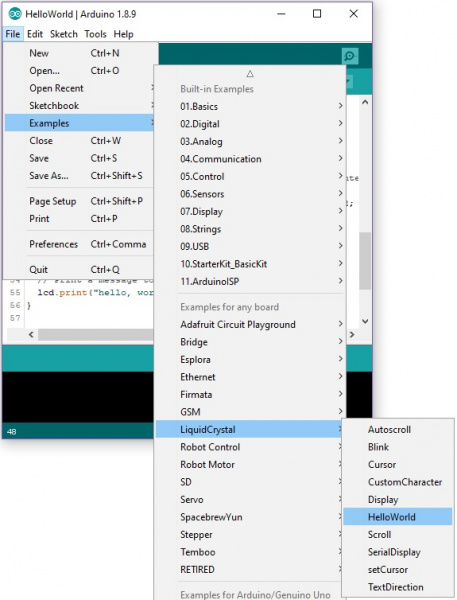
Open the Arduino IDE, and load the example program: File > Examples > LiquidCrystal > HelloWorld.
Once open, you will need to adjust the pin connections based on your circuit. In this case, we'll need to adjust the pin definitions based on our circuit that we connected earlier. Head to the line where the pins are defined.
language:c
const int rs = 12, en = 11, d4 = 5, d5 = 4, d6 = 3, d7 = 2;
LiquidCrystal lcd(rs, en, d4, d5, d6, d7);
Then adjust the pin definitions based on your connections.
language:c
const int rs = 13, en = 12, d4 = 11, d5 = 10, d6 = 9, d7 = 8;
LiquidCrystal lcd(rs, en, d4, d5, d6, d7);
You can also copy and paste the code below. Just make sure to select the correct board (in this case the Arduino/ Genuino Uno) and the COM port that the Arduino enumerated on. Then upload the code to your Arduino.
language:c
/*LCD-Hello_world.ino

 Modified By: Ho Yun "Bobby" Chan
 SparkFun Electronics
 Date: 5/22/2019
 License: This code is public domain.

 Demonstrates the use a 16x2 LCD display.  The LiquidCrystal
 library works with all LCD displays that are compatible with the
 Hitachi HD44780 driver. There are many of them out there, and you
 can usually tell them by the 16-pin interface.

 This sketch prints "Hello World!" to the LCD
 and shows the time since the Arduino was turned on.

  Hardware Hookup:

    lCD VSS pin to GND
    LCD VCC pin to 5V
    10kΩ Potentiometer to LCD VO pin (pin 3)
    LCD RS pin to digital pin 13
    LCD R/W pin to GND
    LCD Enable pin to digital pin 12
    .
    .
    .
    LCD D4 pin to digital pin 11
    LCD D5 pin to digital pin 10
    LCD D6 pin to digital pin 9
    LCD D7 pin to digital pin 8
    LCD-Backlight - Anode to 10KΩ resistor to +5V (optional depending on your LCD)
    LCD Backlight - K to GND

 Library originally added 18 Apr 2008
 by David A. Mellis
 library modified 5 Jul 2009
 by Limor Fried (http://www.ladyada.net)
 example added 9 Jul 2009
 by Tom Igoe
 modified 22 Nov 2010
 by Tom Igoe
 modified 7 Nov 2016
 by Arturo Guadalupi

 http://www.arduino.cc/en/Tutorial/LiquidCrystalHelloWorld=

https://learn.sparkfun.com/tutorials/basic-character-lcd-hookup-guide

*/

// include the library code:
#include <LiquidCrystal.h>

//initialize the library by associating any needed LCD interface pin
//with the arduino pin number it is connected to
const int rs = 13, en = 12, d4 = 11, d5 = 10, d6 = 9, d7 = 8;
LiquidCrystal lcd(rs, en, d4, d5, d6, d7);

void setup() {
  //set up the LCD's number of columns and rows:
  lcd.begin(16, 2);
  //Print a message to the LCD.
  lcd.print("Hello, world!");
}

void loop() {
  //set the cursor to column 0, line 1
  //(note: line 1 is the second row, since counting begins with 0):
  lcd.setCursor(0, 1);
  // print the number of seconds since reset:
  lcd.print(millis() / 1000);
}
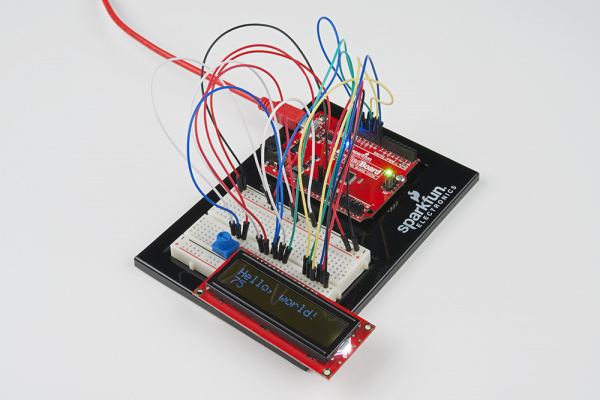
After uploading it to your board, a "hello, world!" should appear on the display. The LCD will also display the time in seconds since the Arduino was reset. You should see something similar to the image below. Depending on how you wrote the code, the letter h might be upper or lower case.
If you see "hello, world!", congratulations! Take a look at the example sketch, and try modifying it to display "hello, your name!" or any other text you'd like. Also, take a look at the other example LiquidCrystal sketches, and the documentation on the Arduino.cc website to see how to write sketches to take advantage of the display. Just make sure to adjust the pin definitions based on how you wired the LCD to your Arduino.

