Basic Character LCD Hookup Guide
 MikeGrusin,
  bboyho
Custom User-Defined Graphics
If you need to make custom characters, there are a few online tools to generate a user-defined graphics. Check out the link below to create your own custom graphic or use any characters made in the pattern library.
For simplicity, we'll just use one of the patterns already generated in the library. Let's create an empty heart. First, you'll need to select your character size. The display that we are using in this example is an 8x5 character space. You'll need to select "Character size: 5 by 8" from the drop down menu so that there is 8 rows and 5 columns of pixels.
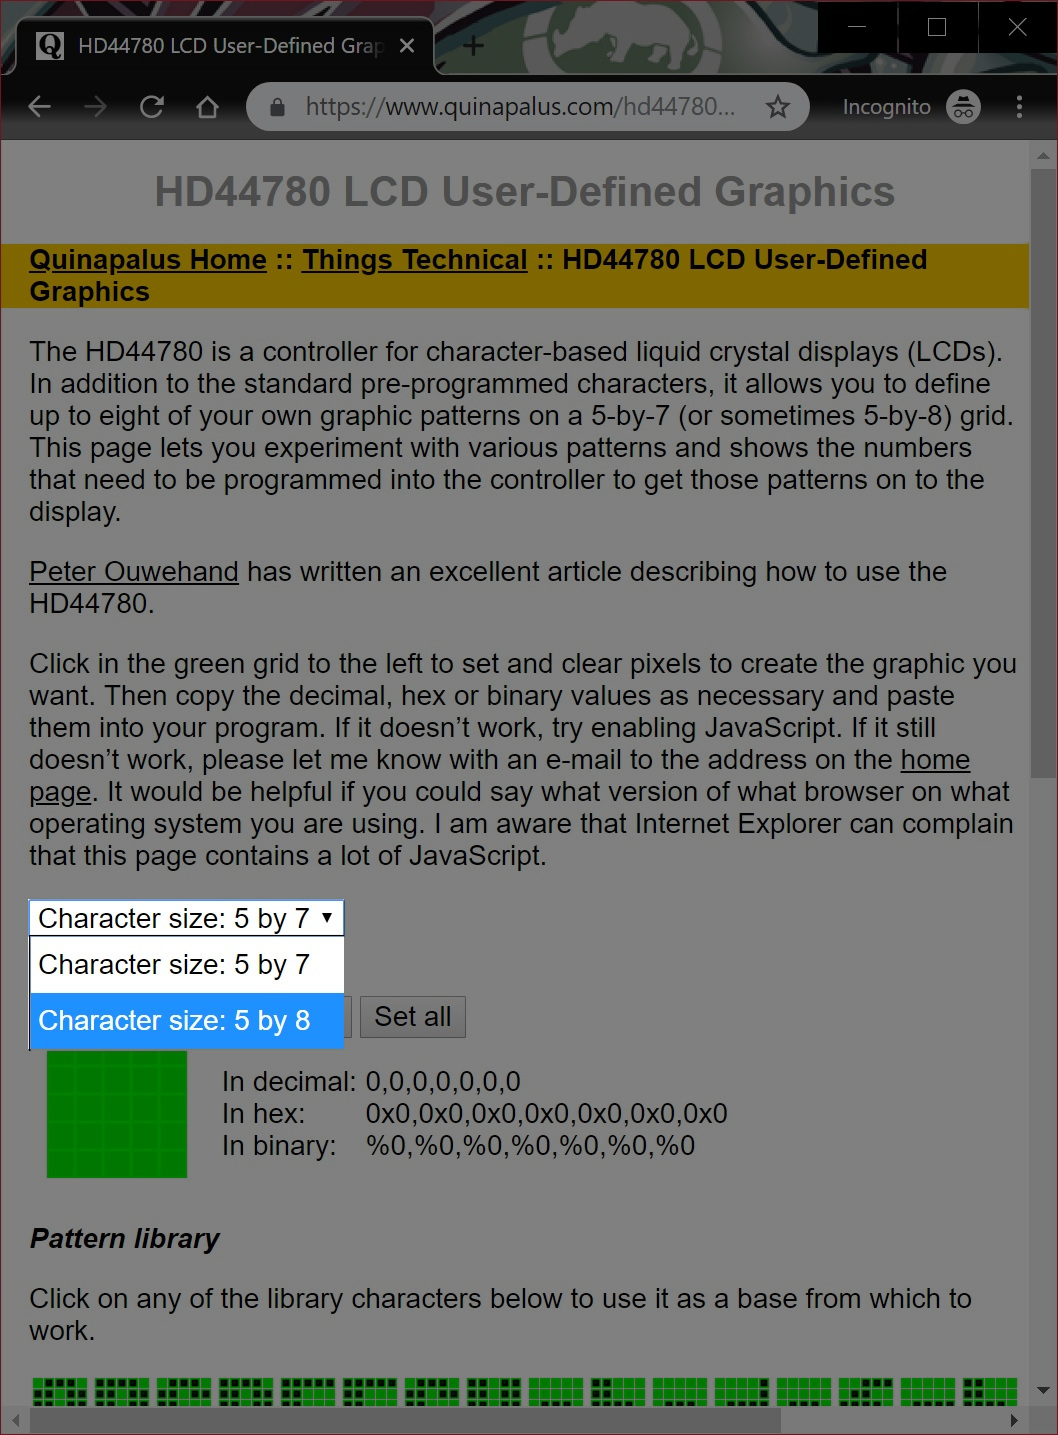
Then scroll down the webpage and click on the empty heart listed under the Pattern library. You will be presented with values representing the custom character in decimal, hex, and binary.

We'll use the binary representation of the empty heart. Each value between the comma represents a slice of the custom character space starting from the top of your character space. A pixel is cleared when the value is 0 and darkened when the value is 1.
language:bash
%0,%0,%1010,%10101,%10001,%1010,%100,%0
You will need to copy the values and format it in your code. Since we are using an Arduino to control the basic character display, we'll place the values within an array. We'll name this array emptyHeart[]. To make it easier to read and ensure that the pixel is turned off, we will fill in the most significant bits with 0's to the left of the values so that each slice from the custom character space has a size of 1x5. After formating the values, your array should look like the code below in Arduino.
language:c
byte emptyHeart[8] = {
  B00000,
  B00000,
  B01010,
  B10101,
  B10001,
  B01010,
  B00100,
  B00000
};
Congratulations! You have just created a custom character! Repeat the steps for up to 8x custom characters as necessary.
Example Code
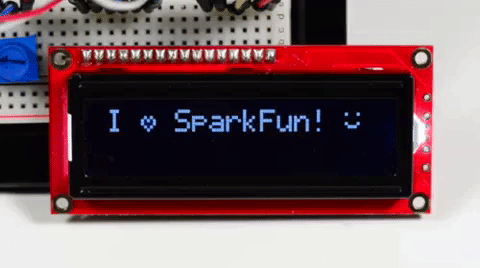
Now that we have created a custom user-defined graphic, let's display it on a screen with a message. The example code below loads three custom characters and displays them on the LCD with a message. Copy the code and paste in the Arduino IDE. Select your board (in this case the Arduino/ Genuino Uno) and COM port. Then upload the code to your Arduino.
language:c
/*LCD-CustomChar.ino

  By: Ho Yun "Bobby" Chan
  SparkFun Electronics
  Date: May 16th, 2019
  License: This code is public domain.

  Description: Demonstrates the use a 16x2 LCD display
  with custom user-defined graphic based on the example
  used in the Arduino.cc's Reference Library: createChar().
  A message will display with an empty and full heart!

  Hardware Hookup:

    lCD VSS pin to GND
    LCD VCC pin to 5V
    10kΩ Potentiometer to LCD VO pin (pin 3)
    LCD RS pin to digital pin 13
    LCD R/W pin to GND
    LCD Enable pin to digital pin 12
    .
    .
    .
    LCD D4 pin to digital pin 11
    LCD D5 pin to digital pin 10
    LCD D6 pin to digital pin 9
    LCD D7 pin to digital pin 8
    LCD-Backlight - Anode to 10KΩ resistor to +5V (optional depending on your LCD)
    LCD Backlight - K to GND

  For more information about using the creatChar() function,
  make sure to check out the Arduino.cc reference and associated tutorial:

  https://www.arduino.cc/en/Reference/LiquidCrystalCreateChar
  https://learn.sparkfun.com/tutorials/basic-character-lcd-hookup-guide
*/

//Include the library code:
#include <LiquidCrystal.h>

// initialize the library by associating any needed LCD interface pin
// with the arduino pin number it is connected to
const int rs = 13, en = 12, d4 = 11, d5 = 10, d6 = 9, d7 = 8;
LiquidCrystal lcd(rs, en, d4, d5, d6, d7);

//Load custom charcter into CGRAM
//Note: Up to 8 characters can be saved

byte smiley[8] = {
  B00000,
  B10001,
  B00000,
  B00000,
  B10001,
  B01110,
  B00000,
};

byte emptyHeart[8] = {
  B00000,
  B00000,
  B01010,
  B10101,
  B10001,
  B01010,
  B00100,
  B00000
};

byte fullHeart[8] = {
  B00000,
  B00000,
  B01010,
  B11111,
  B11111,
  B01110,
  B00100,
  B00000,
};

void setup() {
  //Load a custom character (glyph) for use on the LCD
  lcd.createChar(0, smiley);
  lcd.createChar(1, emptyHeart);
  lcd.createChar(2, fullHeart);

  //Set up the LCD's number of columns and rows:
  lcd.begin(16, 2);

  //Clear the display
  lcd.clear();
}

void loop() {
  //Set the cursor to the 0,0 position (top left corner)
  lcd.setCursor(0, 0);

  //Display a message with the custom characters
  lcd.print("I ");
  lcd.write(byte(1)); //display custom character related associated with num 1
  lcd.print(" SparkFun! ");
  lcd.write(byte(0)); //display custom character related associated with num 0
  delay(1000);

  //Set the cursor to the 0,0 position (top left corner)
  lcd.setCursor(2, 0);

  lcd.write(byte(2)); //display custom character related associated with num 1
   delay(1000);
}
After uploading, a message will display with an empty and full heart!