Wireless Remote Control with micro:bit
 bboyho
 Experiment 1: Sending and Receiving a Signal
Introduction
There are a few methods of transmitting data between two or more micro:bits. You can send a number, or a string. For simplicity, we will send one number between two micro:bits.
radio code blocks? Try looking at the MakeCode reference guide!
Parts Needed
You will need the following parts:
- 2x micro:bit Boards
- 2x Micro-B USB Cables
For a few items listed, you will need more than one unit (i.e. micro:bits, micro-B USB cables, etc.). You may not need everything though depending on what you have. Add it to your cart, read through the guide, and adjust the cart as necessary.


micro:bit Board
DEV-142081.1: Sending
For this part of the experiment, we are going to send a number from one micro:bit to another micro:bit on the same channel.
Hardware Hookup
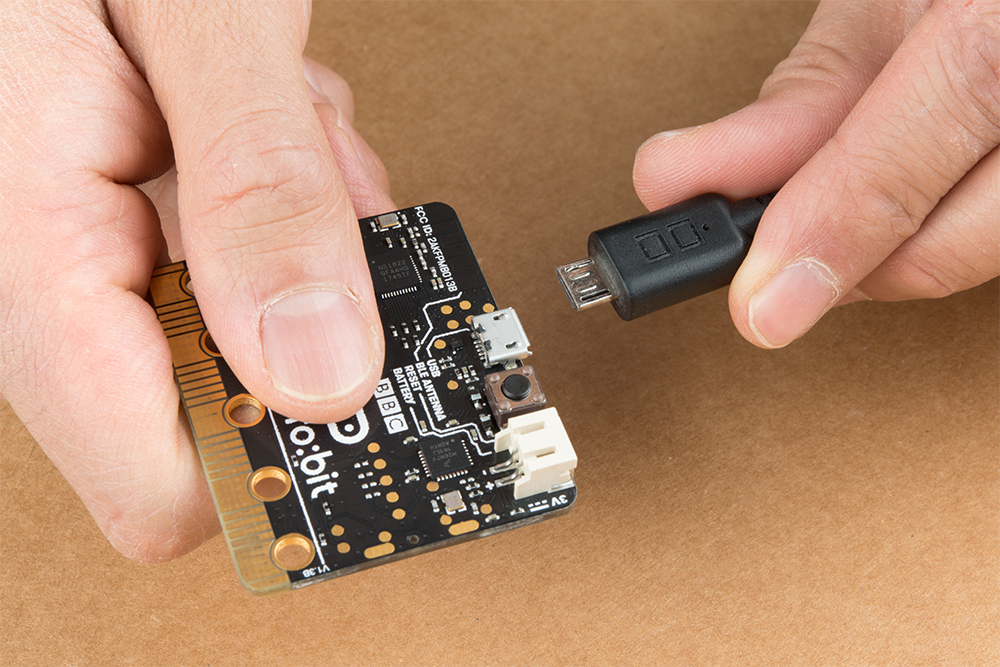
Connect the first micro:bit to your computer via USB cable.
Running Your Script
We are going to use Microsoft MakeCode to program the micro:bit. You can download the following example script and move the *.hex file to your micro:bit. Or use it as an example to build it from scratch in MakeCode.
Code to Note
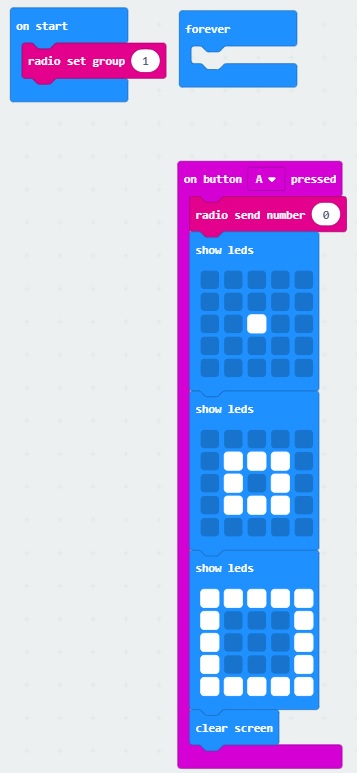
When the micro:bit is powered up, we'll want it set up the radio to a certain channel. In this case, we head to the Radio blocks, grab the radio set group __ block, and set it to 1. We will use the built-in button A on the micro:bit. From the Input blocks, we use the on button A pressed, Once the button is pressed, we will transmit a number 0 wirelessly. For feedback, we will use the Basic blocks to have the LEDs animate with a dot expanding out into a square to represent a signal being sent out. Once the animation is finished, we will clear the screen.
1.2: Receiving
For this part of the experiment, we are going to have a second micro:bit receive a number from the first micro:bit.
Hardware Hookup
To avoid confusion when uploading code, unplug the first micro:bit from your computer. Then connect the second micro:bit to your computer via USB cable.
Running Your Script
Download the following example script and move the *.hex file to your micro:bit. Or use it as an example to build it from scratch in MakeCode. You will need to open a new project to receive the data from the first part of this experiment.
Code to Note
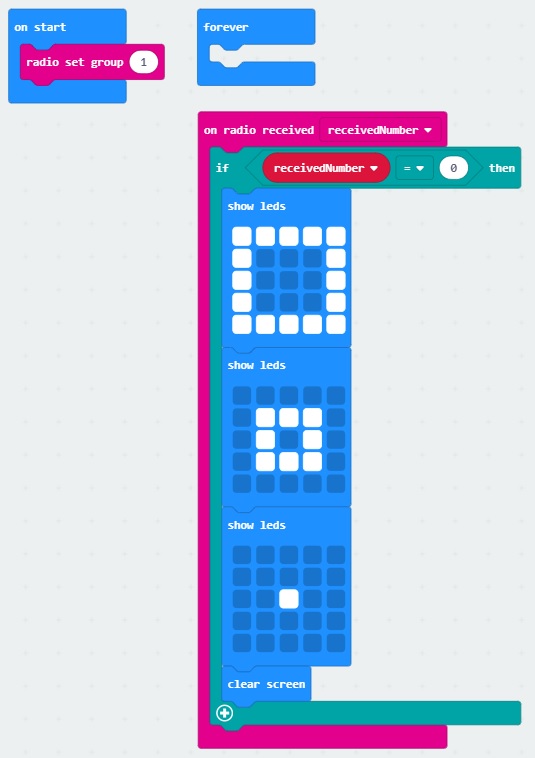
When the second micro:bit is powered up, we'll want to set the radio to the same channel as the first micro:bit. In this case, it will be 1. Using the on radio received __________ block, we will want to check to see what signal was received. In this case, we will want to check for a receivedNumber that is equal to 0 since a number was sent from the first micro:bit. Using the if statement from the Logic blocks, we will want to check if the variable holding the received number matches 0. If it matches, we will want the micro:bit to do something. Visually, using LEDs would be the easiest so an animation of a square shrinking to a dot was chosen to represent the received signal. Once the animation is finished, we will want to clear the screen until we receive another signal.
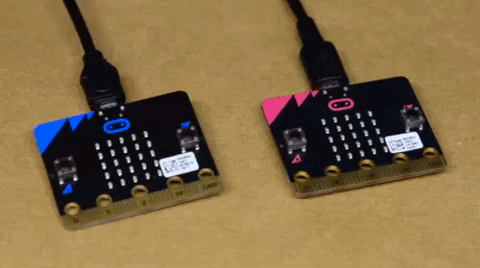
What You Should See
Pressing on button A with the first micro:bit (our transmitting) will send a number out in channel 1. In this case, the number that is transmitted is 0.
The second micro:bit (our receiving) will take that number that was sent on channel 1 and do something based on the condition statement. In this case, there is an animation using the LED array to indicate when we have received the number.