Qwiic IR Array (MLX90640) Hookup Guide
 Englandsaurus
Example Code
Note: This example assumes you are using the latest version of the Arduino IDE on your desktop. If this is your first time using Arduino, please review our tutorial on installing the Arduino IDE.
Teensyduino Add-On
If you haven't used Teensy before, you'll probably need to download and install the extension for the Arduino IDE called Teensyduino, located here.
Library
Melexis has written a library to control the Qwiic IR Array with MLX90640. You can obtain these libraries by clicking the below button, which also includes the SparkFun written example sketches from the GitHub repository. Just makes sure the associated files are in the same path when opening each example.
Example 1 - Basic Readings
Once you've downloaded the example sketches and library, go ahead and open the first example under SparkFun_MLX90640_Arduino_Example-master > Firmware > Example1_BasicReadings > Example1_BasicReadings. To initialize the sensor, we first attempt to talk to the MLX90640 with the isConnected() function. Looking closer at our setup() loop reveals that we extract a set of paramaters from the MLX using MLX90640_DumpEE and MLX90640_ExtractParamaters. This only needs to be done once in the setup() loop before the board is ready to use, the code is shown below.
language:c
void setup()
{
  Wire.begin();
  Wire.setClock(400000); //Increase I2C clock speed to 400kHz

  Serial.begin(9600);
  while (!Serial); //Wait for user to open terminal
  Serial.println("MLX90640 IR Array Example");

  if (isConnected() == false)
  {
    Serial.println("MLX90640 not detected at default I2C addres. Please check wiring. Freezing.");
    while (1);
  }
  Serial.println("MLX90640 online!");

  //Get device parameters - We only have to do this once
  int status;
  uint16_t eeMLX90640[832];
  status = MLX90640_DumpEE(MLX90640_address, eeMLX90640);
  if (status != 0)
    Serial.println("Failed to load system parameters");

  status = MLX90640_ExtractParameters(eeMLX90640, &mlx90640);
  if (status != 0)
    Serial.println("Parameter extraction failed");

  //Once params are extracted, we can release eeMLX90640 array
}
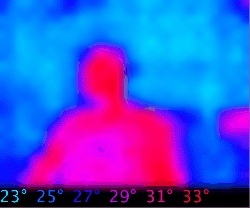
Once you've selected your board and serial port, upload the sketch to your Teensy. Then open the serial monitor set at 115200 baud. The output should look something like the below image, with the temperature values of each pixel being displayed in °C.

Example 2 - Output To Processing
Note: Processing is a software that enables visual representation of data, among other things. If you've never dealt with Processing before, we recommend you also check out the Arduino to Processing tutorial. Follow the below button to go ahead and download and install Processing.
This next example involves the Processing IDE. Processing listens for serial data, so we'll need to get our Arduino producing serial data that makes sense to Processing. To pull up the next example, go to SparkFun_MLX90640_Arduino_Example-master > Firmware > Example2_OutputToProcessing > Example2_OutputToProcessing to open the example sketch. This sketch simply prints a comma separated list of our temperatures over serial for Processing to listen to.
Once this sketch is uploaded, we need to tell Processing how to turn this data into a visualization. The Processing sketch to do this is located in the same folder as Example 2. So go to the sketch folder to open the MLXHeatCam file in Processing. Attempting to run the sketch will show us available serial ports in the debug window.
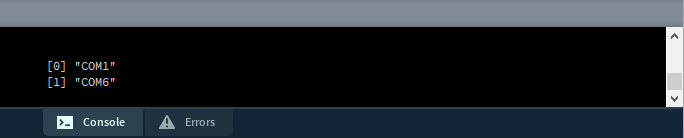
Identify which serial port your Teensy is on. For instance, my Teensy is on COM6, which corresponds to [1] in the above image, so I will need to change 0 to 1 in the following line to ensure Processing is listening in the right location.
language:c
myPort = new Serial(this, Serial.list()[0], 115200);
Once I've done this, we should be able to run the Processing sketch and it will give us a nice visualization of the pixels on our Qwiic IR Array with MLX90640. Move your face or hand in front of the sensor and see what it looks like on the screen. The output should look similar to the image below. Note that the camera can only hit about 4 Hz due to the data rate over I2C. The hypothetical refresh rate of the MLX90640 is 64 Hz, but unless you have a microcontroller capable of a much faster I2C rate, you won't be hitting framerates anywhere near that.