Photon Weather Shield Hookup Guide
This Tutorial is Retired!
Note: V11 of the Photon Weather Shield utilizes the Si7021 for humidity and temperature sensing as opposed to the HTU21D.
View the updated tutorial: Photon Weather Shield Hookup Guide V11
Particle Libraries and the Particle IDE
The Particle team has created both an online and a desktop version of their programming IDE. The online version is referred to as Particle Build. The desktop version is referred to as Particle Dev. It can be downloaded here. Documentation on how to use Particle Dev can be found here. The libraries and example sketches presented throughout this tutorial will work in both versions, however, the means by which each is accomplished will vary slightly.
When dealing with many libraries, you may find it easier to use the Particle Dev desktop IDE as it is easier to add entire project folders. However, if you prefer to use the online IDE or are using a Linux computer, which does not have a desktop version of the IDE at this time, you can still follow along.
Once you have the IDE of your choice setup, visit GitHub, and download the SparkFun Photon Weather Shield Repository. You can also download the .zip file by clicking the link below.
Once the download is complete, open the folder, and navigate to the Firmware folder. Each example uses a variety of different libraries. There are too many to go over in detail here. However, they are all linked below if you would like to learn more about a given library.
- SparkFun Photon Weather Shield Particle Library - Used to communicate to the on-board I2C sensors.
- OneWire Particle Library - Used to communicate with any DS18B20 waterproof temp senors.
- Dallas Temperature Particle Library - Used to communicate with any DS18B20 waterproof temp senors.
- SparkFun Phant Particle Library - Used to post weather data to data.sparkfun.com.
- SparkFun Serial Graphic LCD Particle Library - Used to print weather data to a serial graphic LCD.
Each project folder in the repository contains the corresponding library files needed to compile that sketch. It's redundant as far as storage is concerned, but it makes importing each project folder into Particle Dev much easier.
Adding Projects to Particle Dev
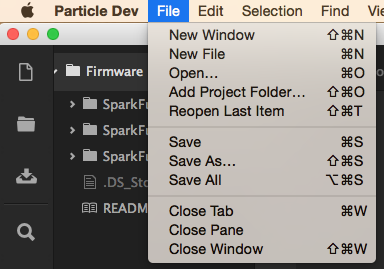
To add a project folder to Particle Dev, simply click File -> Add Project Folder, and select the project of your choice.
You can learn more about this process in our Photon Development Guide.
Adding Projects to Particle Build
Unfortunately, there is no way to import project folders into the online IDE at this time, so each library will need to be added individually. Adding a library in Particle Build requires you to search for that library in their library manager. Once found, you can click the Include In App button to add that library to your project.
Each example will state which libraries are needed for it to work.
You can learn more about this process in our Photon Development Guide.
Now that you know how to work within the Particle IDE, lets upload some code!

