Photon Remote Temperature Sensor
This Tutorial is Retired!
This tutorial covers concepts or technologies that are no longer current. It's still here for you to read and enjoy, but may not be as useful as our newest tutorials.
 jenfoxbot
 Introduction
Phant is No Longer in Operation
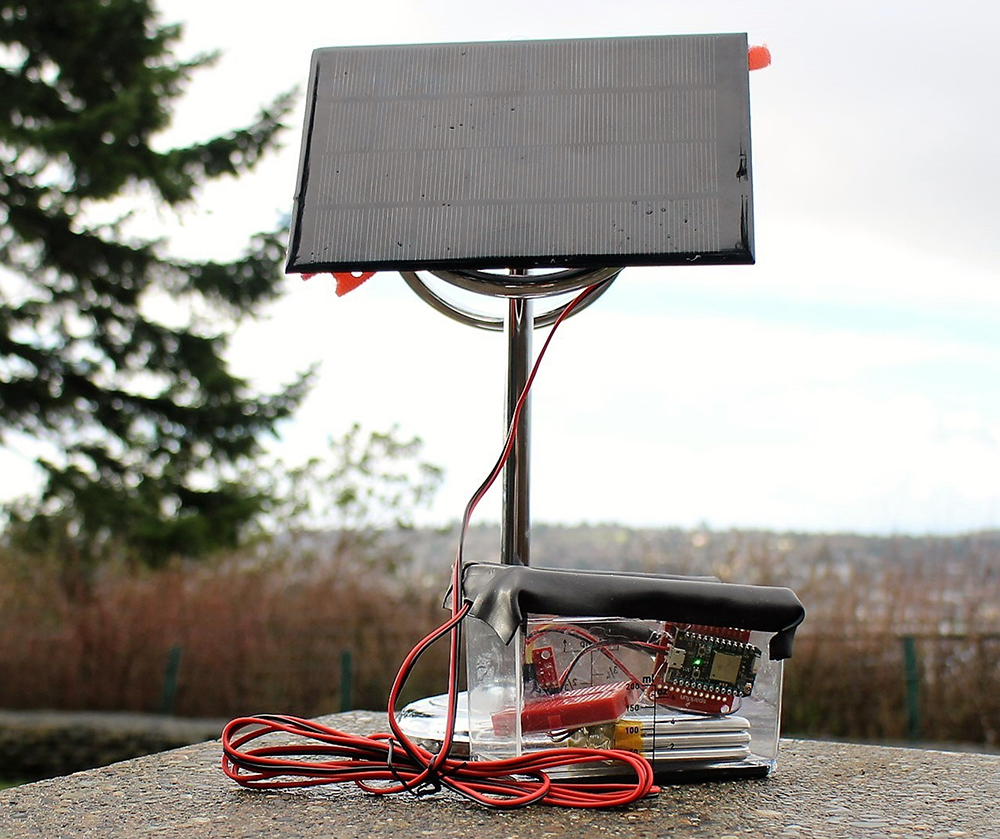
The scientific method allows us to examine the universe and its natural phenomena. Through collection and analysis of data, we discover historical trends to make predictions about future events. One such phenomenon that greatly impacts our daily, and long-term, lives is temperature. This tutorial shows you how to build your own remote temperature sensor that automatically uploads data to the data.sparkfun.com web service. This is a perfect, hands-on project for teaching, or learning, the difference between daily temperature fluctuations and average temperature over time, a particularly crucial distinction when discussing climate change.
This system uses the Particle Photon as the control device, a handy lil' microcontroller that easily connects to WiFi. The Photon reads in temperature data from the SparkFun TMP102 digital temperature sensor, then uploads the data to a web server for remote data acquisition and, if desired, subsequent analysis and plotting.
For all you visual learners, check out a video of the project below:
Materials
To follow along with this project at home, you'll need the following:
Electronics
- Particle Photon microcontroller
- SparkFun Photon Battery Shield
- TMP102 Digital Temperature Sensor
- 2.5 W Solar panel
- Polymer Lithium Ion Battery - 6 Ah
- Please note that the Battery Shield is intended to charge single-cell LiPo batteries. Using the triple-cell 6Ah battery will give you a longer battery life, but be aware that each cell may not be charged at the same rate.
- If you live in a sunnier climate than Seattle, you can use a lower capacity battery (e.g. 2000 mAh battery).
- Be careful with the JST connectors, and avoid pulling the wires, particularly when removing them. Check out this tutorial for an easy way to remove them.
- Six (6) Header pins
- Surface Mount DC Barrel Jack
- Four (4) Male-to-Female Breadboard Jumper Wires (or use 22-gauge insulated wire)
- Breadboard (and/or PCB board)
Here's a wish list of most of the parts mentioned above for your convenience.

Qwiic Cable - Breadboard Jumper (4-pin)
PRT-14425
Qwiic Cable - 200mm
PRT-14428Casing and Installation
For electronics: Project box or waterproof tupperwear
There are tons of options for cases, just be sure it is durable, waterproof, and not made of metal (will block the WiFi signal).
Stand for solar panel (e.g. metal post, garden sign, plant holder, tripod, etc.)
While a stand is somewhat optional, it allows you to point the panel towards the sun and adjust it throughout the year to obtain maximum incident solar radiation. Check out your local thriftstore for inexpensive items to use as a stand. Be sure the stand and attached panel will withstand the elements (including wind). Alternatively, you can attach the solar panel directly to the temperature sensor case.
Tools
- Soldering iron and supplies
- Wire Strippers
- Multimeter
- Epoxy, or other electrically insulating adhesive
- Velcro (to adhere solar panel to stand)
- Drill or waterproofing electrical tape (for getting solar panel cable into case)
Recommended Reading
The goal of this tutorial is to give you enough information to get your remote temperature sensor up and running as quickly as possible, regardless of your background and experience with the components used in this project. As such, this tutorial provides only a brief mention of the underlying hardware and software elements. Check out the guides below for more in-depth information, including the I2C communication protocol used by the TMP102 sensor and the Phant library used by the data.sparkfun.com web service.
Hardware
- Guide to setting up the Particle Photon
- Guide for developing on the Photon
- Hookup Guide for Photon Battery Shield
- Datasheet for the TMP102
- Datasheets are your friend! It is highly recommended to review this datasheet, at the very least to get more familiar with datasheets.
Software
- The TMP102 temperature sensor uses I2C (Inter-Integrated Circuit) communication protocols. If you are new to this, here is a handy overview of the I2C protocol.
- This tutorial uses the data.sparkfun.com web server to host the temperature data stream.