Photon Remote Temperature Sensor
This Tutorial is Retired!
This tutorial covers concepts or technologies that are no longer current. It's still here for you to read and enjoy, but may not be as useful as our newest tutorials.
 jenfoxbot
 Program It
Read in the TMP102 Temperature Sensor
The program provided below is designed to function essentially as-is, with only a few minor changes necessary to get the system up and running. Unless you want to add more sensors, or use different sensors, you do not need to change the program code to read in the TMP102 temperature data. That said, if you are new to electronics, or I2C communication, it is still helpful to understand the basics of how the TMP102 sends data, particularly when debugging.
Quick Overview of TMP102 Data Signal
The TMP102 temperature sensor uses I2C communication, a two-wire serial interface. The two lines are SDA (Data) and SCL (Clock). The corresponding Photon pins are D0 (SDA) and D1 (SCL). The program below uses the default address of 72 (code variable TEMP102_ADDRESS) for the TMP102 sensor.
The TMP102 sensor outputs two bytes in binary (code variable BYTES_TO_READ). The first byte is the most significant byte (MSB), and the second byte is the least significant byte (LSB). The first 12 bits (out of 16) are used to indicate temperature, where one LSB is 0.0625 °C. The program is commented where these operations occur.
Review the TMP102 data sheet for more information.
Set up a Data Host
This system uses the data.sparkfun.com web service to log the TMP102 temperature data. You can remotely access the temperature data using the public URL generated when you create your data stream. To use the program provided in the next section, follow the procedure below to set up a data stream on the data.sparkfun.com server.
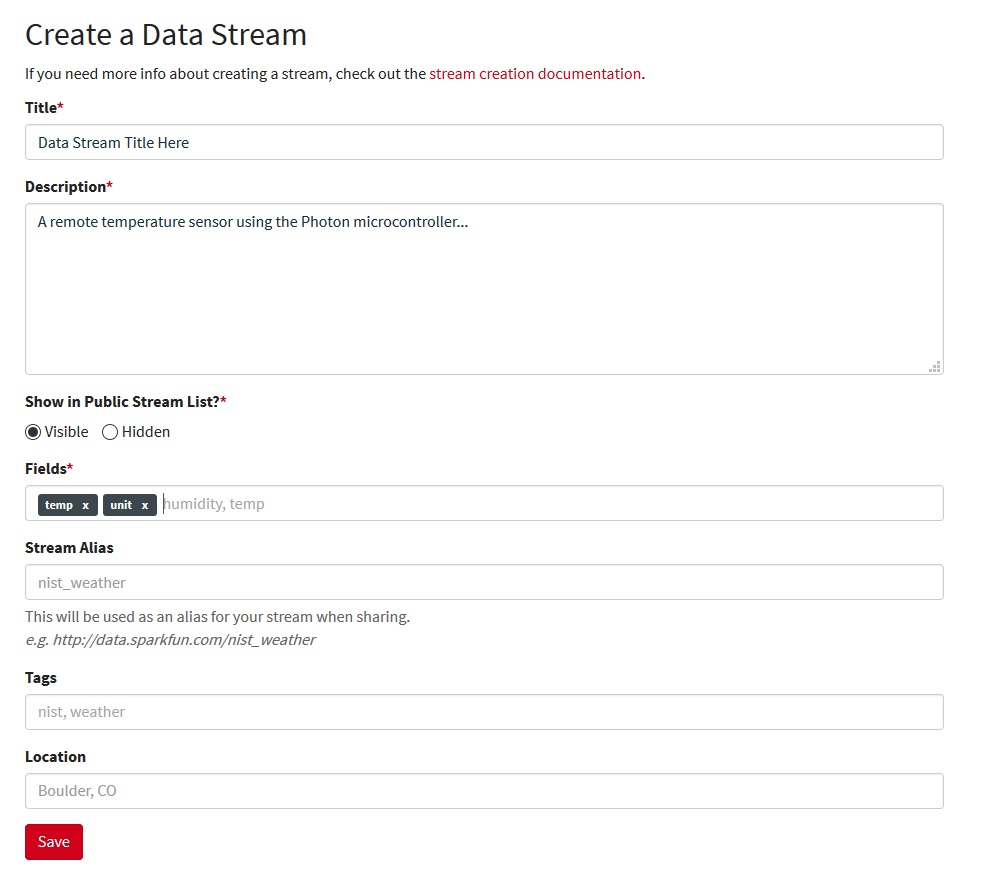
Create a data stream on the data.sparkfun.com service by clicking the Create button.
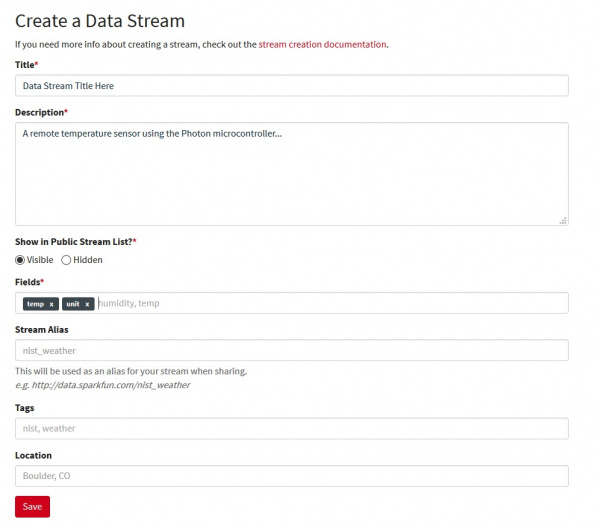
Fill in your desired title and description.
For the fields section, input "temp" and "unit". It is imperative to use these exact field names (all lower case) or the data will not upload unless you change the respective field names in the program.
Save the data stream. This will redirect you to the stream's key page. Copy all of this information and store in a secure location.
A quick overview of the keys:
Public Key – This is a long hash that is used to identify your stream and provide a unique URL. This key is publicly visible, meaning that anyone who visits your stream’s URL will be able to see this hash.
Private Key – The private key is necessary to post data to the stream. Only you should know this key.
Delete Key – This key deletes the stream, so normally you’ll want to avoid this key. Only use this key if you need to fix the field names or if you truly want to delete the data stream.
Fields – In our program, our fields are "temp", which corresponds to the temperature reading in degrees Celsius, and "unit", to let us know that our reading is in degrees Celsius. These fields set specific values and create a new log of data.
The timestamp generated is given in the UTC (Universal Time Coordinate) timezone. The easiest way to handle this timezone is to convert it to your local timezone once you've downloaded the data.
To monitor the Photon output, use the Particle driver download as described in the "Connecting Your Device" Photon tutorial.
To view the particle serial monitor, in the command prompt type
particle serial monitor. This is extremely helpful for debugging and checking to be sure the Photon is posting data to your host. The program provided in the next section includes print statements that indicate the status of the data acquisition and upload process to help facilitate the setup process. You can also use any of the serial terminals mentioned in our Serial Terminal Baiscs tutorial to view serial data from your Photon.
System Code
What you need to change in the program:
Copy and paste your data stream public key to the array called
publicKey[].const char publicKey[] = "INSERT_PUBLIC_KEY_HERE";Copy and paste your data stream private key to the array called
privateKey[].const char privateKey[] = "INSERT_PRIVATE_KEY_HERE";
What you may want to change in the program:
The posting rate (code variable
postingRate) sets how often the temperature data is uploaded to the data stream. The current post rate is ~ 20s (20000 ms). You can set a different value in line 23 of the program, reproduced below. The maximum post rate allowed by the data.sparkfun.com host is about one data point every 10 seconds (100 posts every 15 minutes).const unsigned long postingRate = 20000; //post rate to data.sparkfun.com (time in milliseconds)The temperature unit (currently in °C).
To upload data in °F, multiply
temp(line 47) by 1.8 and add 32, as shown below.int temp = (((( MSB << 8) | LSB) >> 4) * 0.0625)*1.8 + 32;Be sure to update the output unit from "C" to "F" in line 51:
postToPhant(temp, 'F');If you are comfortable with code, feel free to change anything else you want!
Photon Remote Temperature Sensor Program
You can grab the code from below, or you can get the most up to date files from the GitHub repository.
language:c
//This code was written by Ace Levenberg <acelevenberg@gmail.com> and Jennifer Fox <jenfoxbot@gmail.com>
/*
 * ----------------------------------------------------------------------------
 * "THE BEER-WARE LICENSE" (Revision 42):
 * <jenfoxbot@gmail.com> and <acelevenberg@gmail.com> wrote this file.  As long as you retain this notice you
 * can do whatever you want with this stuff. If we meet some day, and you think
 * this stuff is worth it, you can buy me a beer in return.
 * ----------------------------------------------------------------------------
 */


// This #include statement was automatically added by the Particle IDE.
//This library is used to push data to the data.sparkfun.com server.
#include "SparkFunPhant/SparkFunPhant.h"

const char server[] = "data.sparkfun.com"; // Phant destination server
const char publicKey[] = "INSERT_PUBLIC_KEY_HERE"; // Phant public key
const char privateKey[] = "INSERT_PRIVATE_KEY_HERE"; // Phant private key

Phant phant(server, publicKey, privateKey); // Create a Phant object


const unsigned long postingRate = 20000; //Post rate to data.sparkfun.com (time in milliseconds)
unsigned long lastPost = millis();

const int TEMP102_ADDRESS = 72; //Address of TMP102
const int BYTES_TO_READ = 2; //Number of bytes to read in from TMP102 (should always be 2)

void setup() {
    Wire.begin(); //Initialize serial communication library
    Serial.begin(9600);
}

void loop() {
    if (Wire.isEnabled()) //Check if receiving a signal from I2C pins
    {
        if (lastPost + postingRate < millis()) //Wait to post until ~ 20s has lapsed
        {
            Serial.print("Requesting from :");
            Serial.println(TEMP102_ADDRESS);
            Wire.requestFrom(TEMP102_ADDRESS, BYTES_TO_READ);
            if (Wire.available() == BYTES_TO_READ)
            {
                Serial.println("Reading!");
                byte MSB = Wire.read();
                byte LSB = Wire.read();
                int temp = ((( MSB << 8) | LSB) >> 4) * 0.0625; //Remove 4 empty bits from 2nd byte (see datasheet),
                //combine 1st byte and 2nd byte then use conversion factor to get temp in deg. C (see datasheet)
                Serial.print("Temp is :");
                Serial.println(temp);
                postToPhant(temp, 'C'); //Post temperature data and unit (deg C) to your data stream at data.sparkfun.com (See lines 68 and on)
                lastPost = millis();
            }
            else
            {
                Serial.println("Unable to read the temperature"); //Used for debugging TMP102 output
            }
        }
    }
    else
    {
        Serial.println("Wire is not enabled make sure to call Wire.begin()"); //Used for debugging I2C protocol
    }
}

//Thanks Jim Lindblom <jim@sparkfun.com> for the sample code and Phant library.
int postToPhant(int temp, char unit){

    phant.add("temp", temp); //Data stream field name "temp"
    phant.add("unit", unit); //Data stream field name "unit"
    TCPClient client;
    char response[512];
    int i = 0;
    int retVal = 0;

    if (client.connect(server, 80)) // Connect to the server
    {
        // Post message to indicate connect success
        Serial.println("Posting!");

        // phant.post() will return a string formatted as an HTTP POST.
        // It'll include all of the field/data values we added before.
        // Use client.print() to send that string to the server.
        client.print(phant.post());
        delay(1000);
        // Now we'll do some simple checking to see what (if any) response
        // the server gives us.
        while (client.available())
        {
            char c = client.read();
            Serial.print(c);    // Print the response for debugging help.
            if (i < 512)
                response[i++] = c; // Add character to response string
        }
        // Search the response string for "200 OK", if that's found the post
        // succeeded.
        if (strstr(response, "200 OK"))
        {
            Serial.println("Post success!");
            retVal = 1;
        }
        else if (strstr(response, "400 Bad Request"))
        {   // "400 Bad Request" means the Phant POST was formatted incorrectly.
            // This most commonly ocurrs because a field is either missing,
            // duplicated, or misspelled.
            Serial.println("Bad request");
            retVal = -1;
        }
        else
        {
            // Otherwise we got a response we weren't looking for.
            retVal = -2;
        }
    }
    else
    {   // If the connection failed, print a message:
        Serial.println("connection failed");
        retVal = -3;
    }
    client.stop();  // Close the connection to server.
    return retVal;  // Return error (or success) code.
}