Pushing Data to Data.SparkFun.com
This Tutorial is Retired!
This tutorial covers concepts or technologies that are no longer current. It's still here for you to read and enjoy, but may not be as useful as our newest tutorials.
 jimblom
Introduction
Phant is No Longer in Operation
SparkFun's Data.SparkFun.com service allows you to easily push your data to the "cloud." Whether you're posting weather readings, office environment conditions, or anything else, it can come in handy to have a central, online location to store those sensor readings. By sending a simple HTTP request to the Data.SparkFun.com server, your project data is stored and displayed in a simple database where it can be retrieved or reviewed at your leisure.

Any electronics project that can be Internet-connected should be able to post data to the SparkFun data service. Luckily, these days -- with Internet-of-Things applications taking off -- there is no shortage of hardware gateways to the web. Basic Arduino's can rely on shields for WiFi or Ethernet access, while many advanced development platforms already have WiFi or Ethernet built-in.
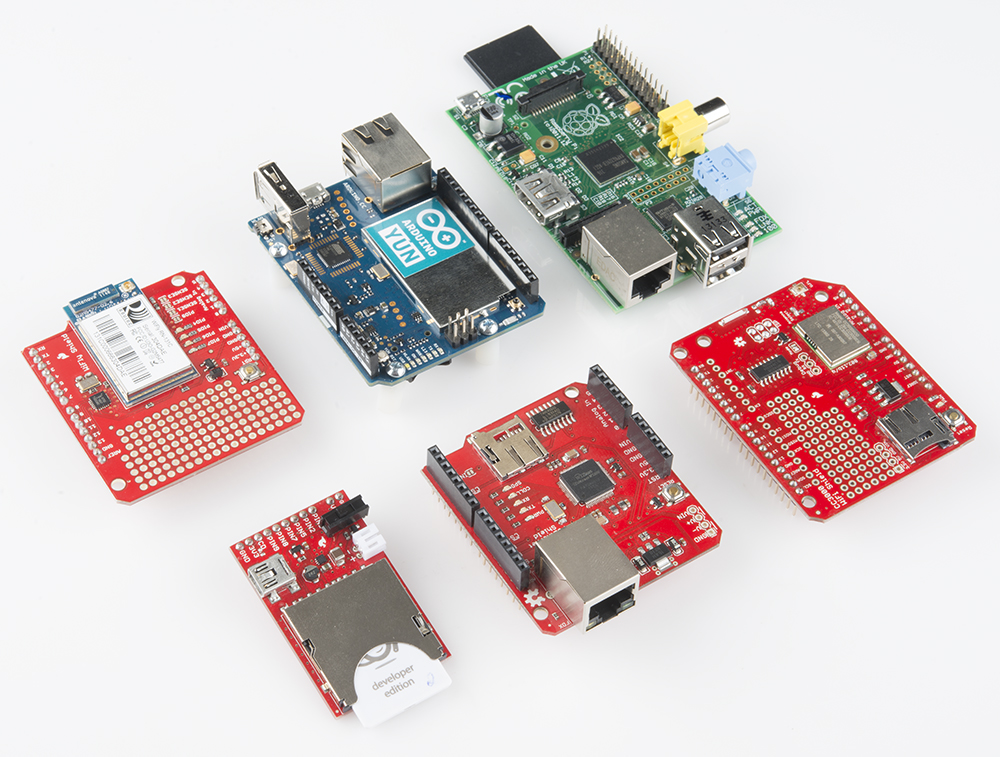
This tutorial is a grab bag of example sketches and scripts that show how you can publish anything to our data service using most of today's popular hardware platforms. Each example has a section dedicated to the example hookup, code and setup:
- Arduino & Ethernet Shield -- The Ethernet Shield has been one of the Arduino's longest lasting Network portals around. If you don't mind a few wires hanging out of your project, this shield is one of the most reliable options around. This example also works with the PoEthernet Shield, or really any shield that uses the Ethernet library.
- Arduino & CC3000 Shield -- The CC3000 WiFi Shield is one of our newest offerings to the WiFi Shield market. Because it's relatively low-cost and reliable, it's a great choice if you're short on RJ-45 ports or Cat5 cable.
- Arduino & WiFly Shield -- The WiFly Shield is another long-surviving shield that makes connecting your 'duino to WiFi easy. Not as cheap as the CC3000, but a good option if you've already got a Shield lying around.
- Arduino Yun -- Internet-of-things applications like this are what the Arduino Yun was made for. With built in Ethernet, WiFi, and even Linux, not much stands in the way of your data on its way to the web.
- Raspberry Pi (using Python) -- With a full Linux kernel at its fingertips, the Raspberry Pi should have no problems posting an HTTP request. In this example we'll use Python, which allows us to toggle I/O at the same time.
- Electric Imp -- A prerequisite to using the Electric Imp is that it must be Internet-connected to download code. With its ability to work with web "agents", the it's easy to get the imp posting HTTP requests.
Each section of the tutorial will demonstrate an example sketch for a particular piece, or combination of hardware. But before clicking over to the platform you plan on using, check out the What is Phant? first. That's where we'll demonstrate how to create a data stream and how to use it.
What is Phant?
The software that powers Data.SparkFun.com is called Phant, short for the animal that never forgets. The project is maintained by folks at SparkFun, and it's fully open-source -- you can download the code, modify it, and even stick it on a server of your own.

Each Phant data stream gets two unique keys -- one public and another private. The public key is visible to everyone who visits your data stream because it's part of the URL. The stream we'll be using in this tutorial, for example, has a public key of "6JZbNolApzF4om2l9yYK", and the URL is https://data.sparkfun.com/streams/6JZbNolApzF4om2l9yYK.
The private key is required to post any data to your stream. This unique hash isn't publicly visible, and it should only be known by you or anyone else allowed to post to your stream.
Finally, each stream contains one or more field names -- the "labels" for your data values. In our example, we have three fields named "light", "switch", and "name." Data of nearly any form can be stored in those fields -- integers, strings, floats, you name it.
Once you have all three of those ingredients, plus data to assign to each field, you can construct either an HTTP GET or POST, and send it to data server. For example, to post data to our example stream using an HTTP GET, a request like this can be sent:
Go ahead an click that, or copy/paste it into your web browser. Then visit the stream, where your data will be instantly viewable.
So, to post data to the stream using Arduino's, Pi's, Imp's or other hardware, all it takes is constructing a HTTP request like above -- basically a lot of string concatenations -- and sending it to the server. That's the common theme we'll be following throughout the next few examples.
To learn about deletion, clearing, and outputting data from your stream check out the Phant documentation section.
Create a Data Stream
You can learn a lot about Phant by just jumping in and creating a stream. To create a data stream, head over to data.sparkfun.com, and click "CREATE".
On the next page, fill in the blanks with your feed’s title and description. Then take extra care to fill in the Fields textbox. This comma-separated list of words defines how you interact with the data stream to post a list of unique values. Make your fields as descriptive and short as you can. I used “light”, “switch”, and “name” to describe the readings.
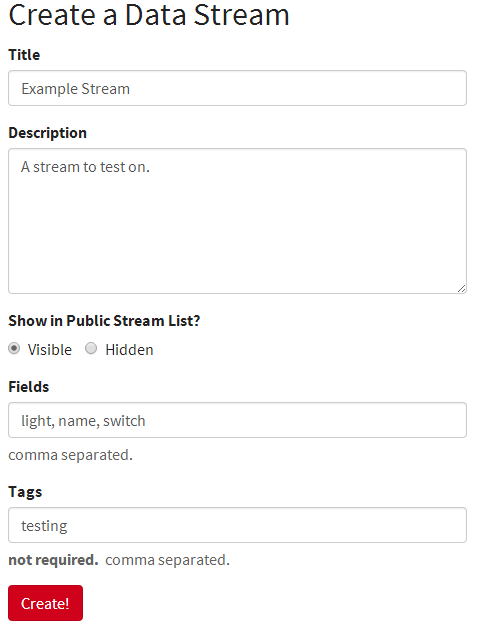
Once you’ve figured all of that out, click "Create!". After which, you'll be led to the stream’s key page.

Copy down all of the information on this page! Better yet, take advantage of the “Email a Copy” section at the bottom to get a more permanent copy of the keys.
Now that you have the stream set up, click around this tutorial to find the hardware set up that suits you. Time to post some data!
Arduino & Ethernet Shield
The real sticking point with using Arduinos in Internet applications like this is finding a bridge between the lowly 8-bit microcontroller and the web. WiFi or Ethernet-enabling shields or breakout boards are usually the best option for that. If you don't mind being tied down by wires, Ethernet can be the faster, more reliable option of the two. The Ethernet Shield, and its variations like the PoEthernet Shield, equip your Arduino with all it needs to access a network and post data to a server over Ethernet.
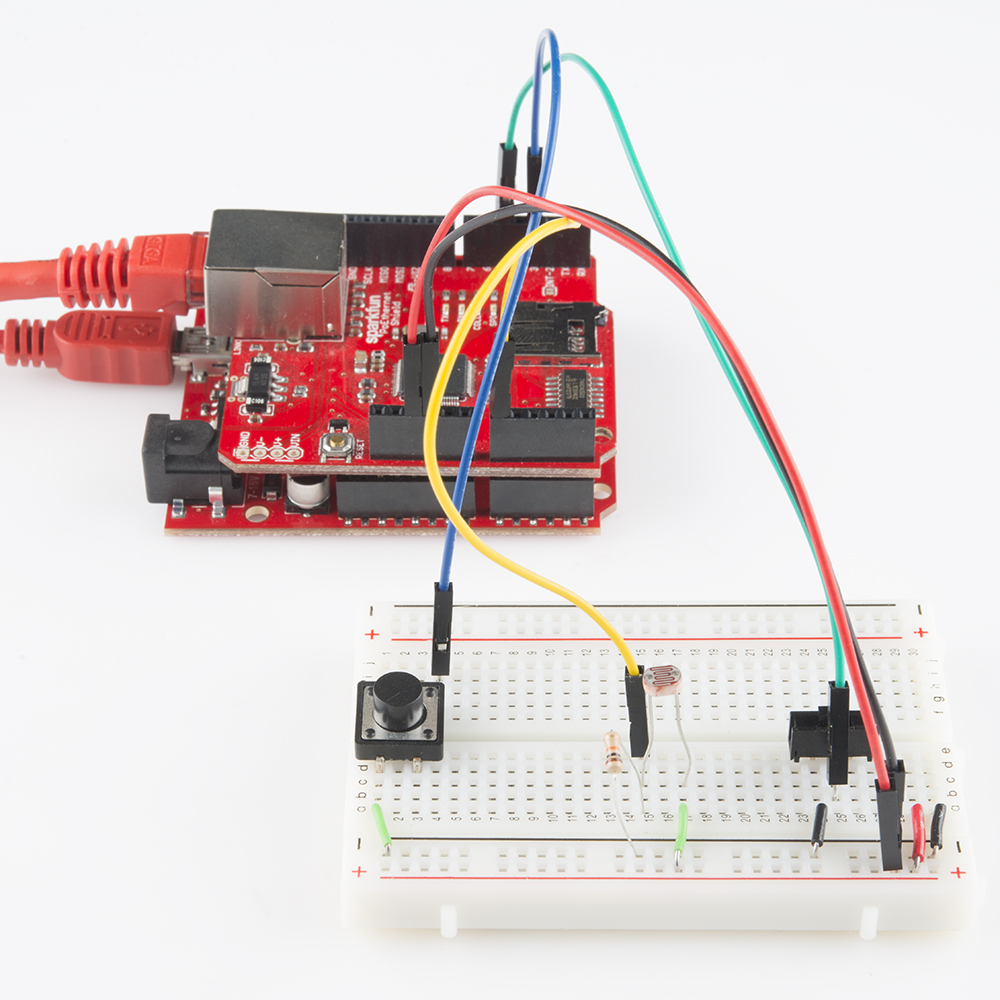
Arduino Example Circuit
We'll use this circuit for all four of the Arduino examples. A simple selection of digital and analog sensors are used to demonstrate the abilities of the Data.SparkFun.com service.
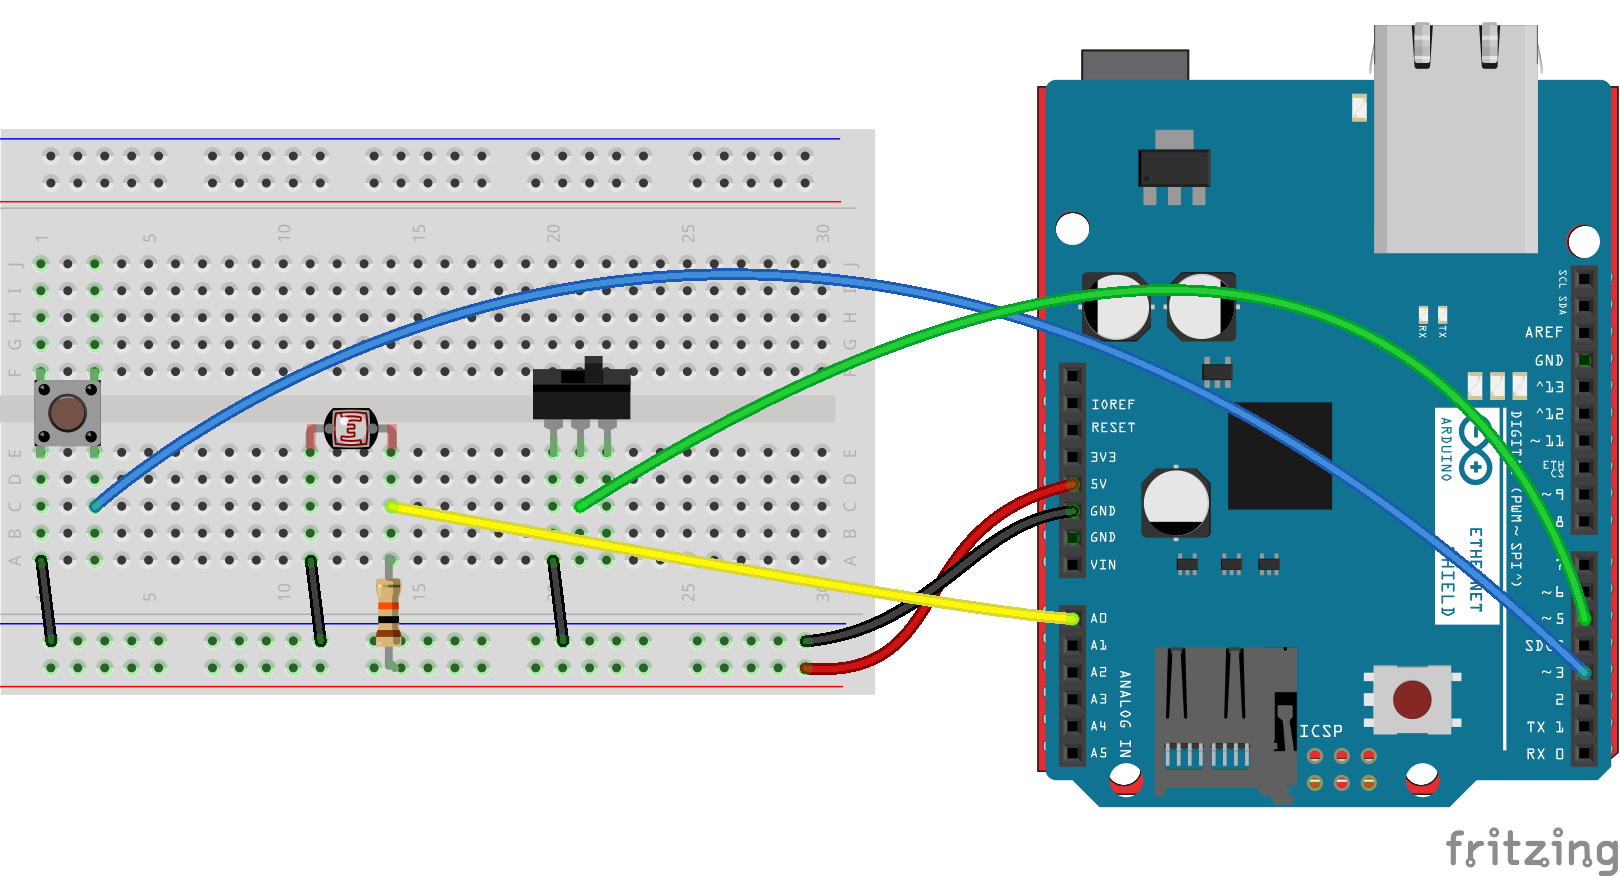
The output of a photocell (voltage divided with a 10kΩ resistor) connects to A0. A momentary push-button is connected to D3 on one end and ground on the other. And a SPDT switch can connect D5 to ground or let it float.
Ethernet Example Code
Here's an example sketch that posts data to Data.SparkFun.com using the Ethernet Shield. Copy and paste from below or click here to download the sketch.
language:c
/*****************************************************************
Phant_Ethernet.ino
Post data to SparkFun's data stream server system (phant) using
an Arduino and an Ethernet Shield.
Jim Lindblom @ SparkFun Electronics
Original Creation Date: July 3, 2014

This sketch uses an Arduino Uno to POST sensor readings to
SparkFun's data logging streams (http://data.sparkfun.com). A post
will be initiated whenever pin 3 is connected to ground.

Before uploading this sketch, there are a number of global vars
that need adjusting:
1. Ethernet Stuff: Fill in your desired MAC and a static IP, even
   if you're planning on having DCHP fill your IP in for you.
   The static IP is only used as a fallback, if DHCP doesn't work.
2. Phant Stuff: Fill in your data stream's public, private, and
data keys before uploading!

Hardware Hookup:
  * These components are connected to the Arduino's I/O pins:
    * D3 - Active-low momentary button (pulled high internally)
    * A0 - Photoresistor (which is combined with a 10k resistor
           to form a voltage divider output to the Arduino).
    * D5 - SPDT switch to select either 5V or 0V to this pin.
  * A CC3000 Shield sitting comfortable on top of your Arduino.

Development environment specifics:
    IDE: Arduino 1.0.5
    Hardware Platform: RedBoard & PoEthernet Shield

This code is beerware; if you see me (or any other SparkFun
employee) at the local, and you've found our code helpful, please
buy us a round!

Much of this code is largely based on David Mellis' WebClient
example in the Ethernet library.

Distributed as-is; no warranty is given.
*****************************************************************/
#include <SPI.h> // Required to use Ethernet
#include <Ethernet.h> // The Ethernet library includes the client
#include <Progmem.h> // Allows us to sacrifice flash for DRAM

///////////////////////
// Ethernet Settings //
///////////////////////
// Enter a MAC address for your controller below.
byte mac[] = { 0xDE, 0xAD, 0xBE, 0xEF, 0xFE, 0xED };
// if you don't want to use DNS (and reduce your sketch size)
// use the numeric IP instead of the name for the server:
//IPAddress server(54,86,132,254);  // numeric IP for data.sparkfun.com
char server[] = "data.sparkfun.com";    // name address for data.sparkFun (using DNS)
// Set the static IP address to use if the DHCP fails to assign
IPAddress ip(192,168,0,177);

// Initialize the Ethernet client library
// with the IP address and port of the server
// that you want to connect to (port 80 is default for HTTP):
EthernetClient client;

/////////////////
// Phant Stuff //
/////////////////
const String publicKey = "6JZbNolApzF4om2l9yYK";
const String privateKey = "Ww0vPW1yrkUNDqWPV9jE";
const byte NUM_FIELDS = 3;
const String fieldNames[NUM_FIELDS] = {"light", "switch", "name"};
String fieldData[NUM_FIELDS];

//////////////////////
// Input Pins, Misc //
//////////////////////
const int triggerPin = 3;
const int lightPin = A0;
const int switchPin = 5;
String name = "Ether-anon";
boolean newName = true;

void setup()
{
  Serial.begin(115200);

  // Setup Input Pins:
  pinMode(triggerPin, INPUT_PULLUP);
  pinMode(switchPin, INPUT_PULLUP);
  pinMode(lightPin, INPUT_PULLUP);

  // Set Up Ethernet:
  setupEthernet();

  Serial.println(F("=========== Ready to Stream ==========="));
  Serial.println(F("Press the button (D3) to send an update"));
  Serial.println(F("Type your name (no spaces!), followed by '!' to update name"));
}

void loop()
{
  // If the trigger pin (3) goes low, send the data.
  if (!digitalRead(triggerPin))
  {
    // Gather data:
    fieldData[0] = String(analogRead(lightPin));
    fieldData[1] = String(digitalRead(switchPin));
    fieldData[2] = name;

    Serial.println("Posting!");
    postData(); // the postData() function does all the work,
                // check it out below.

    delay(1000);
  }

  // Check for a new name input:
  if (Serial.available())
  {
    char c = Serial.read();
    if (c == '!')
    {
      newName = true;
      Serial.print("Your name is ");
      Serial.println(name);
    }
    else if (newName)
    {
      newName = false;
      name = "";
      name += c;
    }
    else
    {
      name += c;
    }
  }
}

void postData()
{
  // Make a TCP connection to remote host
  if (client.connect(server, 80))
  {
    // Post the data! Request should look a little something like:
    // GET /input/publicKey?private_key=privateKey&light=1024&switch=0&name=Jim HTTP/1.1\n
    // Host: data.sparkfun.com\n
    // Connection: close\n
    // \n
    client.print("GET /input/");
    client.print(publicKey);
    client.print("?private_key=");
    client.print(privateKey);
    for (int i=0; i<NUM_FIELDS; i++)
    {
      client.print("&");
      client.print(fieldNames[i]);
      client.print("=");
      client.print(fieldData[i]);
    }
    client.println(" HTTP/1.1");
    client.print("Host: ");
    client.println(server);
    client.println("Connection: close");
    client.println();
  }
  else
  {
    Serial.println(F("Connection failed"));
  }

  // Check for a response from the server, and route it
  // out the serial port.
  while (client.connected())
  {
    if ( client.available() )
    {
      char c = client.read();
      Serial.print(c);
    }
  }
  Serial.println();
  client.stop();
}

void setupEthernet()
{
  Serial.println("Setting up Ethernet...");
  // start the Ethernet connection:
  if (Ethernet.begin(mac) == 0) {
    Serial.println(F("Failed to configure Ethernet using DHCP"));
    // no point in carrying on, so do nothing forevermore:
    // try to congifure using IP address instead of DHCP:
    Ethernet.begin(mac, ip);
  }
  Serial.print("My IP address: ");
  Serial.println(Ethernet.localIP());
  // give the Ethernet shield a second to initialize:
  delay(1000);
}
No library additions are required, since the Ethernet library used here is included with Arduino.
Unmodified, this example sketch should post to our example stream whenever you press the button connected to D3.
Modifying Ethernet and Phant Settings
Before uploading the sketch there are a few global variables you'll need to adjust. First off, depending on your network, you may need to adjust some Ethernet-specific values. These are listed under the "Ethernet Settings" heading:
language:c
///////////////////////
// Ethernet Settings //
///////////////////////
// Enter a MAC address for your controller below.
byte mac[] = { 0xDE, 0xAD, 0xBE, 0xEF, 0xFE, 0xED };
// if you don't want to use DNS (and reduce your sketch size)
// use the numeric IP instead of the name for the server:
//IPAddress server(54,86,132,254);  // numeric IP for data.sparkfun.com
char server[] = "data.sparkfun.com";    // name address for data.sparkFun (using DNS)
// Set the static IP address to use if the DHCP fails to assign
IPAddress ip(192,168,0,177);
The mac array -- a list of six HEX bytes -- can be changed to any value you require. Newer Ethernet shields may even have MAC address printed on them. Just make sure your MAC address is unique!
Unless your using something else, leave the server variable set to "data.sparkfun.com". Customize your IP address to match compatible values on your network -- this only becomes necessary if DHCP fails; the static IP is a fallback plan.
Next, you'll want to modify your data stream keys and fields. Those in the example sketch should work, feel free to post to our example stream, at least temporarily. To set it to your data stream, adjust the variables under the "Phant Stuff" heading:
language:c
/////////////////
// Phant Stuff //
/////////////////
const String publicKey = "6JZbNolApzF4om2l9yYK";
const String privateKey = "Ww0vPW1yrkUNDqWPV9jE";
const byte NUM_FIELDS = 3;
const String fieldNames[NUM_FIELDS] = {"light", "switch", "name"};
String fieldData[NUM_FIELDS];
The publicKey and privateKey variables will be given to you when you create your stream. You can also adjust the number of data fields and their names here as well. The values in the fieldNames string array should match exactly what you typed when you created the stream.
Running the Sketch
After you've fixed the WiFi and datastream settings, upload the sketch. Then open the Serial Monitor and set the baud rate to 115200 bps. Some debug messages will flow by at the start. Once you see your IP address printed, your Arduino is connected and you're ready to post some data.

One of the fields in this example pushes a name to the server. If you want to update the name value, type in your name into the Serial Monitor and terminate it with a '!'.
To push your data to the server, simply press the button tied to D3 (or just short that pin to ground). A few serial lines will quickly be printed. Check to make sure HTTP/1.1 200 OK is somewhere among those lines -- that means the server accepted your request.
Going Further
To further customize the sketch, you'll want to mess around with the "gathering data" stage. In this example, a trio of lines load data into the fieldData array, converting each into a string beforehand. Those values from fieldData are later used in the postData() function when the HTTP GET string is formulated.
Most of the importatnt stuff happens in the postData() function. Here you'll find an example for creating an HTTP GET, and routing it out to the server. Check out the comments for a line-by-line dissection of the code.
Arduino & CC3000 Shield
The CC3000 WiFi Shield (or, alternatively, the CC3000 Breakout) is a relatively low-cost WiFi solution for the Arduino. This is a fully-functional wireless networking shield which gives any Arduino-compatible board an easy route to WiFi and the Internet.
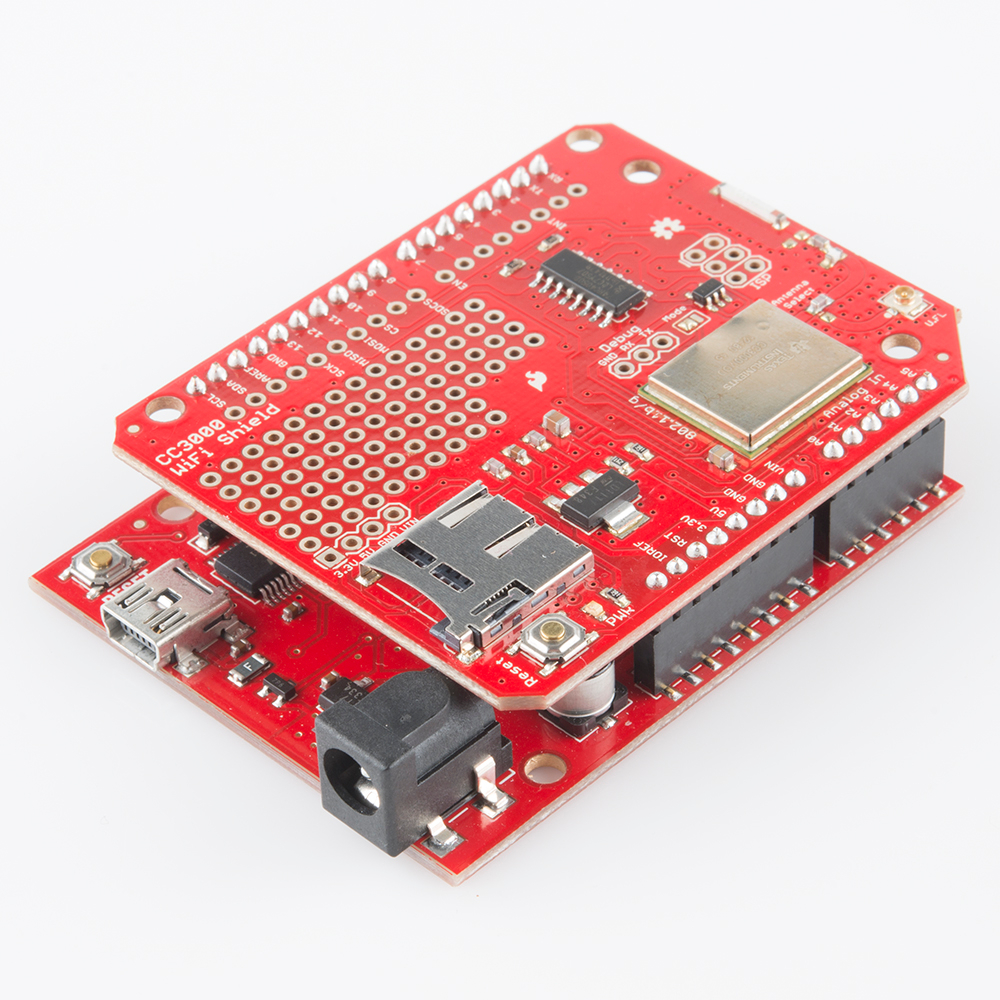
If you haven't already, check out the CC3000 Hookup Guide, which will show you how to install the shield and get started using the library.
Arduino Example Circuit
We'll use the same, exact circuit as that in the Arduino & Ethernet Shield example.

The output of a photocell (voltage divided with a 10kΩ resistor) connects to A0. A momentary push-button is connected to D3 on one end and ground on the other. And a SPDT switch can connect D5 to ground or let it float.
CC3000 Shield Example Code
Before running the sketch, you'll need to download and install the CC3000 Arduino Library. You can grab it from our [GitHub Repository]((https://github.com/sparkfun/SFE_CC3000_Library) or download it directly by clicking here. Check out our CC3000 Library Installation Guide for help installing the library.
Click here to download the example sketch, or, if you'd rather just copy/paste, here it is:
language:c
/*****************************************************************
Phant_CC3000.ino
Post data to SparkFun's data stream server system (phant) using
an Arduino and the CC3000 Shield.
Jim Lindblom @ SparkFun Electronics
Original Creation Date: July 3, 2014

This sketch uses an Arduino Uno to POST sensor readings to
SparkFun's data logging streams (http://data.sparkfun.com). A post
will be initiated whenever pin 3 is connected to ground.

Before uploading this sketch, there are a number of global vars
that need adjusting:
1. WiFi Stuff: Fill in your SSID, WiFi Passkey, and encryption
   setting using three variables available.
2. Phant Stuff: Fill in your data stream's public, private, and
data keys before uploading!

This sketch requires that you install this library:
* SFE_CC3000: https://github.com/sparkfun/SFE_CC3000_Library

Hardware Hookup:
  * These components are connected to the Arduino's I/O pins:
    * D3 - Active-low momentary button (pulled high internally)
    * A0 - Photoresistor (which is combined with a 10k resistor
           to form a voltage divider output to the Arduino).
    * D5 - SPST switch to select either 5V or 0V to this pin.
  * A CC3000 Shield sitting comfortable on top of your Arduino.

Development environment specifics:
    IDE: Arduino 1.0.5
    Hardware Platform: RedBoard & CC3000 Shield (v10)

This code is beerware; if you see me (or any other SparkFun
employee) at the local, and you've found our code helpful, please
buy us a round!

Much of this code is largely based on Shawn Hymel's WebClient
example in the SFE_CC3000 library.

Distributed as-is; no warranty is given.
*****************************************************************/
// SPI and the pair of SFE_CC3000 include statements are required
// for using the CC300 shield as a client device.
#include <SPI.h>
#include <SFE_CC3000.h>
#include <SFE_CC3000_Client.h>
// Progmem allows us to store big strings in flash using F().
// We'll sacrifice some flash for extra DRAM space.
#include <Progmem.h>

////////////////////////////////////
// CC3000 Shield Pins & Variables //
////////////////////////////////////
// Don't change these unless you're using a breakout board.
#define CC3000_INT      2   // Needs to be an interrupt pin (D2/D3)
#define CC3000_EN       7   // Can be any digital pin
#define CC3000_CS       10  // Preferred is pin 10 on Uno
#define IP_ADDR_LEN     4   // Length of IP address in bytes

////////////////////
// WiFi Constants //
////////////////////
char ap_ssid[] = "NETWORK_ID";                // SSID of network
char ap_password[] = "NETWORK_PASS";        // Password of network
unsigned int ap_security = WLAN_SEC_UNSEC; // Security of network
// ap_security can be any of: WLAN_SEC_UNSEC, WLAN_SEC_WEP,
//  WLAN_SEC_WPA, or WLAN_SEC_WPA2
unsigned int timeout = 30000;             // Milliseconds
char server[] = "data.sparkfun.com";      // Remote host site

// Initialize the CC3000 objects (shield and client):
SFE_CC3000 wifi = SFE_CC3000(CC3000_INT, CC3000_EN, CC3000_CS);
SFE_CC3000_Client client = SFE_CC3000_Client(wifi);

/////////////////
// Phant Stuff //
/////////////////
const String publicKey = "6JZbNolApzF4om2l9yYK";
const String privateKey = "Ww0vPW1yrkUNDqWPV9jE";
const byte NUM_FIELDS = 3;
const String fieldNames[NUM_FIELDS] = {"light", "switch", "name"};
String fieldData[NUM_FIELDS];

//////////////////////
// Input Pins, Misc //
//////////////////////
const int triggerPin = 3;
const int lightPin = A0;
const int switchPin = 5;
String name = "Anonymouse";
boolean newName = true;

void setup()
{
  Serial.begin(115200);

  // Setup Input Pins:
  pinMode(triggerPin, INPUT_PULLUP);
  pinMode(switchPin, INPUT_PULLUP);
  pinMode(lightPin, INPUT_PULLUP);

  // Set Up WiFi:
  setupWiFi();

  Serial.println(F("=========== Ready to Stream ==========="));
  Serial.println(F("Press the button (D3) to send an update"));
  Serial.println(F("Type your name, followed by '!' to update name"));
}

void loop()
{
  // If the trigger pin (3) goes low, send the data.
  if (!digitalRead(triggerPin))
  {
    // Gather data:
    fieldData[0] = String(analogRead(lightPin));
    fieldData[1] = String(digitalRead(switchPin));
    fieldData[2] = name;

    // Post data:
    Serial.println("Posting!");
    postData(); // the postData() function does all the work,
                // check it out below.
    delay(1000);
  }

  // Check for a new name input:
  if (Serial.available())
  {
    char c = Serial.read();
    if (c == '!')
    {
      newName = true;
      Serial.print("Your name is ");
      Serial.println(name);
    }
    else if (newName)
    {
      newName = false;
      name = "";
      name += c;
    }
    else
    {
      name += c;
    }
  }
}

void postData()
{

  // Make a TCP connection to remote host
  if ( !client.connect(server, 80) )
  {
    // Error: 4 - Could not make a TCP connection
    Serial.println(F("Error: 4"));
  }

  // Post the data! Request should look a little something like:
  // GET /input/publicKey?private_key=privateKey&light=1024&switch=0&time=5201 HTTP/1.1\n
  // Host: data.sparkfun.com\n
  // Connection: close\n
  // \n
  client.print("GET /input/");
  client.print(publicKey);
  client.print("?private_key=");
  client.print(privateKey);
  for (int i=0; i<NUM_FIELDS; i++)
  {
    client.print("&");
    client.print(fieldNames[i]);
    client.print("=");
    client.print(fieldData[i]);
  }
  client.println(" HTTP/1.1");
  client.print("Host: ");
  client.println(server);
  client.println("Connection: close");
  client.println();

  while (client.connected())
  {
    if ( client.available() )
    {
      char c = client.read();
      Serial.print(c);
    }
  }
  Serial.println();
}

void setupWiFi()
{
  ConnectionInfo connection_info;
  int i;

  // Initialize CC3000 (configure SPI communications)
  if ( wifi.init() )
  {
    Serial.println(F("CC3000 Ready!"));
  }
  else
  {
    // Error: 0 - Something went wrong during CC3000 init!
    Serial.println(F("Error: 0"));
  }

  // Connect using DHCP
  Serial.print(F("Connecting to: "));
  Serial.println(ap_ssid);
  if(!wifi.connect(ap_ssid, ap_security, ap_password, timeout))
  {
    // Error: 1 - Could not connect to AP
    Serial.println(F("Error: 1"));
  }

  // Gather connection details and print IP address
  if ( !wifi.getConnectionInfo(connection_info) )
  {
    // Error: 2 - Could not obtain connection details
    Serial.println(F("Error: 2"));
  }
  else
  {
    Serial.print(F("My IP: "));
    for (i = 0; i < IP_ADDR_LEN; i++)
    {
      Serial.print(connection_info.ip_address[i]);
      if ( i < IP_ADDR_LEN - 1 )
      {
        Serial.print(".");
      }
    }
    Serial.println();
  }
}
Before uploading the sketch there are a few global variables you'll need to adjust. Check out the section below. Most importantly, you need to alter some constants to connect to your WiFI network. The relevant section is under the "WiFi Constants" heading:
language:c
////////////////////
// WiFi Constants //
////////////////////
char ap_ssid[] = "NETWORK_ID";                // SSID of network
char ap_password[] = "NETWORK_PASS";        // Password of network
unsigned int ap_security = WLAN_SEC_UNSEC; // Security of network
// ap_security can be any of: WLAN_SEC_UNSEC, WLAN_SEC_WEP,
//  WLAN_SEC_WPA, or WLAN_SEC_WPA2
unsigned int timeout = 30000;             // Milliseconds
char server[] = "data.sparkfun.com";      // Remote host site
The ap_ssid and ap_password strings should be adjusted to match your WiFi network. If your network is open (no passkey), that second variable should be blank (ap_password[] = "";). Also make sure to adjust the ap_security variable to match the security of your network. See the comments for possible values.
With those correctly set, you can run the sketch. This example sketch should post to our example stream whenever you press the button connected to D3.
Modifying Data.SparkFun.com Settings
Next, you'll want to modify your data stream keys and fields. Those in the example sketch should work, feel free to post to our example stream, at least temporarily. To set it to your data stream, adjust the variables under the "Phant Stuff" heading:
language:c
/////////////////
// Phant Stuff //
/////////////////
const String publicKey = "6JZbNolApzF4om2l9yYK";
const String privateKey = "Ww0vPW1yrkUNDqWPV9jE";
const byte NUM_FIELDS = 3;
const String fieldNames[NUM_FIELDS] = {"light", "switch", "name"};
String fieldData[NUM_FIELDS];
The publicKey and privateKey variables will be given to you when you create your stream. You can also adjust the number of data fields and their names here as well. The values in the fieldNames string array should match exactly what you typed when you created the stream.
Running the Sketch
After you've fixed the WiFi and datastream settings, upload the sketch. Then open the Serial Monitor and set the baud rate to 115200 bps. Some debug messages will flow by at the start. Once you see your IP address printed, your Arduino is connected and you're ready to post some data.
One of the fields in this example pushes a name to the server. If you want to update the name value, type in your name into the Serial Monitor and terminate it with a '!'.
To push your data to the server, simply press the button tied to D3 (or just short that pin to ground). A few serial lines will quickly be printed. Check to make sure HTTP/1.1 200 OK is somewhere among those lines -- that means the server accepted your request.
Going Further
To further customize the sketch, you'll want to mess around with the "gathering data" stage. In this example, a trio of lines load data into the fieldData array, converting each into a string beforehand. Those values from fieldData are later used in the postData() function when the HTTP GET string is formulated.
Most of the importatnt stuff happens in the postData() function. Here you'll find an example for creating an HTTP GET, and routing it out to the server. Check out the comments for a line-by-line dissection of the code.
Arduino & WiFly Shield
The WiFly Shield is another easy solution for wirelessly connecting your Arduino to the Internet.
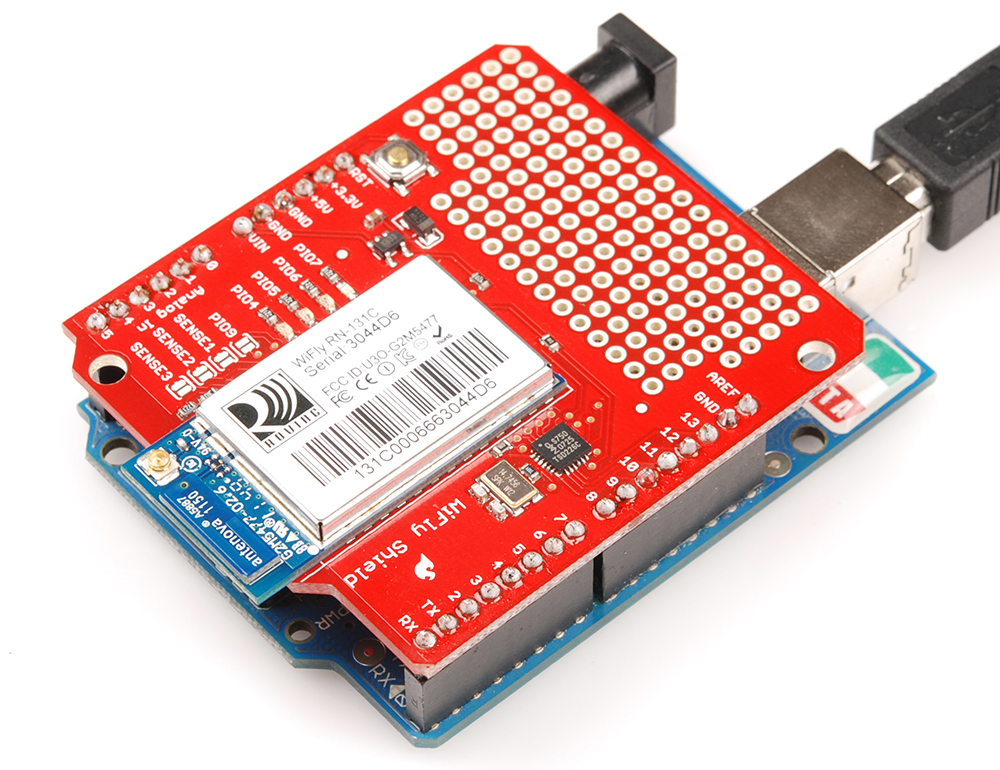
Check out our WiFly Shield Hookup Guide, if you haven't already, for help setting up and testing out your WiFly Shield.
Arduino Example Circuit
We'll use the same, exact circuit as that in the previous Arduino examples.
The output of a photocell (voltage divided with a 10kΩ resistor) connects to A0. A momentary push-button is connected to D3 on one end and ground on the other. And a SPDT switch can connect D5 to ground or let it float.
WiFly Example Sketch
This example sketch requires the WiFly Shield library. You can download it from the GitHub repository. Follow the instructions in our How to Install an Arduino Library for help installing the library.
Once you've installed the library, click here to download the example sketch, or copy/paste from below:
language:c
/*****************************************************************
Phant_WiFly.ino
Post data to SparkFun's data stream server system (phant) using
an Arduino and the WiFly Shield.
Jim Lindblom @ SparkFun Electronics
Original Creation Date: July 7, 2014

This sketch uses an Arduino Uno to POST sensor readings to
SparkFun's data logging streams (http://data.sparkfun.com). A post
will be initiated whenever pin 3 is connected to ground.

Before uploading this sketch, there are a number of global vars
that need adjusting:
1. WiFi Stuff: Fill in your SSID, WiFi Passkey, and encryption
   setting using three variables available.
2. Phant Stuff: Fill in your data stream's public, private, and
data keys before uploading!

This sketch requires that you install this library:
* WiFly_Shield: https://github.com/sparkfun/WiFly-Shield/tree/master/Libraries

Hardware Hookup:
  * These components are connected to the Arduino's I/O pins:
    * D3 - Active-low momentary button (pulled high internally)
    * A0 - Photoresistor (which is combined with a 10k resistor
           to form a voltage divider output to the Arduino).
    * D5 - SPST switch to select either 5V or 0V to this pin.
  * A WiFly Shield sitting comfortable on top of your Arduino.

Development environment specifics:
    IDE: Arduino 1.0.5
    Hardware Platform: RedBoard & WiFly Shield

This code is beerware; if you see me (or any other SparkFun
employee) at the local, and you've found our code helpful, please
buy us a round!

Distributed as-is; no warranty is given.
*****************************************************************/
// Include the WiFly library and the SPI library to support it:
#include <SPI.h>
#include <WiFly.h>
// Progmem allows us to store big strings in flash using F().
// We'll sacrifice some flash for extra DRAM space.
#include <Progmem.h>

////////////////////
// WiFi Constants //
////////////////////
char ssid[] = "SSID"; // SSID of the WiFi network
char passphrase[] = "SSID_PASSPHRASE"; // Password (if applicable)
// Security of your network. Set to true if your network uses WPA,
// otherwise (if it's open) set it to false:
boolean wpaEnabled = true;

/////////////////
// Phant Stuff //
/////////////////
const String publicKey = "6JZbNolApzF4om2l9yYK";
const String privateKey = "Ww0vPW1yrkUNDqWPV9jE";
char server[] = "data.sparkfun.com"; // Remote host site
const byte NUM_FIELDS = 3;
const String fieldNames[NUM_FIELDS] = {"light", "switch", "name"};
String fieldData[NUM_FIELDS];

//////////////////////
// Input Pins, Misc //
//////////////////////
const int triggerPin = 3;
const int lightPin = A0;
const int switchPin = 5;
String name = "WiFlyShield"; // Your/Arduino's name (no spaces)
boolean newName = true;

void setup()
{
  Serial.begin(115200);

  // Setup Input Pins:
  pinMode(triggerPin, INPUT_PULLUP);
  pinMode(switchPin, INPUT_PULLUP);
  pinMode(lightPin, INPUT_PULLUP);

  // Set up WiFi:
  setupWiFi();

  Serial.println(F("=========== Ready to Stream ==========="));
  Serial.println(F("Press the button (D3) to send an update"));
  Serial.println(F("Type your name (no spaces!), followed by '!' to update name"));
}

void loop()
{
  // If the trigger pin (3) goes low, send the data.
  if (!digitalRead(triggerPin))
  {
    // Gather data:
    fieldData[0] = String(analogRead(lightPin));
    fieldData[1] = String(digitalRead(switchPin));
    fieldData[2] = name;

    // Post data:
    Serial.println(F("Posting!"));
    postData(); // the postData() function does all the work,
                // check it out below.
    delay(1000);
  }

  // Check for a new name input:
  if (Serial.available())
  {
    char c = Serial.read();
    if (c == '!')
    {
      newName = true;
      Serial.print(F("Your name is "));
      Serial.println(name);
    }
    else if (newName)
    {
      newName = false;
      name = "";
      name += c;
    }
    else
    {
      name += c;
    }
  }
}

void postData()
{
  WiFlyClient client(server, 80);

  if (client.connect())
  {
    Serial.println(F("Connected"));

    // Post the data! Request should look a little something like:
    // GET /input/publicKey?private_key=privateKey&light=1024&switch=0&time=5201 HTTP/1.1\n
    // Host: data.sparkfun.com\n
    // Connection: close\n
    // \n
    client.print("GET /input/");
    client.print(publicKey);
    client.print("?private_key=");
    client.print(privateKey);
    for (int i=0; i<NUM_FIELDS; i++)
    {
      client.print("&");
      client.print(fieldNames[i]);
      client.print("=");
      client.print(fieldData[i]);
    }
    client.println(" HTTP/1.1");
    client.print("Host: ");
    client.println(server);
    client.println("Connection: close");
    client.println();

    // While we're connected, print out anything the server sends:
    while (client.connected())
    {
      if (client.available())
      {
        char c = client.read();
        Serial.print(c);
      }
    }
    Serial.println();
  }
  else // If the connection failed, print a message:
  {
    Serial.println(F("Connection failed"));
  }

  // If we're disconnected, stop the client:
  if (!client.connected())
  {
    Serial.println(F("Disconnecting."));
    client.stop();
  }
}

void setupWiFi()
{
  Serial.println(F("Initializing WiFly"));
  WiFly.begin();

  Serial.print(F("Connecting to "));
  Serial.println(ssid);
  if (!WiFly.join(ssid, passphrase, wpaEnabled))
  {
    Serial.println(F("Association failed."));
    while (1)
      ;// Hang on failure.
  }

  // Print the IP address:
  Serial.print(F("IP: "));
  Serial.println(WiFly.ip());
}
Before uploading the sketch there are a few global variables you'll need to adjust to configure it to your WiFi network. The relevant section is under the "WiFi Constants" heading:
language:c
////////////////////
// WiFi Constants //
////////////////////
char ssid[] = "SSID"; // SSID of the WiFi network
char passphrase[] = "SSID_PASSPHRASE"; // Password (if applicable)
// Security of your network. Set to true if your network uses WPA,
// otherwise (if it's open) set it to false:
boolean wpaEnabled = true;
The ssid and passphrase character arrays should be adjusted to match your WiFi network. If your network is open (no passkey), that second variable should be blank (passphrase[] = "";). Also make sure to adjust the wpaEnabled variable to match the security of your network. If it uses WPA, set that variable to true, otherwise (if it's open) set it to false.
With those correctly set, you can run the sketch. This example sketch should post to our example stream whenever you press the button connected to D3.
Configuring Data.SparkFun.com Settings
To use your own data stream, you'll want to modify the data stream keys and fields. To set it to a data stream of your own, adjust the variables under the "Phant Stuff" heading:
language:c
/////////////////
// Phant Stuff //
/////////////////
const String publicKey = "6JZbNolApzF4om2l9yYK";
const String privateKey = "Ww0vPW1yrkUNDqWPV9jE";
char server[] = "data.sparkfun.com"; // Remote host site
const byte NUM_FIELDS = 3;
const String fieldNames[NUM_FIELDS] = {"light", "switch", "name"};
String fieldData[NUM_FIELDS];
The publicKey and privateKey variables will be given to you when you create your stream. You can also adjust the number of data fields and their names here as well. The values in the fieldNames string array should match exactly what you typed when you created the stream.
Running the Sketch
After you've fixed the WiFi and datastream settings, upload the sketch. Then open the Serial Monitor and set the baud rate to 115200 bps. Some debug messages will flow by at the start. Once you see your IP address printed, your Arduino is connected and you're ready to post some data.
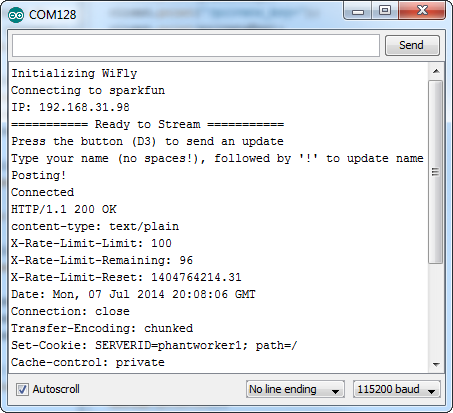
One of the fields in this example pushes a name to the server. If you want to update the name value, type in your name into the Serial Monitor and terminate it with a '!'.
To push your data to the server, simply press the button tied to D3 (or just short that pin to ground). A few serial lines will quickly be printed. Check to make sure HTTP/1.1 200 OK is somewhere among those lines -- that means the server accepted your request.
Going Further
To further customize the sketch, you'll want to mess around with the "gathering data" stage. In this example, a trio of lines load data into the fieldData array, converting each into a string beforehand. Those values from fieldData are later used in the postData() function when the HTTP GET string is formulated.
Most of the importatnt stuff happens in the postData() function. Here you'll find an example for creating an HTTP GET, and routing it out to the server. Check out the comments for a line-by-line dissection of the code.
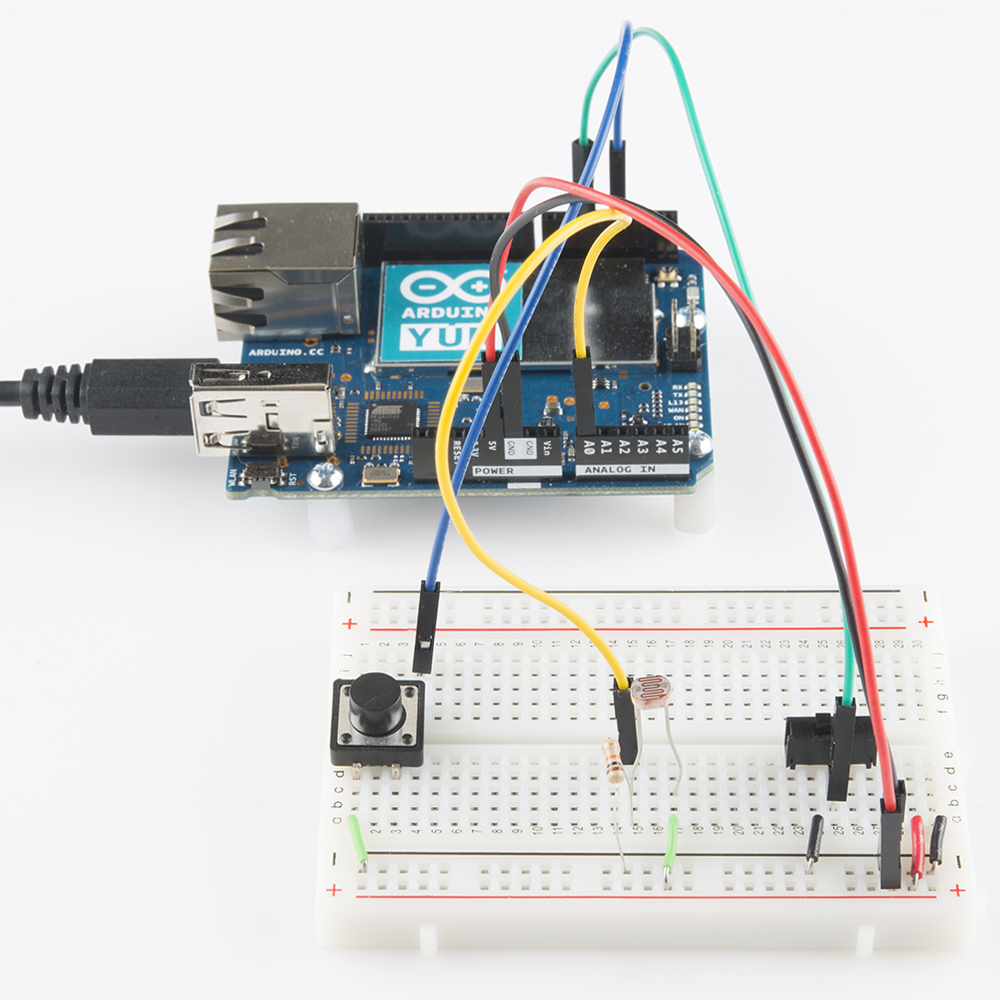
Arduino Yún
With its built-in WiFi and Ethernet, the Arduino Yun was made for internet-of-things applications like this.
For help getting started with the Yun, check out Arduino's Guide to the Arduino Yun. If you're going to use the Yun over WiFi, definitely check out their section on configuring the WiFi.
Arduino Example Circuit
As with every other Arduino example in this tutorial, we'll be using a simple circuit consisting of a photocell (voltage divided with a 10kΩ resistor) connecte to A0. A momentary push-button is connected to D3 on one end and ground on the other. And a SPDT switch can connect D5 to ground or let it float.
Pretend the RedBoard in the Fritzing diagram above is Arduino-blue, and you should be golden.
Yun Example Sketch
Make sure your Yun is connected to the Internet, before continuing on. If you have an Ethernet switch or router nearby, simply connect an Ethernet cable between the two. If you're using your Yun through WiFi, follow these directions to connect your Yun to a WiFi network.
Here's the code. Copy and paste from below, or click here to download it.
language:c
/*****************************************************************
Phant_Yun.ino
Post data to SparkFun's data stream server system (phant) using
an Arduino Yun
Jim Lindblom @ SparkFun Electronics
Original Creation Date: July 3, 2014

This sketch uses an Arduino Yun to POST sensor readings to
SparkFun's data logging streams (http://data.sparkfun.com). A post
will be initiated whenever pin 3 is connected to ground.

Make sure you fill in your data stream's public, private, and data
keys before uploading! These are in the global variable section.

Hardware Hookup:
  * These components are connected to the Arduino's I/O pins:
    * D3 - Active-low momentary button (pulled high internally)
    * A0 - Photoresistor (which is combined with a 10k resistor
           to form a voltage divider output to the Arduino).
    * D5 - SPST switch to select either 5V or 0V to this pin.
  * Your Yun should also, somehow, be connected to the Internet.
    You can use Ethernet, or the on-board WiFi module.

Development environment specifics:
    IDE: Arduino 1.5.6-r2
    Hardware Platform: Arduino Yun

This code is beerware; if you see me (or any other SparkFun
employee) at the local, and you've found our code helpful, please
buy us a round!

curl example from:
https://github.com/sparkfun/phant/blob/master/examples/sh/curl_post.sh

Distributed as-is; no warranty is given.
*****************************************************************/
// Process.h gives us access to the Process class, which can be
// used to construct Shell commands and read the response.
#include <Process.h>

/////////////////
// Phant Stuff //
/////////////////
// URL to phant server (only change if you're not using data.sparkfun
String phantURL = "http://data.sparkfun.com/input/";
// Public key (the one you see in the URL):
String publicKey = "6JZbNolApzF4om2l9yYK";
// Private key, which only someone posting to the stream knows
String privateKey = "Ww0vPW1yrkUNDqWPV9jE";
// How many data fields are in your stream?
const int NUM_FIELDS = 3;
// What are the names of your fields?
String fieldName[NUM_FIELDS] = {"light", "switch", "name"};
// We'll use this array later to store our field data
String fieldData[NUM_FIELDS];

////////////////
// Pin Inputs //
////////////////
const int triggerPin = 3;
const int lightPin = A0;
const int switchPin = 5;

String name = "Yun-anon";
boolean newName = true;

void setup()
{
  Bridge.begin();
  Serial.begin(115200);

  // Setup Input Pins:
  pinMode(triggerPin, INPUT_PULLUP);
  pinMode(switchPin, INPUT_PULLUP);
  pinMode(lightPin, INPUT_PULLUP);

  Serial.println("=========== Ready to Stream ===========");
  Serial.println("Press the button (D3) to send an update");
  Serial.println("Type your name, followed by '!' to update name");
}

void loop()
{
  // If the trigger pin (3) goes low, send the data.
  if (!digitalRead(triggerPin))
  {
    // Gather Data
    fieldData[0] = String(analogRead(lightPin));
    fieldData[1] = String(digitalRead(switchPin));
    fieldData[2] = name;

    // Post Data
    Serial.println("Posting Data!");
    postData(); // the postData() function does all the work,
                // see below.
    delay(1000);
  }

  // Check for a new name input:
  if (Serial.available())
  {
    char c = Serial.read();
    if (c == '!')
    {
      newName = true;
      Serial.print("Your name is ");
      Serial.println(name);
    }
    else if (newName)
    {
      newName = false;
      name = "";
      name += c;
    }
    else
    {
      name += c;
    }
  }
}

void postData()
{
  Process phant; // Used to send command to Shell, and view response
  String curlCmd; // Where we'll put our curl command
  String curlData[NUM_FIELDS]; // temp variables to store curl data

  // Construct curl data fields
  // Should look like: --data "fieldName=fieldData"
  for (int i=0; i<NUM_FIELDS; i++)
  {
    curlData[i] = "--data \"" + fieldName[i] + "=" + fieldData[i] + "\" ";
  }

  // Construct the curl command:
  curlCmd = "curl ";
  curlCmd += "--header "; // Put our private key in the header.
  curlCmd += "\"Phant-Private-Key: "; // Tells our server the key is coming
  curlCmd += privateKey;
  curlCmd += "\" "; // Enclose the entire header with quotes.
  for (int i=0; i<NUM_FIELDS; i++)
    curlCmd += curlData[i]; // Add our data fields to the command
  curlCmd += phantURL + publicKey; // Add the server URL, including public key

  // Send the curl command:
  Serial.print("Sending command: ");
  Serial.println(curlCmd); // Print command for debug
  phant.runShellCommand(curlCmd); // Send command through Shell

  // Read out the response:
  Serial.print("Response: ");
  // Use the phant process to read in any response from Linux:
  while (phant.available())
  {
    char c = phant.read();
    Serial.write(c);
  }
}
After uploading the sketch, open the Serial Monitor and set your baud rate to 115200 bps. Wait for the "Ready to Stream" message to appear, then press the button to send data. This example sketch should post to our example stream by default.
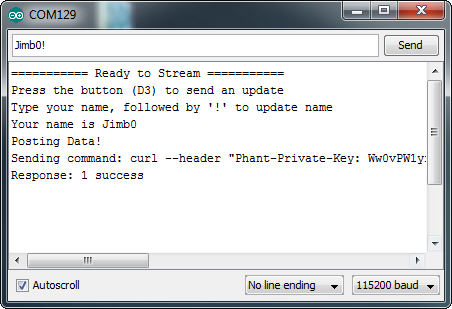
You can update the name value that posts, by sending a series of characters followed by an exclamation mark (!).
Configuring to Use Your Data Stream
The section in the code under "Phant Stuff" is where you can alter variables and set the Yun to use a data stream of your own.
language:c
/////////////////
// Phant Stuff //
/////////////////
// URL to phant server (only change if you're not using data.sparkfun
String phantURL = "http://data.sparkfun.com/input/";
// Public key (the one you see in the URL):
String publicKey = "6JZbNolApzF4om2l9yYK";
// Private key, which only someone posting to the stream knows
String privateKey = "Ww0vPW1yrkUNDqWPV9jE";
// How many data fields are in your stream?
const int NUM_FIELDS = 3;
// What are the names of your fields?
String fieldName[NUM_FIELDS] = {"light", "switch", "name"};
// We'll use this array later to store our field data
String fieldData[NUM_FIELDS];
The publicKey and privateKey variables should be set to the respective keys your were supplied when creating your stream. Also make sure to set the NUM_FIELDS variable to the number of fields in your stream and update the fieldName array values accordingly.
Using the Sketch
In this example we use the Unix cURL command to transfer data to a server. The Yun's Process class comes in handy for sending a shell command, and reading its response.
Most of the action happens in the void postData() function. That's where we read the Arduino's inputs and formulate a cURL command. The contents of the cURL command include the server URL, public and private keys, and our data keys and values. Check out the comments in that function for a line-by-line dissection.
Raspberry Pi (Python)
The multi-talented Raspberry Pi has no shortage of tools for posting data to web servers. You could use a shell script and cURL, similar to what we did on the Yun, but in this example we'll use Python, which pairs nicely with the Pi's RPi.GPIO module.
If you haven't used Python on the Pi to read-and-write to I/O pins, check out our Raspberry gPIo tutorial. This tutorial leans on that to read the status of a couple input pins.
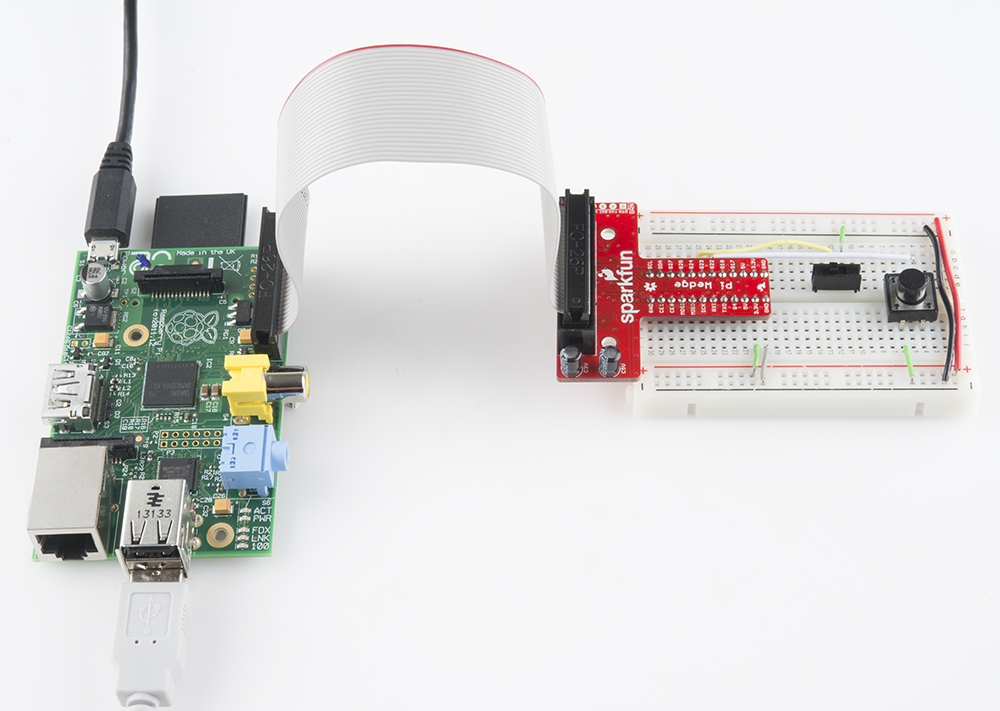
Example Circuit
Our simple example circuit changes a little bit in this case. The Pi doesn't have analog inputs, so we can't plug the photocell in, but we'll still use a button and switch:
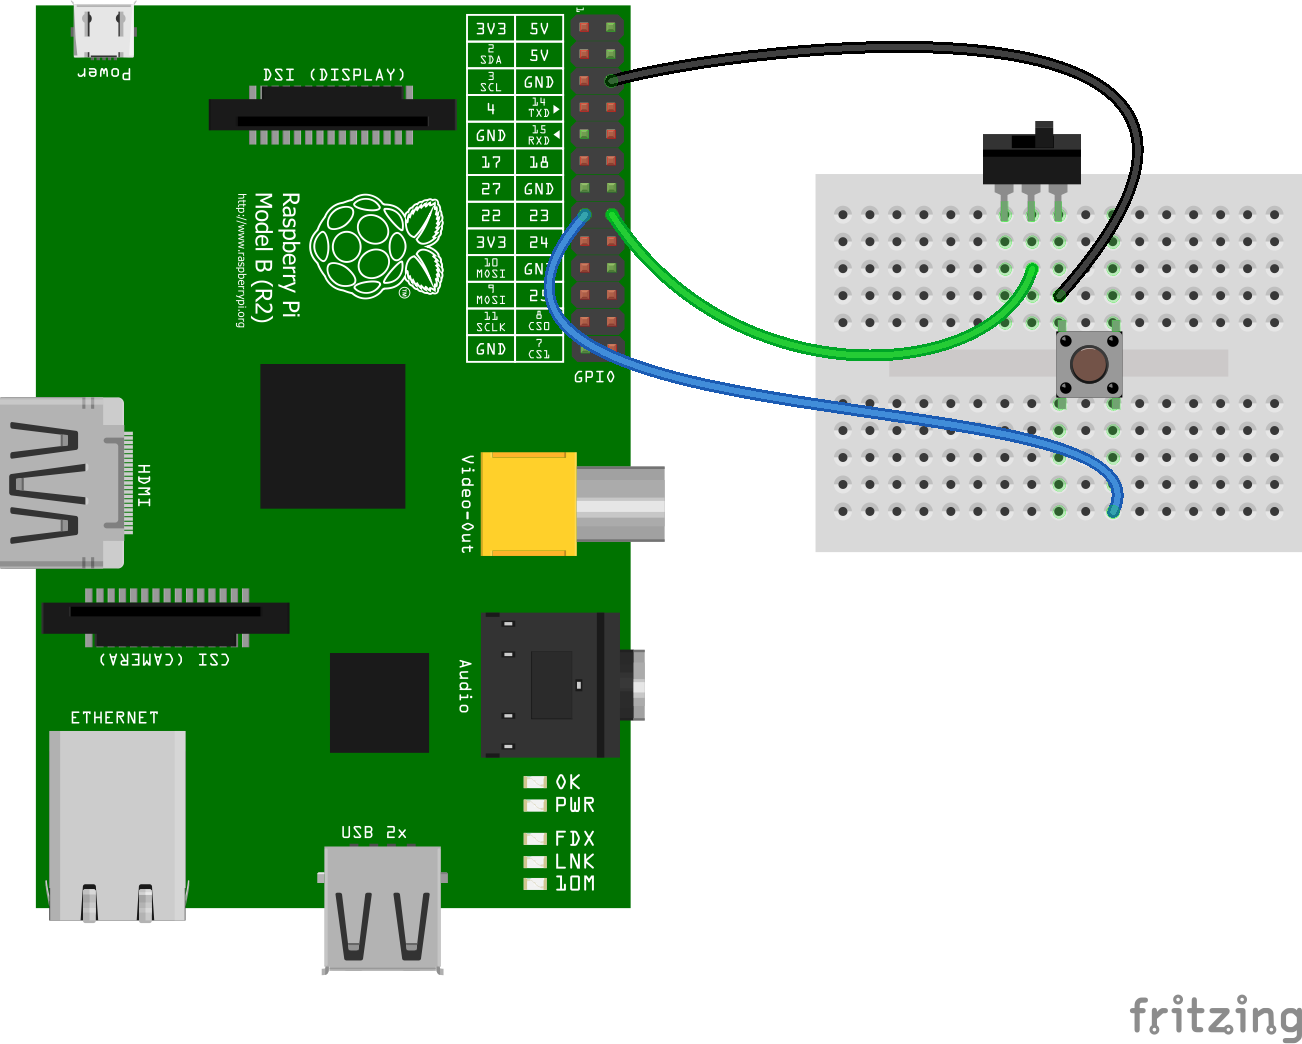
The button is connected to the Pi's pin 22 (that's the Broadcom chip pin), and the switch output is connected to pin 23.
If you have a Pi Wedge, it makes the job of wiring to the Pi much easier.
Example Script
Right-click and Save Link As to download the example python script, or copy and paste from below. We've named our file phant-raspi.py, if you're making the file on your own. Place it in an easily-accesible directory on your Pi.
language:c
########################################################################
# phant-raspi.py
# Raspberry Pi Phant Example
# Jim Lindblom @ SparkFun Electronics
# July 7, 2014
#
# This example demonstrates how to post data to a phant server (e.g.
#   data.sparkfun.com) using python on a Raspberry Pi.
#   The RPi.GPIO module is used to enable I/O reading and writing.
#   Before running this script, make sure to update your public and
#   private keys (publicKey and privateKey vars).
#
# Development environment specifics:
#   Raspberry Pi rev 2
#
# This code is beerware; if you see me (or any other SparkFun employee)
# at the local, and you've found our code helpful, please buy us a round!
# Distributed as-is; no warranty is given.
########################################################################

import RPi.GPIO as GPIO  # RPi.GPIO used for GPIO reading/writing
import time              # time used for delays
import httplib, urllib   # http and url libs used for HTTP POSTs
import socket            # socket used to get host name/IP

#################
## Phant Stuff ##
#################
server = "data.sparkfun.com" # base URL of your feed
publicKey = "6JZbNolApzF4om2l9yYK" # public key, everyone can see this
privateKey = "Ww0vPW1yrkUNDqWPV9jE"  # private key, only you should know
fields = ["light", "switch", "name"] # Your feed's data fields

######################
## I/O Stuff & Misc ##
######################
buttonPin = 22 # Active-low button connected to Broadcom pin 22
switchPin = 23 # SPST switch connected to Broadcom pin 23
myname = socket.gethostname() # Send local host name as one data field

##############
## I/O Setup #
##############
GPIO.setmode(GPIO.BCM) # Broadcom pin-numbering scheme
GPIO.setup(buttonPin, GPIO.IN, pull_up_down=GPIO.PUD_UP) # Button pin set as input w/ pull-up
GPIO.setup(switchPin, GPIO.IN, pull_up_down=GPIO.PUD_UP) # Switch set as input w/ pull-up

##########
## Loop ##
##########
print("Here we go! Press CTRL+C to exit")
try:
    # Loop until CTRL+C is pressed
    while 1:
        # If the button is pressed, we'll send our data. It's active-low
        # so we need to check if it's 0.
        if not (GPIO.input(buttonPin)):
            print("Sending an update!")
            # Our first job is to create the data set. Should turn into
            # something like "light=1234&switch=0&name=raspberrypi"
            data = {} # Create empty set, then fill in with our three fields:
            # Field 0, light, gets the local time:
            data[fields[0]] = time.strftime("%A %B %d, %Y %H:%M:%S %Z")
            # Field 1, switch, gets the switch status:
            data[fields[1]] = GPIO.input(switchPin)
            # Field 2, name, gets the pi's local name:
            data[fields[2]] = myname
            # Next, we need to encode that data into a url format:
            params = urllib.urlencode(data)

            # Now we need to set up our headers:
            headers = {} # start with an empty set
            # These are static, should be there every time:
            headers["Content-Type"] = "application/x-www-form-urlencoded"
            headers["Connection"] = "close"
            headers["Content-Length"] = len(params) # length of data
            headers["Phant-Private-Key"] = privateKey # private key header

            # Now we initiate a connection, and post the data
            c = httplib.HTTPConnection(server)
            # Here's the magic, our reqeust format is POST, we want
            # to send the data to data.sparkfun.com/input/PUBLIC_KEY.txt
            # and include both our data (params) and headers
            c.request("POST", "/input/" + publicKey + ".txt", params, headers)
            r = c.getresponse() # Get the server's response and print it
            print r.status, r.reason

            time.sleep(1) # delay for a second

except KeyboardInterrupt: # If CTRL+C is pressed, exit cleanly:
    GPIO.cleanup() # cleanup all GPIO
Now open up the terminal, and navigate to the directory where your script lives, and run it like this:
pi@raspberrypi ~/code/phant-pi $ sudo python phant-raspi.py
With the script running, when you connect the button pin (22) to ground it should send an update. A handful of messages will appear each time a message is sent. You want to see "200 OK" after the "Sending an Update!" message. That should indicate that the HTTP POST was succesfully sent.
To customize it to your own Phant stream, edit the public, private, and field keys in this section:
language:python
#################
## Phant Stuff ##
#################
server = "data.sparkfun.com" # base URL of your feed
publicKey = "6JZbNolApzF4om2l9yYK" # public key, everyone can see this
privateKey = "Ww0vPW1yrkUNDqWPV9jE"  # private key, only you should know
fields = ["light", "switch", "name"] # Your feed's data fields
You may also want to modify how the data for those fields is gathered. That happens near the very beginning of the lone if statement. Field 0 ("light") contains the current time/date, field 1 ("switch") contains the status of our switch, and field 2 ("name") contains the localhost name of your Pi.
Electric Imp
The Electric Imp -- a development platform centered around Internet-of-Things applications -- is a perfect tool for sending data to a Phant stream. If you want to get code on the little SD-card sized module, it already has to be Internet connected. Plus the Imp API already has all of the HTTP-related features you need to send server requests.
If you're unfamiliar with the Electric Imp, check out our Electric Imp Hookup Guide, which will guide you through the BlinkUp process and includes a few example programs to get you started.
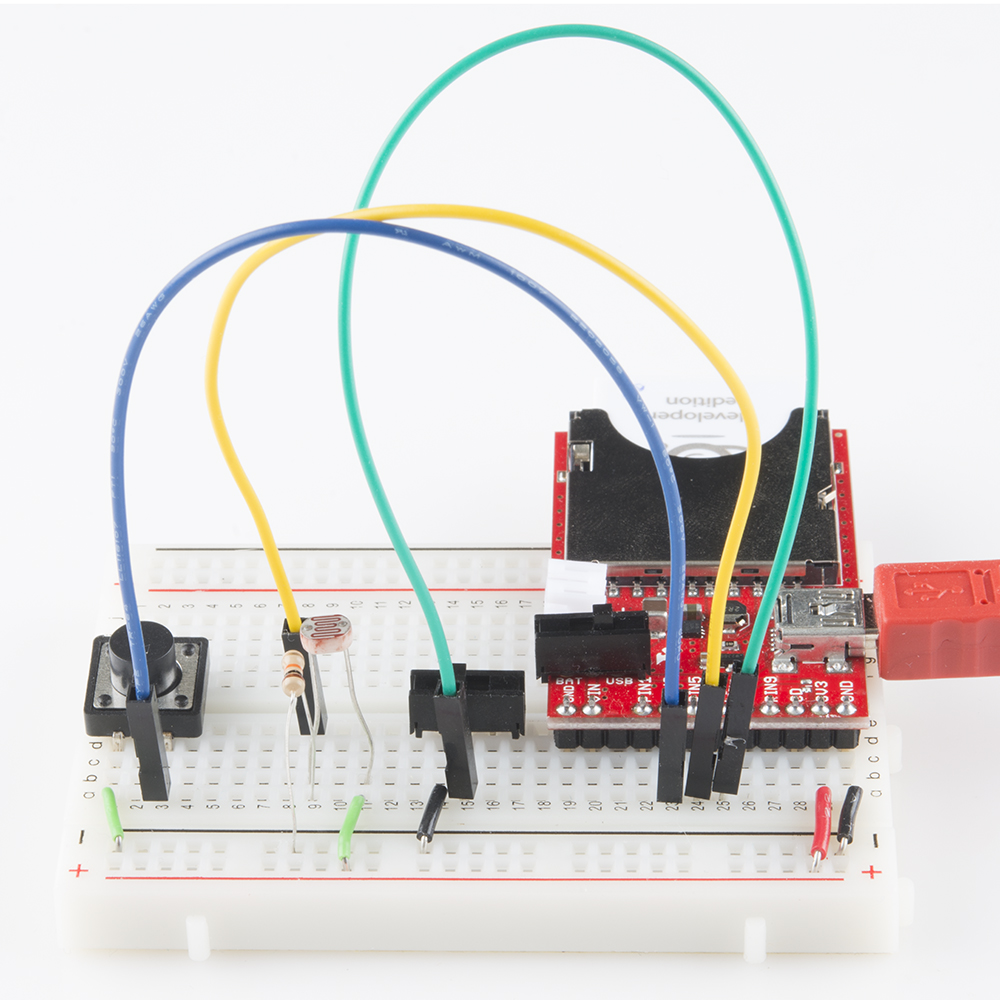
The Imp Example Circuit
Here's the example circuit for our Imp example:
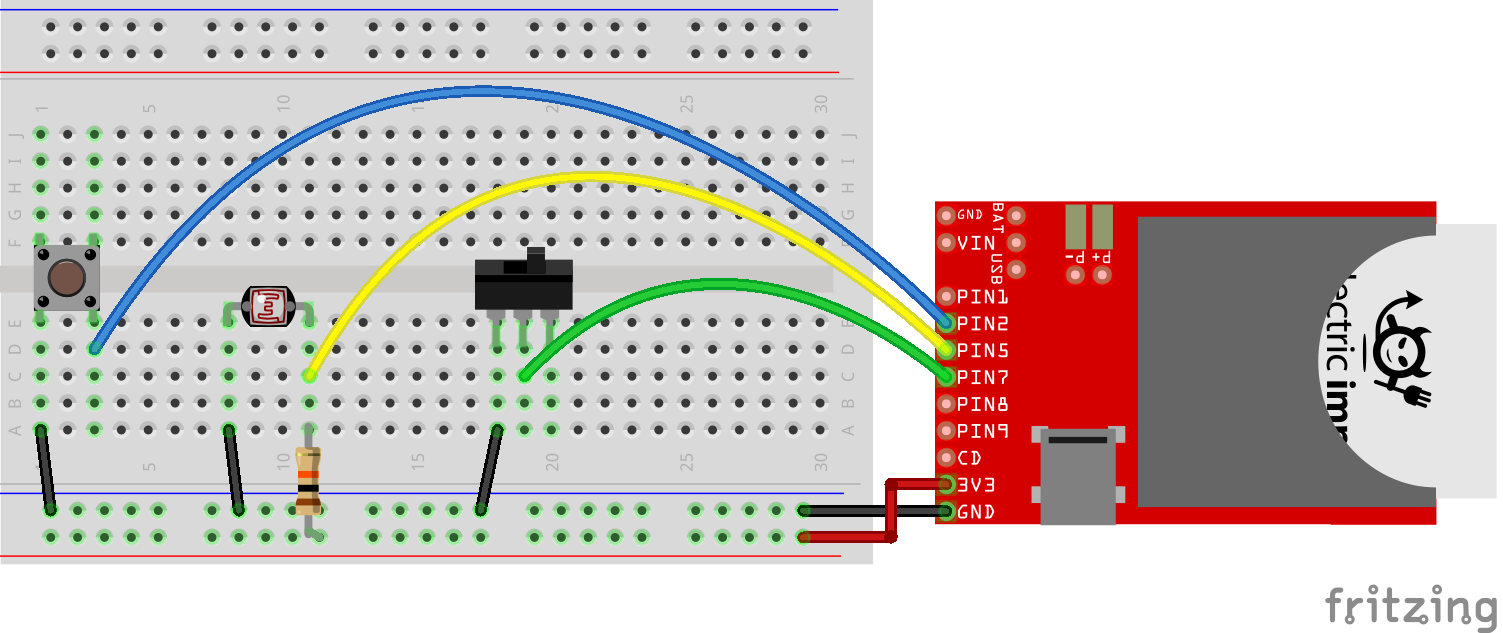
The output of a photocell (voltage divided with a 10kΩ resistor) connects to pin 5. A momentary push-button is connected to pin 2 on one end and ground on the other. And a SPDT switch can connect pin 7 to ground or let it float.
The Imp Example Code
As with most Electric Imp code examples, there are two halves to this puzzle: device code and agent code. Create a new model in your imp IDE -- we called ours "Phant Imp" -- and paste these two bits of code into their respective half.
Device Code
The Imp device itself is responsible for reading the button, switch, and light inputs, packaging them into a string and sending that off to the agent. Here's the code:
language:JavaScript
/*****************************************************************
Phant Imp (Device)
Post data to SparkFun's data stream server system (phant) using
an Electric Imp
Jim Lindblom @ SparkFun Electronics
Original Creation Date: July 7, 2014

Description

Hardware Hookup:
  * These components are connected to the Arduino's I/O pins:
    * Pin 1 - Active-low momentary button (pulled high internally)
    * Pin 2 - Photoresistor (which is combined with a 10k resistor
           to form a voltage divider output to the Arduino).
    * Pin 5 - SPST switch to select either 5V or 0V to this pin.

This code is beerware; if you see me (or any other SparkFun
employee) at the local, and you've found our code helpful, please
buy us a round!

Distributed as-is; no warranty is given.
*****************************************************************/

/////////////////
// Phant Stuff //
/////////////////
const FIELD_COUNT = 3; // Number of fields in the stream
local fieldNames = ["light", "switch", "name"]; // Exact names of each field

/////////////////////
// Pin Definitions //
/////////////////////
buttonPin <- hardware.pin2;
lightPin <- hardware.pin5;
switchPin <- hardware.pin7;

// This name will be sent to the stream each update:
local impName = "Imp%20" + imp.getmacaddress();

////////////////////////////
// Button Press Interrupt //
////////////////////////////
// This function will be called each time the button (connected to pin 2) is
// pressed or released.
function sendData()
{
    // Only do this if the pin is low (pressed)
    if (buttonPin.read() == 0)
    {
        // Collect Data
        local lightValue = lightPin.read();
        local switchValue = switchPin.read();

        // Populate fieldData array with respective data values
        local fieldData = [lightValue, switchValue, impName];

        // Create a data string to send to the agent. Should be of the form:
        // "fieldName0=fieldData0&fieldName1=fieldData1&fieldName2=fieldData2"
        local data = "";
        for (local i=0; i<FIELD_COUNT; i++)
        {
            data += fieldNames[i] + "=" + fieldData[i];
            if (i < FIELD_COUNT - 1)
                data += "&";
        }
        server.log("Sending Data!");
        agent.send("postData", data);

        imp.sleep(1); // Wait for a second (lazy debounce, update rate control)
    }
}

///////////////
// Pin Setup //
///////////////
buttonPin.configure(DIGITAL_IN_PULLUP, sendData); // Button -- input w/ pull-up
lightPin.configure(ANALOG_IN); // Light sensor -- Analog input
switchPin.configure(DIGITAL_IN_PULLUP); // Switch -- Input w/ pull-up

server.log("Phant Imp has started"); // Hello, world.
The very first few lines of that code, under the "Phant Stuff" heading, determine the field names of your data steram. Make sure to set the FIELD_COUNT variable to the number of data fields in your stream, and stick the exact name of each field in the fieldNames array.
Agent Code
Paste this code into the left, agent half of your Imp IDE.
language:JavaScript
/*****************************************************************
Phant Imp (Agent)
Post data to SparkFun's data stream server system (phant) using
an Electric Imp
Jim Lindblom @ SparkFun Electronics
Original Creation Date: July 7, 2014

Description

Before uploading this sketch, there are a number of vars that need adjusting:
1. Phant Stuff: Fill in your data stream's public, private, and
data keys before uploading!

This code is beerware; if you see me (or any other SparkFun
employee) at the local, and you've found our code helpful, please
buy us a round!

Distributed as-is; no warranty is given.
*****************************************************************/

/////////////////
// Phant Stuff //
/////////////////
local publicKey = "6JZbNolApzF4om2l9yYK"; // Your Phant public key
local privateKey = "Ww0vPW1yrkUNDqWPV9jE"; // The Phant private key
local phantServer = "data.sparkfun.com"; // Your Phant server, base URL, no HTTP

/////////////////////
// postData Action //
/////////////////////
// When the agent receives a "postData" string from the device, use the
// dataString string to construct a HTTP POST, and send it to the server.
device.on("postData", function(dataString) {

    server.log("Sending " + dataString); // Print a debug message

    // Construct the base URL: https://data.sparkfun.com/input/PUBLIC_KEY:
    local phantURL = "https://" +  phantServer + "/input/" + publicKey;
    // Construct the headers: e.g. "Phant-Priave-Key: PRIVATE_KEY"
    local phantHeaders = {"Phant-Private-Key": privateKey, "connection": "close"};
    // Send the POST to phantURL, with phantHeaders, and dataString data.
    local request = http.post(phantURL, phantHeaders, dataString);

    // Get the response from the server, and send it out the debug window:
    local response = request.sendsync();
    server.log("Phant response: " + response.body);
});
The agent is responsible for receiving data from the Imp and sending it off to a server in the form of an HTTP POST. The public and private keys of your stream are stored in this half of the model. Update those, under the "Phant Stuff" heading, to the hashes in your stream.
In this example, the agent is totally ignorant of the data being passed to the stream. It's relying on the device to construct that string exactly as the server wants to see it. That seemed to be the easiest way to handle this, as the device can only send a single string at a time to the agent.
With those two halves of code copied and pasted, upload them to your Imp. Then, whenever you press the button, it should post its data to our example stream. Update the variables under the "Phant Stuff" headings to configure it to your stream.
Resources and Going Further
Need more Phant documentation or examples? Check out these resources:
- Phant Documentation Page -- All of the in's and out's of Phant. This page shows how you can post to the server, read from the server, and even delete your stream.
- Phant GitHub Repository -- Want to use Phant on your server? Want to modify the code? It's all hosted here on GitHub.
- Phant Example Code -- Example code covering perl, PHP, Ruby, and shell.
- Phant Arduino Library -- The Phant Arduino library makes creating HTTP GETs and POSTs super easy.
Going Further
Now that you're posting data to the Internet, what project are you going to create to use the SparkFun data service? Need some inspiration? Check out these tutorials:
- Weather Station Wirelessly Connected to Wunderground -- This weather station project served as the main inspiration behind Phant. Check this tutorial out for more Electric Imp goodness.
- Internet Datalogging with Arduino & XBee WiFi -- This tutorial explains how to combine an Arduino, XBee WiFi module, and XBee Shield in order to post data to Phant.
- Browse through our sensor category, pick a few out, and log them!