Internet Datalogging With Arduino and XBee WiFi
This Tutorial is Retired!
This tutorial covers concepts or technologies that are no longer current. It's still here for you to read and enjoy, but may not be as useful as our newest tutorials.
 jimblom
Introduction
Phant is No Longer in Operation
Are you looking to get your data gathering project hooked into the "Internet-of-Things"? Then check out data.sparkfun.com! It makes posting data to the web as easy as constructing a URL and POSTing it to a server.
I wanted to create a quick project to test out SparkFun's data logging service. Combining an Arduino, XBee WiFi module, and a variety of gas, temperature, and light sensors I built an office conditions logger.
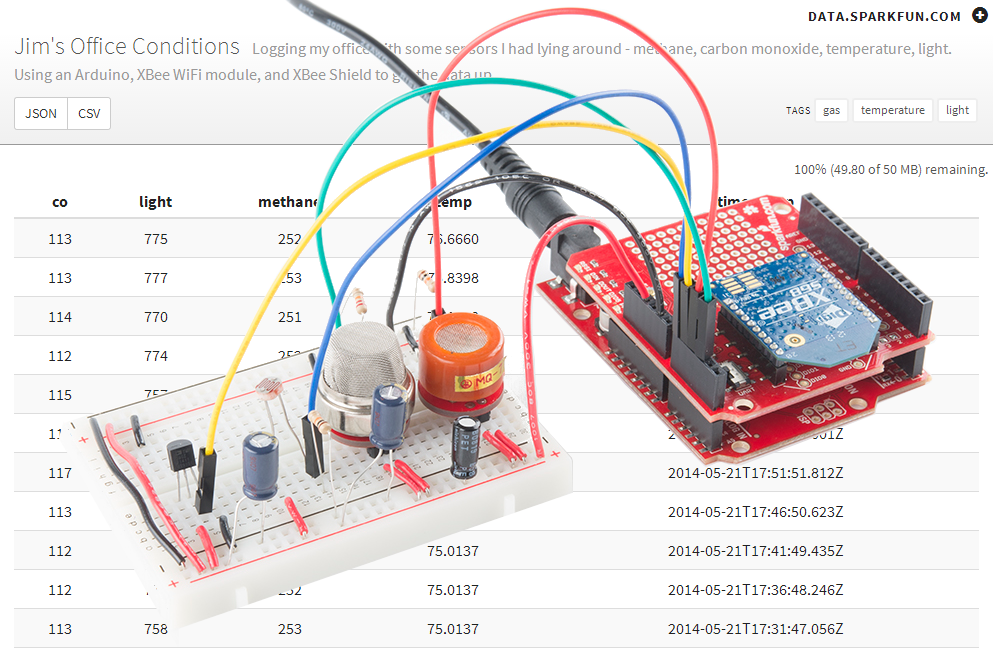
Logging data to the web provides many advantages over local storage -- most significantly it gives you instant and constant access to logged data. The trade-off for that instant data access is a loss of privacy, but, if you don't care who knows what the temperature, light, or methane (well...) levels in your office are, then logging data to data.sparkfun.com is an awesomely-easy solution.
Required Materials
In this tutorial we'll use a variety of simple analog sensors to create an "Office Conditions Logger", but the hardware hookup and example code should be easily adaptable to more unique or complex sensors. Here's a list of stuff I used to make my logger:
Some notes on this wishlisted bill of materials:
- You'll also need some breadboarding tools -- a breadboard and jumper wire.
- To assemble the shield you'll need soldering tools and headers.
- I didn't add resistors to that list, but you'll need a few 10kΩ-22kΩ resistors to complete the circuit. If you don't already have one, we recommend grabbing an ever-handy resistor kit.
- The XBee Shield can be swapped out for a Regulated Explorer, or even something as simple as an XBee Breakout, with some additional jumper wires (and maybe level shifting).
- I'm using the RedBoard, but any Arduino-compatible board will work, whether it's an Uno, Leonardo or Mega.
These days Arduino's have no shortage of routes to the Internet. I'm using the XBee WiFi modules because they're simple to use, relatively low-cost, and they work with XBee Shields (which you may already have in your electronics toolkit). So, while the code in this tutorial is specific to that module, it should be adaptable to the WiFi Shield, Ethernet Shield, CC3000 Shield, or whatever means your Arduino is using to access the Internet.
Suggested Reading
- XBee WiFi Hookup Guide -- This is a good place to start, especially if you need to get your XBee WiFi configured to connect to your WiFi network.
- XBee Shield Hookup Guide -- We'll use the XBee Shield to interface the XBee WiFi with an Arduino. Learn all about the shield in this tutorial.
- Analog-to-Digital Converters (ADCs) -- All of our sensors in this example are analog, so we'll be relying on the Arduino's ADC to read those analog voltages and turn them into something digital.
- How to Power Your Project -- The gas sensors can consume quite a bit of power, check out this tutorial to get some ideas for how to power your project.
Hardware Hookup
On this page we'll discuss the schematic and wiring of this project. We can divide our circuit up into two sub-systems -- the XBee WiFi and the sensors -- and wire them separately.
Connect the XBee WiFi
The difficulty-level of this step depends on whether you're using a Shield (easiest), an XBee Regulated Explorer (easy-ish), or a more general XBee Breakout (easy after you've figured out level-shifting). If you're using a Shield, simply populate your headers and plug stuff in. Make sure the switch is in the DLINE position!

If you're using an XBee Regulated or similar, you'll need to run four wires between the Arduino and XBee: power, ground, RX (DIN), and TX (DOUT). We've wired the XBee's DIN and DOUT pins as such:

| XBee Pin | Arduino Pin |
|---|---|
| DIN | 2 |
| DOUT | 3 |
Since we're using SoftwareSerial, you can move those serial lines to any other Arduino digital pin, just don't forget to modify the code.
Keep in mind that the XBee is a 3.3V device, it won't tolerate 5V on either its power or I/O lines. If you're using something really simple, like the XBee Breakout, you'll need to power the XBee off the 3.3V rail, and level shift those I/O lines!
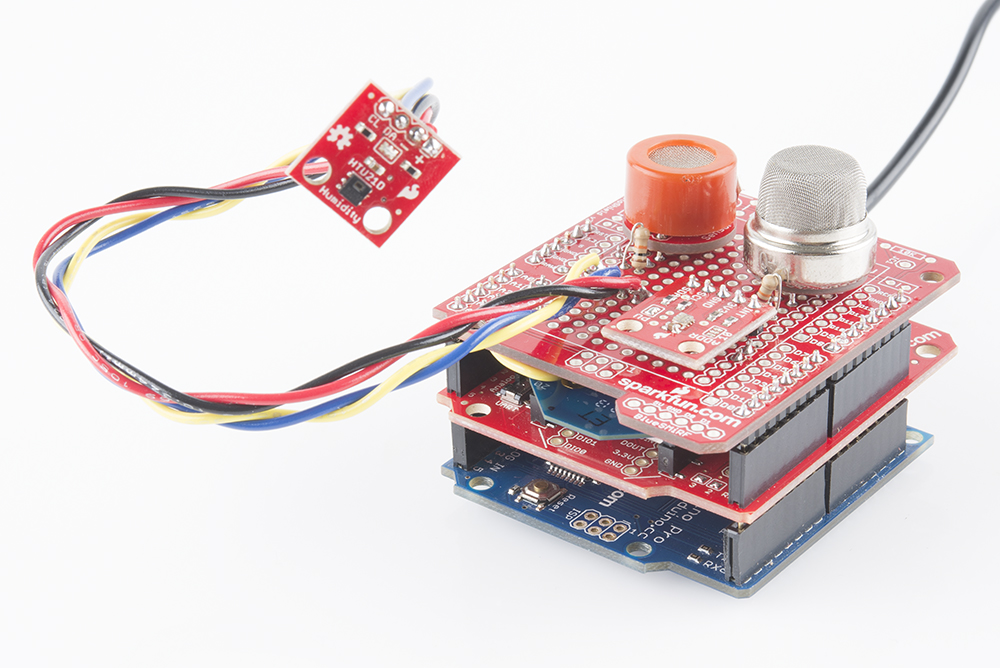
Connect Your Sensors
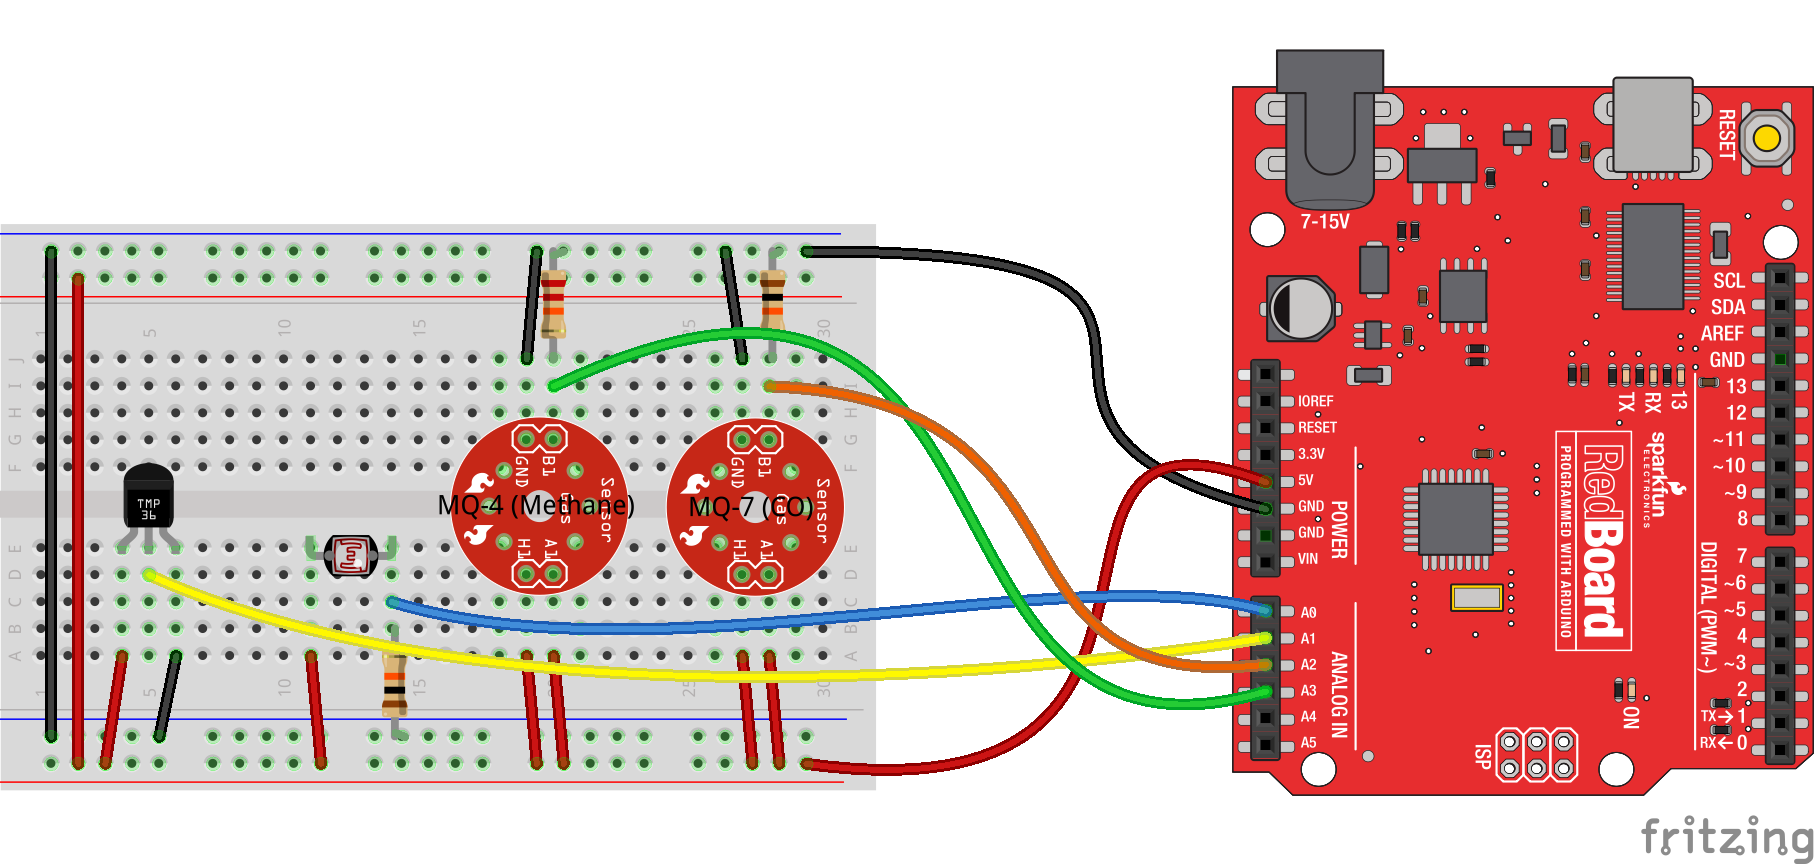
I'm using a collection of analog sensors to monitor carbon monoxide, methane, temperature, and light conditions in the office. Here's how everything is hooked up:
| Sensor | Arduino Pin | Notes |
|---|---|---|
| Photoresistor (Light) | A0 | Connect a 10kΩ resistor from output to ground. Tie other leg of photocell to 5V. |
| TMP36 (Temperature) | A1 | Power the TMP36 off the 5V rail. The temperature (in °C) is the (read voltage - 0.5V)*100. |
| MQ-4 (Methane) | A2 | Connect a 22kΩ resistor from output to ground. These things suck a lot of power, adding a cap nearby may help to smooth out the voltage supply. |
| MQ-7 (Carbon-Monoxide) | A3 | Connect a 10kΩ resistor from output to ground. These things suck a lot of power, adding a cap nearby may help to smooth out the voltage supply. |
If you just want to try the data logging system out, don't feel required to connect all of those sensors. Heck, you can even leave all of those analog input pins floating to test everything out.
Adding more complex sensors shouldn't take too much extra effort. I'll try to keep the code modular, so you can plug your own sensor-reading functions in.
Configure the XBee WiFi
The example code will attempt to configure your XBee -- given an SSID, passkey, and encryption mode -- but you can give it a head start by using XCTU to configure your XBee's network settings.
If you have a USB Explorer or any other means for connecting your XBee to your computer, we recommend following along with the Using XCTU page of our XBee WiFi Hookup Guide to at least configure the module with your WiFi network's SSID and password.
Set Up a Data Stream
If this is your first SparkFun data stream, follow along here as we walk you through the process of creating a feed.
Create a Feed
To begin, head over to data.sparkfun.com and click Create.

On the next page, fill in the blanks with your feed's title and description. Then take extra care to fill in the Fields textbox. This comma-separated list of words defines how you interact with the data stream to post a list of unique values. Make your fields as descriptive and short as you can. I used "methane", "co", "temp" and "light" to describe the readings.
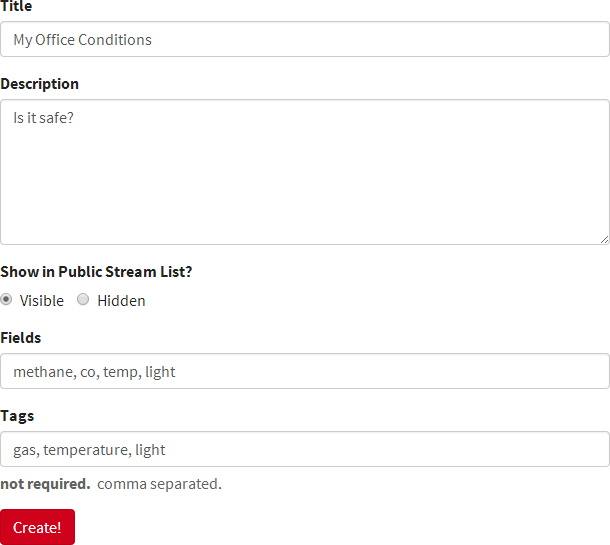
Once you've figured all of that out, click Create!.
Anatomy of a Feed
After you've created your feed you'll be led to the stream's key page. Copy down all of the information on this page! Better yet, take advantage of the "Email a Copy" section at the bottom to get a more permanent copy of the keys.
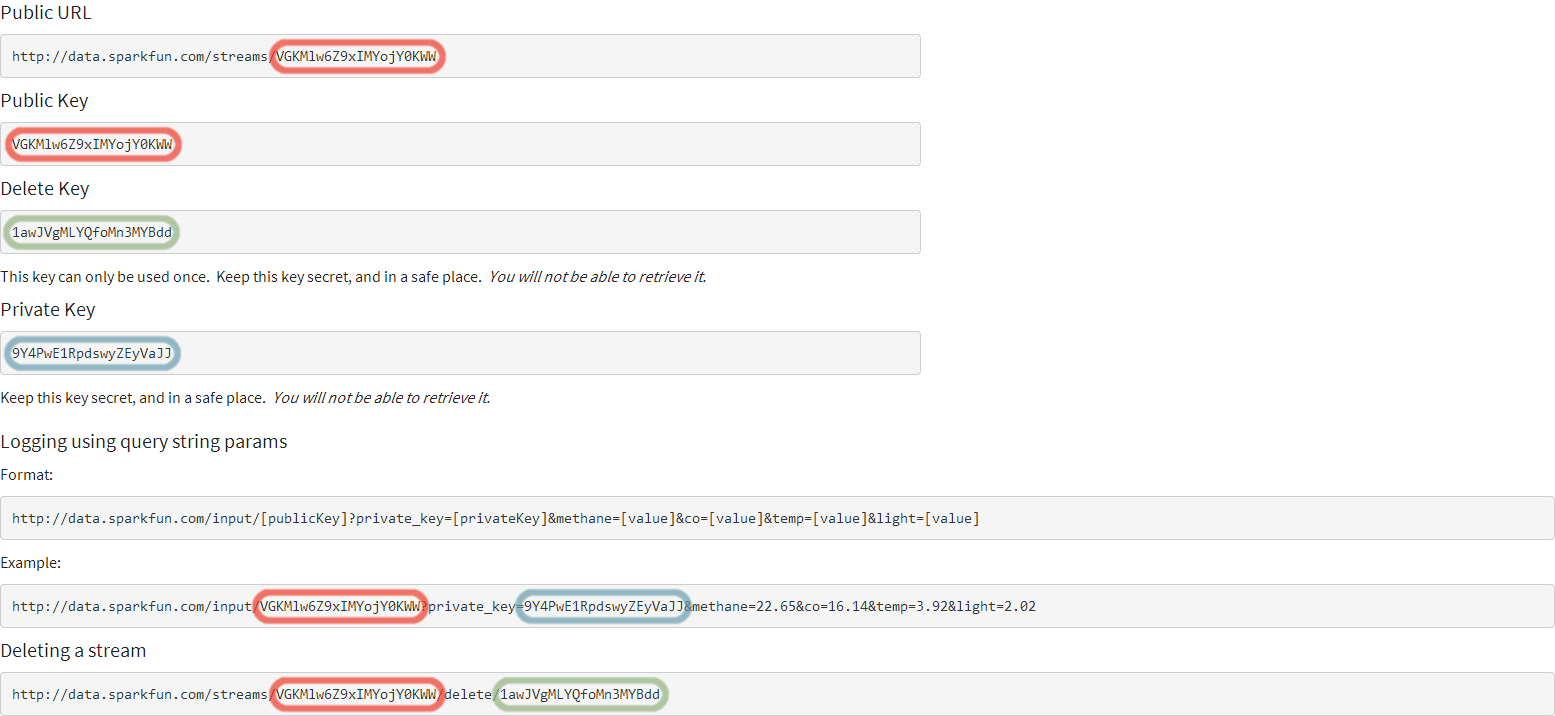
A quick overview on the keys:
- Public Key -- This is a long hash that is used to identify your stream and provide a unique URL. This key is publicly visible -- anyone who visits your stream's URL will be able to see this hash.
- Private Key -- The private key is required in order to post data to the stream. Only you should know this key.
- Delete Key -- Normally you'll want to avoid this key, as it will delete your stream in its entirety. If you messed up -- maybe you want to add or modify a field -- this key, and the delete URL, may come in handy.
- Fields -- Not highlighted in the image above are the four fields we defined when we were creating this stream -- "methane", "co", "temp" and "light". Those fields are used to set specific values and create a new log of data. Check out the example under "Logging using query string params" to see how those fields are used.
Now that you've created your stream, and have the hardware set up, you have everything you need to start coding. To the next page!
Modify and Upload the Code
Download and Install the Phant Arduino Library
The sensational creators of the SparkFun data stream service have developed an Arduino library to make posting data to a stream as easy as can be. The Phant Arduino library helps to manage keys and fields, and even assembles HTTP POSTs for you to send to a server.
Head over to the phant-arduino GitHub repo to download a copy (click the "Download ZIP" link on the bottom-right side of the page) or click here if you want to avoid a trip to GitHub.
Install the library by extracting it to the libraries folder within your Arduino sketchbook. Check out our Installing an Arduino Library tutorial for help with that.
Download and Modify the Example Code
Click here to download the example sketch or copy and paste from below:
language:c
/*****************************************************************
Phant_XBee_WiFi.ino
Post data to SparkFun's data stream server system (phant) using
an XBee WiFi and XBee Shield.
Jim Lindblom @ SparkFun Electronics
Original Creation Date: May 20, 2014
https://learn.sparkfun.com/tutorials/online-datalogging-with-an-xbee-wifi
This sketch uses an XBee WiFi and an XBee Shield to get on
the internet and POST analogRead values to SparkFun's data
logging streams (http://data.sparkfun.com).
Hardware Hookup:
The Arduino shield makes all of the connections you'll need
between Arduino and XBee WiFi. If you have the shield make
sure the SWITCH IS IN THE "DLINE" POSITION.
I've also got four separate analog sensors (methane, co,
temperature, and photocell) connected to pins A0-A3. Feel
free to switch that up. You can post analog data, digital
data, strings, whatever you wish to the Phant server.
Requires the lovely Phant library:
https://github.com/sparkfun/phant-arduino
Development environment specifics:
IDE: Arduino 1.0.5
Hardware Platform: SparkFun RedBoard
XBee Shield & XBee WiFi (w/ trace antenna)
This code is beerware; if you see me (or any other SparkFun
employee) at the local, and you've found our code helpful, please
buy us a round!
Distributed as-is; no warranty is given.
*****************************************************************/
// SoftwareSerial is used to communicate with the XBee
#include <SoftwareSerial.h>
// The Phant library makes creating POSTs super-easy
#include <Phant.h>
// Time in ms, where we stop waiting for serial data to come in
// 2s is usually pretty good. Don't go under 1000ms (entering
// command mode takes about 1s).
#define COMMAND_TIMEOUT 2000 // ms
////////////////////////
// WiFi Network Stuff //
////////////////////////
// Your WiFi network's SSID (name):
String WIFI_SSID = "WIFI_NAME_HERE";
// Your WiFi network's encryption setting
// Set the "encrypt" variable to one of these four characters:
// OPEN = 0, WPA_TKIP = 1, WPA2_AES = 2, WEP = 3
enum encryption{NO_SECURITY, WPA_TKIP, WPA2_AES, WEP};
encryption WIFI_EE = WPA2_AES;
// Your WiFi network's passphrase (if necessary). If your network
// is open, make this a blank string (passphrase = "";)
String WIFI_PSK = "WIFI_PASSWORD_HERE";
/////////////////
// Phant Stuff //
/////////////////
// destIP will go into the XBee's configuration setting, so
// it'll automatically connect to the correct server.
String destIP = "54.86.132.254"; // data.sparkfun.com's IP address
// Initialize the phant object:
// Phant phant(server, publicKey, privateKey);
Phant phant("data.sparkfun.com", "Public_Key", "Private_Key");
// Phant field string defintions. Make sure these match the
// fields you've defined in your data stream:
const String methaneField = "methane";
const String coField = "co";
const String tempField = "temp";
const String lightField = "light";
////////////////
// XBee Stuff //
////////////////
const byte XB_RX = 2; // XBee's RX (Din) pin
const byte XB_TX = 3; // XBee's TX (Dout) pin
// We'll use "xB" from here-on to send and receive data to it:
SoftwareSerial xB(XB_RX, XB_TX);
const int XBEE_BAUD = 9600; // Your XBee's baud (9600 is default)
/////////////////////////////
// Sensors/Input Pin Stuff //
/////////////////////////////
const int lightPin = A0; // Photocell input
const int tempPin = A1; // TMP36 temp sensor input
const int coPin = A2; // Carbon-monoxide sensor input
const int methanePin = A3; // Methane sensor input
// opVoltage - Useful for converting ADC reading to voltage:
const float opVoltage = 4.7;
float tempVal;
int lightVal, coVal, methaneVal;
/////////////////////////
// Update Rate Control //
/////////////////////////
// Phant limits you to 10 seconds between posts. Use this variable
// to limit the update rate (in milliseconds):
const unsigned long UPDATE_RATE = 300000; // 300000ms = 5 minutes
unsigned long lastUpdate = 0; // Keep track of last update time
///////////
// Setup //
///////////
// In setup() we configure our INPUT PINS, start the XBee and
// SERIAL ports, and CONNECT TO THE WIFI NETWORK.
void setup()
{
// Set up sensor pins:
pinMode(lightPin, INPUT);
pinMode(coPin, INPUT);
pinMode(methanePin, INPUT);
pinMode(tempPin, INPUT);
// Set up serial ports:
Serial.begin(9600);
// Make sure the XBEE BAUD RATE matches its pre-set value
// (defaults to 9600).
xB.begin(XBEE_BAUD);
// Set up WiFi network
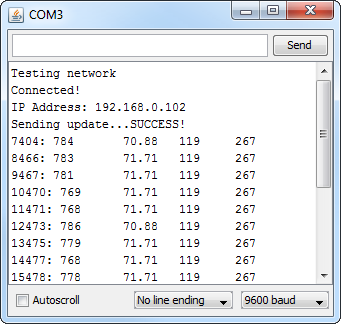
Serial.println("Testing network");
// connectWiFi will attempt to connect to the given SSID, using
// encryption mode "encrypt", and the passphrase string given.
connectWiFi(WIFI_SSID, WIFI_EE, WIFI_PSK);
// Once connected, print out our IP address for a sanity check:
Serial.println("Connected!");
Serial.print("IP Address: "); printIP(); Serial.println();
// setupHTTP() will set up the destination address, port, and
// make sure we're in TCP mode:
setupHTTP(destIP);
// Once everything's set up, send a data stream to make sure
// everything check's out:
Serial.print("Sending update...");
if (sendData())
Serial.println("SUCCESS!");
else
Serial.println("Failed :(");
}
//////////
// Loop //
//////////
// loop() constantly checks to see if enough time has lapsed
// (controlled by UPDATE_RATE) to allow a new stream of data
// to be posted.
// Otherwise, to kill time, it'll print out the sensor values
// over the serial port.
void loop()
{
// If current time is UPDATE_RATE milliseconds greater than
// the last update rate, send new data.
if (millis() > (lastUpdate + UPDATE_RATE))
{
Serial.print("Sending update...");
if (sendData())
Serial.println("SUCCESS!");
else
Serial.println("Failed :(");
lastUpdate = millis();
}
// In the meanwhile, we'll print data to the serial monitor,
// just to let the world know our Arduino is still operational:
readSensors(); // Get updated values from sensors
Serial.print(millis()); // Timestamp
Serial.print(": ");
Serial.print(lightVal);
Serial.print('\t');
Serial.print(tempVal);
Serial.print('\t');
Serial.print(coVal);
Serial.print('\t');
Serial.println(methaneVal);
delay(1000);
}
////////////////
// sendData() //
////////////////
// sendData() makes use of the PHANT LIBRARY to send data to the
// data.sparkfun.com server. We'll use phant.add() to add specific
// parameter and their values to the param list. Then use
// phant.post() to send that data up to the server.
int sendData()
{
xB.flush(); // Flush data so we get fresh stuff in
// IMPORTANT PHANT STUFF!!!
// First we need to add fields and values to send as parameters
// Since we just need to read values from the analog pins, this
// can be automized with a for loop:
readSensors(); // Get updated values from sensors.
phant.add(tempField, tempVal);
phant.add(lightField, lightVal);
phant.add(methaneField, methaneVal);
phant.add(coField, coVal);
// After our PHANT.ADD's we need to PHANT.POST(). The post needs
// to be sent out the XBee. A simple "print" of that post will
// take care of it.
xB.print(phant.post());
// Check the response to make sure we receive a "200 OK". If
// we were good little programmers we'd check the content of
// the OK response. If we were good little programmers...
char response[12];
if (waitForAvailable(12) > 0)
{
for (int i=0; i<12; i++)
{
response[i] = xB.read();
}
if (memcmp(response, "HTTP/1.1 200", 12) == 0)
return 1;
else
{
Serial.println(response);
return 0; // Non-200 response
}
}
else // Otherwise timeout, no response from server
return -1;
}
// readSensors() will simply update a handful of global variables
// It updates tempVal, lightVal, coVal, and methaneVal
void readSensors()
{
tempVal = ((analogRead(tempPin)*opVoltage/1024.0)-0.5)*100;
tempVal = (tempVal * 9.0/5.0) + 32.0; // Convert to farenheit
lightVal = analogRead(lightPin);
methaneVal = analogRead(methanePin);
coVal = analogRead(coPin);
}
///////////////////////////
// XBee WiFi Setup Stuff //
///////////////////////////
// setupHTTP() sets three important parameters on the XBee:
// 1. Destination IP -- This is the IP address of the server
// we want to send data to.
// 2. Destination Port -- We'll be sending data over port 80.
// The standard HTTP port a server listens to.
// 3. IP protocol -- We'll be using TCP (instead of default UDP).
void setupHTTP(String address)
{
// Enter command mode, wait till we get there.
while (!commandMode(1))
;
// Set IP (1 - TCP)
command("ATIP1", 2); // RESP: OK
// Set DL (destination IP address)
command("ATDL" + address, 2); // RESP: OK
// Set DE (0x50 - port 80)
command("ATDE50", 2); // RESP: OK
commandMode(0); // Exit command mode when done
}
///////////////
// printIP() //
///////////////
// Simple function that enters command mode, reads the IP and
// prints it to a serial terminal. Then exits command mode.
void printIP()
{
// Wait till we get into command Mode.
while (!commandMode(1))
;
// Get rid of any data that may have already been in the
// serial receive buffer:
xB.flush();
// Send the ATMY command. Should at least respond with
// "0.0.0.0\r" (7 characters):
command("ATMY", 7);
// While there are characters to be read, read them and throw
// them out to the serial monitor.
while (xB.available() > 0)
{
Serial.write(xB.read());
}
// Exit command mode:
commandMode(0);
}
//////////////////////////////
// connectWiFi(id, ee, psk) //
//////////////////////////////
// For all of your connecting-to-WiFi-networks needs, we present
// the connectWiFi() function. Supply it an SSID, encryption
// setting, and passphrase, and it'll try its darndest to connect
// to your network.
int connectWiFi(String id, byte auth, String psk)
{
const String CMD_SSID = "ATID";
const String CMD_ENC = "ATEE";
const String CMD_PSK = "ATPK";
// Check if we're connected. If so, sweet! We're done.
// Otherwise, time to configure some settings, and print
// some status messages:
int status;
while ((status = checkConnect(id)) != 0)
{
// Print a status message. If `status` isn't 0 (indicating
// "connected"), then it'll be one of these
// (from XBee WiFI user's manual):
// 0x01 - WiFi transceiver initialization in progress.
// 0x02 - WiFi transceiver initialized, but not yet scanning
// for access point.
// 0x13 - Disconnecting from access point.
// 0x23 – SSID not configured.
// 0x24 - Encryption key invalid (either NULL or invalid
// length for WEP)
// 0x27 – SSID was found, but join failed. 0x40- Waiting for
// WPA or WPA2 Authentication
// 0x41 – Module joined a network and is waiting for IP
// configuration to complete, which usually means it is
// waiting for a DHCP provided address.
// 0x42 – Module is joined, IP is configured, and listening
// sockets are being set up.
// 0xFF– Module is currently scanning for the configured SSID.
//
// We added 0xFE to indicate connected but SSID doesn't match
// the provided id.
Serial.print("Waiting to connect: ");
Serial.println(status, HEX);
commandMode(1); // Enter command mode
// Write AH (2 - Infrastructure) -- Locked in
command("ATAH2", 2);
// Write CE (2 - STA) -- Locked in
command("ATCE2", 2);
// Write ID (SparkFun) -- Defined as parameter
command(CMD_SSID + id, 2);
// Write EE (Encryption Enable) -- Defined as parameter
command(CMD_ENC + auth, 2);
// Write PK ("sparkfun6175") -- Defined as parameter
command(CMD_PSK + psk, 2);
// Write MA (0 - DHCP) -- Locked in
command("ATMA0", 2);
// Write IP (1 - TCP) -- Loced in
command("ATIP1", 2);
commandMode(0); // Exit Command Mode CN
delay(2000);
}
}
// Check if the XBee is connected to a WiFi network.
// This function will send the ATAI command to the XBee.
// That command will return with either a 0 (meaning connected)
// or various values indicating different levels of no-connect.
byte checkConnect(String id)
{
char temp[2];
commandMode(0);
while (!commandMode(1))
;
command("ATAI", 2);
temp[0] = hexToInt(xB.read());
temp[1] = hexToInt(xB.read());
xB.flush();
if (temp[0] == 0)
{
command("ATID", 1);
int i=0;
char c=0;
String atid;
while ((c != 0x0D) && xB.available())
{
c = xB.read();
if (c != 0x0D)
atid += c;
}
if (atid == id)
return 0;
else
return 0xFE;
}
else
{
if (temp[1] == 0x13)
return temp[0];
else
return (temp[0]<<4) | temp[1];
}
}
/////////////////////////////////////
// Low-level, ugly, XBee Functions //
/////////////////////////////////////
void command(String atcmd, int rsplen)
{
xB.flush();
xB.print(atcmd);
xB.print("\r");
waitForAvailable(rsplen);
}
int commandMode(boolean enter)
{
xB.flush();
if (enter)
{
char c;
xB.print("+++"); // Send CMD mode string
waitForAvailable(1);
if (xB.available() > 0)
{
c = xB.read();
if (c == 'O') // That's the letter 'O', assume 'K' is next
return 1; // IF we see "OK" return success
}
return 0; // If no (or incorrect) receive, return fail
}
else
{
command("ATCN", 2);
return 1;
}
}
int waitForAvailable(int qty)
{
int timeout = COMMAND_TIMEOUT;
while ((timeout-- > 0) && (xB.available() < qty))
delay(1);
return timeout;
}
byte hexToInt(char c)
{
if (c >= 0x41) // If it's A-F
return c - 0x37;
else
return c - 0x30;
}
Wait! Before you get on with uploading that code to your Arduino, there are a few variable constants you'll need to modify.
Define Your WiFi Network
The example code does its best to set up the XBee WiFi with your WiFi network's unique settings. Under the "WiFi Network Stuff" section, you'll need to fill in your WiFi's SSID, encryption mode, and passkey (if applicable).
language:c
////////////////////////
// WiFi Network Stuff //
////////////////////////
// Your WiFi network's SSID (name):
String WIFI_SSID = "network_name_here";
// Your WiFi network's encryption setting
// Set the "encrypt" variable to one of these four characters:
// OPEN = 0, WPA_TKIP = 1, WPA2_AES = 2, WEP = 3
enum encryption{NO_SECURITY, WPA_TKIP, WPA2_AES, WEP};
encryption WIFI_EE = WPA2_AES;
// Your WiFi network's passphrase (if necessary). If your network
// is open, make this a blank string (passphrase = "";)
String WIFI_PSK = "network_passphrase_here";
For the encryption setting, we've created an enumerated type, which will corral that variable into one of four possible values: open (no passphrase), WPA TKIP, WPA2 AES, or WEP.
Set Up Phant Stuff
All of the keys and fields you defined during the stream creation process come into play next. Follow the directions in the comments to add your data stream's public key, private key, and data fields.
language:c
/////////////////
// Phant Stuff //
/////////////////
// destIP will go into the XBee's configuration setting, so
// it'll automatically connect to the correct server.
String destIP = "54.86.132.254"; // data.sparkfun.com's IP address
// Initialize the phant object:
// Phant phant(server, publicKey, privateKey);
Phant phant("data.sparkfun.com","5Jzx1x8Epgfld3GVzdpo","7BdxZxyVj6Flq5Wn6qVM");
// Phant field string defintions. Make sure these match the
// fields you've defined in your data stream:
const String methaneField = "methane";
const String coField = "co";
const String tempField = "temp";
const String lightField = "light";
Unless you're using a server of your own (good on you!), leave the destIP and "data.sparkfun.com" values alone. That random IP address (54.86.132.254) DNS's to data.sparkfun.com.
In this section we're creating an instance of the Phant class called phant, which we'll reference later on in the sketch. Check out the library's Readme file for more explanation of the Phant library.
Set Up XBee WiFi Stuff
The next section sets up communication with the XBee. If you're using the shield (or the setup from the "Hardware Hookup" page), and your XBee is set to a default baud rate, you can most likely leave this section alone.
language:c
////////////////
// XBee Stuff //
////////////////
const byte XB_RX = 2; // XBee's RX (Din) pin
const byte XB_TX = 3; // XBee's TX (Dout) pin
// We'll use "xB" from here-on to send and receive data to it:
SoftwareSerial xB(XB_RX, XB_TX);
const int XBEE_BAUD = 9600; // Your XBee's baud (9600 is default)
If you've customized the pin connections, adjust the XB_RX and XB_TX variables accordingly. Same goes for the XBEE_BAUD variable, if you've modified your XBee's baud rate.
Setting the Update Rate
The code is configured to send an updated log just about every 5 minutes. You can turn the update speed up or down by adjusting the UPDATE_RATE variable. This value is defined in milliseconds, so it'll take a bit of math to convert from a desired minute-ish rate.
language:c
/////////////////////////
// Update Rate Control //
/////////////////////////
// Phant limits you to 10 seconds between posts. Use this variable
// to limit the update rate (in milliseconds):
const unsigned long UPDATE_RATE = 300000; // 300000ms = 5 minutes
SparkFun's Phant service limits you to one update every 10 seconds, so don't drop the update rate below 10000.
Upload the Code and Test
Once you've made those adjustments, you can safely upload the code. After you've sent the sketch to your Arduino, open up the Serial Monitor to get an idea of what's going on.
If your XBee isn't already connected to a network, it may take a few moments to get the handshakes and DHCP arranged with the router. A few Waiting to connect: XX messages may flow by every couple of seconds indicating the various phases of connecting. (If you're curious, the meaning of those "XX" values are explained in the connectWiFi function.)
Once the XBee is connected, we'll attempt to post our first log of data. You should see a Sending Update... message, followed quickly by SUCCESS!. If you got a success message, go refresh your public stream URL! If your message fails to log, an error message will be printed -- in that case double-check that everything is defined correctly (these things are case-sensitive).

In addition to posting to the web, the sensor readings will begin to stream in the serial monitor...it gives the Arduino something to do in between updates.
Using the Phant Library
The real meat of the server-logging action occurs in the sendData() function. This function achieves two goals: it reads the sensor values, then packages those up into a Phant update to send to our server.
The real key to using the Phant library is the phant.add([field], [value]) function. Since we have four fields to update, we need to make four unique calls of this function to set our four values:
language:c
phant.add(tempField, tempVal); // Write in the temperature field "temp" and value
phant.add(lightField, lightVal); // Write in the light field "temp" and value
phant.add(methaneField, methaneVal); // Write in the methane field "temp" and value
phant.add(coField, coVal); // Write in the carbon-monoxide field "temp" and value
If you have more or less data fields in your stream, you'll need to adjust those four lines accordingly. Once we've made our phant.add()'s, the last step is to send the data off to the server. In this case we combine a software serial print (to send data to the XBee) with the phant.post() function.
language:c
// After our PHANT.ADD's we need to PHANT.POST(). The post needs
// to be sent out the XBee. A simple "print" of that post will
// take care of it.
xB.print(phant.post());
That's all there is to it. The XBee will route that post out to the server it's connected to, and your Arduino can get on with reading sensors or constructing a new post.
Resources and Going Further
Mmmm data. But once you've logged your data to the Internet, what's next? Here are some ideas.
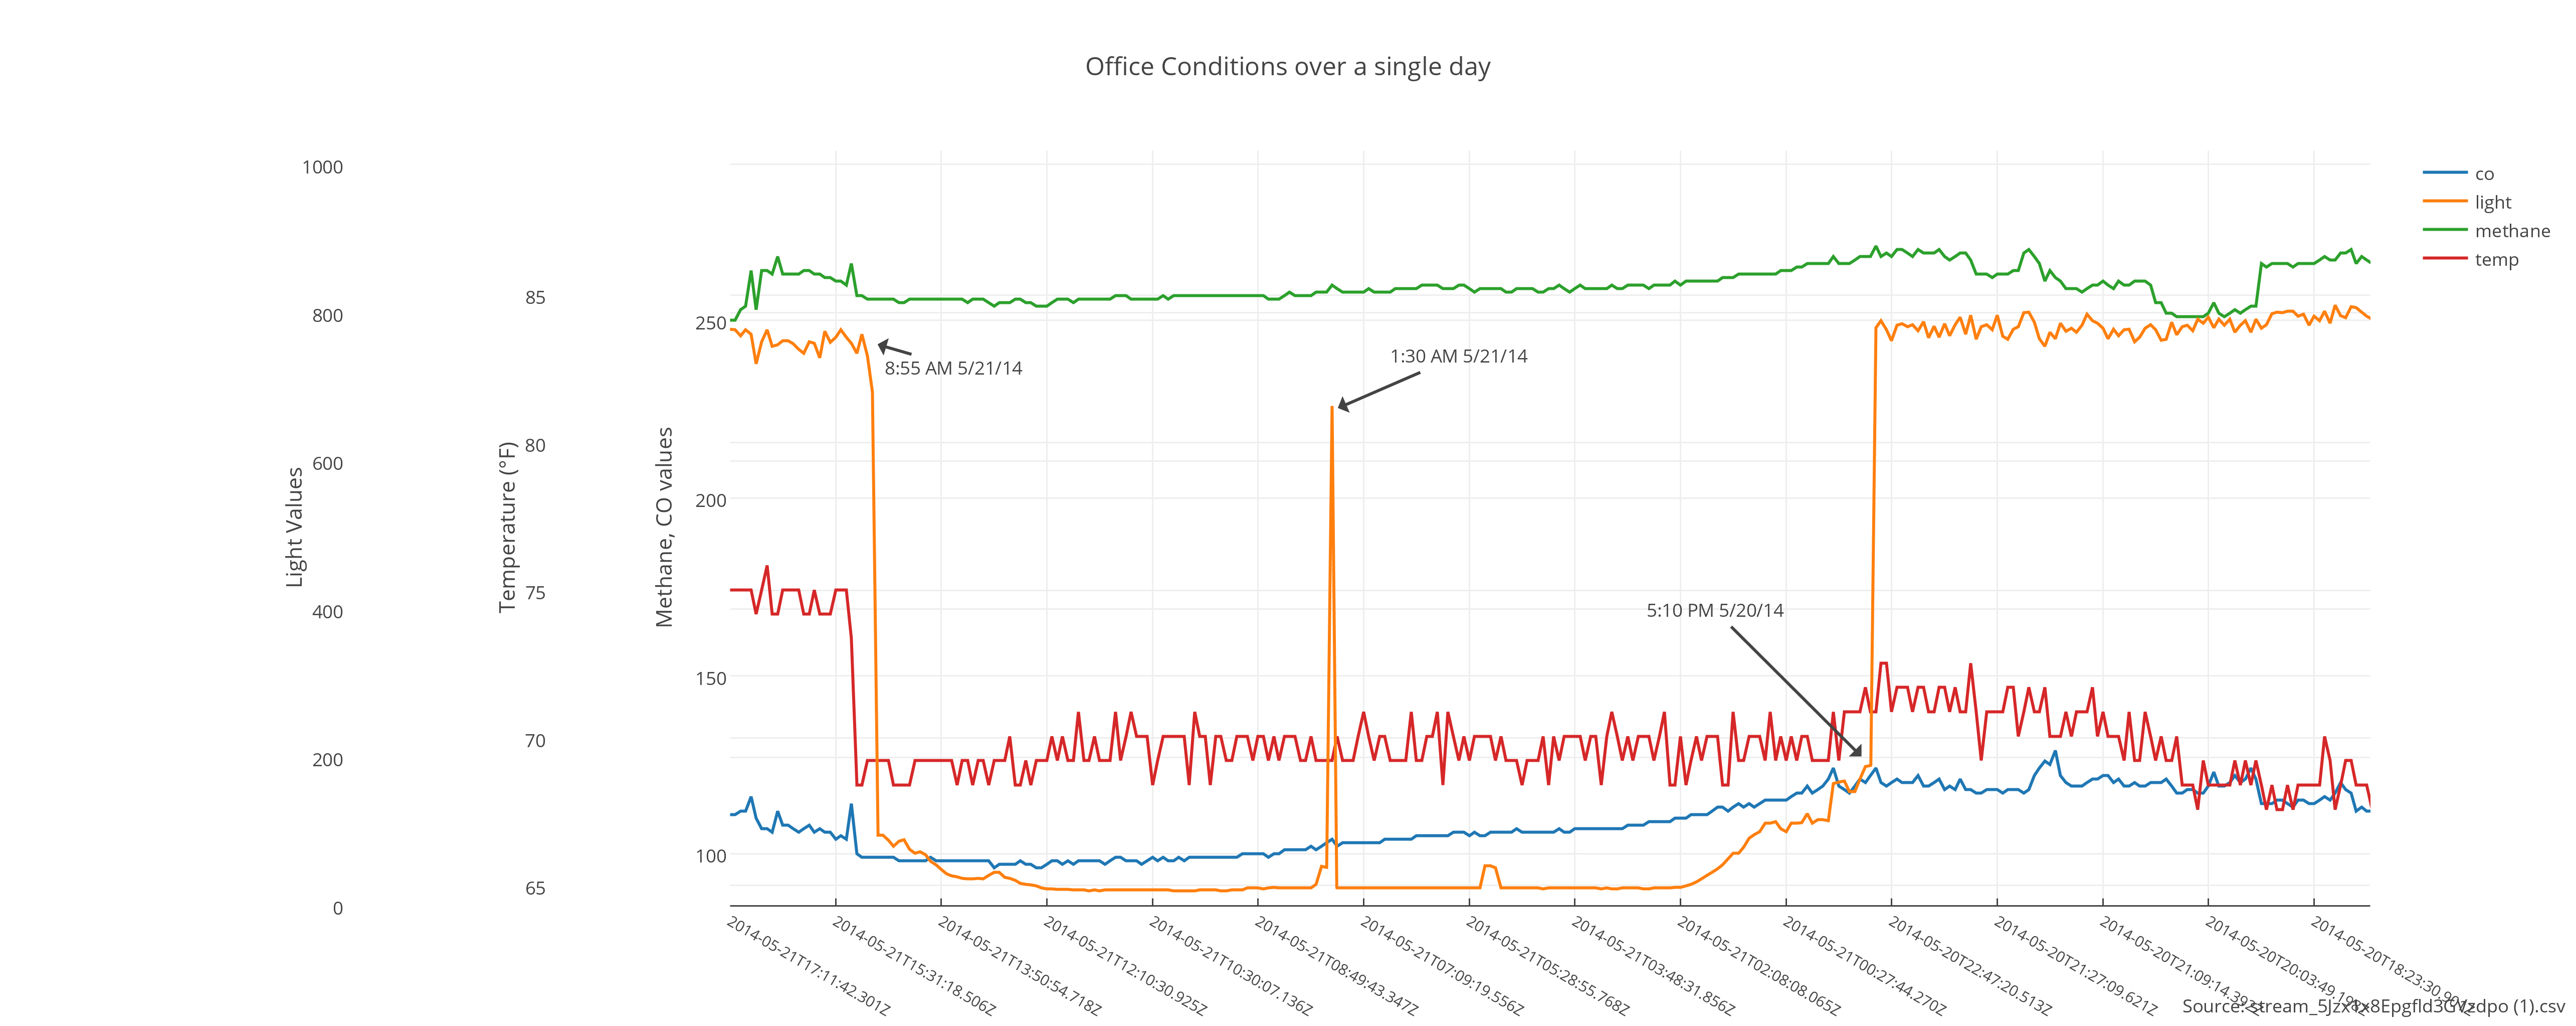
Using the Data
Once you have the data stream running, you have a few tools to view and manipulate the data. You can download it as either a CSV or JSON, by clicking the links at the top of the page. Then you can import those files into a spreadsheet or one of many online plotting services. We're big fans of Plot.ly, which you can use to generate beautiful graphs, like this:
Add Your Own Sensors!
Unfortunately, the least flexible part of the example code is the most wide-open, fun part: customizing it with your own sensors.
To update sensor readings, we defined a function -- readSensors() -- which reads our sensors and updates a global variable to store each value. Feel free to plug your own machinations into that function, customize the variables, or even add more!
If you're adding or removing sensors, don't forget to modify the Phant fields, and add or remove Phant.add() function calls to get your data into the HTTP POST.
For example, I wanted to increase the reliability of my logger's data, so I replaced the analog light and temperature sensors with digital options -- the TSL2561 luminosity sensor and an HTU21D Humidity/Temperature sensor.
That meant adding a pair of Arduino libraries to read from those sensors, and modifying the code a bit. If you want to check out my advanced example, click here to download the sketch. You can see how I modified the code to add a fifth data field (humidity), and incorporated more complex sensor data gathering for the digital sensors.
There are a plethora of sensors out there, what are you going to log? Weather is always a popular option; perhaps you can turn out a version of our wireless weather station data logger, which uses an Electric Imp instead of Arduino/XBee.
Or how about making the project wearable with a LilyPad XBee? That's where I'm headed next.
This tutorial is only the start, we can't wait to see what you do with data.sparkfun.com!