Pushing Data to Data.SparkFun.com
This Tutorial is Retired!
This tutorial covers concepts or technologies that are no longer current. It's still here for you to read and enjoy, but may not be as useful as our newest tutorials.
 jimblom
Arduino Yún
With its built-in WiFi and Ethernet, the Arduino Yun was made for internet-of-things applications like this.
For help getting started with the Yun, check out Arduino's Guide to the Arduino Yun. If you're going to use the Yun over WiFi, definitely check out their section on configuring the WiFi.
Arduino Example Circuit
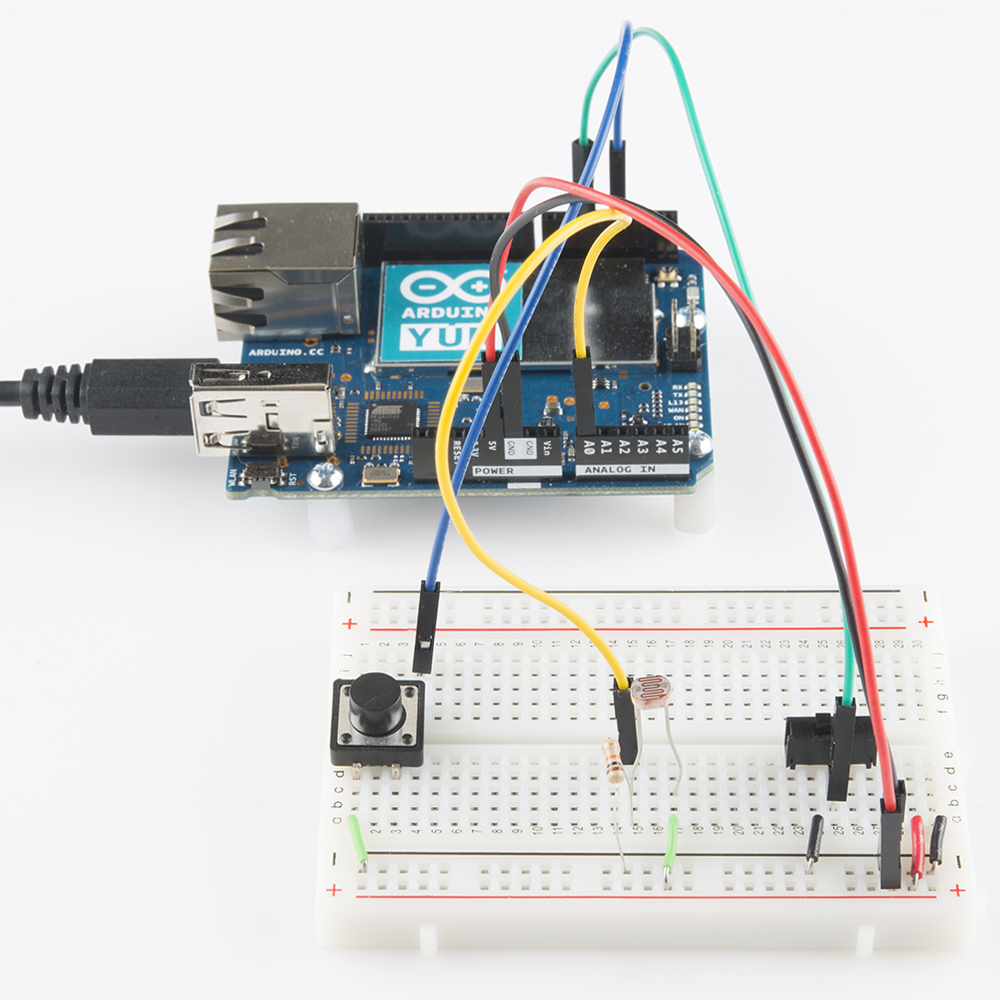
As with every other Arduino example in this tutorial, we'll be using a simple circuit consisting of a photocell (voltage divided with a 10kΩ resistor) connecte to A0. A momentary push-button is connected to D3 on one end and ground on the other. And a SPDT switch can connect D5 to ground or let it float.

Pretend the RedBoard in the Fritzing diagram above is Arduino-blue, and you should be golden.
Yun Example Sketch
Make sure your Yun is connected to the Internet, before continuing on. If you have an Ethernet switch or router nearby, simply connect an Ethernet cable between the two. If you're using your Yun through WiFi, follow these directions to connect your Yun to a WiFi network.
Here's the code. Copy and paste from below, or click here to download it.
language:c
/*****************************************************************
Phant_Yun.ino
Post data to SparkFun's data stream server system (phant) using
an Arduino Yun
Jim Lindblom @ SparkFun Electronics
Original Creation Date: July 3, 2014

This sketch uses an Arduino Yun to POST sensor readings to
SparkFun's data logging streams (http://data.sparkfun.com). A post
will be initiated whenever pin 3 is connected to ground.

Make sure you fill in your data stream's public, private, and data
keys before uploading! These are in the global variable section.

Hardware Hookup:
  * These components are connected to the Arduino's I/O pins:
    * D3 - Active-low momentary button (pulled high internally)
    * A0 - Photoresistor (which is combined with a 10k resistor
           to form a voltage divider output to the Arduino).
    * D5 - SPST switch to select either 5V or 0V to this pin.
  * Your Yun should also, somehow, be connected to the Internet.
    You can use Ethernet, or the on-board WiFi module.

Development environment specifics:
    IDE: Arduino 1.5.6-r2
    Hardware Platform: Arduino Yun

This code is beerware; if you see me (or any other SparkFun
employee) at the local, and you've found our code helpful, please
buy us a round!

curl example from:
https://github.com/sparkfun/phant/blob/master/examples/sh/curl_post.sh

Distributed as-is; no warranty is given.
*****************************************************************/
// Process.h gives us access to the Process class, which can be
// used to construct Shell commands and read the response.
#include <Process.h>

/////////////////
// Phant Stuff //
/////////////////
// URL to phant server (only change if you're not using data.sparkfun
String phantURL = "http://data.sparkfun.com/input/";
// Public key (the one you see in the URL):
String publicKey = "6JZbNolApzF4om2l9yYK";
// Private key, which only someone posting to the stream knows
String privateKey = "Ww0vPW1yrkUNDqWPV9jE";
// How many data fields are in your stream?
const int NUM_FIELDS = 3;
// What are the names of your fields?
String fieldName[NUM_FIELDS] = {"light", "switch", "name"};
// We'll use this array later to store our field data
String fieldData[NUM_FIELDS];

////////////////
// Pin Inputs //
////////////////
const int triggerPin = 3;
const int lightPin = A0;
const int switchPin = 5;

String name = "Yun-anon";
boolean newName = true;

void setup()
{
  Bridge.begin();
  Serial.begin(115200);

  // Setup Input Pins:
  pinMode(triggerPin, INPUT_PULLUP);
  pinMode(switchPin, INPUT_PULLUP);
  pinMode(lightPin, INPUT_PULLUP);

  Serial.println("=========== Ready to Stream ===========");
  Serial.println("Press the button (D3) to send an update");
  Serial.println("Type your name, followed by '!' to update name");
}

void loop()
{
  // If the trigger pin (3) goes low, send the data.
  if (!digitalRead(triggerPin))
  {
    // Gather Data
    fieldData[0] = String(analogRead(lightPin));
    fieldData[1] = String(digitalRead(switchPin));
    fieldData[2] = name;

    // Post Data
    Serial.println("Posting Data!");
    postData(); // the postData() function does all the work,
                // see below.
    delay(1000);
  }

  // Check for a new name input:
  if (Serial.available())
  {
    char c = Serial.read();
    if (c == '!')
    {
      newName = true;
      Serial.print("Your name is ");
      Serial.println(name);
    }
    else if (newName)
    {
      newName = false;
      name = "";
      name += c;
    }
    else
    {
      name += c;
    }
  }
}

void postData()
{
  Process phant; // Used to send command to Shell, and view response
  String curlCmd; // Where we'll put our curl command
  String curlData[NUM_FIELDS]; // temp variables to store curl data

  // Construct curl data fields
  // Should look like: --data "fieldName=fieldData"
  for (int i=0; i<NUM_FIELDS; i++)
  {
    curlData[i] = "--data \"" + fieldName[i] + "=" + fieldData[i] + "\" ";
  }

  // Construct the curl command:
  curlCmd = "curl ";
  curlCmd += "--header "; // Put our private key in the header.
  curlCmd += "\"Phant-Private-Key: "; // Tells our server the key is coming
  curlCmd += privateKey;
  curlCmd += "\" "; // Enclose the entire header with quotes.
  for (int i=0; i<NUM_FIELDS; i++)
    curlCmd += curlData[i]; // Add our data fields to the command
  curlCmd += phantURL + publicKey; // Add the server URL, including public key

  // Send the curl command:
  Serial.print("Sending command: ");
  Serial.println(curlCmd); // Print command for debug
  phant.runShellCommand(curlCmd); // Send command through Shell

  // Read out the response:
  Serial.print("Response: ");
  // Use the phant process to read in any response from Linux:
  while (phant.available())
  {
    char c = phant.read();
    Serial.write(c);
  }
}
After uploading the sketch, open the Serial Monitor and set your baud rate to 115200 bps. Wait for the "Ready to Stream" message to appear, then press the button to send data. This example sketch should post to our example stream by default.
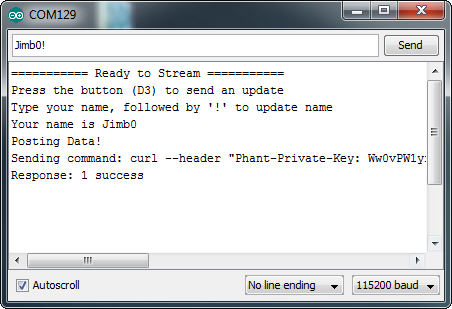
You can update the name value that posts, by sending a series of characters followed by an exclamation mark (!).
Configuring to Use Your Data Stream
The section in the code under "Phant Stuff" is where you can alter variables and set the Yun to use a data stream of your own.
language:c
/////////////////
// Phant Stuff //
/////////////////
// URL to phant server (only change if you're not using data.sparkfun
String phantURL = "http://data.sparkfun.com/input/";
// Public key (the one you see in the URL):
String publicKey = "6JZbNolApzF4om2l9yYK";
// Private key, which only someone posting to the stream knows
String privateKey = "Ww0vPW1yrkUNDqWPV9jE";
// How many data fields are in your stream?
const int NUM_FIELDS = 3;
// What are the names of your fields?
String fieldName[NUM_FIELDS] = {"light", "switch", "name"};
// We'll use this array later to store our field data
String fieldData[NUM_FIELDS];
The publicKey and privateKey variables should be set to the respective keys your were supplied when creating your stream. Also make sure to set the NUM_FIELDS variable to the number of fields in your stream and update the fieldName array values accordingly.
Using the Sketch
In this example we use the Unix cURL command to transfer data to a server. The Yun's Process class comes in handy for sending a shell command, and reading its response.
Most of the action happens in the void postData() function. That's where we read the Arduino's inputs and formulate a cURL command. The contents of the cURL command include the server URL, public and private keys, and our data keys and values. Check out the comments in that function for a line-by-line dissection.