LiPo Fuel Gauge (MAX1704X) Hookup Guide
 bboyho
Combined Example B: Simple Serial, Qwiic Micro OLED, Battery Icon
This example is pretty much the same as the previous combined example. However, we will add an additional battery meter icon.
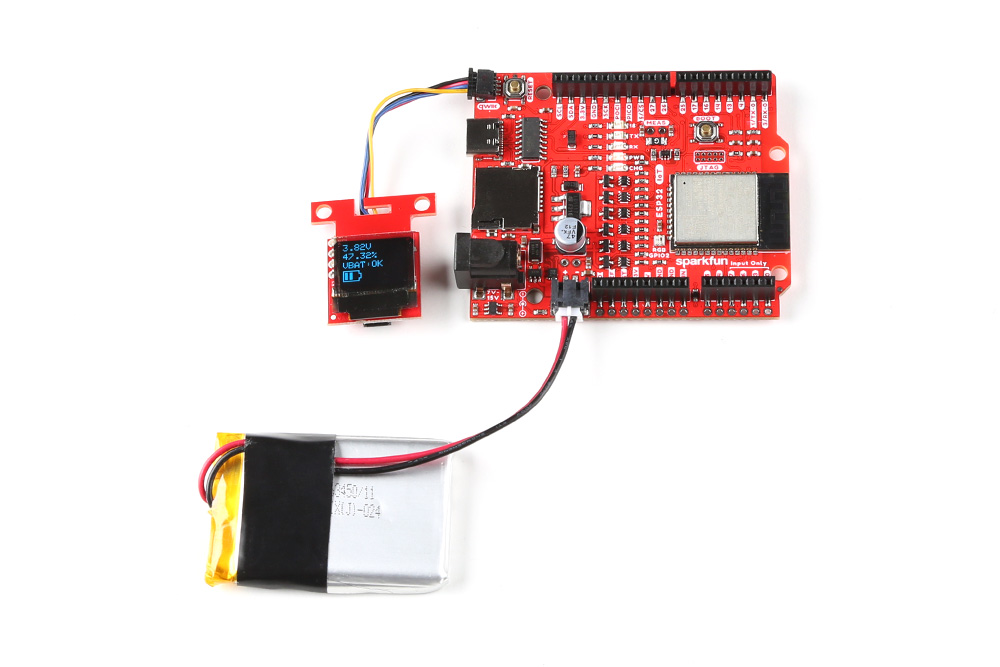
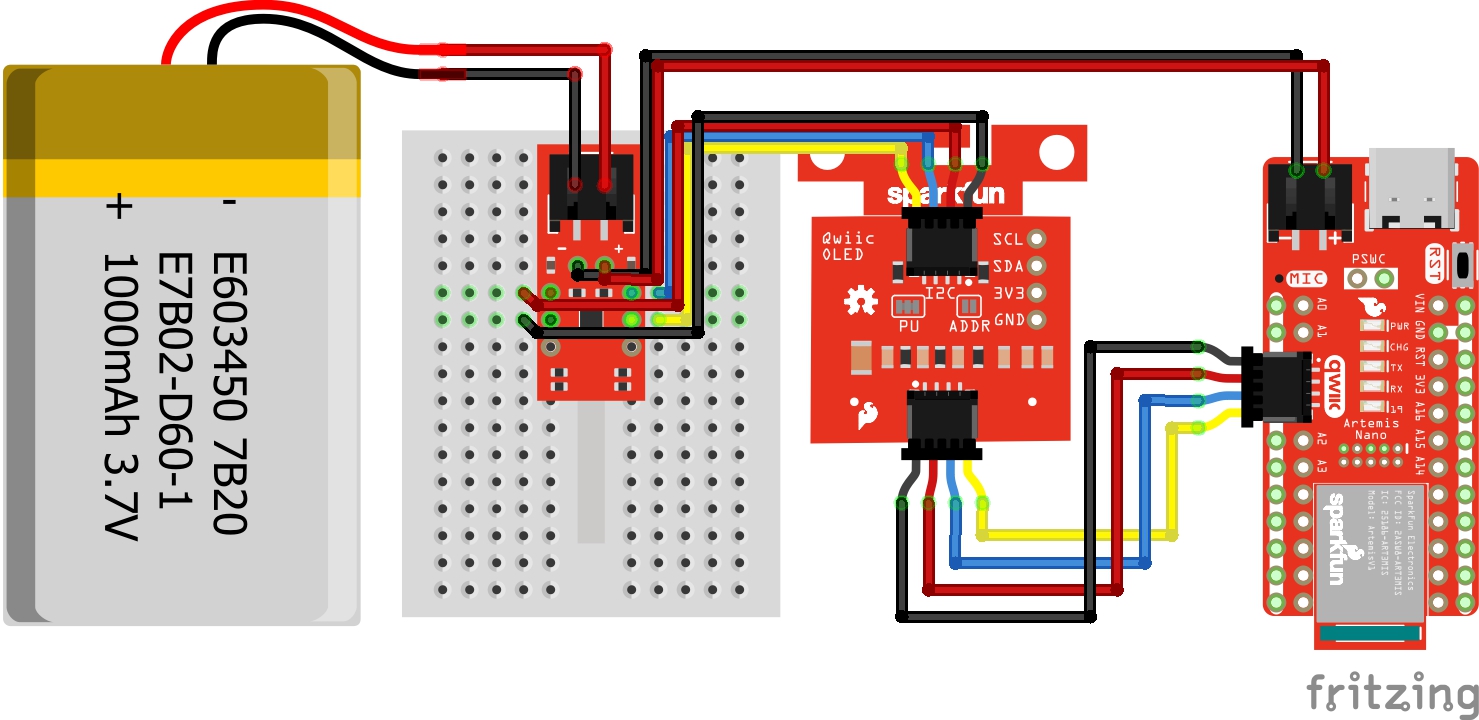
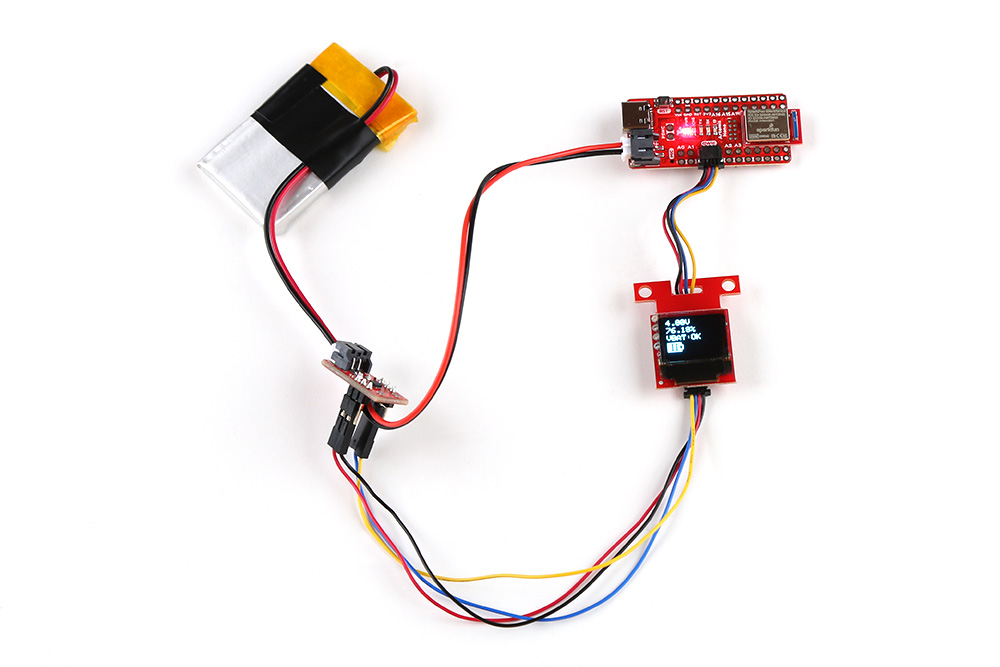
Hardware Hookup
For this example we will use the same parts as the previous combined example's wishlist.
- 1x Reversible USB A to C Cable - 0.8m
- 1x SparkFun RedBoard Artemis Nano
- 1x Break Away Headers - Straight
- 1x SparkFun LiPo Fuel Gauge - MAX17043
- 1x Flexible Qwiic Cable - Female Jumper (4-pin)
- 1x SparkFun Micro OLED Breakout (Qwiic)
- 1x Flexible Qwiic Cable - 50mm
- 1x LiPo Battery
- 1x JST Jumper 2 Wire Assembly
Upload Code
Copy and paste following code into your Arduino IDE.
language:c
/******************************************************************************
  Combined Simple Serial and Qwiic Micro OLED Example
  Modified By: Ho Yun "Bobby" Chan
  SparkFun Electronics
  Date: February 10, 2023
  License: MIT. See license file for more information but you can
  basically do whatever you want with this code.

  This is a combined example of Paul Clark's MAX17043 Fuel Guage
  simple serial example, Kirk Benell's Qwiic OLED Hello example,
  and Nathan Seidle's RTK Display Test Sketch. The example reads a
  single cell LiPo battery's voltage and state-of-charge (SOC)
  using the MAX1704X. The voltage, percent remaining (i.e. the
  SOC), and alert flag are displayed as an output on the Qwiic
  Micro OLED. A graphic of a LiPo battery's remaining charge is
  displayed on the Qwiic Micro OLED as well.

  By opening the Arduino Serial Monitor (115200 baud), the example
  will also print the gauge's voltage, state-of-charge (SOC)
  readings, alert status to Serial.

  Feel like supporting open source hardware?
  Buy a board from SparkFun!

  LiPo Fuel Gauge - MAX17043 : https://www.sparkfun.com/products/20680
  Qwiic Micro OLED: https://www.sparkfun.com/products/14532

  Distributed as-is; no warranty is given.
******************************************************************************/

#include <Wire.h> // Needed for I2C


//////////LIPO FUEL GAUGE//////////
#include <SparkFun_MAX1704x_Fuel_Gauge_Arduino_Library.h> // Click here to get the library: http://librarymanager/All#SparkFun_MAX1704x_Fuel_Gauge_Arduino_Library

SFE_MAX1704X lipo; // Defaults to the MAX17043

//SFE_MAX1704X lipo(MAX1704X_MAX17043); // Create a MAX17043
//SFE_MAX1704X lipo(MAX1704X_MAX17044); // Create a MAX17044
//SFE_MAX1704X lipo(MAX1704X_MAX17048); // Create a MAX17048
//SFE_MAX1704X lipo(MAX1704X_MAX17049); // Create a MAX17049

double voltage = 0; // Variable to keep track of LiPo voltage
double soc = 0; // Variable to keep track of LiPo state-of-charge (SOC)
bool alert; // Variable to keep track of whether alert has been triggered


//////////QWIIC MICRO OLED//////////
#include <SparkFun_Qwiic_OLED.h> //http://librarymanager/All#SparkFun_Qwiic_Graphic_OLED
#include "icons.h"

// The Qwiic OLED Library supports three different types of SparkFun boards. The demo uses the following
// defines to determine which device is being used. Uncomment the device being used for this demo.
QwiicMicroOLED myOLED;
// QwiicTransparentOLED myOLED;
// QwiicNarrowOLED myOLED;

// Fonts
#include <res/qw_fnt_5x7.h>
//#include <res/qw_fnt_8x16.h>, not used
//#include <res/qw_fnt_31x48.h>, not used
//#include <res/qw_fnt_7segment.h>, not used
//#include <res/qw_fnt_largenum.h>, not used


void setup() {
  Serial.begin(115200); // Start serial, to output debug data
  //while (!Serial)
  //  ; //Wait for user to open terminal
  Serial.println(F("Combined MAX17043 Example & Qwiic OLED Example"));

  Wire.begin();

  lipo.enableDebugging(); // Uncomment this line to enable helpful debug messages on Serial

  // Set up the MAX17043 LiPo fuel gauge:
  if (lipo.begin() == false) // Connect to the MAX17043 using the default wire port
  {
    Serial.println(F("MAX17043 not detected. Please check wiring. Freezing."));
    while (1)
      ;
  }

  // Initalize the OLED device and related graphics system
  if (myOLED.begin() == false)
  {
    Serial.println(F("Device begin failed. Freezing..."));
    while (true)
      ;
  }

  // Quick start restarts the MAX17043 in hopes of getting a more accurate
  // guess for the SOC.
  lipo.quickStart();

  // We can set an interrupt to alert when the battery SoC gets too low.
  // We can alert at anywhere between 1% - 32%:
  lipo.setThreshold(20); // Set alert threshold to 20%.
}

void loop() {

  // lipo.getVoltage() returns a voltage value (e.g. 3.93)
  voltage = lipo.getVoltage();

  // lipo.getSOC() returns the estimated state of charge (e.g. 79%)
  soc = lipo.getSOC();

  // lipo.getAlert() clears the alert flag
  // Output: 0 on success, positive integer on fail.
  lipo.clearAlert();
  // lipo.getAlert() returns a 0 or 1 (0=alert not triggered)
  alert = lipo.getAlert();

  myOLED.erase(); //clear display

  //set font type, we'll use a character size of 5x7
  myOLED.setFont(&QW_FONT_5X7);
  //myOLED.setFont(&QW_FONT_8X16); //not used
  //myOLED.setFont(&QW_FONT_31X48); //not used
  //myOLED.setFont(&QW_FONT_LARGENUM); //not used
  //myOLED.setFont(&QW_FONT_7SEGMENT); //not used

  // "Print" Voltage
  myOLED.setCursor(0, 0);
  myOLED.print(voltage, 2);
  myOLED.print(F("V"));

  // "Print" Battery %
  myOLED.setCursor(0, 10);
  myOLED.print(soc, 2);
  myOLED.print(F("%"));

  // "Print" Alert Status
  myOLED.setCursor(0, 20);
  myOLED.print(F("VBAT:")); //alert pin
  if (alert == HIGH) {
    myOLED.print(F("LOW")); //Flag was raised, battery is low!!!
  }
  else {

    myOLED.print(F("OK")); //Battery charge is good. 8)
  }

  if (soc >= 50.00) {
    //Battery Level 50-100%
    displayBitmap(0, 30, Battery_2_Width, Battery_2_Height, Battery_3);
  }
  else if (20.00 <= soc < 50.00) {
    //Battery Level 20-50%
    displayBitmap(0, 30, Battery_2_Width, Battery_2_Height, Battery_2);
  }
  else if (10.00 <= soc < 20.00) {
    //Battery Level 10%-20%
    displayBitmap(0, 30, Battery_2_Width, Battery_2_Height, Battery_1);
  }
  else {
    //Battery Level <10%
    displayBitmap(0, 30, Battery_2_Width, Battery_2_Height, Battery_0);
  }


  // There's nothing on the screen yet - Now send the graphics to the device
  myOLED.display();


  // Print the variables to Serial Terminal:
  Serial.print(F("Voltage: "));
  Serial.print(voltage);  // Print the battery voltage
  Serial.println(" V");

  Serial.print(F("Percentage: "));
  Serial.print(soc); // Print the battery state of charge
  Serial.println(" %");

  Serial.print(F("Alert: "));
  Serial.println(alert);
  Serial.println();

  delay(500);
}


//Wrapper to avoid needing to pass width/height data twice
void displayBitmap(uint8_t x, uint8_t y, uint8_t imageWidth, uint8_t imageHeight, uint8_t *imageData) {
  myOLED.bitmap(x, y, x + imageWidth, y + imageHeight, imageData, imageWidth, imageHeight);
}
To keep track of the icons that we create, we are going to create a header file with the *.ino. This is useful when writing code for big projects that involve a lot of components (e.g. RTK Express, RTK Express Plus, RTK Facet, RTK Facet L-Band, etc.). Click on the icon to create a new tab. We will name this icons.h.

Copy and paste the following code into tab.
language:c
uint8_t Battery_3 [] = {
0xFF, 0x01, 0xFD, 0xFD, 0xFD, 0x01, 0x01, 0xFD, 0xFD, 0xFD, 0x01, 0x01, 0xFD, 0xFD, 0xFD, 0x01,
0x0F, 0x08, 0xF8, 0x0F, 0x08, 0x0B, 0x0B, 0x0B, 0x08, 0x08, 0x0B, 0x0B, 0x0B, 0x08, 0x08, 0x0B,
0x0B, 0x0B, 0x08, 0x0F, 0x01, 0x01,
};
int Battery_3_Height = 12;
int Battery_3_Width = 19;

uint8_t Battery_2 [] = {
0xFF, 0x01, 0xFD, 0xFD, 0xFD, 0x01, 0x01, 0xFD, 0xFD, 0xFD, 0x01, 0x01, 0x01, 0x01, 0x01, 0x01,
0x0F, 0x08, 0xF8, 0x0F, 0x08, 0x0B, 0x0B, 0x0B, 0x08, 0x08, 0x0B, 0x0B, 0x0B, 0x08, 0x08, 0x08,
0x08, 0x08, 0x08, 0x0F, 0x01, 0x01,
};
int Battery_2_Height = 12;
int Battery_2_Width = 19;

uint8_t Battery_1 [] = {
0xFF, 0x01, 0xFD, 0xFD, 0xFD, 0x01, 0x01, 0x01, 0x01, 0x01, 0x01, 0x01, 0x01, 0x01, 0x01, 0x01,
0x0F, 0x08, 0xF8, 0x0F, 0x08, 0x0B, 0x0B, 0x0B, 0x08, 0x08, 0x08, 0x08, 0x08, 0x08, 0x08, 0x08,
0x08, 0x08, 0x08, 0x0F, 0x01, 0x01,
};
int Battery_1_Height = 12;
int Battery_1_Width = 19;

uint8_t Battery_0 [] = {
0xFF, 0x01, 0x01, 0x01, 0x01, 0x01, 0x01, 0x01, 0x01, 0x01, 0x01, 0x01, 0x01, 0x01, 0x01, 0x01,
0x0F, 0x08, 0xF8, 0x0F, 0x08, 0x08, 0x08, 0x08, 0x08, 0x08, 0x08, 0x08, 0x08, 0x08, 0x08, 0x08,
0x08, 0x08, 0x08, 0x0F, 0x01, 0x01,
};
int Battery_0_Height = 12;
int Battery_0_Width = 19;
If you have not already, select your Board (in this case the RedBoard Artemis Nano), and associated COM port (in this case, COM27). Then hit the upload button. Disconnect the USB cable from your RedBoard Artemis Nano. Hit the reset button.
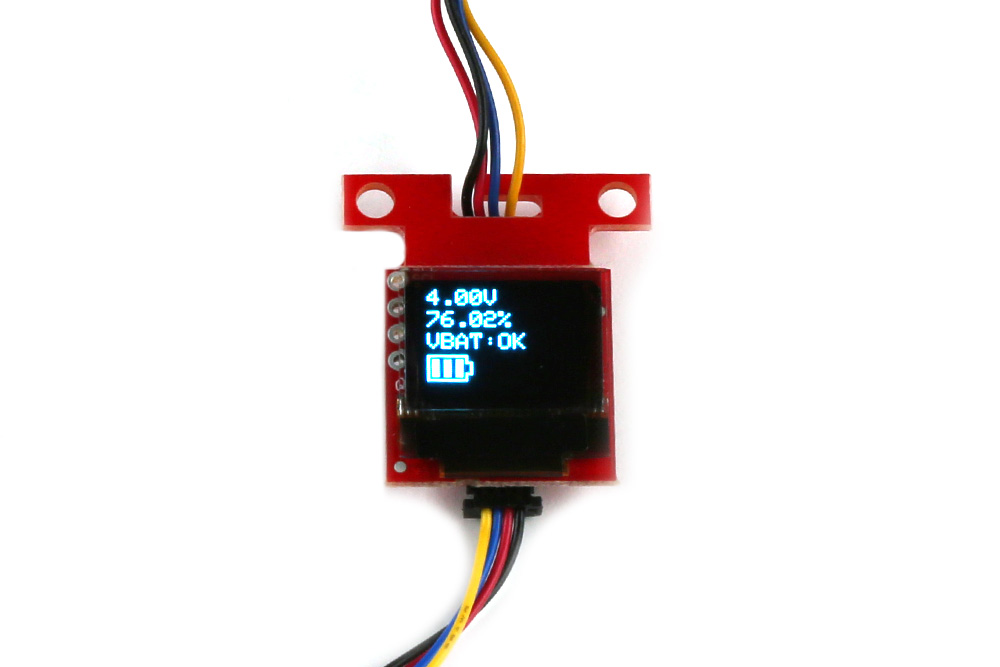
Looking close at the display, you should see the voltage, remaining charge, the alert flag indicating if the battery is low, and a battery meter icon. These values may be different depending on how much charge the LiPo battery has available!