Internet Datalogging With Arduino and XBee WiFi
This Tutorial is Retired!
This tutorial covers concepts or technologies that are no longer current. It's still here for you to read and enjoy, but may not be as useful as our newest tutorials.
Hardware Hookup
On this page we'll discuss the schematic and wiring of this project. We can divide our circuit up into two sub-systems -- the XBee WiFi and the sensors -- and wire them separately.
Connect the XBee WiFi
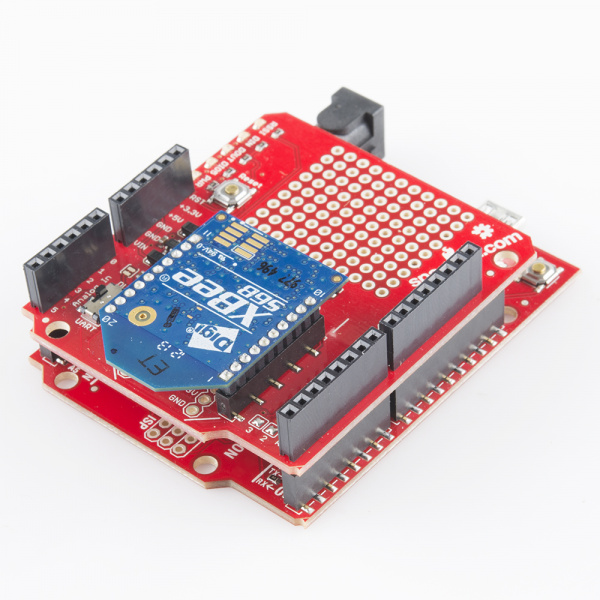
The difficulty-level of this step depends on whether you're using a Shield (easiest), an XBee Regulated Explorer (easy-ish), or a more general XBee Breakout (easy after you've figured out level-shifting). If you're using a Shield, simply populate your headers and plug stuff in. Make sure the switch is in the DLINE position!
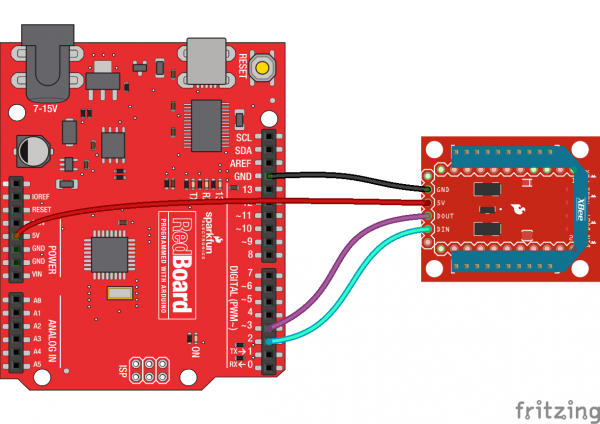
If you're using an XBee Regulated or similar, you'll need to run four wires between the Arduino and XBee: power, ground, RX (DIN), and TX (DOUT). We've wired the XBee's DIN and DOUT pins as such:
| XBee Pin | Arduino Pin |
|---|---|
| DIN | 2 |
| DOUT | 3 |
Since we're using SoftwareSerial, you can move those serial lines to any other Arduino digital pin, just don't forget to modify the code.
Keep in mind that the XBee is a 3.3V device, it won't tolerate 5V on either its power or I/O lines. If you're using something really simple, like the XBee Breakout, you'll need to power the XBee off the 3.3V rail, and level shift those I/O lines!
Connect Your Sensors
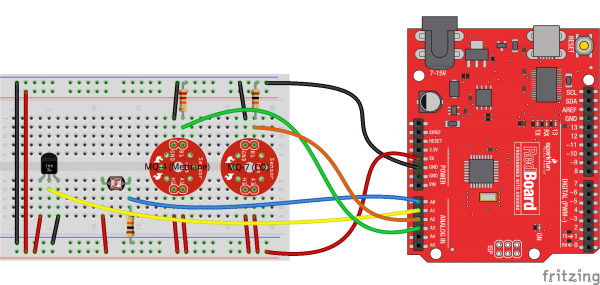
I'm using a collection of analog sensors to monitor carbon monoxide, methane, temperature, and light conditions in the office. Here's how everything is hooked up:
| Sensor | Arduino Pin | Notes |
|---|---|---|
| Photoresistor (Light) | A0 | Connect a 10kΩ resistor from output to ground. Tie other leg of photocell to 5V. |
| TMP36 (Temperature) | A1 | Power the TMP36 off the 5V rail. The temperature (in °C) is the (read voltage - 0.5V)*100. |
| MQ-4 (Methane) | A2 | Connect a 22kΩ resistor from output to ground. These things suck a lot of power, adding a cap nearby may help to smooth out the voltage supply. |
| MQ-7 (Carbon-Monoxide) | A3 | Connect a 10kΩ resistor from output to ground. These things suck a lot of power, adding a cap nearby may help to smooth out the voltage supply. |
If you just want to try the data logging system out, don't feel required to connect all of those sensors. Heck, you can even leave all of those analog input pins floating to test everything out.
Adding more complex sensors shouldn't take too much extra effort. I'll try to keep the code modular, so you can plug your own sensor-reading functions in.
Configure the XBee WiFi
The example code will attempt to configure your XBee -- given an SSID, passkey, and encryption mode -- but you can give it a head start by using XCTU to configure your XBee's network settings.
If you have a USB Explorer or any other means for connecting your XBee to your computer, we recommend following along with the Using XCTU page of our XBee WiFi Hookup Guide to at least configure the module with your WiFi network's SSID and password.


