AST-CAN485 WiFi Shield Hookup Guide
 Alex the Giant, Ell C, JamesBM
Software Setup and Programming
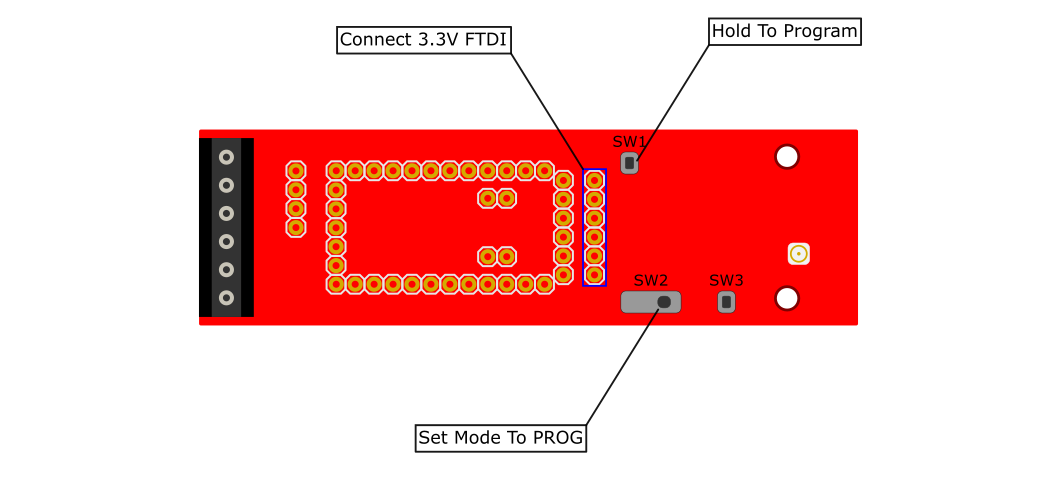
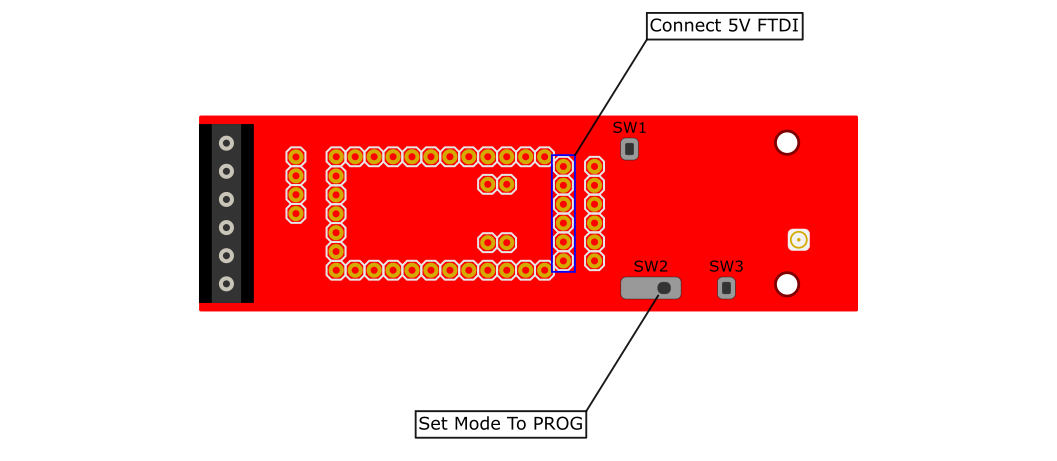
The Programming Mode Selection Switch
The ESP and CAN485 modules are connected using a hardware serial port. The same port is used to program either of the devices. It is therefore necessary to disconnect the serial port in order to program either of the devices. A selector switch is provided in order to make this possible.
If the selector switch is set to RUN, the ESP and CAN485 are connected via a serial port. If the switch is set to PROG, the serial port is disconnected and the devices may be programmed.

Setup Arduino For ESP Programming
There are many options for programming ESP8266 based devices. The approach recommended by this guide is to make use of the ESP8266 Arduino Addon which has been developed by the ESP community. The Addon can be downloaded via the GitHub Repository or by clicking the button below.
This implementation is based on the ESP8266 Thing and the same setup instructions may be used. For more information, refer to the ESP8266 Thing Hookup Guide.
ESP8266 Thing Development Board Hookup Guide
If you have not previously installed an Arduino library, please check out our installation guide.
Installing an Arduino Library
Programming the ESP
The following process is followed in order to program the ESP module:
- Switch the mode selection switch to PROG.
- Insert a 3.3V FTDI into the FTDI header.
- Hold down the ESP programming button and upload a sketch.
- Return the mode selection switch to RUN to reconnect the devices.
Programming the CAN485
The following process is followed in order to program the CAN485 module:
- Switch the mode selection switch to PROG.
- Connect a 5V FTDI to the FTDI header on the CAN485 module.
- Upload a sketch
- Return the mode selection switch to RUN to reconnect the devices.
Examples
The WiFi Shield GitHub Repository includes a few examples which demonstrate the use of the board. After downloading the repository, open up one the examples in the Arduino IDE. Select the CAN485 as the board, the COM port that it enumerated on, and hit upload to test.
Basic Serial Example
This example demonstrates serial communication between and inserted CAN485 and the on board ESP8266. Each device has a built in LED which is controlled by the other device over the serial port. Operation is as follows:
- The CAN485 sends a command to the ESP every 100 ms.
- The ESP sets its LED on or off depending on the command.
- The ESP sends the same command back to the CAN485.
- The CAN485 sets its LED depending on the command received by the ESP.
In addition to the examples in the WiFi Shield GitHub Repository, there are a number of examples using the ESP8266 in the ESP Arduino Library. These are accessible in the Arduino IDE under File>Examples. Examples may also be found in the ESP Github Community Forum.