Artemis Development with the Arduino IDE
 Liquid Soulder, Member #1571936
Troubleshooting Tips
Below, we have also included some additional troubleshooting tips for issues that you may come across with the Artemis Development Kit.
- One of our employees compiled a great list of troubleshooting tips based on the most common customer issues. This is the perfect place to start.
- For any Arduino IDE specific issues, we recommend starting with their troubleshooting guide.
If neither of the troubleshooting guides above were able to help, here are some tips you might have missed. (Most of this material is summarized from the tutorial.):
Are You Using a Recommended Computer OS?
This board is not compatible with the Arduino Web IDE. We do NOT recommend using a Chromebook, Netbook, tablet, phone, or the Arduino Web IDE in general. If you are here, try a RECOMMENDED operating system.My Board Isn't Working:
Every Artemis board gets tested before getting packaged up. That being said, let's try a basic test to see if just the board is working. Disconnect everything that you have attached to the board; we just want to test the board.- Inspect the board:
Check the board to make sure everything looks about right. Use the pictures on the product page to verify component placement or alignment, and bad solder joints, or damage. - Power and check the status LEDs:
Using a known good USB-C cable, plug your board in to the computer. Do any of the status LEDs turn on?- New boards, out of the bag, usually come programmed with a test sketch. Often it is a sketch that blinks that status LED at a rate of approximately 2 blinks per second.
- Test a Blink sketch:
Try to program the blink sketch. Why blink? It is simple, known to work (from the example files), and you have an indicator LED.- Double check that you have the proper Board selected prior to uploading or exporting the compiled binary.
- For boards that are already running the blink example, I recommend changing the timing parameters to check for a change in the board's response.
- Driver Installation:
The CH340 serial-to-UART chip may require the latest driver to operate properly. For the associated boards, make sure that the driver is up to date. For instructions for updating your driver, please refer to the CH340 driver installation tutorial.
I Don't See My Board on a Serial/COM Port:
If you don't see your board as an available COM port on the Arduino IDE:- Try to re-open the Arduino IDE.
- Check the Device Manager to verify that your computer recognizes the board.
- The issue might be related to your USB cable. Check that you are using a USB cable capable of data transfers. Some cables only have the power pins connected for charging. A good way to test this is to plug in a device to your USB cable (like a phone). If it doesn't show up as a device or drive, then try a new USB-C cable.
- This rarely happens, but it is easy to check. If you are using a USB 3.0 port (you will see a blue "tongue" in the USB jack or bad USB port, try a different USB port. You can also try to test the board on a different computer to double check for a hardware incompatibility (usually with expansion boards).
Errors Uploading to the Board:
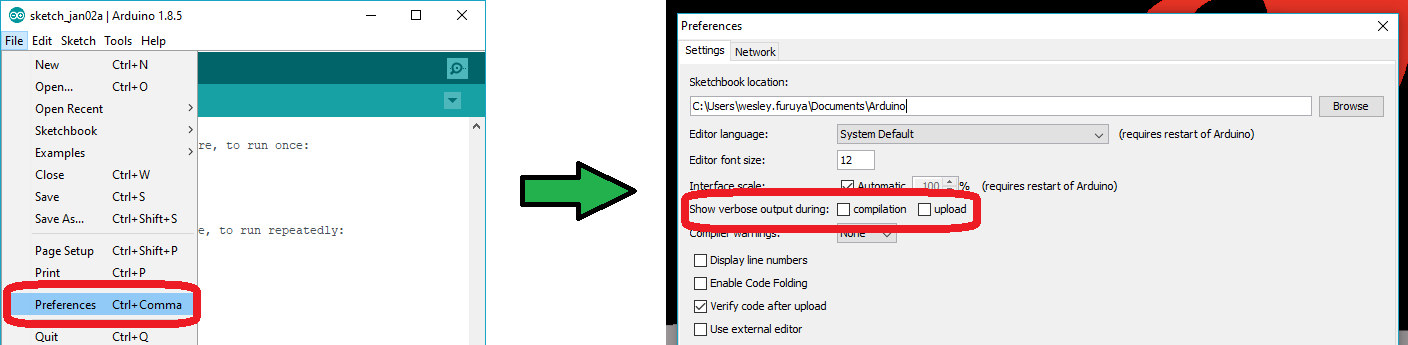
There are two types of issues that you will usually see in the console of the Arduino IDE, compile errors or upload errors. The easiest way to see where to start is by clicking the Verify button (check mark); the Arduino IDE will try to compile your code. A failure here is a compile error.It takes a some experience, but if you enable the verbose output from the Arduino IDE preferences, it may give you more clues to where the issue is.
- Compile Errors:
With compile errors, there are several things that could be causing issues. However, 99% of the time, it is user error. Usually something wrong with your code or the library you are using. Once in a while you will have a file structure issue if you manually added a file/folder in any of the Arduino folders (still user error). - Upload Errors:
Upload errors get a little more tricky. You will usually just see the Arduino IDE trying to upload to the board multiple times. There are usually several different causes for this, often without specific errors in the console. Here are a few common examples:- Wrong Board Selection:
Double check you board selection options. If you uploaded with the wrong board selection, there is a small chance that you may have overwritten the bootloader on the board or damaged the microcontroller. - Missing Bootloader:
If your board has the bootloader flashed, pin 13 will flash several times on power up. - Serial Port Interference:
If a device is communicating to the microcontroller over digital pins 0 and 1, while you are trying to upload code. - Bad USB cable or port (see Serial Port section above).
- Wrong Board Selection:
Additional Tips:
- If an input pin is read and that is floating (with nothing connected to it), you may see random data/states. In practice, it is useful to tie an input pin to a known state with a pull-up resistor (to VCC), or a pull-down resistor (to GND).
- There is a maximum amount of current an I/O pin can source (provide positive current) or sink (provide negative current). You can usually power small sections of LED strips or small motors, but will run into issue with high power devices.
- The pins on your board may use 3.3V logic and aren't directly compatible with 5V devices.
Need more help?
If you need technical assistance or information, head on over to the SparkFun Technical Assistance page for some initial troubleshooting.
If you don't find what you need there, the SparkFun Forums are a great place to find and ask for help. If this is your first visit, you'll need to create a Forum Account to search product forums and post questions.