How to Build a DIY GNSS Reference Station
Introduction
GNSS Real Time Kinematics (RTK) is amazing but one of the major confusion points is getting access to correction data. We’ve covered how to get publicly accessible RTCM correction data in previous tutorials but it can be spotty. We’ve covered how to set up your own temporary base to send RTCM correction data over a telemetry radio link, but what if you are a kilometer or more from your base? This tutorial will focus on setting up your own fixed antenna on your roof or other fixed structure and configuring a mini-computer to serve that data over the internet where it can be accessed by WiFi or more commonly, from a cellular phone or modem. Consider this the sequel to Setting up a Rover Base RTK System.
Suggested Reading
Before getting started, be sure you are comfortable with Getting Started with U-Center and be sure to checkout our What is GPS RTK? tutorial.
What is GPS RTK?
Getting Started with U-Center for u-blox
GPS-RTK2 Hookup Guide
Setting up a Rover Base RTK System
We’re going to talk a lot about NTRIP. I found all the descriptions and graphics describing NTRIP to be frustratingly confusing. NTRIP is just a fancy means of getting correction data from a spot, over the internet, to a rover. Think of it like a music stream for your rover. For your rover to jam, you need to provide it a constant source of music. There’s a ton of services out there for music (youtube, Spotify, Pandora). Similarly, there are all sorts of sources for RTCM (Trimble, Leica, Telit, etc). All these RTCM services charge different amounts of money and act just differently enough to be confusing. But all I want is my music!
This tutorial will show you how to generate your own GNSS correction data and push it to the internet, all for free (or the cost of a dedicated mini-PC if you need it)! You’ll be your own music streaming service! Your rover will be able to listen to that correction data using a cell phone connection. Yes we will talk about NTRIP clients and servers and mount points, but don’t worry; it’s just passing bytes from one computer to another over the internet.
Static Base Setup & LASERS!
In the previous tutorial we described how to create a temporary base station with the 1 to 10 minute survey-in method. The temporary base method is flexible, but it is not as accurate and can vary dramatically in time required. The ZED-F9P has a much faster way to provide base corrections: if you know the location of your antenna, you can set the coordinates of the receiver and it will immediately start providing RTCM corrections. The problem is ‘what is the location of the antenna?’. It’s as if you need a soldering iron to assemble your soldering iron kit. Where do we start?
Why don’t I just survey-in my fixed antenna to get its location?
While a survey-in is easy to set up and fine for an in-the-field way to establish the location of a base, it’s not recommended for getting the fixed location of a static base station as it is less accurate. Instead, PPP or Precise Point Positioning is far more accurate and is recommended for obtaining your antenna’s position. It’s a similar process but involves bouncing frick’n lasers off of satellites!
A major problem is that the predicted orbits are often off by one meter or more. Ground stations bounce lasers off the individual satellites as they pass overhead and use this new data to compute the actual orbits of the satellites. Using this new ephemeris data, when it becomes available, combined with the receiver’s raw data, better fixes can be computed. This is the basis of PPP.
The PPP process works like this:
- Install an antenna in a fixed location
- Gather 24 hours worth of raw GNSS data from that antenna
- Pass the raw data to a processing center for PPP
- Obtain a highly accurate position of the antenna we use to set a ‘Fixed Mode’ on a receiver
There are some great articles written about PPP. We’ll scrape the surface but for more information checkout:
Affix Your Antenna
You don’t want your antenna moving once you’ve determined its position. Consider investing in a premium antenna but we’ve used the classic u-blox L1/L2 antenna with good success. Mount the antenna to a proper ground plane to a fixed surface that has a very clear view of the sky. No nearby anything.
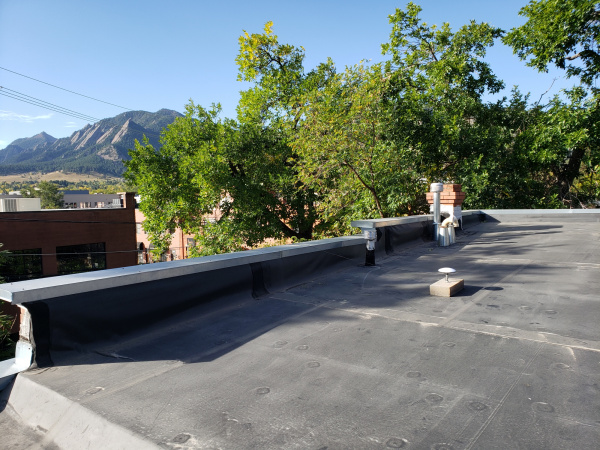
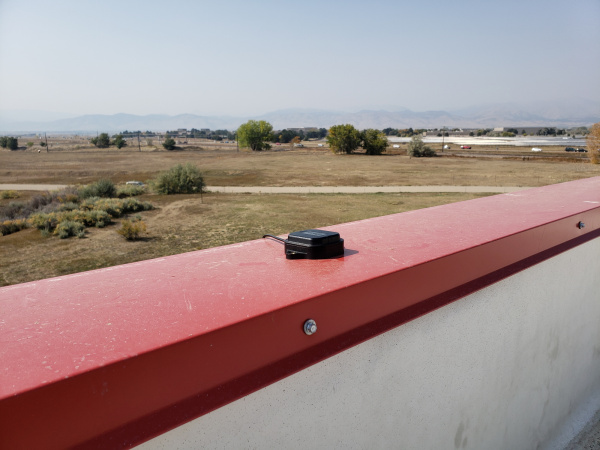
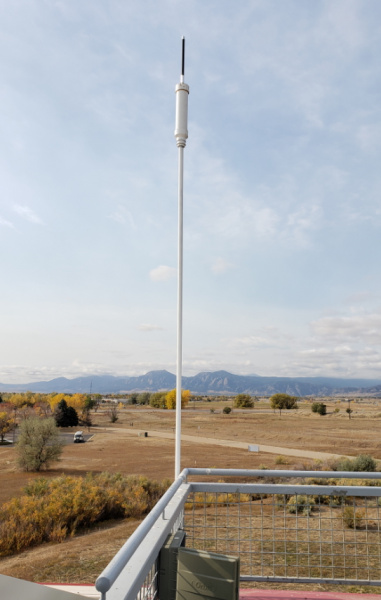
We mounted the u-blox antenna to the ferrous flashing around the top of the SparkFun building. While not completely permanent, the magnets on the u-blox antenna are tested to survive automobile strength winds so it should be fine in the 100+ MPH winds experienced in the front range of Colorado. The u-blox ANN-MB-00 antenna has a 5m cable attached but this was not long enough to get from the SparkFun roof to the receiver so we attached a 10m SMA extension. It’s true that most L1/L2 antennas have a built-in amplifier but every meter of extension and every connector will slightly degrade the GNSS signal. Limit the use of connector converters and use an extension as short as possible to get where you need.
If you want to use a higher grade antenna that doesn’t have a magnetic base we’ve come up with a great way to create a stable fix point without the need for poking holes in your roof!
Most surveying grade antennas have a ⅝” 11-TPI (threads per inch) thread on the bottom of the antenna. Luckily, ⅝” 11-TPI is the thread found on wedge anchors in hardware stores in the US. Wedge anchors are designed to hold walls to foundations but luckily for us we can use the same hardware to anchor an antenna. (We’ve also heard of concrete anchors that use epoxy so be sure to shop around.)
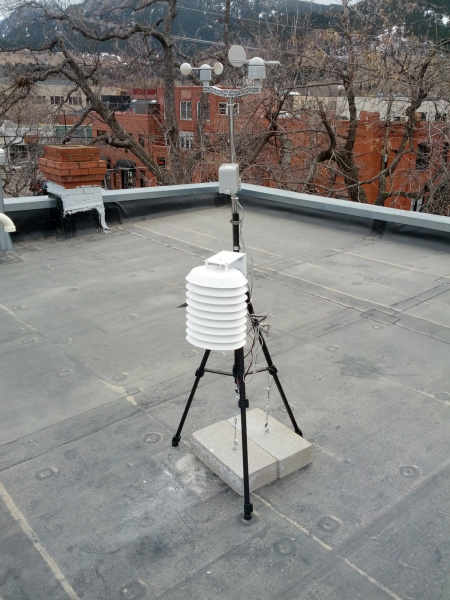
I needed to mount an antenna to my roof. Luckily, I had two, left over cinder blocks from a weather station that, based on the Electric Imp, had long since been retired.
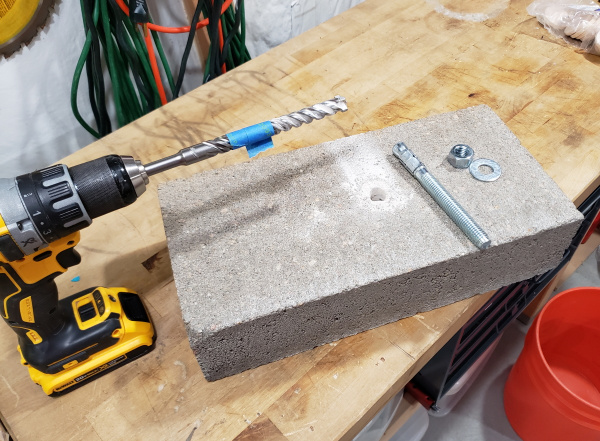
Step one is drilling the ⅝” hole into the cinder block. The masonry bit cost me $20 but cheaper, less fancy ones can be had for less than $10. The blue tape shows me the depth I’m trying to hit. The cinder block is 3.5” thick so I settled on ~2.5” deep. Once the hole is drilled, tip the block upside down to get most of the cement dust out. Then pound the anchor into place.
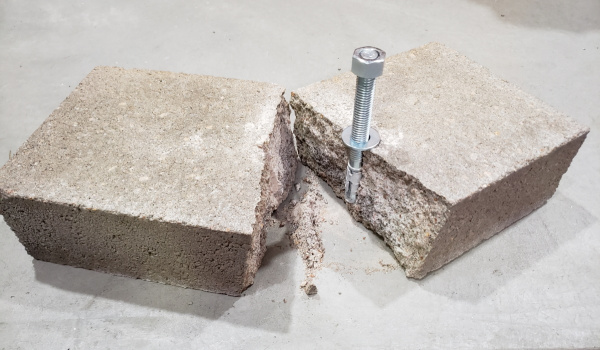
Don’t get greedy! I pounded the anchor so far it split the block. Luckily, I had a second block!
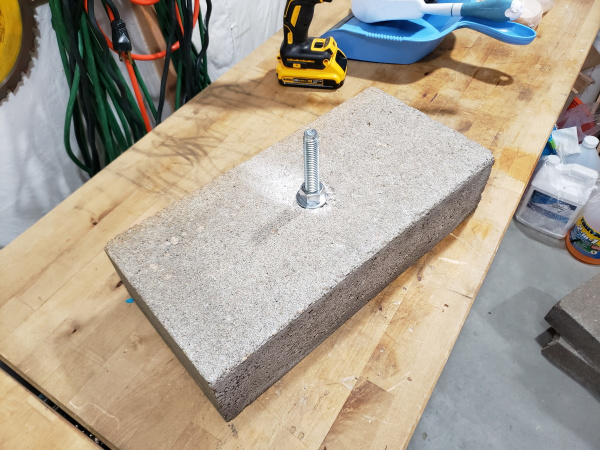
Once the anchor is ~2 inches into the hole tighten the bolt. This will draw the achor back up compressing the collar into place. Note: I finger tightened the bolt and added a ½ turn with a wrench. If you really go after the bolt and tighten it too much you risk pushing the collar out further and breaking the cinder block in half (see Ooops! picture above). We are not anchoring a wall here, just a 400g antenna.
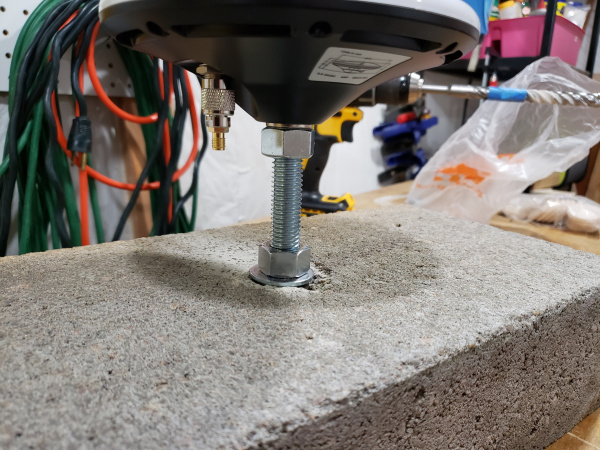
I used a 2nd bolt, tightened against the antenna base, to lock it into place and prevent rotation in either direction. Astute readers will notice my TNC to SMA adapter in the picture above. It’s the wrong gender. Originally, I used an SMA extension to connect my GPS-RTK-SMA to my u-blox L1/L2 antenna on my roof. The GPS-RTK-SMA expects a regular SMA connection so the end of the extension would not connect to this adapter. So before you get out the ladder, test connect everything! Luckily I have a set of adapters and found the right TNC to SMA converter to suit my needs.
I wrapped the SMA extension once around the base. In case anything pulls on the SMA cable the tension will be transferred to the bolt rather than the TNC connection to the antenna.
Gather Raw GNSS Data
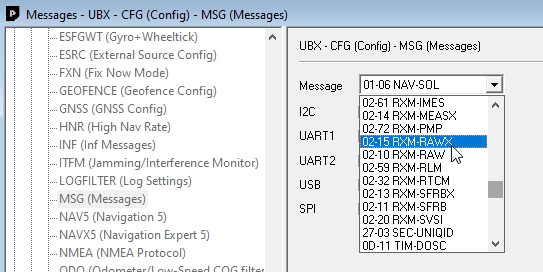
Once you’ve got the antenna into a location where it will not move or be moved we need to establish its location. Open u-center and verify that you can get a lock and see 25+ satellites with your ZED-F9P. Assuming you’ve got good reception, we now need to set the receiver to output raw data from the satellites.
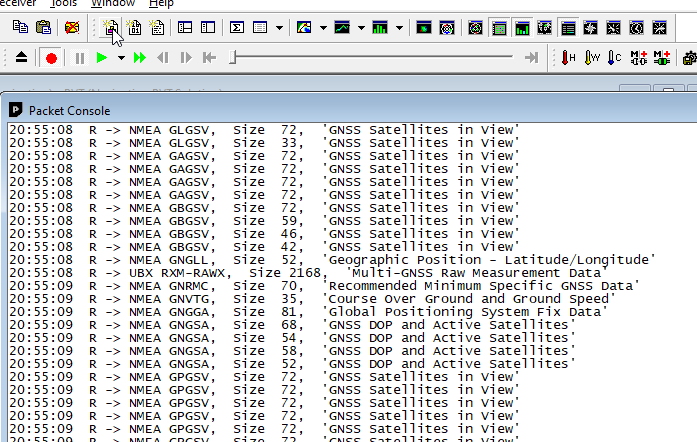
Once the RXM-RAWX message is enabled for USB, verify reception in the packet viewer.
RAWX messages are binary so you won’t be able to see them in the text viewer.
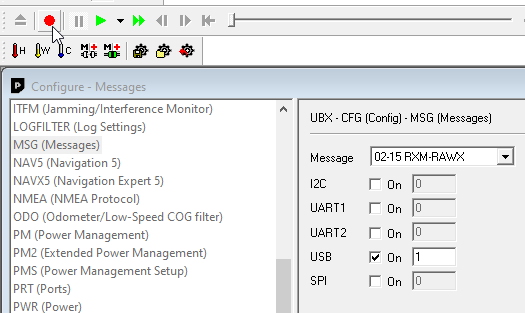
Hit the record button. This will record all the data (NMEA, UBX, and RAWX) from the receiver to a *.ubx file. Allow this to run for 24 hours. Don’t worry if you go long but do realize that a 24 hour file will be ~300MB so don’t let it run for a month.
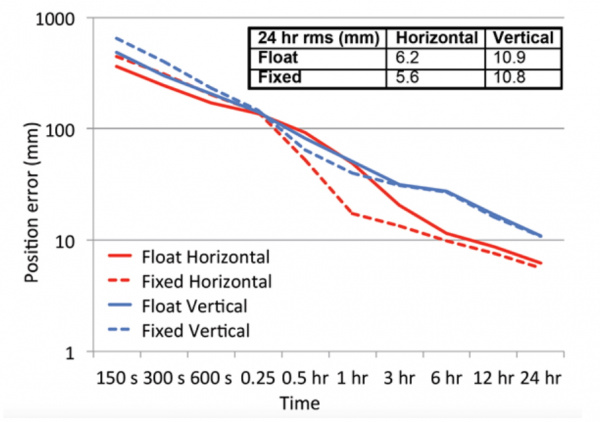
Capturing 6 hours is good, 24 is slightly better (note the logarithmic scale for position error in the graph above). Most PPP analyzation services will accept more than 24 hours of data but they may truncate it to 24 hours. If you capture 30 hours of RAWX data, that’s ok, we will show you how to trim a file that is too long.
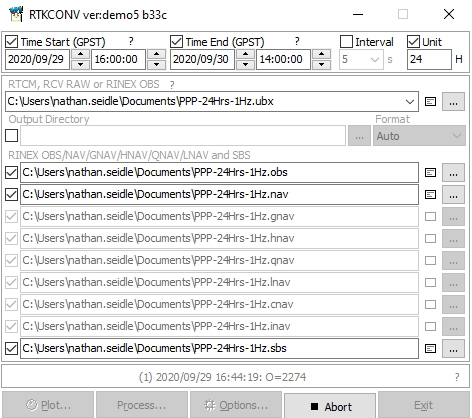
The 300MB UBX file will need to be converted to RINEX (Receiver Independent Exchange Format). The popular RTKLIB is here to help. We recommend the rtklibexplorer’s modified version of RTKLIB (available for download here) but you can obtain the original RTKLIB here. Open RTKCONV. Select your UBX file and hit ‘Convert’. Our 300MB file took ~30 seconds to convert. You should see an *.obs file once complete.
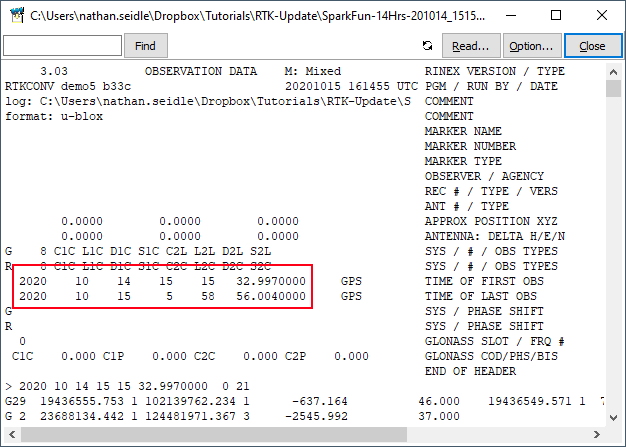
If your data file is 25 hours or a little more, that’s fine. If you need to cut your RINEX file down because it’s too large (or 40 hours long) you can trim the time window. Convert the entire file then click on the notepad icon to open the OBS file. You’ll see the GPS start time and stop time for this capture.
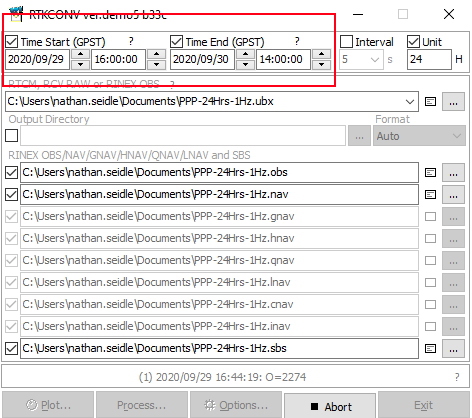
Using these times, you can limit the time window to whatever you need and re-convert the file.
Why don’t we crank up the fix rate? Moar is better!™
The ZED-F9P can go up to 30Hz. Why not get RAWX data at greater than 1Hz? Because nature doesn’t move that fast. Most PPP analyzation services will ignore anything greater than 1Hz. OPUS goes so far as to “decimate all recording rates to 30 seconds”. And, your OBS files will be monstrously large. If 24 hours is 300MB at 1Hz, it follows that 24 hours at 30Hz will be ~9 gig. So no, keep it at 1Hz.
We now need to pass the raw GNSS satellite data in RINEX format (*.obs) through a post processing center to try to get the actual location of the antenna. There are a handful of services but we’ve had great luck using the Canadian CSRS-PPP service. The US National Geodetic Service provides a service called OPUS but we found it to be frustratingly limited by file size and format issues. Your mileage may vary.
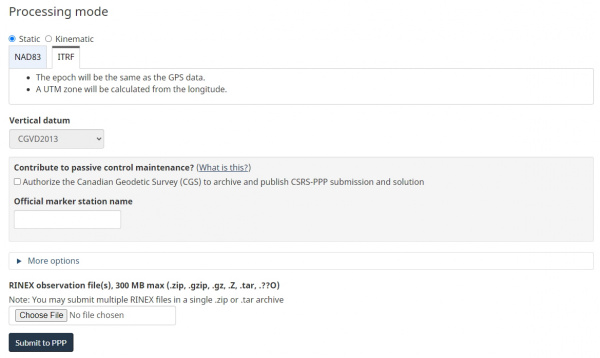
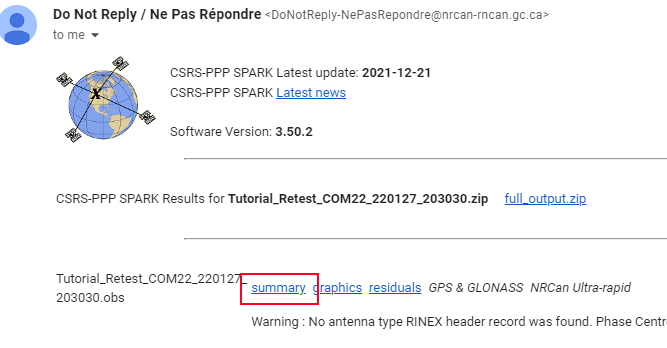
Zip your obs file then create an account with CSRS. Select ITRF then upload your file. Twiddle your thumbs for a few hours and you should receive an email that looks like this:
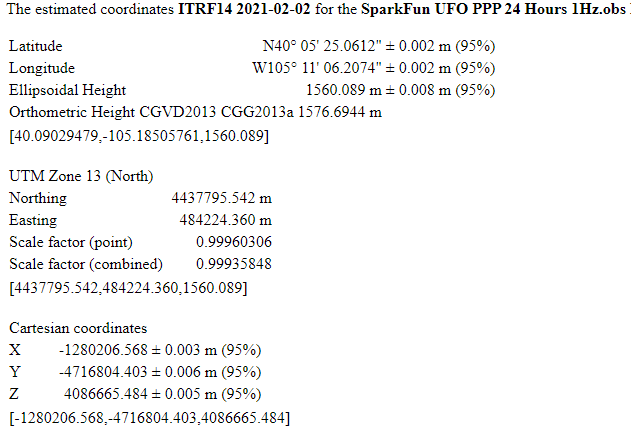
Click the 'Summary' link to open a summary of results. This summary contains the coordinates of your antenna in Geodetic, UTM, and Cartesian formats.
The email will also include a fancy PDF report of your antenna’s location but does not include the Cartesian coordinates we will need later.
If all goes well you should have a very precise location for your antenna. For u-blox receivers we are most interested in ECEF coordinates. ECEF is fascinating. Rather than lat and long, ECEF is the number of meters from the internationally agreed upon reference frame of the center of mass of the Earth. Basically, your ECEF coordinates are the distance you are from the center of the Earth. Neat.
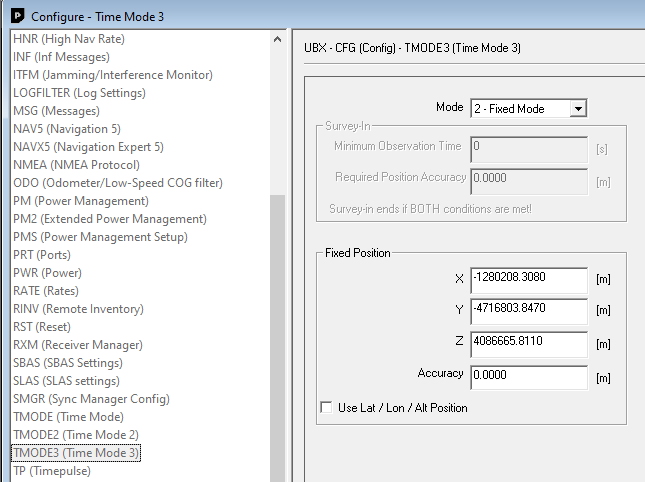
Now that you’ve got the ECEF position of your antenna, let’s tell the ZED-F9P where its antenna is located with a few millimeters of accuracy.
Return to the TMODE3 message and enter the ECEF coordinates from the report. Assuming this receiver is attached to a fixed antenna, we recommend saving these settings to BBR/Flash so that every time this receiver powers on it will immediately enter TIME mode and start outputting RTCM data.
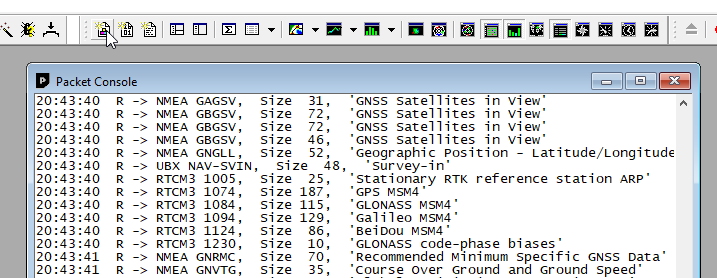
Almost immediately following ECEF entry your module should begin outputting RTCM messages. Use the packet viewer to confirm. If you don’t see them be sure to check out the previous tutorial describing how to set up a base station. More than likely you have not enabled the required RTCM message. Again, be sure to save your setting to BBR/Flash so that at every power on, this receiver will begin broadcasting correction data without user intervention.
Mini-Computer Setup (Option 1)
You’ve got your antenna setup. You’ve got the ZED-F9P outputting RTCM. Nice work! Now how do we get this data out to the world and into rovers everywhere?
Correction data is good up to 10km from a given base location. That said, for every 10km you add beyond it will add 1.5cm worth of inaccuracy to the location (I need to find the source of this statement, but I’m pretty sure it’s true). 10km is a long way to transmit over a wireless link so let’s use the internet instead!
Do you have an ESP32 laying around? You may want to skip this section and checkout the ESP32 Setup.
You will need an internet connected, dedicated computer to connect to the ZED-F9P, receive the serial data, and then forward that data on to the internet. We recommend using a PC for casting. Yes, Windows is painful and not as stable as Linux but because u-center is Windows only it's really the only option. It is extremely handy to be able to remote desktop into the dedicated machine, twiddle a few receiver settings using u-center, and continue broadcasting. I’m not sure how to get this same flexibility in Linux. Additionally, I am far from being a sysadmin. The following can be a helpful method for configuring your dedicated computer but really it’s just me, recording my notes, so that I can recreate the system when I need it.
- Procure a derelict machine with Windows. We spent ~$100 for a mini-PC. Any old PC should do, you certainly don’t need hefty processing power. If possible, get a mini PC that includes mounting hardware. This will make it easier to attach to a wall or outdoor enclosure.
- Within the mini-PC’s BIOS, enable auto-power on after power loss. Enable remote desktop. There are plenty of tutorials showing how to do this. The goal is to get the mini-PC to a point where you can configure and control the PC from the comfort of your desk, not the roof.
- Consider making the IP address of the mini-PC static either from the mini-PC or your router via the mini-PC’s MAC address. This will make accessing the mini-PC over RDP (remote desktop protocol) a bit easier.
- If you plan to access the mini-PC from an external network you will need to enable port forwarding on port 3389 (for RDP) to the static IP address of the mini-PC.
- If you plan to use u-center as a caster you’ll need to enable port forwarding on port 2101 (for NTRIP) to the static IP address of the mini-PC (more in the following sections).
- Disable windows power saving. The mini-PC should never turn off. If you’re worried about energy costs, it’s not zero, but we measured approximately 4.4W while the unit was tethered to the GNSS receiver and broadcasting. This is $5.07 a year at $0.13 per kWh (the US average in 2020).
At this point, be sure you can access the PC via remote desktop. If successful, install the mini-PC into the field. We should be able to configure everything else remotely.
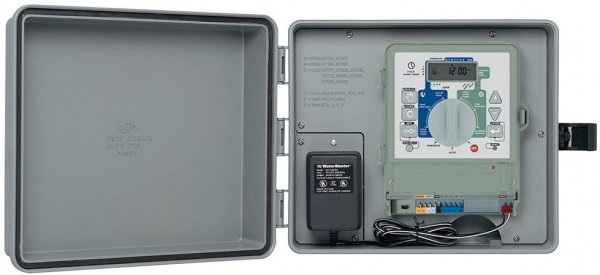
- If the computer will be outside consider one with a built-in GFCI outlet. This Orbit enclosure is very nice.
- Turn off all Windows notifications (use the Notifications and Actions sub menu).
- For security reasons disable Bluetooth and if you’re using wired ethernet, consider disabling WiFi.
- Install u-center.
- Install a local copy of rtkexplorer’s version of RTKLIB.
- Install a serial terminal of your choice.
- Connect the ZED-F9P over USB C.
- Connect the antenna (fixed or semi-fixed).
- Consider connecting a 915MHz radio over USB microB (not soldered to the ZED-F9P breakout). More on this later.
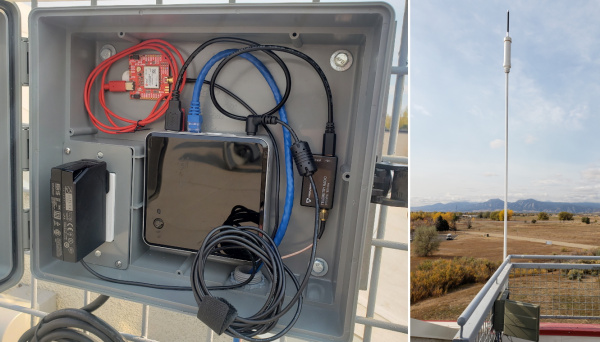
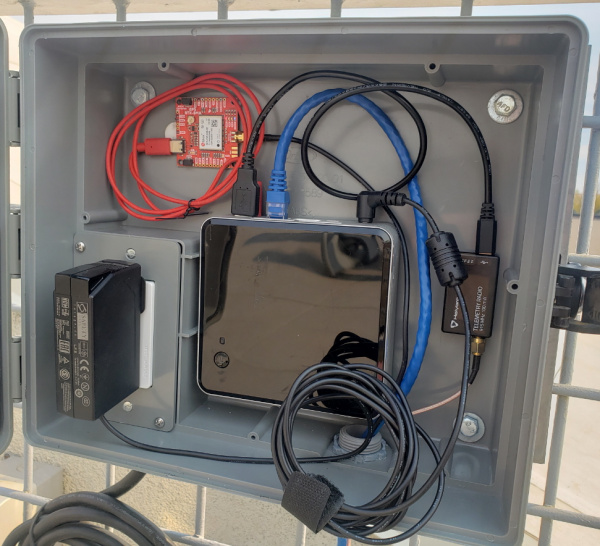
The hardware installation is unique to each site. At my home, I have the mini-PC indoors with the antenna cable coming through a gap in a window jam. At SparkFun, the mini-PC is housed in an Orbit External Enclosure with Power (really handy!). Picture hanging strips make it easy to install electronics to an enclosure; the velcro backing holds the device in place while allowing a user to pull apart a system when needed. Once everything is installed, RDC into the machine and confirm that you can configure the GNSS receiver using u-center.
If you haven’t already, or if your antenna has moved at all, consider re-running the PPP survey of your antenna as described in the previous section.
Caster Setup
Now that you have the Windows mini-PC setup, let’s talk casting. As previously mentioned, NTRIP is the industry standard for moving RTCM corrections over the internet. For our purposes we need to ‘cast’ from the base station and use a ‘client’ at the rover to get access to the caster.
There are a variety of options available:
- Use u-center’s built in Caster/Client
- Use STRSVR’s built in Caster
- Use STRSVR as the Server and RTK2GO as a Caster
There are a few ways to pipe data from the ZED-F9P to the internet. We’ll start with the easiest:
U-center as a Caster
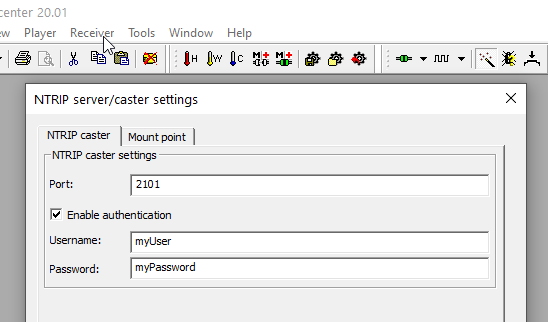
U-center has a very easy to use NTRIP caster. In terms of ease-of-use, this is by far the easiest (second only to using radios that require no configuration). Simply enter a user name, password, and mount point info and click ok. U-center will automatically configure the receiver to broadcast the RTCM sentences, and begin transmitting correction data over port 2101 to anyone who hits this PC’s IP address with the proper credentials (usually using an NTRIP client).
Pros:
- Crazy easy to set up.
Cons:
- You’ll need to poke a hole in your router for port 2101 (not the most secure).
- There is not currently a way to auto-start u-center in caster mode. This means that every time the mini-PC loses power or reboots you will need to log into the machine, open u-center, and restart the caster.
We recommend using u-center to ‘kick the tires’ of NTRIP. It’s very satisfying and a great learning experience to get correction data, but long term u-center is not our choice.
STRSVR as Caster
Really quick, and just because I lost a day trying to make this work: RTKLIB does not support NTRIP casting even though it displays it.
Pros:
- STRSVR can be auto-started
Cons:
- Caster doesn’t do anything
STRSVR and RTK2GO
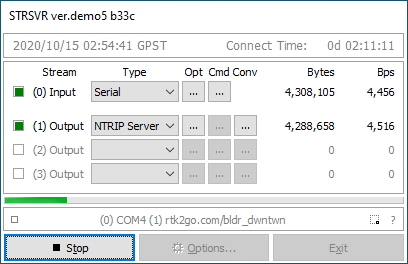
The winner really is using STRSVR as a NTRIP Server (it’s confusing but this means to upload data to a server on the internet) and then RTK2GO as the NTRIP Caster.
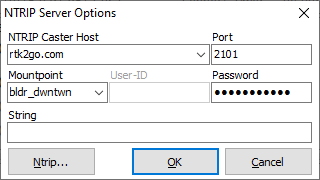
There are a variety of Windows applications out there that claim to be an NTRIP caster. We found them to be generally terrible. The easiest solution is using RTK2GO. RTK2GO seems to be a pet project of SNIP. We recommend creating a mount point and a password through RTK2GO.com. Yes it looks spammy but we found it is the best solution.
Note: We quickly got banned from RTK2GO because, after completing our registration, we started STRSVR and pointed it at rtk2go.com with the temporary password. Very quickly (1-2 minutes) our account and password were active. Which means our broadcasting at RTK2GO with the temp password became invalid. After ~60 seconds of invalid connections by STRSVR (because the PW changed from temp to permanent) our IP was banned for a few minutes, then hours. Our recommendation is to just wait a few minutes. Do not connect STRSVR to RTK2GO using the temp password. Just wait for the confirmation email from RTK2GO, respond with the ‘yes I’m not a robot email’, and wait for the email from RTK2GO that says your mount point and password are valid. At that point, start STRSVR with your credentials.
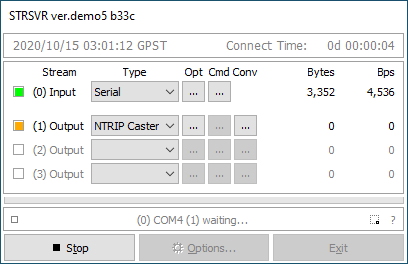
With your mount point and password point STRSVR at RTK2GO. Because we are pushing data to an NTRIP server we don't need to open port 2101 on our local network.
Then press ‘Start’. Within a few seconds the lights should turn green indicating that data from the ZED-F9P is correctly transmitting to RTK2GO. Good. Give yourself ~60 seconds and then open a browser and go to rtk2go.com:2101. This should show you the list of current mount points. Your mount point should be on there. If not, check that you have the correct PW entered, that the base is correctly set up with RTCM messages turned on, and in TIME mode.
Note: When you close STRSVR it will save these settings. If you run 'strsvr.exe -auto' it will start STRSVR and automatically start casting.
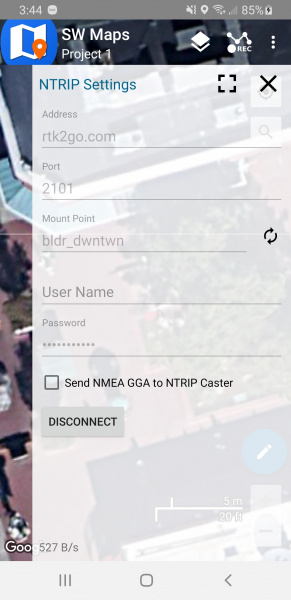
Congrats! You’re getting wonderfully close to the finish line. You are welcome to grab a surveyor setup, go out into the field, and use SW Maps to connect to your correction data using the built in NTRIP client. You can also use u-center to act as a client.
Advanced Trick - Add a Radio
Of course we have a 915MHz antenna on the roof of SparkFun. So why not hook it up? Unlike the small GNSS antenna in the previous section, this antenna has significant lightning protection.
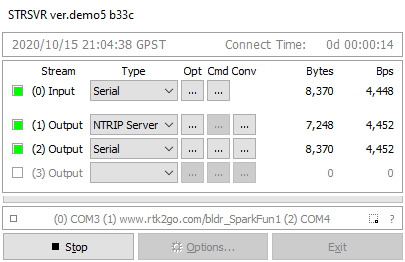
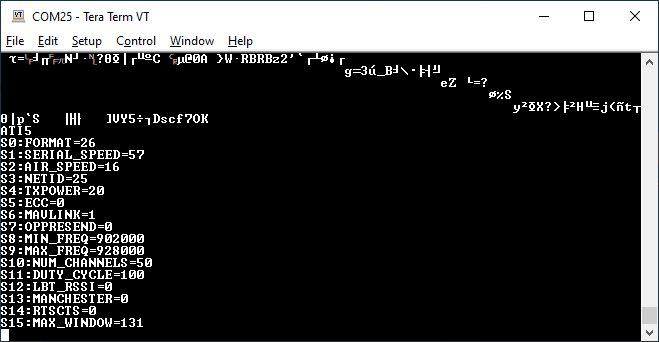
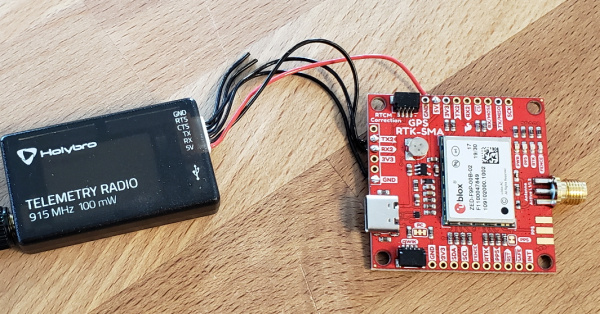
STRSVR is very powerful. You can pipe your RTCM data to multiple places, not just a NTRIP server. We attached a 100mW 915MHz radio to USB. It enumerated as a COM port. We can then add that COM port (remember to set the baud rate to 57600bps to match the radio) to STRSVR so that the RTCM data goes to both the NTRIP server and to the radio. This allows us to use a radio connection for local area RTK and swap to cellular if we get outside the range of the radio.
Why not solder the radio to UART2 like in the previous tutorial?
By connecting the radio to USB it allows us to configure the radio over a terminal window. If it was wired directly to the UART2 on the ZED-F9P the correction data would transmit, but this way we can modify the radio’s AIR_SPEED and other settings to get greater range.
Schedule a Task
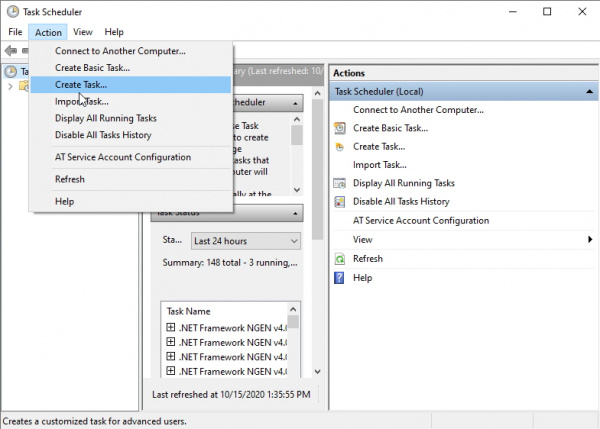
We need STRSVR to start automatically. STRSVR will remember its settings and will automatically start with the last used settings by running strsvr.exe -auto. Now let’s create a Task in windows to ensure it starts at every power on.
Open the Windows Task Scheduler app and create a new Task.
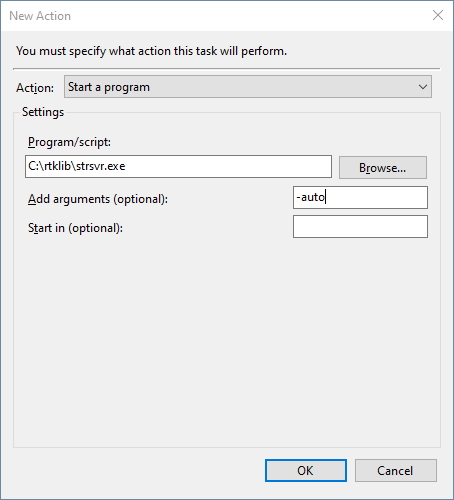
Tell the task to run STRSVR with '-auto'.
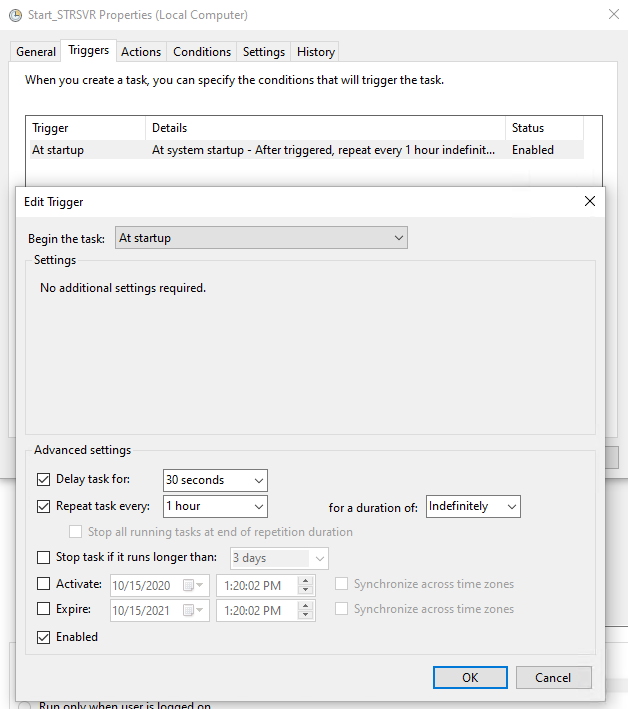
The main things are running the optional ‘-auto’ command, the task should start at startup without need for logon, and the task should delay 30 to 60 seconds. We found that this task (STRSVR) would fail to start at Windows startup possibly because the ZED-F9P and/or the radio COM ports were not yet enumerated. Delaying for 30 seconds or more fixes the issue. And if the program ever shuts down or crashes for some reason the task schedule should, every hour, restart STRSVR, if it is not already running.
Once your task is defined, reset your mini-PC and verify that it automatically starts STRSVR and begins broadcasting.
ESP32 Setup (Option 2)
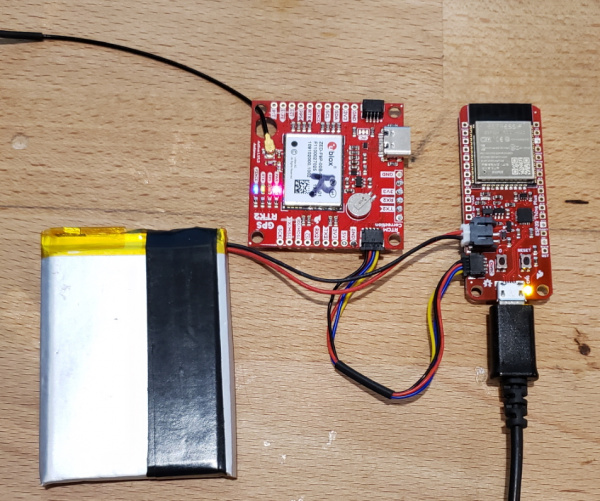
Ok, I admit I am a bit behind the curve here, but the ESP32 Thing Plus is an astounding piece of hardware. If you don’t want to set up a dedicated Windows machine, the ESP32 can send your RTCM correction data directly over WiFi. This greatly simplifies the hardware and software. To hammer the point home, here’s the entirety of my NTRIP Server:
Yep. That’s it. You don’t even really need the USB, that’s only there for power. You can similarly power it from LiPo. And, for extra points, attach a LiPo and USB and your system has a UPS in case the power goes out!
As part of our ever growing Arduino u-blox GNSS library, we’ve added a NTRIP Server example (located under ... -> examples -> ZED-F9P -> Example14_NTRIPServer).
For this code you will need:
- Local WiFi SSID and password
- A casting service such as RTK2Go or Emlid (the port is almost always 2101)
- A mount point and password
- The ECEF coordinates for your fixed or semi-fixed antenna (from earlier in the tutorial)
Modify secrets.h to match your local WiFi SSID and PW. Modify the mount point and caster information. Once all the settings are up to date, load the code onto an ESP32 Thing Plus. Need help getting started? See the ESP32 Thing Plus Hookup Guide.
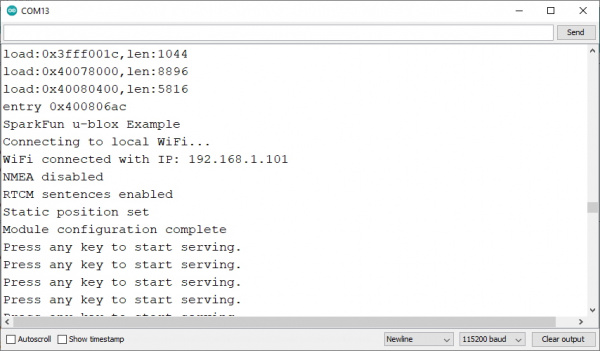
Once running you will be prompted to press a key to start sending RTCM data. This is to ensure that we don’t unnecessarily hammer or ping the casters before we’re ready. RTK2Go is particularly vigilant about blocking IP addresses that mis-use the service (and rightfully so). So tread lightly and make sure your data is being transmitted correctly. Similarly, you can press a key at any time to stop transmitting and disconnect the socket to the caster.
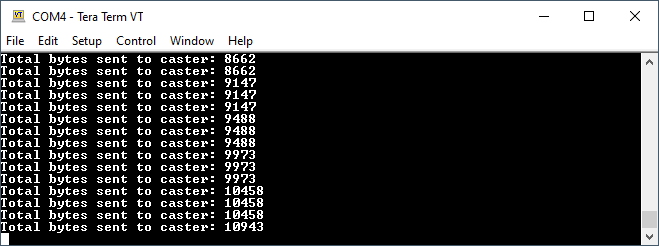
Assuming you’ve got a good static location and your antenna is set up with a clear view of the sky you should start to see ~600 bytes being transmitted to the caster.
That’s it! Remove the key press waits and your NTRIP Server will automatically connect to WiFi and to the Caster service and your NTRIP Server is complete. Easiest NTRIP Server ever.
If you want to also send the RTCM correction data over a radio you can hang the standard SiK1000 radio off the UART2 port of the ZED-F9P. The receiver will diligently pass out the RTCM serial data and the radio will broadcast it.
Pros:
- The power consumption of an ESP32 based system is ~0.5W. Great for a solar powered NTRIP Server!
- Less susceptible to downtime because of Windows updates or COM port issues.
- Much less software to set up and configure.
Cons:
- Configuring an optional radio is not as simple as opening a terminal window and typing AT commands. That said, it’s quite possible to have the ESP32 configure the radio on the fly using AT commands but for our purposes we generally set the radio and forget it.
- The ethernet is not wired so it’s only as stable as your WiFi router.
Raspberry Pi Setup (Option 3)
A GNSS Base Station can also be created using a SBC (single board computer). Thanks to originaldev on the SparkFun forums for creating a Raspberry Pi based setup. You can checkout their build instructions here.
Deploy!
That’s it! You should now be able to point the NTRIP Client of your choice at RTK2GO.com or Emlid, port 2101, with your mount point and password and receive the correction data from your base to any number of rovers in the field within 10km of your base. We recommend SW Maps heartily as it's incredibly easy to pull the correction data down from RTK2GO over the cellular network and automatically pass that data back to a rover configured ZED-F9P. It can be a bit of work setting up a dedicated correction base station but with the right setup the base should run for many months or years without supervision.
I’ve had a ton of fun learning about RTK and surveying. But I’ve learned not to get too hung up on learning where this exact spot is in the world. Space is relative and changing just like time. I don’t mean to rock your world but the north american tectonic plate is moving at 2cm per year. So just enjoy the now now.
Further Reading
Need more RTK? Checkout some of these additional tutorials:
