WAV Trigger Hookup Guide
This Tutorial is Retired!
This tutorial covers concepts or technologies that are no longer current. It's still here for you to read and enjoy, but may not be as useful as our newest tutorials.
 JordanDee
Operation
The Basics
By default, each trigger will cause its corresponding track to play when it is connected with ground. For example, first place a track on the micro SD card called 001-example-name.WAV. The name doesn't matter as long as it starts with 001 and is a WAV audio file. Plug the microSD card into the WAV Trigger. Power the board with a source that can provide between 6V and 15V, and connect headphones or speakers.
Using a stripped piece of wire, connect the via for T1 with the via for GND (no soldering necessary). This shorts trigger 1 to ground, causing track 001 to play. You could also solder a switch or button between the T1 and GND connections so that they trigger the sound. Trigger 1's sound file will continually play while it's held to ground.
The other triggers will work the same way by default. For example, if you have a file named 012-music.WAV on your SD card, connecting Trigger 12 (T12) to ground (GND) will cause this file to play. If you play this track while trigger 1 or another track is still playing, the two will mix together, since polyphony is enabled by default, and you will hear both at the same time. This allows you to mix music with sound effects or whatever else you desire.
Here are some sample tracks with which to experiment.
Note: If you are using a microcontroller or sensor to trigger the tracks, make sure you are matching up your logic levels. You may need to use one of our logic level converters.
Extra Features
There are many other ways of using these triggers including playing random tracks, pausing tracks, or even changing volume as it plays. These features will be discussed in detail since they require configuration with the InitMaker application. This app allows you to change how each trigger works, test them, and then save your setup to put on the SD card along with your tracks. If you have not downloaded the app, now would be a good time. Here are the links again:
Here is a picture of the InitMaker, which we'll use to test different methods of setting up a trigger and make our configuration file to put on the SD card so the board's triggers behave the way we want.
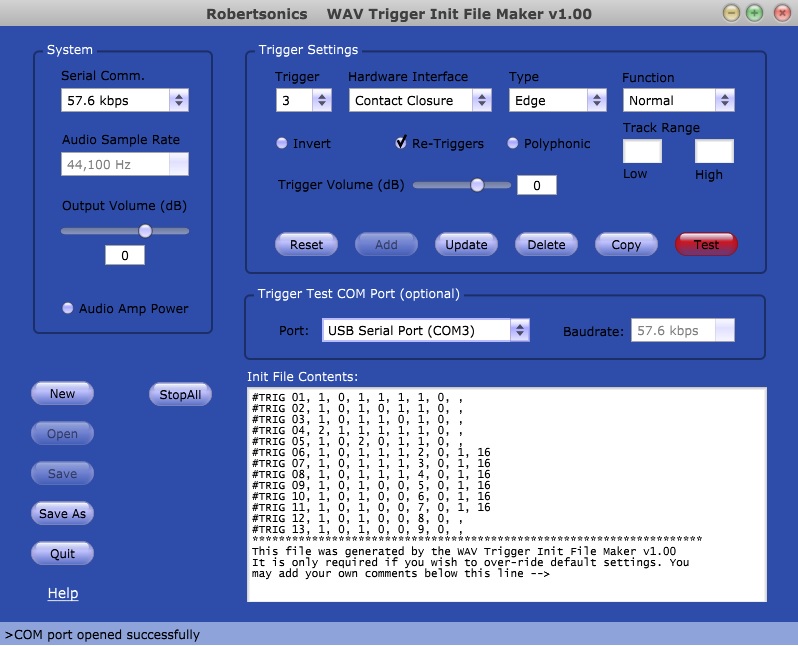
Let's go over each setting, piece by piece.
Trigger - This selects which trigger's functionality we are changing.
Hardware Interface - In short, use "Contact Closure" for when you're connecting triggers to buttons or switches. The trigger will start if physically connected to ground, and otherwise will be high due to an internal pull-up resistor. Use “Active – 3.3V/5V” with active devices like microcontrollers or sensors. If this is selected, the trigger will be activated if connected to a high signal (3.3V or 5V) and will otherwise remain low due to an internal pull-down resistor.
Type - By default, “Edge Triggered” starts the track when the trigger first goes active, and the track continues to play until stopped by some other event. “Level Triggered” starts the track when the trigger goes active, but the track plays only as long as the trigger remains active.
Function - This option selects the function that the trigger will perform. Some of the functions require that a range of tracks be specified, and the values in the range can be from 1 to 999.
“Normal”, the default function, directs the WAV Trigger to play the corresponding track number.
“Next” plays the next track in the specified range, starting with the low track and wrapping back to that track after playing the high track in the range.
“Previous” plays the previous track in the specified range, starting with the highest track and wrapping back to that track after playing the lowest track in the range.
“Random” plays a random track from the specified range. It will not play the same track twice in a row.
“Pause” will pause all the tracks in the specified range. These tracks will remain paused until they are resumed or restarted. Combining with the “Level Triggered” type option creates a momentary Pause feature; The specified tracks will resume when the trigger is released.
“Resume” will resume all the tracks in the specified range, provided that they are still “paused”.
“Stop” will stop all the tracks in the specified range. Combining with the “Level Triggered” type option will create a “Stop and Inhibit” function, preventing all the tracks in the range from restarting as long as the trigger remains active.
“Volume Up” or Volume Dn” will re-purpose the trigger to be a volume control. Each activation of the trigger will increase or decrease the output stage volume of the WAV Trigger by 1dB.
Invert - This check box will invert the logic of the trigger. The default is active low. Checking this option makes the trigger active high. This is automatically checked when selecting an "Active 3.3V/5V" hardware interface.
Re-Triggers - This option enables certain trigger functions to work again immediately while the track(s) that they may have previously started is(are) still playing. For example, with the “Normal” trigger function, enabling this option allows the trigger to restart the corresponding track, even if it has not finished playing, while disabling this option prevents the trigger from working until the track has finished playing (or is stopped by some other event.) Similarly, for the “Next”, “Previous” and “Random” functions, disabling this option prevents the trigger from working until whatever track was previously started from this trigger is finished. This is enabled by default.
Polyphonic - This option specifies that the track played by the trigger function can be mixed with any track(s) currently playing. When this option is disabled, activating the trigger will stop any and all tracks that are currently playing before the new track is started.
Now that you have a sense of the possibilities, let's walk through an example of testing a custom trigger and initialization file.