Using Flask to Send Data to a Raspberry Pi
 SFUptownMaker
ESP8266 Thing Firmware
Now we'll need to program the Thing. This portion assumes that you've followed the SparkFun ESP8266 Thing hookup guide and can program the ESP8266.
Example Code
Note: This example assumes you are using the latest version of the Arduino IDE on your desktop. If this is your first time using Arduino, please review our tutorial on installing the Arduino IDE. If you have not previously installed an Arduino library, please check out our installation guide.
Here's the firmware that I've written to send the proper page requests to the Raspberry Pi.
language:cpp
#include <Arduino.h>
#include <ESP8266WiFi.h>
#include <ESP8266WiFiMulti.h>
#include <ESP8266HTTPClient.h>

ESP8266WiFiMulti WiFiMulti;

void setup()
{
  Serial.begin(115200);

  // ESP8266 takes a few moments to boot, so we give it a few seconds
  for(uint8_t t = 4; t > 0; t--)
  {
    Serial.printf("[SETUP] WAIT %d...\n", t);
    Serial.flush();
    delay(1000);
  }

  // Add the WiFi access point information
  WiFiMulti.addAP("SSID", "PASSWORD");

  // Set our buttons pins to inputs with pullup resistors enabled
  pinMode(12, INPUT_PULLUP);
  pinMode(13, INPUT_PULLUP);

}

void loop()
{
  // wait for WiFi connection
  if((WiFiMulti.run() == WL_CONNECTED))
  {
    // Check if button 12 is pressed...
    if (digitalRead(12) == LOW)
    {
      //...and if so, issue a GET request of the format
      //  gpio/x/y, where x is the desired pin and y is the
      //  desired level to set the pin to. Currently the
      //  Flask app only supports pin 2.
      HTTPClient http;
      // Be sure to change this IP address and port number
      //  to match yours!!!
      http.begin("http://10.8.253.193:5000/gpio/2/0");
      int httpCode = http.GET();
      http.end();
    }
    // Repeat the process for pin 13.
    if (digitalRead(13) == LOW)
    {
      HTTPClient http;
      // Be sure to change this IP address and port number
      //  to match yours!!!
      http.begin("http://10.8.253.193:5000/gpio/2/1");
      int httpCode = http.GET();
      http.end();
    }
  }
  else
  {
    Serial.println("No WiFi");
  }
}
Hopefully, the code and comments make it clear what's going on. Two quick reminders:
First, the IP address and port number in the functions
http.begin()are mine from development. You'll have to change them to match the IP address and port number used on your Raspberry Pi.Second, don't forget to put in your
SSIDandPASSWORDfor your wireless network.
Try It Out!
By now, you ought to have everything ready to go. You'll need to start the script on the Raspberry Pi. Enter these commands in the subdirectory where you created the 'app.py' file:
chmod a+x app.py
./app.py
You should see a message, then, like the one below.
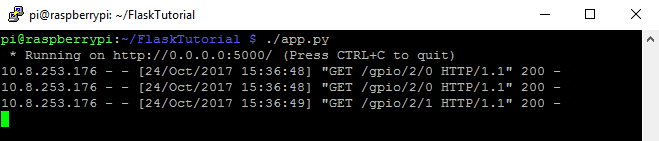
As you can see, I pressed the buttons a couple of times to show you what it looks like when a client makes an HTTP request. Flask reports the IP address of the client, the date and time stamp of the request, the contents of the request, and the result of the request (in this case, 200, or "success"). This is a useful tool to make sure that your requests are actually making it through to the Flask server and not disappearing into the ether somewhere.