TeensyView Hookup Guide
Contributors:
 MTaylor
Example: Audio Board-Compatible Connection
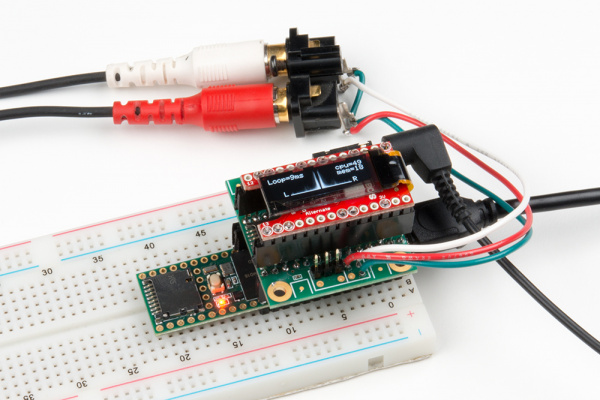
This example shows off using the TeensyView with the audio platform. It takes incoming audio data on both line-in channels and displays a 40-bin FFT for each, plus some CPU usage info.
The TeensyView atop a Teensy Audio stack
Hardware Requirements
- Teensy 3.1 to 3.6 (Note: CPU usage at 100% on the 3.1 with both FFTs enabled)
- TeensyView set to alternate jumpers
- Audio board with a line-in connection added
- Optional: Headphones attached to headphone out port (passes audio)
Choose the example TeensyViewAudio from the menu, compile and run. You should see all sorts of graphic demos go by on the screen. (Note: These can progress at different speeds depending on which Teensy is used.)
Alternately, copy the code from here:
language:c
/******************************************************************************
  TeensyViewAudio.ino
  Example using the TeensyView with the Teensy Audio board

  Marshall Taylor @ SparkFun Electronics, December 6, 2016
  https://github.com/sparkfun/SparkFun_TeensyView_Arduino_Library

  This is modified FFT example software.  It passes L/R audio channels to the
  headphone output while displaying the FFTs as a bar graph on the OLED, with
  CPU usage reports.

  Compatible with:
  Teensy 3.1 + Teensy Audio Board (100% processor usage)
  Teensy 3.2 + Teensy Audio Board (100% processor usage)
  Teensy 3.5 + Teensy Audio Board
  Teensy 3.6 + Teensy Audio Board

  Resources:
  Requires the Teensy Audio library

  Development environment specifics:
  Arduino IDE 1.6.12 w/ Teensyduino 1.31
  Arduino IDE 1.8.1 w/ Teensyduino 1.35
  TeensyView v1.0

  This code is released under the [MIT License](http://opensource.org/licenses/MIT).

  Please review the LICENSE.md file included with this example. If you have any questions
  or concerns with licensing, please contact techsupport@sparkfun.com.

  Distributed as-is; no warranty is given.
******************************************************************************/
#include <Audio.h>
#include <Wire.h>
#include <SPI.h>
#include <SD.h>
#include <SerialFlash.h>

// GUItool: begin automatically generated code
AudioInputI2S            audioInput;     //xy=458,218
AudioAnalyzeFFT1024      LeftFFT;          //xy=672,138
AudioAnalyzeFFT1024      RightFFT;      //xy=683,295
AudioOutputI2S           audioOutput;    //xy=686,219
AudioConnection          patchCord1(audioInput, 0, LeftFFT, 0);
AudioConnection          patchCord2(audioInput, 0, audioOutput, 0);
AudioConnection          patchCord3(audioInput, 1, audioOutput, 1);
AudioConnection          patchCord4(audioInput, 1, RightFFT, 0);
AudioControlSGTL5000     audioShield;    //xy=467,310
// GUItool: end automatically generated code

const int myInput = AUDIO_INPUT_LINEIN;
//const int myInput = AUDIO_INPUT_MIC;

#include <TeensyView.h>  // Include the TeensyView library

///////////////////////////////////
// TeensyView Object Declaration //
///////////////////////////////////
//Standard
//#define PIN_RESET 15
//#define PIN_DC    5
//#define PIN_CS    10
//#define PIN_SCK   13
//#define PIN_MOSI  11

//Alternate (Audio)
#define PIN_RESET 2
#define PIN_DC    21
#define PIN_CS    20
#define PIN_SCK   14
#define PIN_MOSI  7

TeensyView oled(PIN_RESET, PIN_DC, PIN_CS, PIN_SCK, PIN_MOSI);

void setup()
{
  // Set up audio stuff:
  // Audio connections require memory to work.  For more
  // detailed information, see the MemoryAndCpuUsage example
  AudioMemory(20);

  // Enable the audio shield and set the output volume.
  audioShield.enable();
  audioShield.inputSelect(myInput);
  audioShield.volume(0.5); //Pass-through volume

  // Configure the window algorithm to use
  LeftFFT.windowFunction(AudioWindowHanning1024);
  RightFFT.windowFunction(AudioWindowHanning1024);

  //Initialize the OLED
  oled.begin();
  // clear(ALL) will clear out the OLED's graphic memory.
  // clear(PAGE) will clear the Arduino's display buffer.
  oled.clear(ALL);  // Clear the display's memory (gets rid of artifacts)
  // To actually draw anything on the display, you must call the
  // display() function.
  oled.display();
  // Give the splash screen some time to shine
  delay(2000);
}

unsigned long last_time = millis();
uint8_t overlayCounter = 0;
float lastLoopTime = 0;
uint16_t lastCPU = 0;
uint16_t lastMem = 0;

float leftBands[40] = {
  0, 0, 0, 0, 0, 0, 0, 0, 0, 0,
  0, 0, 0, 0, 0, 0, 0, 0, 0, 0,
  0, 0, 0, 0, 0, 0, 0, 0, 0, 0,
  0, 0, 0, 0, 0, 0, 0, 0, 0, 0
};

float RightBands[40] = {
  0, 0, 0, 0, 0, 0, 0, 0, 0, 0,
  0, 0, 0, 0, 0, 0, 0, 0, 0, 0,
  0, 0, 0, 0, 0, 0, 0, 0, 0, 0,
  0, 0, 0, 0, 0, 0, 0, 0, 0, 0
};

void loop()
{
  float loopTime;
  int i;

  //calc loopTime
  unsigned long this_time = millis();
  if (this_time > last_time)
  {
    loopTime = (this_time - last_time);
  }
  last_time = this_time;

  //Update data every 20 frames for readability
  overlayCounter++;
  if (overlayCounter > 20)
  {
    lastLoopTime = loopTime;
    lastCPU = AudioProcessorUsageMax();
    AudioProcessorUsageMaxReset();
    lastMem = AudioMemoryUsageMax();
    AudioMemoryUsageMaxReset();

    overlayCounter = 0;
  }

  //Draw a frame
  oled.clear(PAGE);

  //Draw left bands
  for (i = 0; i < 40; i++)
  {
    if (leftBands[i] > 0.5) leftBands[i] = 0.25;
    oled.line(62 - i, 31, 62 - i, 31 - (leftBands[i] * 127));
  }

  //Draw Right bands
  for (i = 0; i < 40; i++)
  {
    if (RightBands[i] > 0.5) RightBands[i] = 0.25;
    oled.line(65 + i, 31, 65 + i, 31 - (RightBands[i] * 127));
  }

  //Overlay info
  //  loop time
  oled.setCursor(0, 0);
  oled.print("Loop=");
  oled.print((uint8_t)lastLoopTime);
  oled.print("ms");
  //  Teensy Audio info
  oled.setCursor(83, 0);
  oled.print("cpu=");
  oled.print(lastCPU);
  oled.setCursor(91, 8);
  oled.print("mem=");
  oled.print(lastMem);
  //  L/R letters
  oled.setCursor(15, 24);
  oled.print("L");
  oled.setCursor(108, 24);
  oled.print("R");

  if (LeftFFT.available()) {
    // each time new FFT data is available
    for (i = 0; i < 40; i++) {
      leftBands[i] = LeftFFT.read(i);
    }
  }
  if (RightFFT.available()) {
    // each time new FFT data is available
    for (i = 0; i < 40; i++) {
      RightBands[i] = RightFFT.read(i);
    }
  }

  oled.display();

}
The important lesson from this sketch is that the constructor is passed the alternate set of pins, and can be used concurrently with the Audio board.
Use the same command from the ScreenDemo and paint the screen with whatever you need to display!
