RFID Beginners Tutorial
 Brandon J. Williams
Software
If this is your first time using Arduino, please review our tutorial on installing the Arduino IDE. If you have not previously installed an Arduino library, please check out our installation guide.
Our final code will be a mash up of two basic examples for our components. We’ll take a quick look at each part of the examples that we’ll use and talk about the main points.
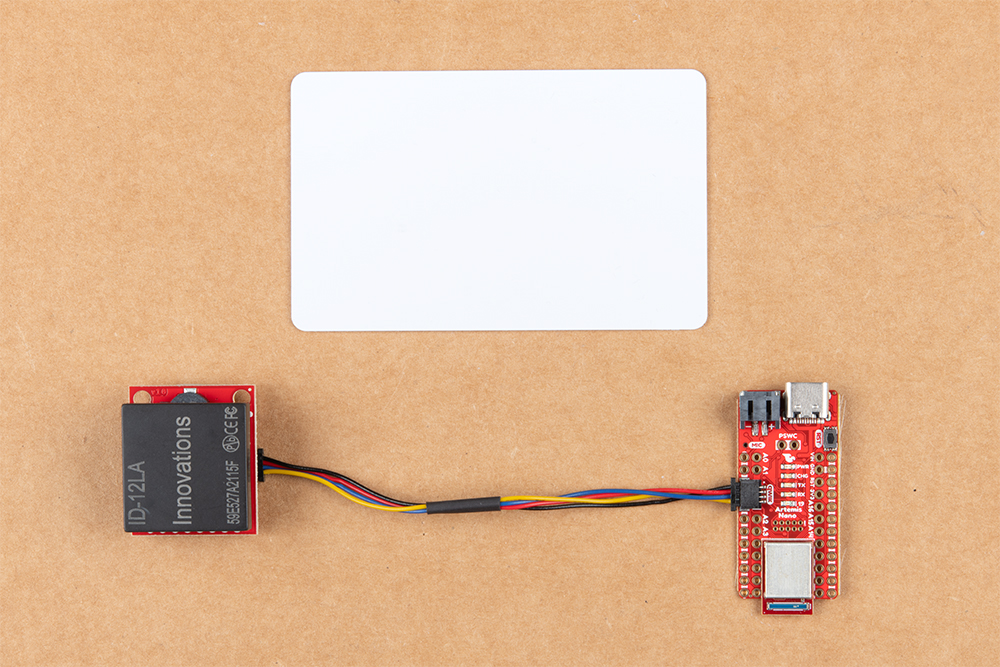
Qwiic RFID Reader
The Qwiic RFID library will give you the full functionality of the Qwiic RFID ID-XXLA without the hub bub of the I²C data transactions. Also included are examples codes to demonstrate the full functionality of the library. You can click the link below to download the file directly and install it manually, or navigate through the Arduino Library Manager by searching SparkFun Qwiic RFID. You can also go the GitHub page and get download it from there.
In the Read_Tag_Basics example, the reader logs all tags that are recognized in a memory buffer. We read the buffer and clear it for a new read. We see that functionality below:
language:c
serialInput = Serial.read();
if (serialInput == 49){   // "1" on your keyboard is 49 in ASCII
  tag = myRfid.getTag();
  Serial.print("Tag ID: ");
  Serial.print(tag);
  scanTime = myRfid.getPrecReqTime();
  // If this time is too precise try:
  // long time = myRfid.getReqTime();
  Serial.print(" Scan Time: ");
  Serial.println(scanTime);
}
Serial.read(); reads the buffer into the micro-controller's memory and clears the reader's buffer for another swipe. The tag is printed in the serial output along with the scan time. What we need to take away from this is the Serial.read(); and myRfid.getTag();.
SAM-M8Q GPS Module
#include "SparkFun_Ublox_Arduino_Library.h" to #include "SparkFun_u-blox_GNSS_Arduino_Library.h".
The SparkFun U-blox Arduino library can be downloaded with the Arduino library manager by searching 'SparkFun Ublox' or you can grab the zip here from the GitHub repository:

Using SparkFun’s u-blox Arduino Library and Example2_NMEAParsing.ino, we’ll get our GPS coordinates and time. If you look closely at the code below, you’ll notice that something is missing:
language:c
long latitude_mdeg = nmea.getLatitude();
long longitude_mdeg = nmea.getLongitude();

Serial.print("Latitude (deg): ");
Serial.println(latitude_mdeg / 1000000., 6);
Serial.print("Longitude (deg): ");
Serial.println(longitude_mdeg / 1000000., 6);
We’re missing functions to get time. However, if we look at the u-blox library header file we can see the following functions that we’ll add in to the final code similarly to how the latitude and longitude functions are called in the example:
language:c
uint16_t getYear(uint16_t maxWait = getPVTmaxWait);
uint8_t getMonth(uint16_t maxWait = getPVTmaxWait);
uint8_t getDay(uint16_t maxWait = getPVTmaxWait);
uint8_t getHour(uint16_t maxWait = getPVTmaxWait);
uint8_t getMinute(uint16_t maxWait = getPVTmaxWait);
uint8_t getSecond(uint16_t maxWait = getPVTmaxWait);
These functions will give us time. Now let's combine all our parts. The full code is below:
language:c
/******************************************************************************
Remote Work Punch Clock
brandon.williams@sparkfun.com
May 6, 2019

Description When a card is read then the GPS coordinates and time are read from
    the GPS module.

Development environment specifics:
Arduino IDE 1.8.12 (or most recent)

Board Definition Packages (or most recent):
  SparkFun Apollo3 Boards           1.1.1
  MicroNMEA                         2.0.1
  SparkFun_Qwiic_Rfid.h             1.1.6
  SparkFun_u-blox_GNSS_Arduino_Library    2.0.2
******************************************************************************/


#include <MicroNMEA.h>

#include <SparkFun_Qwiic_Rfid.h>

#include <SparkFun_u-blox_GNSS_Arduino_Library.h>//http://librarymanager/All#SparkFun_u-blox_GNSS


#define RFID_ADDR 0x7D // Default Qwiic RFID I2C address

// Variables and Constants
      /*GPS*/
SFE_UBLOX_GNSS myGNSS;
char nmeaBuffer[100];
MicroNMEA nmea(nmeaBuffer, sizeof(nmeaBuffer));
      /*RFID*/
Qwiic_Rfid myRFID(RFID_ADDR);
String tag;
float scanTime;
int serialInput;

void setup() {

  Wire.begin();
  //Disable Serial after confirming setup works
  Serial.begin(115200);

  /*Qwiic RFID begin*/
  if(myRFID.begin()== false){
    Serial.println("Could not communicate with Qwiic RFID!");
    while(1);
  }

}

void loop() {

  /*RFID loop code*/
  tag = myRFID.getTag();

  /* Empty string is returned if no tag is present,
   * wait till a valid ID string is returned.
   */
    if(myGNSS.begin() != false){
      if(tag.length() != 6){
        Serial.print("Tag ID: ");
        Serial.println(tag);

        /*GPS loop code*/
        myGNSS.checkUblox(); //See if new data is available. Process bytes as they come in.

        if(nmea.isValid() == true){
          if(nmea.getNumSatellites() != 0){
            long latitude_mdeg = nmea.getLatitude();
            long longitude_mdeg = nmea.getLongitude();
            uint16_t dateYear =  nmea.getYear();
            uint8_t dateMonth = nmea.getMonth();
            uint8_t dateDay = nmea.getDay();
            uint8_t dateHour = nmea.getHour();
            uint8_t dateMin = nmea.getMinute();
            uint8_t dateSec = nmea.getSecond();

            //Print Coordinates
            Serial.print("Latitude (deg): ");
            Serial.println(latitude_mdeg / 1000000., 6);
            Serial.print("Longitude (deg): ");
            Serial.println(longitude_mdeg / 1000000., 6);

            //Print Time
            Serial.print("Date and Time: ");
            Serial.print(dateMonth);
            Serial.print("-");
            Serial.print(dateDay);
            Serial.print("-");
            Serial.print(dateYear);
            Serial.print(" @ ");
            Serial.print(dateHour);
            Serial.print(":");
            Serial.print(dateMin);
            Serial.print(":");
            Serial.println(dateSec);
          }
        }
        else{
          Serial.print("No Fix - ");
          Serial.print("Num. satellites: ");
          Serial.println(nmea.getNumSatellites());
        }
      }
      delay(500);
    }
}

//This function gets called from the SparkFun Ublox Arduino Library
//As each NMEA character comes in you can specify what to do with it
//Useful for passing to other libraries like tinyGPS, MicroNMEA, or even
//a buffer, radio, etc.
void SFE_UBLOX_GNSS::processNMEA(char incoming)
{
  //Take the incoming char from the Ublox I2C port and pass it on to the MicroNMEA lib
  //for sentence cracking
  nmea.process(incoming);
}
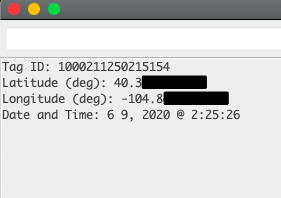
When we swipe a card over the scanner then we should get something like below: