Qwiic Pro Kit Project Guide
 M-Short,
  bboyho
 Introduction
The Qwiic Pro Kit was designed to allow users to get started with Arduino without the need for soldering or a breadboard. We've included three inputs (a joystick, accelerometer, and proximity sensor) and one display that can be daisy chained to your Arduino. Hooking up a handful of inputs and outputs to an Arduino has never been so easy with the Qwiic system!
SparkFun Qwiic Pro Kit
KIT-15349Suggested Reading
If you aren't familiar with the Qwiic system, we recommend reading here for an overview.
| Qwiic Connect System |
We would also recommend taking a look at the following tutorials to set up the RedBoard Turbo and get a feel for each Qwiic component.
RedBoard Turbo Hookup Guide
Qwiic Micro OLED Hookup Guide
Qwiic Accelerometer (MMA8452Q) Hookup Guide
Qwiic Joystick Hookup Guide
Qwiic Proximity Sensor (VCNL4040) Hookup Guide
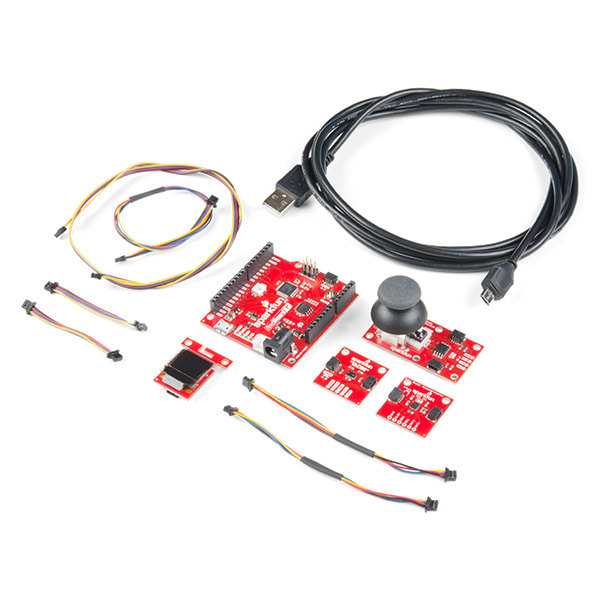
Kit Contents
You will find the following parts in the kit.

- 1x RedBoard Turbo (SAMD21) Development Board
- 1x Reversible USB A to Reversible Micro-B Cable - 0.8m
- Inputs
- Outputs
- Qwiic Cables
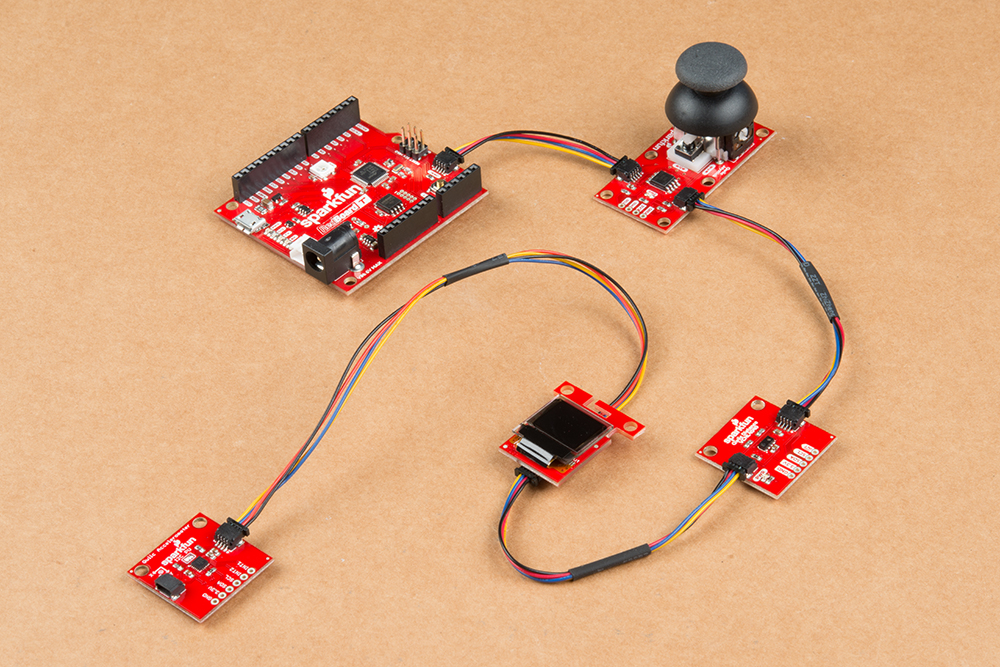
Hardware Hookup
The Qwiic connection system makes it easy to connect the boards together. Simply grab a Qwiic cable of your choice to connect. If you are using the demo code from this tutorial to play micro pong, you will need to connect all the boards together. We recommend using longer cable lengths for users using the Qwiic boards to control each paddle and placing them on opposite sides of the micro OLED. We also found it easier to add the accelerometer at the end of the daisy chain since the board requires movement. Additionally, you will need to orient the micro OLED so that the paddle is on the side of the player's Qwiic board after uploading the example code.

SparkFun Qwiic Ideation Kit
KIT-16262Installing the Board Add-Ons and Drivers
There are a few board add-ons to install before you are able to upload code to your RedBoard Turbo. If you have not already, make sure to check out the RedBoard Turbo's hookup guide to install the SAMD21 and SparkFun board add-ons.
Drivers
The RedBoard Turbo is now easier than ever to program, thanks the UF2 bootloader. With this bootloader, the RedBoard Turbo shows up on your computer as a USB storage device without having to install drivers for Windows 10, Mac, and Linux!
However, if you are using a Windows 7 OS, you will need to install SAMD drivers. Head to the RedBoard Turbo's hookup guide for more information about installing drivers for Windows 7.
Installing the Library
SparkFun has written a library for the Qwiic enabled joystick, triple axis accelerometer (MMA8452Q), proximity sensor (VCNL4040), and 64x48 micro OLED. You can obtain these libraries through the Arduino Library Manager. Search for the following terms to automatically install the latest versions of each library. If you have issues compiling, you may need to download the respective library versions listed below.
- SparkFun Joystick (v1.0.4)
- SparkFun MMA8452Q (v1.4.0)
- SparkFun VCNL4040 (v1.0.2)
- SparkFun micro OLED (v1.2.5)
If you prefer downloading the libraries manually, you can grab them from each of the respective GitHub repositories.
Example Code
We recommend grabbing the code from its the GitHub repository. Otherwise, you can download the zipped file from the link below.
After downloading, unzip the files and open the QwiicStarterExample.ino sketch. It should be located in the downloads folder similar to this path: .../Firmware/Arduino/QwiicStarterExample/QwiicStarterExample.ino. Open the code up in the Arduino IDE, select the board (i.e. the SparkFun RedBoard Turbo), and the COM port that the board enumerated on. Then hit the upload button.
// in front of the following line: #define Serial SerialUSB // Uncomment for RedBoard Turbo, this reroutes all Serial commands to SerialUSBWith a friend, try rocking the accelerometer back and forth along the x-axis or moving your hand above the proximity sensor to control each paddle. You will need to orient the micro OLED so that the paddle is on the side of the player's Qwiic board. The game will continue as long as the ball hits the paddle and bounces to the other side. A player will win a round as soon as the other player fails to bounce the ball back to the other side. The current score will be briefly displayed before the next game. Try to rack up more points than your opponent!

The default code uses the accelerometer as player 1 and the proximity sensor as player 2. Try adjusting the code to use the joystick for one of the players by adding and removing the single line comments. The joystick will control the paddle along the "vertical" y-axis. Each board can only have one player assigned. See if you can try to remove the unused Qwiic board from the daisy chain and commenting out each instance of the related board.
Resources and Going Further
Now that you've successfully got your Qwiic Starter Kit up and running, what will else will you build? For more information, check out the resource below:
- Arduino Libraries
- Qwiic Pro Kit Code
- SFE Product Showcase
Need some inspiration for your next project? Check out some of these related tutorials: