Papa Soundie Audio Player Hookup Guide
 LightningHawk
 Introduction
The Papa Soundie is an audio playback device breaking out VLSI's VS1000D audio codec which decodes ogg vorbis (license free) and wav type files. With an SD card for sound storage and a built-in ATMEGA328P programmed with Arduino you'll be adding custom sound effects to your project with less hardware and in a familiar programming environment.
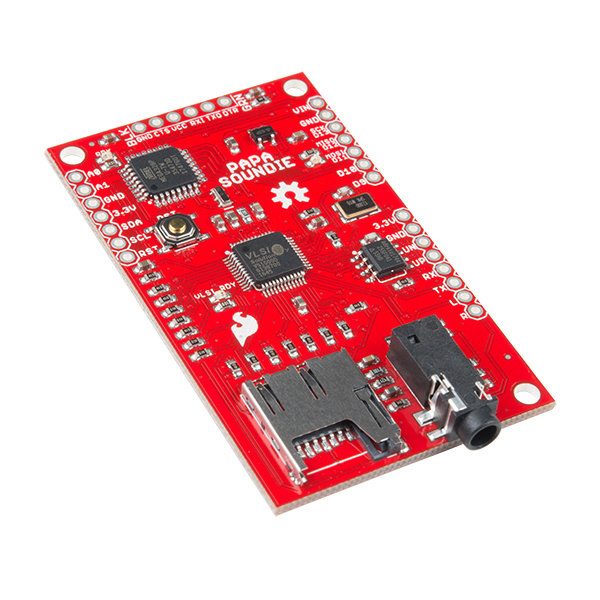
SparkFun Papa Soundie Audio Player
DEV-14554Required Materials
To follow along with this hookup guide, you will need at least the following materials:
Tools
You will need a soldering iron, solder, and general soldering accessories.


Weller WLC100 Soldering Station
TOL-14228Suggested Reading and Viewing
If you aren’t familiar with the following concepts, we recommend checking out these tutorials before continuing.
Pull-up Resistors
How to Solder: Through-Hole Soldering
Serial Peripheral Interface (SPI)
Binary
How to Use a Breadboard
Logic Levels
I2C
You may also want to check out this Audacity Tutorial on YouTube.
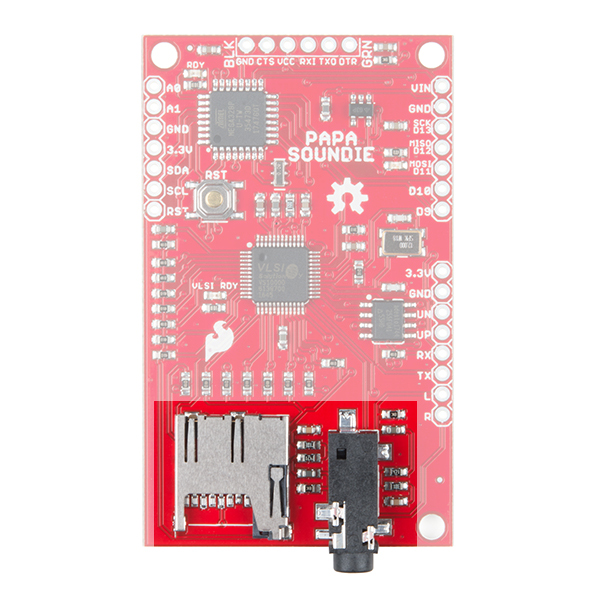
Hardware Overview
Let's go over the Papa Soundie Audio Player in detail.
Details:
- VIN 3.3V-6V, regulated to 3.3V
- All IO 3.3V logic (not 5V tolerant)
- Plays audio stored on micro-SD card
- 4Mb flash for boot firmware
- Uses high-performance license-free Ogg Vorbis decoder for compressed audio
- Also plays .WAV type files
- Customizable
- Line-Out stereo analog output with SNR>90dB
- Supports variable bit-rate and sample rates
- Built-in Arduino
- I2C & SPI
- 2 Analog Inputs
- 7 Digital IO pins (3 PWM)
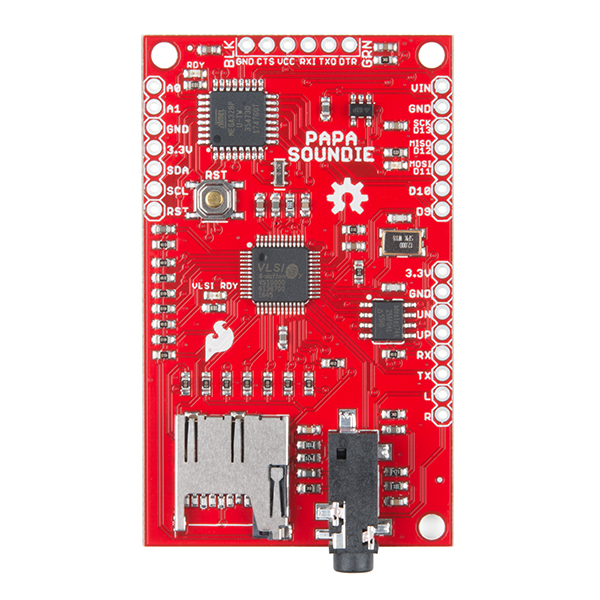
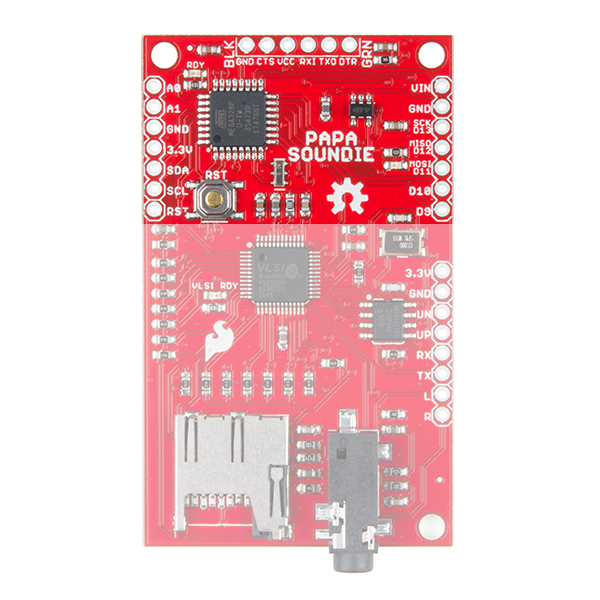
Arduino Control
The top section of this board contains the Arduino Controls. We've broken out 2 analog input pins and 7 digital pins, which includes 3 PWM pins, SPI and I2C communication pins.
The ATMEGA328P is there to easily trigger the pins on the VS1000D using software. The GPIO (D2-D6) are connected to the trigger pins on the VS1000D with pull-down resistors. Sending those digital pins high triggers the audio. Having a built-in software solution means you can trigger audio with or without external hardware on the Arduino pins.
Using binary-coded playback, an audio file is mapped to a number which is also mapped to a series of pins set high or low. For instance, if you wanted to play file 5 under some specific set of conditions you call the function that would set the first and third IO high while leaving the second, fourth and fifth IO low. This allows triggering more files than available pins on the VS1000D.
IO triggers aside, this is also a paired down Arduino board. It can be used both to control and sense, just like a Redboard or Pro-Mini. You will need an FTDI breakout board to program the Papa Soundie in Arduino.
Audio Playback
UN and UP are the USB lines you can use if you wish to add USB functionality to the product. There are firmware solutions written by VLSI that allow the VS1000D to be mounted as a mass storage device. Audio files can then be dragged and dropped onto the flash storage. This functionality is not built into the firmware by default.
RX and TX can be used to reprogram the VS1000D, which is done through VLSI's VSIDE. VLSI is a great resource for researching other software solutions.
The Left and Right audio signals are broken out so you can either use the noisy cricket or build your own amplifier speaker system using 2 Mono Audio Amp Breakout boards.
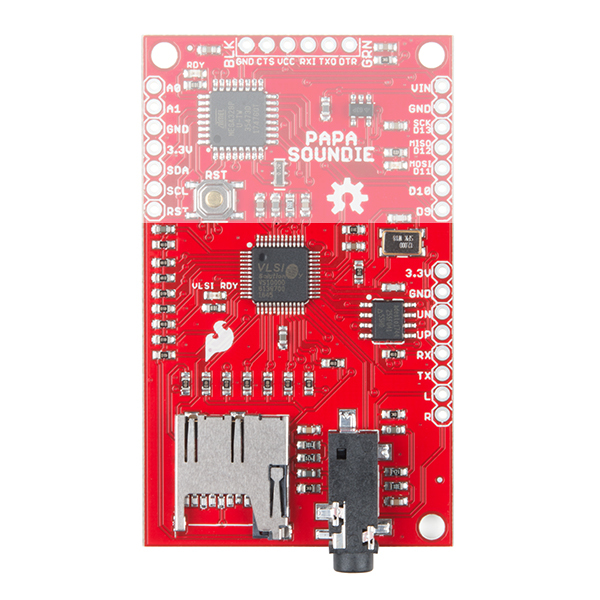
Connectors
The connectors highlighted here are the micro-SD card socket and the 3.5mm Jack which is to be used with powered speakers only - not headphones. Headphones won't break anything but you won't get any sound either.
Audio Files
You can trigger up to 32 files from the SD card. With the extra space on the SD card you use much larger files than on the Little Soundie. For the Papa Soundie to keep track of the audio files they need to be named in a particular way; in a 7.3 format. Of the 7, the first five characters are reserved for the name of file and the last two characters are reserved for the file number. This is how the hardware knows which pin triggers which file. The .3 refers to the file extension, which can be either .ogg or .wav. For instance: file 1 could be AUDIO00.ogg or FILES00.wav. File 32 could be something like CLAPS31.ogg File one will be triggered when D2 is held high.
What is OGG Vorbis?
Ogg Vorbis is an audio file format developed by xiph, an open source multi-media company.
Ogg Vorbis is a fully open, non-proprietary, patent-and-royalty-free, general-purpose compressed audio format for mid to high quality (8kHz-48.0kHz, 16+ bit, polyphonic) audio and music at fixed and variable bitrates from 16 to 128 kbps/channel. This places Vorbis in the same competitive class as audio representations such as MPEG-4 (AAC), and similar to, but higher performance than MPEG-1/2 audio layer 3, MPEG-4 audio (TwinVQ), WMA and PAC.
There are sites out there that will do the conversion for you without having to open a program, like this one.
Audacity is a great open source resource for all things audio that also has fantastic documentation.
There are several sound effects sites such Zapsplat and Soundbible to grab license free sound bites from and then convert to .OGG or .WAV using the methods listed above.
Binary Coded Playback
To get the most of your device and trigger more sounds than available pins the firmware is set up to trigger pins based on a binary code to associate an audio file with a specific set of pins. On the Papa Soundie you can trigger 32 files. Under the Binary column below the number represents which pins on the Arduino are pulled high and low from D6 to D2.
| File No. | Binary/IO Pin State | Audio File |
|---|---|---|
| 1 | 00001 | AUDIO00.OGG |
| 2 | 00010 | AUDIO01.OGG |
| 3 | 00011 | AUDIO02.OGG |
| 4 | 00100 | AUDIO03.OGG |
| 5 | 00101 | AUDIO04.OGG |
| ... | ||
| 28 | 11011 | AUDIO27.OGG |
| 29 | 11100 | AUDIO28.OGG |
| 30 | 11101 | AUDIO29.OGG |
| 31 | 11110 | AUDIO30.OGG |
| 32 | 11111 | AUDIO31.OGG |
- AUDIO00.ogg
- AUDIO01.ogg
- AUDIO02.ogg
- You can't jump to AUDIO08.ogg, the next file has to be AUDIO03.ogg
Programming
Preparing your microSD Card
Format your microSD Card. The Papa Soundie works with FAT12, FAT16, and FAT32 disks. Load the files you wish to play using the naming convention shown in the previous section. Once the card is inserted you are almost ready to play.
Arduino Library
Within the Arduino IDE, the set up is the same as for the Pro Mini. Under the Tools menu choose the following for the board:
- Board: Arduino Pro or Pro Mini
- Processor: ATmega328P (3.3V, 8 MHz)
To get started immediately, use the example code and library files below.
Library Overview
These are functions used to setup the pins at startup and to play and stop audio playback.
PapaSoundie::begin() - Sets GPIO as output, turns on the VLSI IC, turns on the status LEDs. Must be called in setup().
PapaSoundie::playFileNumber(int number) - Plays the audio file associated with the number.
PapaSoundie::playRepeat(int number) - Plays the audio files associated with the number repeatedly.
PapaSoundie::stopRepeat() - Stops playback of repeat function.
Install FTDI Drivers
To upload with an FTDI, make sure the FTDI drivers installed. Depending on your computer’s operating system, you will need to follow specific instructions. Please go to How to Install FTDI Drivers, for more information.
How to Install FTDI Drivers
Example Sketch
Copy and paste the following code into the Arduino IDE. Hit upload, and see what happens! Make sure to select the correct board and COM port when uploading.
language:c
/*
Papa Soundie Hookup Guide: Software Example
Mary West @ SparkFun Electronics
4/16/2018

:)

This sketch will sequentially play audio files from a list of 12 stored on
the SD Card every 5 seconds.

This code is released under the MIT License (http://opensource.org/licenses/MIT)

******************************************************************************/
#include "SparkFun_PapaSoundie.h"

PapaSoundie sfx = PapaSoundie();

void setup() {
  sfx.begin();
  Serial.begin(115200);
}

// the loop function runs over and over again forever
void loop() {
    for(int i = 0; i < 12; i++)
    {
        Serial.print("Playing: ");
        Serial.println(i);
        sfx.playFileNumber(i);
        delay(5000);
    }
}
sfx is the constructor to instantiate the PapaSoundie class. You can name this constructor whatever you'd like.
Hardware Example Project: The Gag
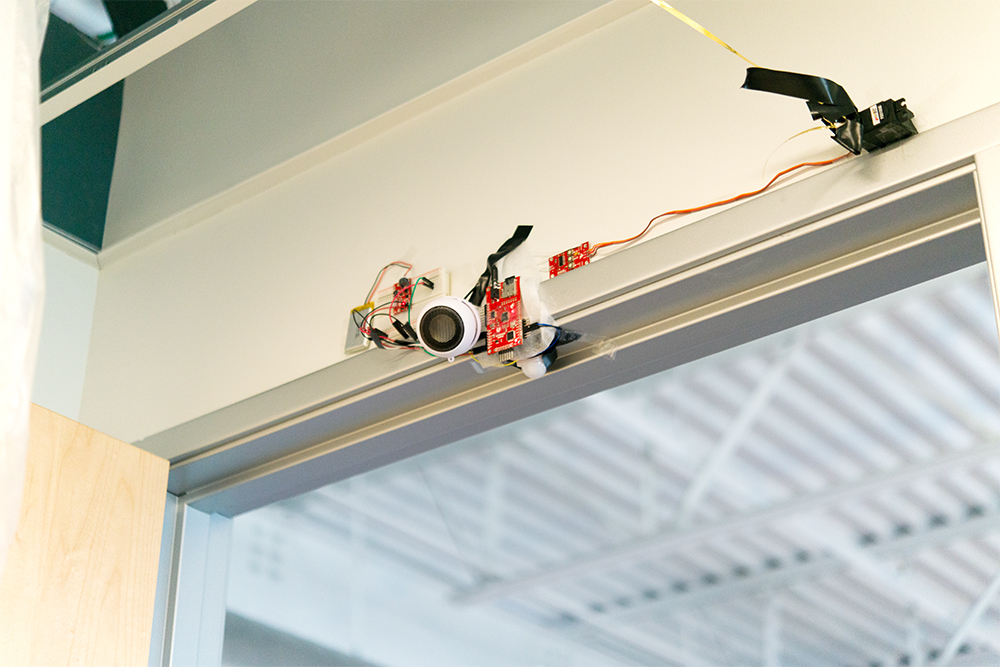
I've been having too many "customers" coming through my office lately so I thought of creating a deterrent. The project senses when someone walks through my door and plays the quintessential convenient store bell. A counter keeps track of the number of customers and when it reaches 100 a cheering and clapping audio file is played and a bag holding balloons and confetti is untied by a servo motor releasing a party on the unsuspecting coworker.
The Game Plan
For this project you will need the following the parts:
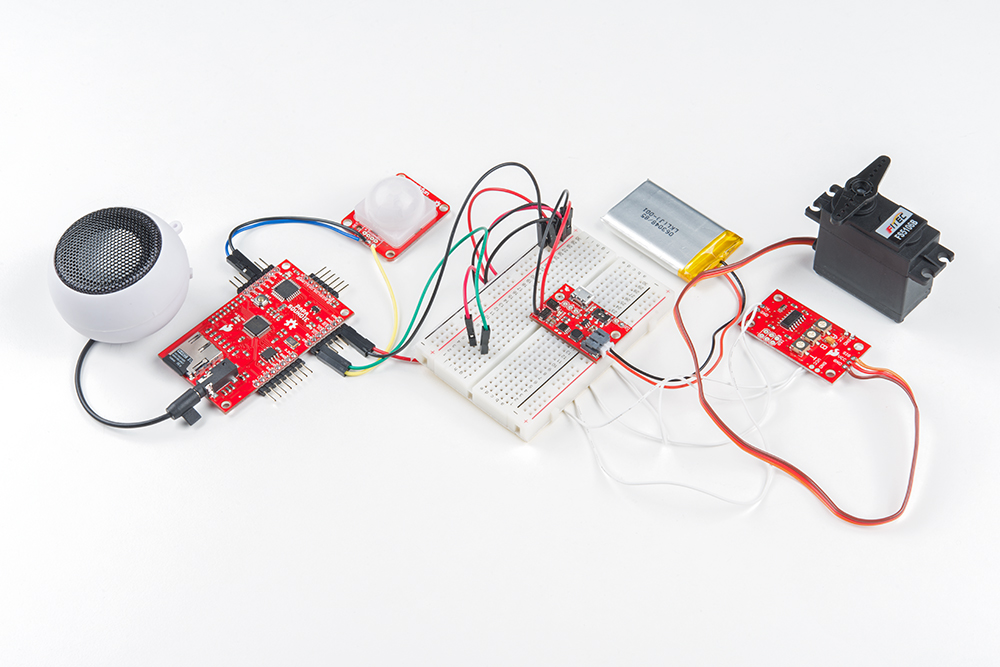
Hardware Hookup
The Fritzing diagram below provides the wiring for the project:
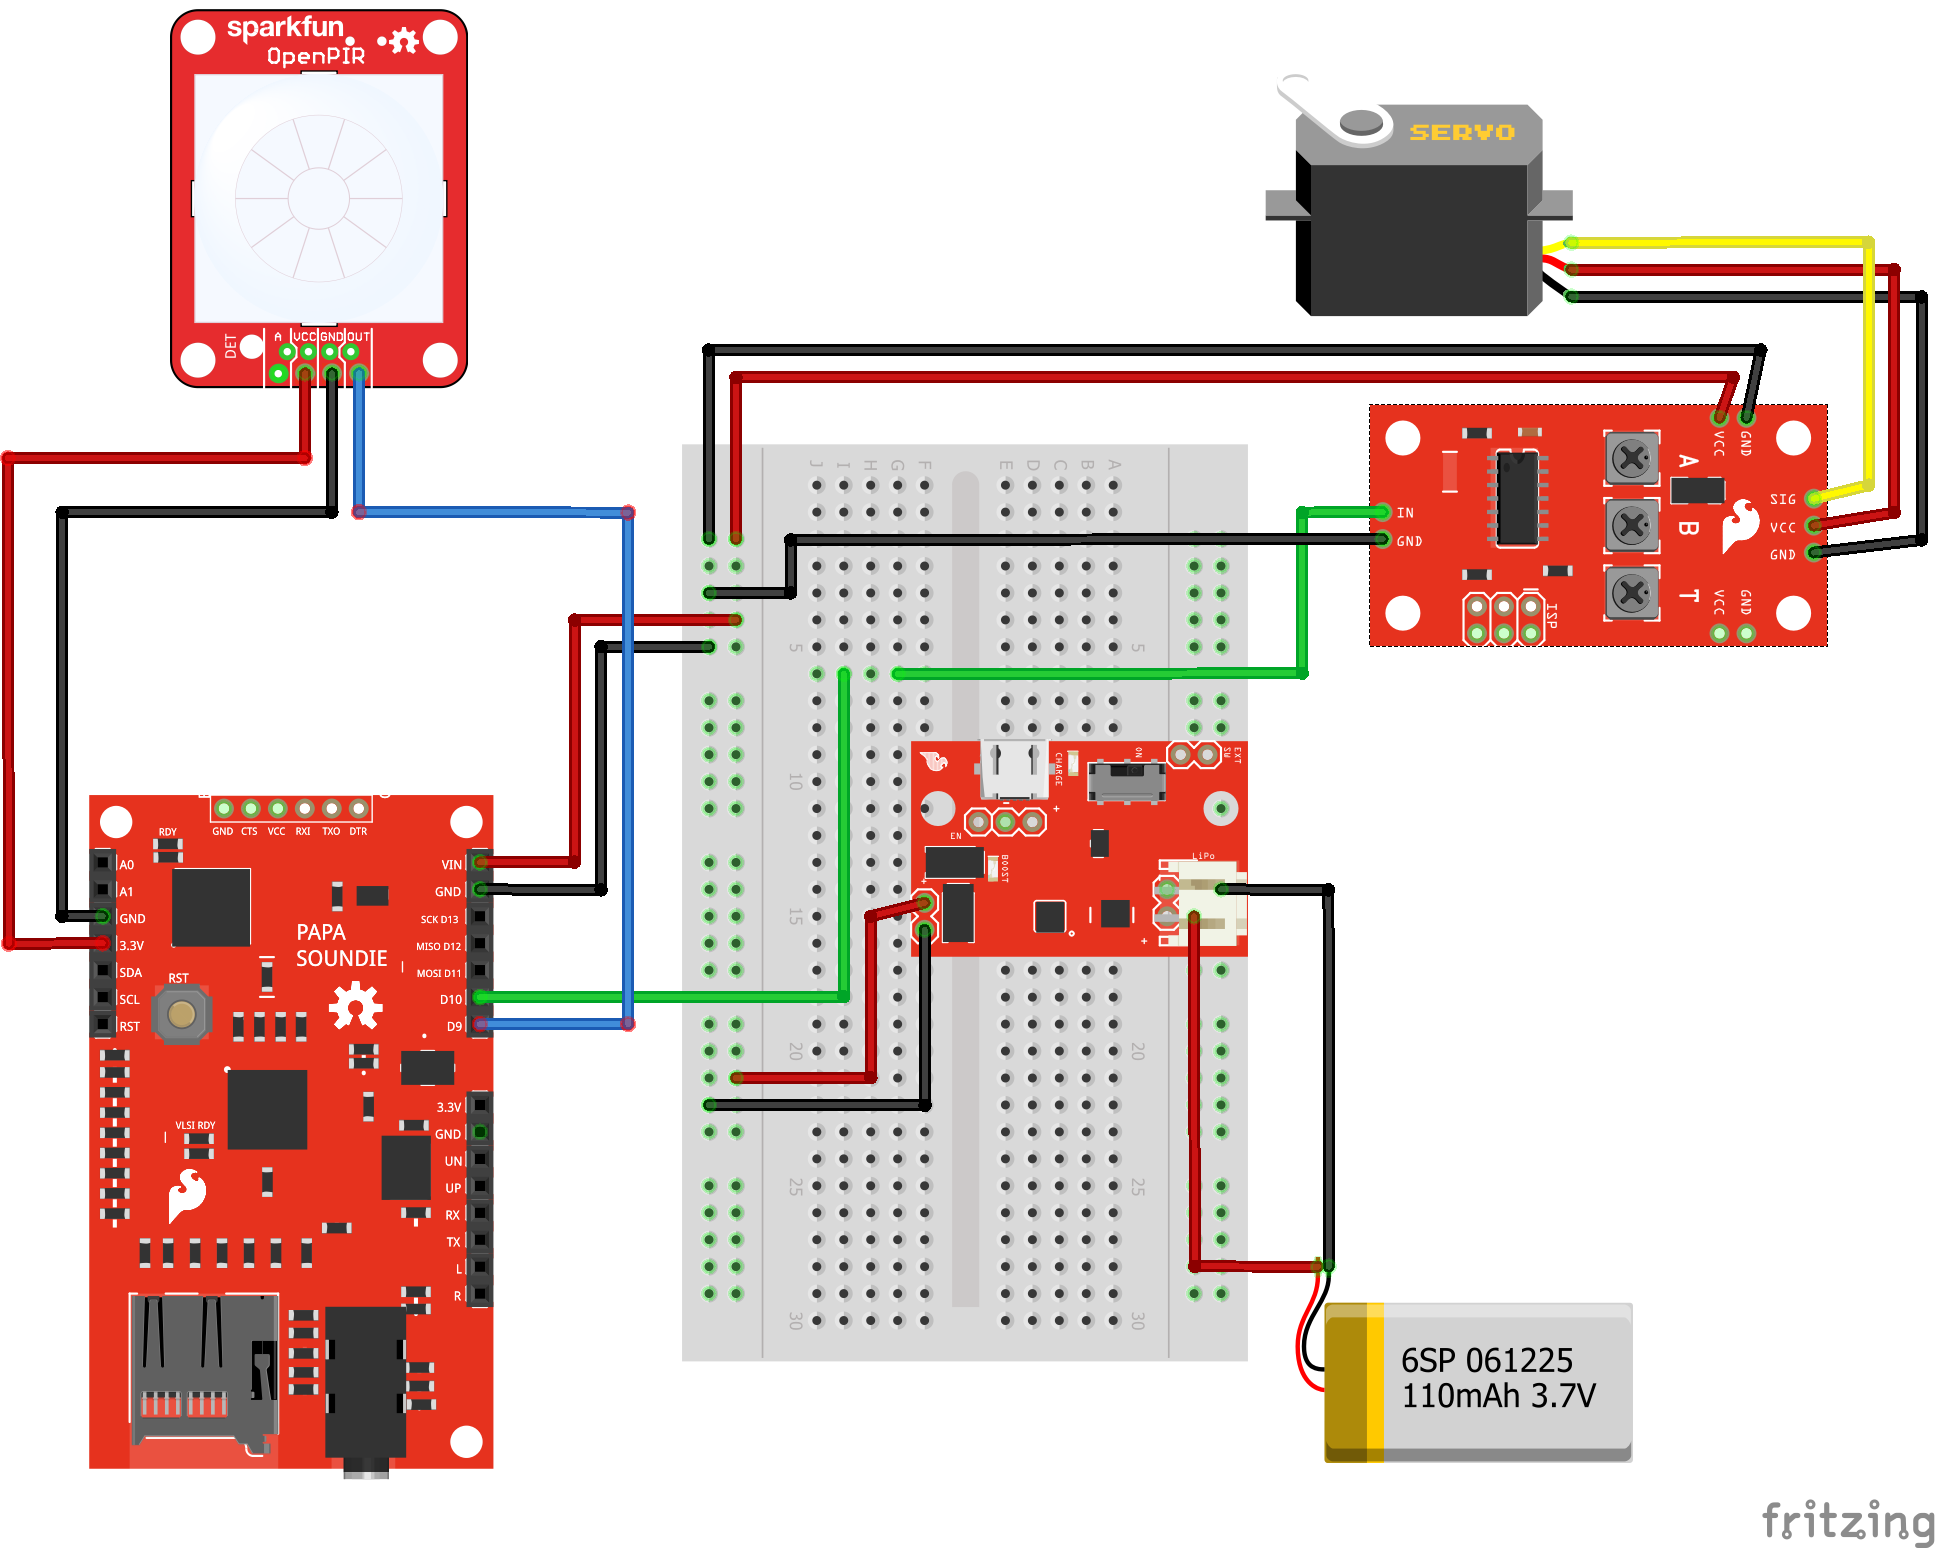
Solder and wire the circuit together.
When the PIR sensor detects movement, the Papa Soundie plays the respective audio file under the conditions set. When the 100th customer enters, pin 10 is sent HIGH. Pin 10 is attached to the Servo Trigger. The servo is used to pull the loose string which holds the bag holding the balloons and confetti closed. Here's a picture of the circuit mounted above the door.
Example Sketch
Copy and paste the following code into the Arduino IDE. Hit upload, and see what happens! Make sure to select the correct board and COM port when uploading.
language:c
#include "SparkFun_PapaSoundie.h"

#define PIR_DOUT 9

int count = 0;
int UNTIE = 10; //High signal to motor driver

PapaSoundie sfx = PapaSoundie();

void setup() {
  Serial.begin(115200);  // Serial is used to view Analog out
  // Analog and digital pins should both be set as inputs (not actually necessary for Analog):
  pinMode(PIR_DOUT, INPUT);
  pinMode(UNTIE, OUTPUT);
  Serial.println("Getting ready");
  sfx.begin();
}

void loop() {
  Serial.println(count);
  int motionStatus = digitalRead(PIR_DOUT);
  Serial.println("Looping");
  if (motionStatus == HIGH)
  {
    sfx.playFileNumber(1);
    motionStatus=LOW;
    delay(1000);
    count = count +1;
    if (count == 100)
    {
      motionStatus = LOW;
      sfx.playFileNumber(2);
      digitalWrite(UNTIE, HIGH);
      delay(1000);
      sfx.playFileNumber(2);
      delay(1000);
      sfx.playFileNumber(2);
      delay(1000);
      count = 0;
      digitalWrite(UNTIE, LOW);
    }
  }
}
The Coup De Grace
This project was in no way a deterrent to keep people from entering my office; in fact, it was the opposite.

What's worse, I was left with the mess. On second thought, this would make a great feature to any party.
Troubleshooting
Papa Soundie Not Working?
Try reformatting your SD card, making sure your audio files are in the correct format, and that your Arduino Sketch doesn't have any issues. If that doesn't work you can reflash the VS1000D with the firmware provided in the project files and on github using VSIDE.
Resources and Going Further
Now that you've successfully got your Papa Soundie up and running, it's time to incorporate it into your own project! For more information, check out the resources below:
- Schematic (PDF)
- Design Files (ZIP)
- VS1000D Datasheet (PDF)
- ATmega328P Datasheet (PDF)
- VSIDE Application Development Environment
- GitHub Repository
- Fritzing Diagram
- SparkFun Product Showcase: Noisy Cricket & Soundie Audio Boards
If you're looking for inspiration for other fun projects, check these out: