nRF52832 Breakout Board Hookup Guide
 jimblom
BLE Blink Example
Here are a few examples that show as bare-bones as possible what it takes to turn your nRF52832 Breakout into a BLE peripheral. This first example allows you to control the board's pin 7 LED from your smart phone -- using the nRF Connect app. It's the Blink sketch of the BLE world!
To test the Bluetooth connection, you’ll need to pair the breakout board with another Bluetooth-compatible device. Most modern smartphones can fit that bill.
You'll also need a BLE application installed on your phone – something that lets you connect to devices and fiddle with or read their characteristics. There are a handful of Bluetooth debugging applications out there that can help get you started communicating via Bluetooth. PunchThrough’s LightBlue Explorer is one of our favorite’s, but it’s only available for iOS. Nordic’s nRF Connect – available for both iOS and Android devices – is another good choice. That’s what we’ll document here.
The Code
Copy and paste the code below into your Arduino IDE.
language:c
// Import libraries (BLEPeripheral depends on SPI)
#include <SPI.h>
#include <BLEPeripheral.h>

//////////////
// Hardware //
//////////////
#define LED_PIN    7 // LED on pin 7
#define LED_ACTIVE LOW // Pin 7 LED is active low
#define LED_DEFAULT LOW

///////////////////////
// BLE Advertisments //
///////////////////////
const char * localName = "nRF52832 LED";
BLEPeripheral blePeriph;
BLEService bleServ("1207");
BLECharCharacteristic ledChar("1207", BLERead | BLEWrite);

void setup()
{
  Serial.begin(115200); // Set up serial at 115200 baud

  pinMode(LED_PIN, OUTPUT);
  digitalWrite(LED_PIN, !LED_ACTIVE);

  setupBLE();
}

void loop()
{
  blePeriph.poll();

  if (ledChar.written())
  {
    int ledState = ledChar.value();
    if (ledState)
      digitalWrite(LED_PIN, LED_ACTIVE);
    else
      digitalWrite(LED_PIN, !LED_ACTIVE);
  }
}

void setupBLE()
{
  // Advertise name and service:
  blePeriph.setDeviceName(localName);
  blePeriph.setLocalName(localName);
  blePeriph.setAdvertisedServiceUuid(bleServ.uuid());

  // Add service
  blePeriph.addAttribute(bleServ);

  // Add characteristic
  blePeriph.addAttribute(ledChar);

  // Now that device6, service, characteristic are set up,
  // initialize BLE:
  blePeriph.begin();

  // Set led characteristic to default value:
  ledChar.setValue(!LED_ACTIVE);
}
Then upload the code to your Breakout, using the instructions from the previous section.
Use the nRF Connect to Test
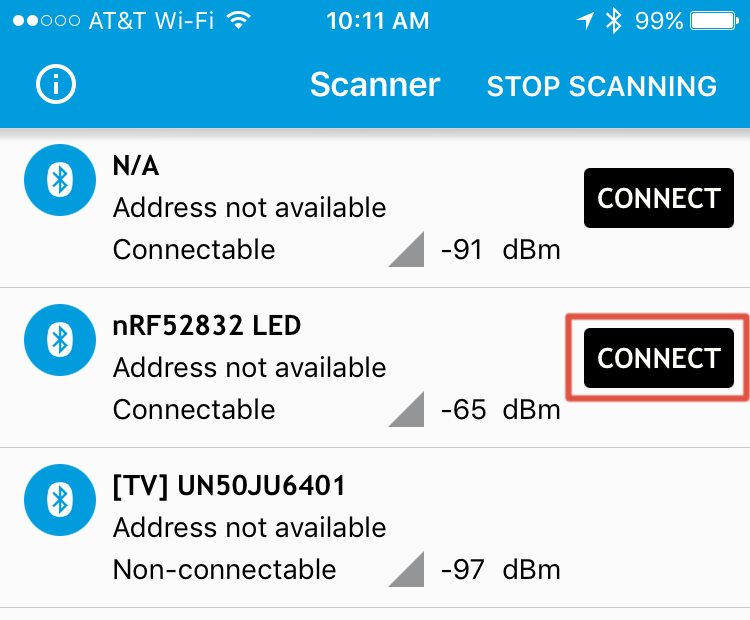
Upon opening nRF Connect, you'll be presented with a list of nearby Bluetooth devices. If you're in the SparkFun offices -- or otherwise surrounded by coworker's with way too many Bluetooth devices -- your list may include page(s) of device names. Look for "nRF52832 LED", and click the "Connect" button next to that. (Note: until you connect to the breakout, it may, instead, advertise the name "Arduino".)
blePeripheral.setDeviceName([name]) function.Click "Connect" on the nRF52832 LED device, and you'll be sent over to the "Services" view. From there, click "Unknown Service" -- the UUID string should match that of the bleServ object in your example code.
This next interface takes some experimenting to figure out. The down arrows represent reads, the up arrows allow you to write to a characteristic, and the triple-down-arrow turns notify on or off. To begin, tap the up arrow next to the top "unknown service". This will allow you to control the state of the LED. In the box that opens up, try entering either 00 or 01, which should turn the LED either off or on, respectively.

After tapping "Send" you should see the LED change state.