MicroMod nRF52840 Processor Hookup Guide
Arduino Software Setup
In this section we'll outline how to install the MicroMod nRF52840 board definitions and drivers. As we mentioned in the Hardware Overview section, the nRF52840 Processor ships with the same bootloader found on the Arduino Nano 33 BLE and takes advantage of Arduino's Mbed Core but we'll need to modify the board files a bit to add the MicroMod nRF52840 Processor to Arduino.
Arduino Mbed Core Installation
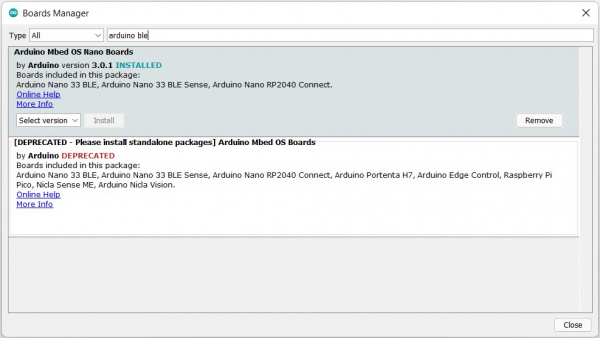
Before we can use the nRF52840 Processor, we need to install the Arduino Mbed Core. The easiest way to do that is to use the Boards Manager tool in Arduino. Open the tool by navigating to the Tools > Boards menu and select Boards Manager at the top of the list. With the Boards Manager tool opened, search for "Arduino Nano 33 BLE", select the board package titled "Arduino mbed OS Nano Boards" and click "Install".
Installation may take a few minutes as all necessary source files for the Mbed Core, plus all of the compiler and software-upload tools needed to use the boards package with Arduino, are included with this install.
Once the board definitions have been installed, you should see a new set of Arduino mbed OS Nano Boards under your Tools > Board menu. However, you won't see an option for the SparkFun MicroMod nRF52840 Processor as we need to manually add the board to the Arduino Mbed OS board package.
Adding the MicroMod nRF52840 Board Definition
Now that the Arduino Mbed Core is installed, we need to modify it to add the MicroMod nRF52840 Processor. The MicroMod variant is based off of the Arduino Nano33BLE board variant so we'll create a copy of that folder and replace a few files to make it work with the MicroMod nRF52840 board.
Before getting started, download the necessary files from the nRF52840 Processor Hardware GitHub Repository. You can download the repository from the GitHub following the link above or you can download the repository in a ZIP by clicking the button below:
With the GitHub repository downloaded we need to open the Arduino Mbed Core folder. If you used the Boards Manager tool to install it, the folder should be in the following location:
- Windows:
%LOCALAPPDATA%\Arduino15\packages\arduino\hardware\mbed\<version> - OSX:
~/Library/Arduino15/packages/arduino/hardware/mbed/<version> - Linux:
~/.arduino15/packages/arduino/hardware/mbed/<version>
If you installed the core manually into your Arduino sketchbook, it will be in hardware/arduino/mbed.
Open the folder with the version number (v3.0.1 at the time of this writing) and follow these steps to create a modified copy of the ARDUINO_NANO33BLE folder:
- Create a copy of the
ARDUINO_NANO33BLEfolder in thehardware/arduino/mbedfolder. - Rename the copied folder to
SF_MM_nRF52840_PB. - Replace the
variant.cppandpins_arduino.hfiles in the copied folder with the files of the same name from the nRF Hardware GitHub repository. - Replace the
boards.txtin the Arduino Mbed Core folder with the file of the same name from the nRF Hardware GitHub repository.
To replace the boards.txt file simply delete the boards.txt file in the mbed/<version> folder and copy/paste the boards.txt file from the nRF Hardware GitHub Repository folder. Alternatively, you can modify the boards.txt in the mbed/<version> folder by opening the file in a text editor, scrolling to the bottom of the file and copy/pasting the below to the file and then saving it:
language:text

sfnrf52840pb.name=SparkFun MicroMod nRF52840 Processor Board
sfnrf52840pb.build.core=arduino
sfnrf52840pb.build.crossprefix=arm-none-eabi-
sfnrf52840pb.build.compiler_path={runtime.tools.arm-none-eabi-gcc-7-2017q4.path}/bin/
sfnrf52840pb.build.variant=SF_MM_nRF52840_PB
sfnrf52840pb.build.mcu=cortex-m4
sfnrf52840pb.build.extra_flags=
sfnrf52840pb.build.architecture=cortex-m4
sfnrf52840pb.build.fpu=-mfpu=fpv4-sp-d16
sfnrf52840pb.build.float-abi=-mfloat-abi=softfp
sfnrf52840pb.build.board=ARDUINO_NANO33BLE
sfnrf52840pb.build.ldscript=linker_script.ld
sfnrf52840pb.build.postbuild.cmd="{tools.imgtool.path}/{tools.imgtool.cmd}" exit
sfnrf52840pb.compiler.mbed.arch.define=-DARDUINO_ARCH_NRF52840
sfnrf52840pb.compiler.mbed.defines={build.variant.path}/defines.txt
sfnrf52840pb.compiler.mbed.ldflags={build.variant.path}/ldflags.txt
sfnrf52840pb.compiler.mbed.cflags={build.variant.path}/cflags.txt
sfnrf52840pb.compiler.mbed.cxxflags={build.variant.path}/cxxflags.txt
sfnrf52840pb.compiler.mbed.includes={build.variant.path}/includes.txt
sfnrf52840pb.compiler.mbed.extra_ldflags=-lstdc++ -lsupc++ -lm -lc -lgcc -lnosys
sfnrf52840pb.compiler.mbed="{build.variant.path}/libs/libmbed.a" "{build.variant.path}/libs/libcc_310_core.a" "{build.variant.path}/libs/libcc_310_ext.a" "{build.variant.path}/libs/libcc_310_trng.a"
sfnrf52840pb.vid.0=0x2341
sfnrf52840pb.pid.0=0x005a
sfnrf52840pb.vid.1=0x2341
sfnrf52840pb.pid.1=0x805a
sfnrf52840pb.vid.2=0x2341
sfnrf52840pb.pid.2=0x015a
sfnrf52840pb.upload_port.0.vid=0x2341
sfnrf52840pb.upload_port.0.pid=0x005a
sfnrf52840pb.upload_port.1.vid=0x2341
sfnrf52840pb.upload_port.1.pid=0x805a
sfnrf52840pb.upload_port.2.vid=0x2341
sfnrf52840pb.upload_port.2.pid=0x015a
sfnrf52840pb.upload.tool=bossac
sfnrf52840pb.upload.tool.default=bossac
sfnrf52840pb.upload.protocol=
sfnrf52840pb.upload.transport=
sfnrf52840pb.upload.use_1200bps_touch=true
sfnrf52840pb.upload.wait_for_upload_port=true
sfnrf52840pb.upload.native_usb=true
sfnrf52840pb.upload.maximum_size=983040
sfnrf52840pb.upload.maximum_data_size=262144
sfnrf52840pb.bootloader.tool=openocd
sfnrf52840pb.bootloader.tool.default=openocd
sfnrf52840pb.bootloader.extra_action.preflash=echo INFO:removed_mass-erase
sfnrf52840pb.bootloader.config=-f target/nrf52.cfg
sfnrf52840pb.bootloader.programmer=-f interface/cmsis-dap.cfg
sfnrf52840pb.bootloader.file=sfnrf52840pb/bootloader.hex
After completing these steps, restart the Arduino IDE if it was open. After restarting, you should be able to select "SparkFun MicroMod nRF52840 Processor Board" from the Boards menu.
