MicroMod nRF52840 Processor Hookup Guide
Arduino Example: Bluetooth Low Energy
This example demonstrates how to send sensor data (in this case, temperature data from a BME280) over Bluetooth Low Energy (BLE). The code creates a BLE peripheral with the temperature service and reading characteristic. This example can be used as a template for creating BLE peripherals and sending the data to another BLE device.
Prior to uploading the example, we'll need to install a couple of things to use and interact with the code.
BME280 Hardware
First off, we of course need a BME280 Atmospheric sensor. The Weather Carrier Board we used in the Hardware Assembly section includes a BME280 so if you are using that as your Carrier Board you're all set. If you are using a different Carrier Board you can attach a BME280 breakout like this Qwiic version to the Qwiic connector on your Carrier or to the primary I2C bus pins.
SparkFun BME280 Arduino Library
If you wish to use the code as is, you'll need to install the SparkFun BME280 Arduino Library. Install the library using the Arduino Library Manager by searching for "SparkFun BME280 Arduino Library". Users who prefer to manually install the library can download the GitHub Repository or by clicking the button below:
A detailed overview of the library can be found here in our Qwiic Atmospheric Sensor (BME280) Hookup Guide.
BLE Temperature Example
Copy the code below into a blank sketch or you can also find the example included the Hardware GitHub Repository. If you are opening the example from the downloaded repository, navigate to the "Test Sketches/ble_temp" folder and open the sketch.
Select your Board and Port from the Tools menu just as you did for the "Blink" example and click "Upload".
language:c
#include <ArduinoBLE.h>
#include "SparkFunBME280.h"

BME280 tempSensor;

 // BLE Temperature Service
BLEService temperatureService("9feb1060-0814-11eb-adc1-0242ac120002");

// BLE Temperature Reading Characteristic
BLEIntCharacteristic temperatureReadingChar("9feb1060-0814-11eb-adc1-0242ac120002",  // standard 16-bit characteristic UUID
    BLERead | BLENotify); // remote clients will be able to get notifications if this characteristic changes

int oldTemperatureF = 0; //last temperature reading from BME280

void setup() {
  Serial.begin(115200);    // initialize serial communication
  Wire.begin();
  while (!Serial);

  pinMode(LED_BUILTIN, OUTPUT); // initialize the built-in LED pin to indicate when a central is connected

  // begin initialization
  if (!BLE.begin()) {
    Serial.println("starting BLE failed!");

    while (1);
  }

  if (tempSensor.begin() == false) { //Connect to BME280
    Serial.println("BME280 did not respond.");
    while(1); //Freeze
  }

  /* Set a local name for the BLE device
     This name will appear in advertising packets
     and can be used by remote devices to identify this BLE device
     The name can be changed but maybe be truncated based on space left in advertisement packet
  */
  BLE.setLocalName("TemperatureReading");
  BLE.setAdvertisedService(temperatureService); // add the service UUID
  temperatureService.addCharacteristic(temperatureReadingChar); // add the temperature reading characteristic
  BLE.addService(temperatureService); // Add the temperature service

  /* Start advertising BLE.  It will start continuously transmitting BLE
     advertising packets and will be visible to remote BLE central devices
     until it receives a new connection */

  // start advertising
  BLE.advertise();

  Serial.println("Bluetooth device active, waiting for connections...");
}

void loop() {
  // wait for a BLE central
  BLEDevice central = BLE.central();

  // if a central is connected to the peripheral:
  if (central) {
    Serial.print("Connected to central: ");
    // print the central's BT address:
    Serial.println(central.address());
    // turn on the LED to indicate the connection:
    digitalWrite(LED_BUILTIN, HIGH);

    // check the temperature every second
    // while the central is connected:
    while (central.connected()) {
        updateTemperature();
        delay(1000);
    }
    // when the central disconnects, turn off the LED:
    digitalWrite(LED_BUILTIN, LOW);
    Serial.print("Disconnected from central: ");
    Serial.println(central.address());
  }
}

void updateTemperature() {
  /* Read the current temperature from the BME280
  */
  int temperatureF = (int)tempSensor.readTempF();

  if (temperatureF != oldTemperatureF) {
    Serial.print("Temperature in F is now: "); // print it
    Serial.println(temperatureF);
    temperatureReadingChar.writeValue(temperatureF);  // and update the temperature reading characteristic
    oldTemperatureF = temperatureF;
  }
}
Reading the Temperature Data with the nRF Connect App
In order to interact with this example we need another device (phone/computer/tablet) connected to the nRF52840. There are plenty of BLE Central applications out there but for this tutorial we'll use Nordic's helpful (and free) testing tool called nRF Connect for Mobile for interfacing between our two devices. You can find the application on both the Google Play Store or Apple's App Store or you can find them by clicking the buttons below. Go ahead and install the app before moving on with this example.
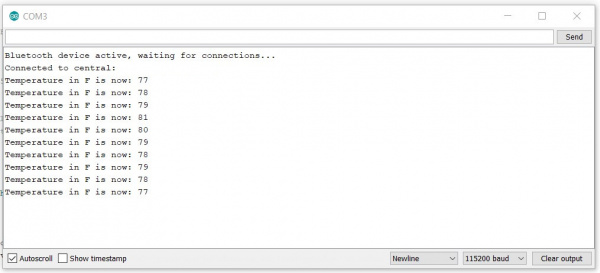
Open the serial monitor after uploading finishes and set the baud rate to 115200. If there are no failures initializing BLE and the BME280, the code will start advertising the nRF52840 Processor until it receives a new connection.
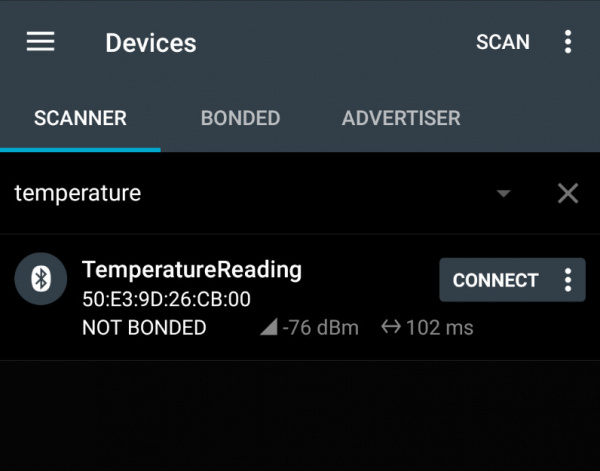
At this point (if you have not already), open your BLE Central App and scan for devices. The nRF52840 Processor should appear as an available BLE device named "TemperatureReading".
Once the nRF52840 connects to the nRF Connect App, the code will print out Connected to central: along with the central Bluetooth's address. The STAT LED on the Processor should also turn on indicating a successful pairing and connection.
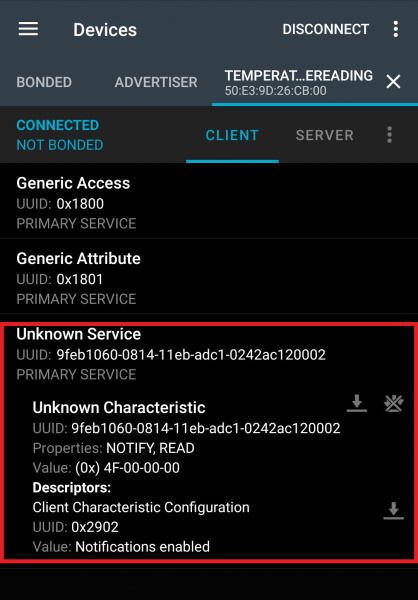
In order to receive temperature data from the nRF52840 on your nRF Connect App you will need to enable notifcations by opening the BLE Temperature Reading Characteristic (shown below as Unknown Service with the full UUID set in the example code) and clicking the icon with three downward-facing arrows.
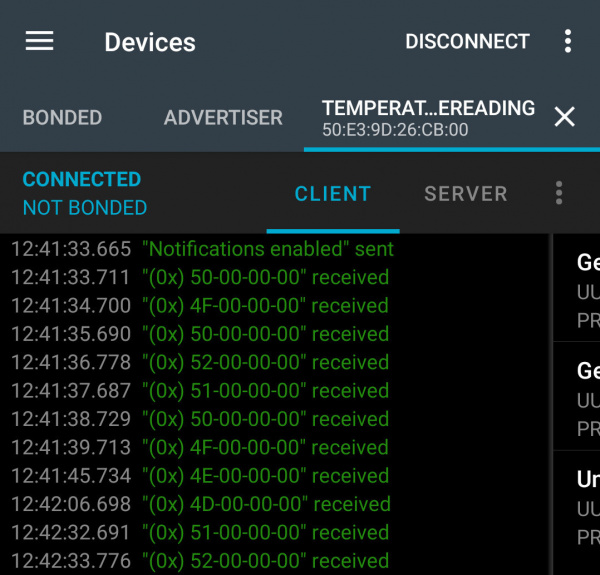
While paired, and if the temperature recorded by the BME280 changes, the code prints the new temperature value to the serial terminal and sends a data packet of the temperature value in Hexadecimal to the paired central device. On the nRF Connect app, swipe to the right to open the data log to see the Hex values for the temperature:
From here, you can take the Hexadecimal values from the BME280 and parse them however you choose to use for your BLE application.


