Introduction to the Raspberry Pi GPIO and Physical Computing
Introduction
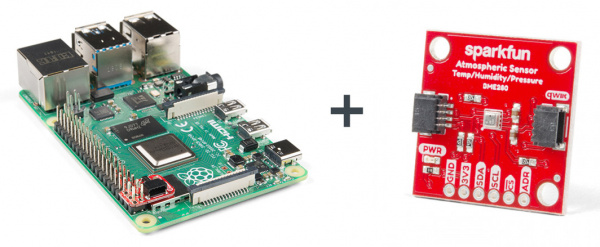
If you’ve recently picked up your first Raspberry Pi, congrats on purchasing perhaps the cheapest and smallest computer you’ll ever own! However, it sure doesn’t look like any computer you’re accustomed to, so let’s talk through the basics to get your Raspberry Pi up and running as a full desktop. We're also going to learn to interact with the GPIO, and hook up an atmospheric sensor to read in some data with Python.
We'll be reading data from an atmospheric sensor with the Raspberry Pi.
Suggested Reading
If you aren't familiar with the Qwiic system, we recommend reading here for an overview.
The Qwiic Connect System is designed to keep your projects moving.
We would also recommend taking a look at the following tutorials and if you aren't familiar with them.
Raspberry gPIo
Raspberry Pi SPI and I2C Tutorial
Qwiic SHIM for Raspberry Pi Hookup Guide
Raspberry Pi 4 Kit Hookup Guide
Hardware Overview and Hookup
As the Raspberry Pi is a fully functioning computer, it needs the peripherals that a computer you may be accustomed to has to be fully interactive. We’ll need six crucial components to get the Raspberry Pi up and running, but we’ll also take a look at some additional hardware that are often times used with the Pi. Let’s start with what’s required!
General hardware for setup
- Monitor - A monitor is basically required for the initial setup and configuration of the operating system. If you’ll be using SSH to connect to your Raspberry Pi, then you won’t need the monitor after setup (Check out this tutorial that walks you through SSH and the Pi!) Make sure your monitor has an HDMI input.
- microSD Card - The microSD Card stores the operating system and files. If you bought a kit, the microSD card might have already been formatted for use. Otherwise, you’ll to manually install an OS’s image onto the mciroSD card to load it on your Pi
- Keyboard and Mouse - You can either buy these together (the mouse is a part of the keyboard) or seperately
- HDMI Cables - You’ll need an HDMI cable to connect the Raspberry Pi to a monitor. Different Raspberry Pi models have different HDMI cable requirements, but the newest model (Raspberry Pi 4) requires an HDMI to Micro HDMI Cable.
- Power Supply - Different Raspberry Pi models have different USB connections and power requirements, but the newest model (Raspberry Pi 4) requires a USB Type C to C Cable and Wall Adapter.
Additional hardware
Heat Sink - Heat sinks are popular for users who are overclocking the CPU, so the Pi is running too hot. If the temperature of the CPU becomes too hot, a heat sink will passively cool air near the CPU to assist in cooling the processor. The heat sink can double as somewhat of a protective case as well. If you think you might need a heat sink, you can use the following command in the terminal to see the temperature of your Pi:
hot./opt/vc/bin/vcgencmd measure_tempCase - Since the Raspberry Pi comes as an exposed circuit board, you might want to protect it from dust and damage with a case. A variety of companies make cases for the Pi; perhaps the most notable case is the Rasberry Pi 400, which essentially uses a keyboard as a case for the Raspberry Pi. Built by the Raspberry Pi Foundation, it extends the Pi ports through the back of the keyboard as to not limit interactability.
Ethernet Cable - Depending on the Raspberry Pi model you have, and if you'd like to bypass wireless connections, pick up an ethernet cable to plug into the world wide web!
Speakers - If you'd like to play music or sound from your Pi, you'll need a set of speakers. Any standard set of speakers with a 3.5 mm jack should do...they will connect into the AV jack on the side of the board.
Quick Note on the Different Raspberry Pi Versions
The Raspberry Pi comes in a variety of form factors and generations - Zero, 2, 3, etc. - for different use cases. The layout varies slightly between the boards, but most of the connections are the same. For the purpose of this tutorial, we'll be focusing on the most recent version, the Raspberry Pi 4. Still, if you're using another model, double check the connections required by consulting the hookup guide for the exact model when collecting the hardware you need.
Specific Hardware Required
SparkFun Raspberry Pi 4 Desktop Kit - 4GB
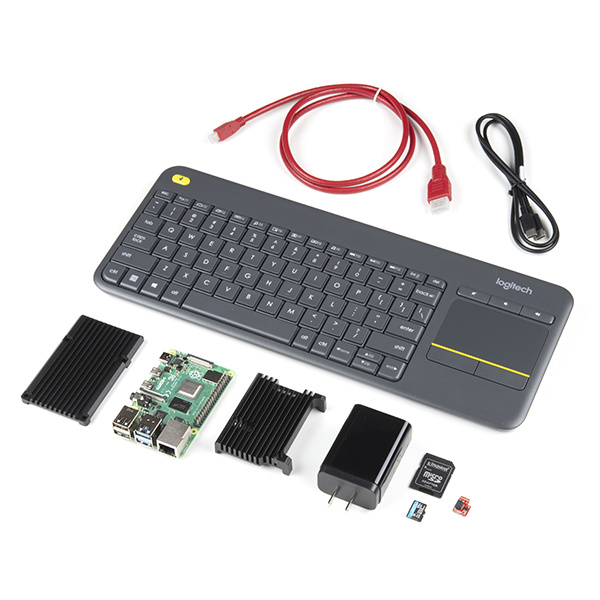
Lucky for us, SparkFun has a kit that practically does the work for you in supplying the appropriate hardware and supporting the least frustrating experience possible - the SparkFun Raspberry Pi 4 Desktop Kit includes the following:
- Raspberry Pi 4 - 4GB Model
- Logitech K400 Plus Wireless Keyboard with Touchpad
- Kingston Canvas Go! Plus 64GB MicroSD Card with Adapter
- USB Type C to Type C Male Cable (1 Meter)
- USB Type C Wall Adapter
- Metal Heatsink Case with Thermal Tape - Black
- HDMI to Micro HDMI Cable
- SparkFun Qwiic SHIM for Raspberry Pi
The dark horse of this kit is the afformentioned Qwiic SHIM, which is a crucial component that we will use to interact with the GPIO later on in this tutorial.
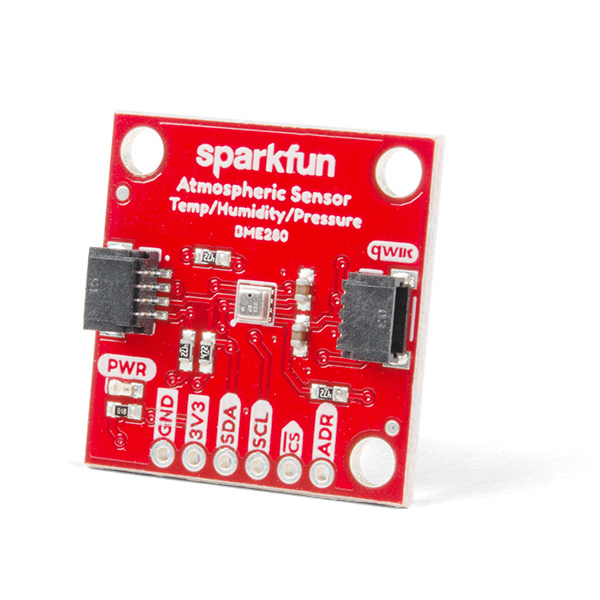
SparkFun Atmospheric Sensor Breakout - BME280
We will also utilize one of the BME280 environmental breakout because it has a wide variety of precise data to offer and can be connected through Qwiic, which means we won't be hindered by soldering and can get right into coding.
Putting it All Together
Fortunately, there is very little additional knowledge for putting it all together. Simply connect the mouse and keyboard via USB, the power supply via USB-C (don't forget to plug the other end into a wall adapter), the HDMI into the both the monitor and the Pi, and load the microSD card into its slot. Besides making sure the wires don't criss-cross and make a mess, you're ready to start your desktop computer!
GPIO Pins Overview
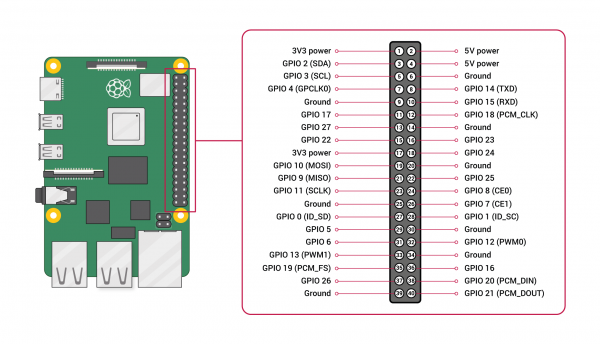
Okay, so we've hooked up the necessary hardware to the Raspberry Pi, and you're itching to start using it as a general-purpose PC for web surfing and Youtube watching and looking at cat memes. But where the Pi really shines is with its 40-pin GPIO (General Purpose Input & Output). The GPIO enables you to switch devices on and off (output) or receive data from sensors and switches (input). What this really means is that you can connect the Raspberry Pi to everything from a smart mirror to a weather station, to an asset tracking robot that displays its coordinates on a web server. Let's take a deeper dive into what's possible with the GPIO header! We can reference the GPIO Pinout Diagram provided by the Raspberry Pi Foundation below as a visual guide for understanding the pins:
Power Pins
Let's start with the power pins, which include both 3.3V and 5V. These pins transmit power as output to power attached peripherals.
Ground
And if we’re going to be rigging up electrical circuits here with power, then we’ll need a ground. You’ll find plenty of grounds within the pins as well.
Standard GPIO Pins
Take out the power and ground pins, and you’ll be left with the pins that are dedicated to sending output and receiving input. All of these can be used for straightforward input/output tasks!
Chatty Cathy Pins
Some of the standard GPIO pins are used for communication purposes. Here's a quick overview of these communication protocols!
- SPI pins – The Serial Peripheral Interface (SPI) is a communication protocol used to transfer data between micro-computers like the Raspberry Pi and peripheral devices. The MISO pin receives data, and the MOSI pin sends data from the Raspberry Pi. Furthermore, the serial clock pin sends pulses at a regular frequency between the Raspberry Pi and the SPI device at the same speed in which the devices to transfer data to each other.
- UART pins – UART stands for universal asynchronous receiver-transmitter, which is a physical circuit designed to send and recieve data.
- PWM pins – PWM means “pulse width modulation,” which is a communication protocol best used with stuff that moves and lights up: motors, LEDs, and so on.
- I2C pins – I2C is short for inter-integrated circuit (two “inters” or I"squared"C). It works similarly to SPI, but it doesn’t force you to use nearly so many pins.
Identifying Pins
There are two ways to identify GPIO pins...the first is by its physical position on the board, or its BOARD name. It also has a Broadcom SOC channel (BCM) name. By opening the terminal and running pinout as a command, it will return a map of the Raspberry Pi GPIO pins and their names based on the Broadcom chip on board.
If you really want to get deep into the Raspberry Pi GPIO pinout, there is an incredibly thorough Raspberry Pi GPIO pinout guide that is interactive and steps through each type of pin on-board. This general overview outlined above should be enough to get us started on our project though!
Operating System Setup
Okay, so the hardware is setup properly! If you picked up a kit like we did for this project, the Raspberry Pi OS image should be installed on the microSD card. If you're using a blank microSD card, you'll have to either visit The Raspberry Pi Foundation to install the appropriate image, or you can install a different operating system image on the MicroSD card. Some other notable operating systems are OSMC, RetroPie, Ubuntu, Rokos, and dozens others.
For the purpose of this tutorial, we will stick with Raspberry Pi's official supported operating system, Raspberry Pi OS (formally known as Raspbian).
When the Raspberry Pi receives power and boots up, it will load the desktop with a glorious wallpaper of the sun rising over Bagan, Myanmar.
It will quickly have a pop-up that will guide you through setting up the OS, including setting the location, date, time, password, WiFi, and doing a few software updates. The screens should progress like the images below, and then the Raspberry Pi will update.
Set country, language, and timezone
Change password to something other than password
Select your local WiFi network
The Pi will update the software
Once the Pi restarts, it will bring you back to main desktop page once more. The main menu on the lower left is comprised of a lightweight open-source programs packaged within Raspbian.
Also along the top right of the screen, you should see a globe icon for Chromium. This is your Internet browser, and if you set up your network settings you can browse the web here. Next along is the file manager, which allows you to browse the files on your SD card and external USB storage. Finally the black icon opens up Terminal. This allows you to type commands directly, and for advanced users can be a faster and more flexible way to perform certain tasks.
There are other applications within the operating system that will prove useful for us, specifically a text editor so that we can write and run code. For this project, we'll specifically use Thonny, which is a Python(3) IDE that can both write and run code from the application. Another notable application in Raspbian is VNC, which allows you to remotely control the desktop interface of your Pi from another computer.
Python Overview and Reading in Sensor Data
The Raspberry Pi Foundation has specifically selected Python as the main language for Raspberry Pi because of its ease of use, power, versatility, and open-source mentality. Python comes pre-installed on Raspbian, so you can load an IDE like Thonny and quickly start coding.
If you've never coded in Python before, be sure to check out our tutorial on Coding in Python...it will get you up and running with variables, operators, objects, data structures, and much more. It will be important to have a basic understanding of Python to interact with the GPIO, so knowing variables, functions, operators, and classes is good, even if you just understand them at a high level and can't write them yourself!
Using gpiozero to Interact With GPIO
We want to dip our toes into the world of physical computing with the world of Raspberry Pi, and one way to do this is to learn to interact with the GPIO. There's a fantastic Python library called gpiozero that makes it quite easy to interact with the GPIO, and it already comes pre-installed on Raspbian.
In Python, libraries and functions used in a script must be imported by name at the top of the file, so you can either import the entire libray,
import gpiozero
or you can import just a component or two:
from gpiozero import Button
You'll need to set the GPIO pins you're using on the Pi to the respective component chosen with gpiozero. For example, if you have hooked up an LED to pin number 17 on the Pi, you could refer to it a multitude of ways with this Python library (remember how the GPIO pins can have many names?)
led = LED(17)
led = LED("GPIO17")
led = LED("BOARD11")
If you wanted to hook up an LED to pin 17 and a ground pin (along with a current limiting resistor), you could blink the LED simply with the code below. It imports the LED component from the library, as well as pause. After letting the board know what pin the LED is connected to, it will call that LED to blink, and then pause.
from gpiozero import LED
from signal import pause

red = LED(17)

red.blink()

pause()
Using a breadboard and wires, you can practically hook up anything to the GPIO and interact with it through gpiozero.
Using the Qwiic Way to Interact With GPIO
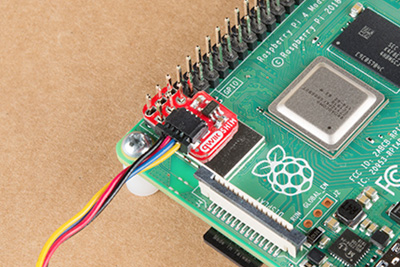
For our project, we want to hook up a Qwiic sensor to the Raspberry Pi, so we'll actually use the Qwiic SHIM included in the kit. We can just align the Qwiic SHIM with Pin 1 on the GPIO header, and slide it in. We don't need to assign which pins we're using - the SHIM is aligned with Pin 1 - but we do need import other libraries that are necessary for the additional atmosphere sensor.
With your Qwiic SHIM mounted on your Pi it should look like this:
 |
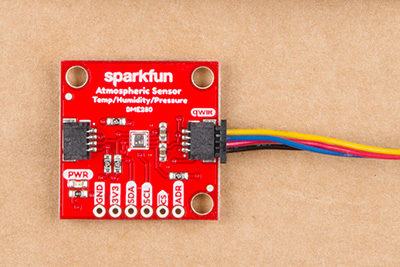 |
| Qwiic SHIM mounted on a Pi 4. | Your sensor on the other end of the Qwiic Cable. |
sudo pip install sparkfun-qwiic-bme280
Now, we can import the BME280 libary, as well as a time and system libary to read in some basic temperature values. We'll need to ensure that the BME280 set to a variable, connected to the system, and then begin running the sensor like we would with Arduino.
The library that's important here is the qwiic_bme280. As you can see, the sensor itself will be set to mySensor the for the duration of the function, so whenever you see mySensor."something", it is calling an instance variable unique to each instance.
import qwiic_bme280
import time
import sys

def runExample():

    print("\nSparkFun BME280 Sensor + Raspberry Pi Example \n")
    mySensor = qwiic_bme280.QwiicBme280()

    if mySensor.isConnected() == False:
        print("The Qwiic BME280 device isn't connected to the system.",
            file=sys.stderr)
        return

    mySensor.begin()

    while True:
        print("Humidity:\t%.3f" % mySensor.humidity)

        print("Pressure:\t%.3f" % mySensor.pressure)

        print("Altitude:\t%.3f" % mySensor.altitude_feet)

        print("Temperature:\t%.2f" % mySensor.temperature_fahrenheit)

        print("")

        time.sleep(1)
Challenge: How might you change the code above to only print the temperature if it exceeds 80 degrees Fahrenheit? (Hint: Remember your operators!)
