Introduction to MQTT
 Alex the Giant
Setting Up the Clients
Now that we know our broker is up and running it's time to add our clients. We're going to create two clients, the first will publish to the topic "room/light" with a message of "on" or "off" every time we push a button. The second client will subscribe to "room/light" and respond to the message by turning an LED on or off.
Publish Client - Switch
To create the switch, we're going to use an ESP32 Thing. To get MQTT working on an ESP we'll need to install a library called PubSubClient, which you can download from the link below:
Once installed, open Arduino and paste in the code below. Just make sure to fill in the WiFi credentials for your router and the IP address of your Raspberry Pi broker. Once the ESP32 connects to the network, it waits for the button to be pressed. Once pushed, the ESP32 will publish the command to the topic "room/light".
language:c
/******************************************************************************
MQTT_Switch_Example.ino
Example for controlling a light using an MQTT switch
by: Alex Wende, SparkFun Electronics

This sketch connects the ESP32 to a MQTT broker and subcribes to the topic
room/light. When the button is pressed, the client will toggle between
publishing "on" and "off".
******************************************************************************/

#include <WiFi.h>
#include <PubSubClient.h>

const char *ssid =  "-----";   // name of your WiFi network
const char *password =  "-----"; // password of the WiFi network

const byte SWITCH_PIN = 0;           // Pin to control the light with
const char *ID = "Example_Switch";  // Name of our device, must be unique
const char *TOPIC = "room/light";  // Topic to subcribe to

IPAddress broker(192,168,1,-); // IP address of your MQTT broker eg. 192.168.1.50
WiFiClient wclient;

PubSubClient client(wclient); // Setup MQTT client
bool state=0;

// Connect to WiFi network
void setup_wifi() {
  Serial.print("\nConnecting to ");
  Serial.println(ssid);

  WiFi.begin(ssid, password); // Connect to network

  while (WiFi.status() != WL_CONNECTED) { // Wait for connection
    delay(500);
    Serial.print(".");
  }

  Serial.println();
  Serial.println("WiFi connected");
  Serial.print("IP address: ");
  Serial.println(WiFi.localIP());
}

// Reconnect to client
void reconnect() {
  // Loop until we're reconnected
  while (!client.connected()) {
    Serial.print("Attempting MQTT connection...");
    // Attempt to connect
    if (client.connect(ID)) {
      Serial.println("connected");
      Serial.print("Publishing to: ");
      Serial.println(TOPIC);
      Serial.println('\n');

    } else {
      Serial.println(" try again in 5 seconds");
      // Wait 5 seconds before retrying
      delay(5000);
    }
  }
}

void setup() {
  Serial.begin(115200); // Start serial communication at 115200 baud
  pinMode(SWITCH_PIN,INPUT);  // Configure SWITCH_Pin as an input
  digitalWrite(SWITCH_PIN,HIGH);  // enable pull-up resistor (active low)
  delay(100);
  setup_wifi(); // Connect to network
  client.setServer(broker, 1883);
}

void loop() {
  if (!client.connected())  // Reconnect if connection is lost
  {
    reconnect();
  }
  client.loop();

  // if the switch is being pressed
  if(digitalRead(SWITCH_PIN) == 0)
  {
    state = !state; //toggle state
    if(state == 1) // ON
    {
      client.publish(TOPIC, "on");
      Serial.println((String)TOPIC + " => on");
    }
    else // OFF
    {
      client.publish(TOPIC, "off");
      Serial.println((String)TOPIC + " => off");
    }

    while(digitalRead(SWITCH_PIN) == 0) // Wait for switch to be released
    {
      // Let the ESP handle some behind the scenes stuff if it needs to
      yield();
      delay(20);
    }
  }
}
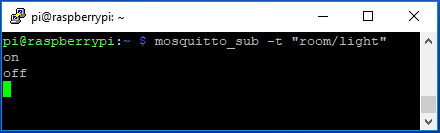
Once the code has uploaded and the ESP32 has connected to the network, we want to test to make sure the broker is working correctly and we're connected to the broker. To test this, from the terminal window of the Pi, we're going to subscribe to "room/light" with the following command:
language:bash
mosquitto_sub -t "room/light"
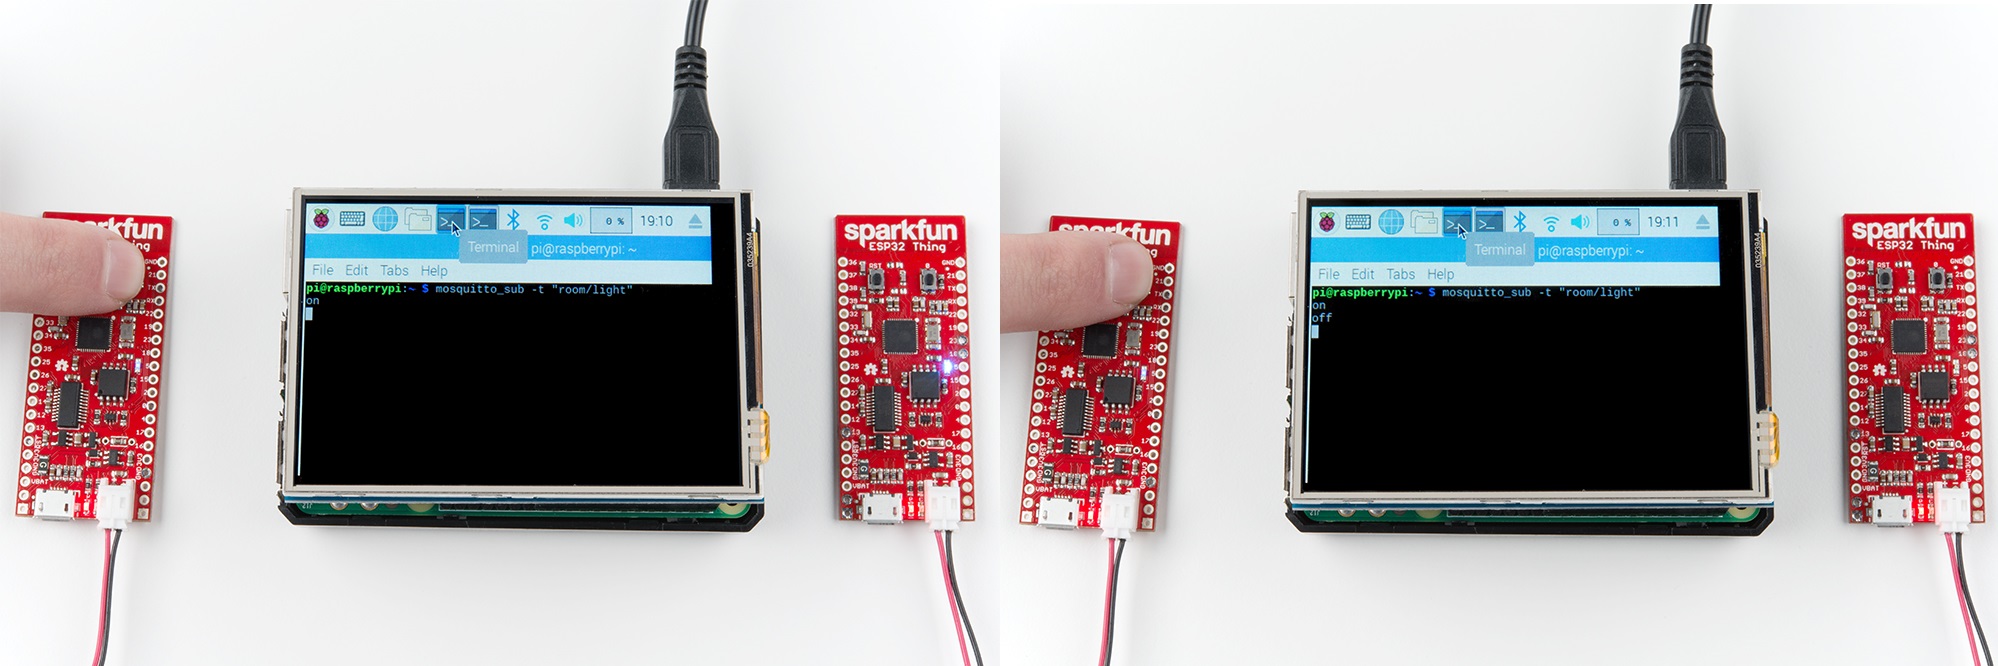
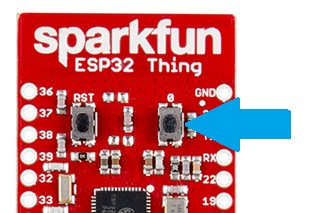
Press on the ESP32's button that is connected on GPIO pin 0.
Now when we press the button on the ESP32 connected to GPIO pin 0, we should see the on/off commands as shown below.
Subscribe Client - Light
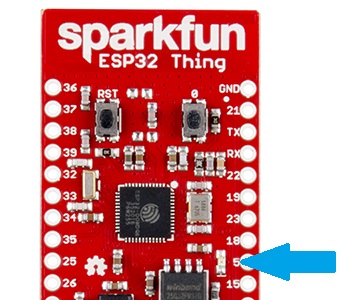
Now that the switch is connected to the broker, we need to connect a device that will react when a new message is sent to the topic. To do this, we'll need another ESP32 and control the LED connected to pin 5 as shown below. Just like before, make sure to fill in the WiFi credentials and the IP address of your Raspberry Pi broker like you did in the previous example.
language:C
/******************************************************************************
MQTT_Light_Example.ino
Example for controlling a light using MQTT
by: Alex Wende, SparkFun Electronics

This sketch connects the ESP8266 to a MQTT broker and subcribes to the topic
room/light. When "on" is recieved, the pin LIGHT_PIN is toggled HIGH.
When "off" is recieved, the pin LIGHT_PIN is toggled LOW.
******************************************************************************/

#include <WiFi.h>
#include <PubSubClient.h>

const char *ssid = "-----";   // name of your WiFi network
const char *password = "-----"; // password of the WiFi network

const byte LIGHT_PIN = 5;           // Pin to control the light with
const char *ID = "Example_Light";  // Name of our device, must be unique
const char *TOPIC = "room/light";  // Topic to subcribe to
const char *STATE_TOPIC = "room/light/state";  // Topic to publish the light state to

IPAddress broker(192,168,1,-); // IP address of your MQTT broker eg. 192.168.1.50
WiFiClient wclient;

PubSubClient client(wclient); // Setup MQTT client

// Handle incomming messages from the broker
void callback(char* topic, byte* payload, unsigned int length) {
  String response;

  for (int i = 0; i < length; i++) {
    response += (char)payload[i];
  }
  Serial.print("Message arrived [");
  Serial.print(topic);
  Serial.print("] ");
  Serial.println(response);
  if(response == "on")  // Turn the light on
  {
    digitalWrite(LIGHT_PIN, HIGH);
    client.publish(STATE_TOPIC,"on");
  }
  else if(response == "off")  // Turn the light off
  {
    digitalWrite(LIGHT_PIN, LOW);
    client.publish(STATE_TOPIC,"off");
  }
}

// Connect to WiFi network
void setup_wifi() {
  Serial.print("\nConnecting to ");
  Serial.println(ssid);

  WiFi.begin(ssid, password); // Connect to network

  while (WiFi.status() != WL_CONNECTED) { // Wait for connection
    delay(500);
    Serial.print(".");
  }

  Serial.println();
  Serial.println("WiFi connected");
  Serial.print("IP address: ");
  Serial.println(WiFi.localIP());
}

// Reconnect to client
void reconnect() {
  // Loop until we're reconnected
  while (!client.connected()) {
    Serial.print("Attempting MQTT connection...");
    // Attempt to connect
    if(client.connect(ID)) {
      client.subscribe(TOPIC);
      Serial.println("connected");
      Serial.print("Subcribed to: ");
      Serial.println(TOPIC);
      Serial.println('\n');

    } else {
      Serial.println(" try again in 5 seconds");
      // Wait 5 seconds before retrying
      delay(5000);
    }
  }
}

void setup() {
  Serial.begin(115200); // Start serial communication at 115200 baud
  pinMode(LIGHT_PIN, OUTPUT); // Configure LIGHT_PIN as an output
  delay(100);
  setup_wifi(); // Connect to network
  client.setServer(broker, 1883);
  client.setCallback(callback);// Initialize the callback routine
}

void loop() {
  if (!client.connected())  // Reconnect if connection is lost
  {
    reconnect();
  }
  client.loop();
}
Find the built-in LED connected to GPIO pin 5 on the second ESP32 Thing.
Once the second ESP32 connects to the network, it will automatically subscribe to "room/light" and when you push the button on the first ESP32, the built-in LED connected to GPIO pin 5 on the second ESP32 should respond and turn on and off. You can also go back and change the topic to "room/light2" or even just "room" to see how (or if) the device responds with the new topic.