Professional
EDU
Distributor
Customer Support
Shop
Documentation
News
Today's Deals
Community
SparkX
SparkFun Electronics - sparkfun.com
search documentation
Back to Webstore
My Account
My Account
Featured
Products
GPS/GNSS
Sensors
Development Boards
IoT & Wireless
Components
Kits
Shop
All
Product
Categories
Navigation menu
Menu
Account
Featured
Products
GPS/GNSS
Sensors
Development Boards
IoT & Wireless
Components
Kits
Shop
All
Product
Categories
Shop
Documentation
News
Today's Deals
Community
SparkX
Home
Tutorials
Firefly Jar Assembly Guide
≡
Pages
Contributors:
b_e_n
,
Mando
Share
Use this URL to share:
Share on Tumblr
Submit to reddi
Share on Twitter
Share on Facebook
Pin It
Step 8: Check Yourself
NOTE!
This felt pattern is now FLIPPED OVER TO THE FRONT FACING SIDE.
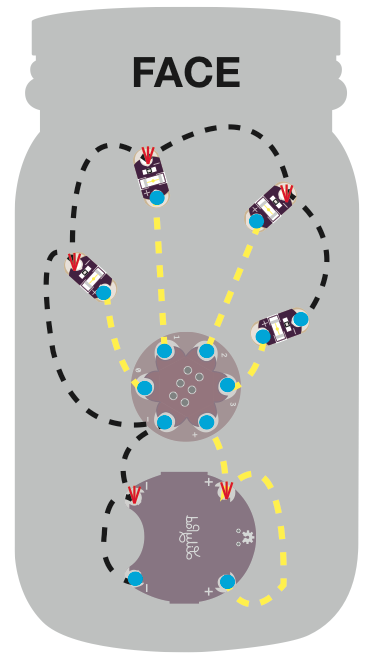
Check to make sure your firefly jar looks like this from the front side where the LEDs are.
Share
Use this URL to share:
Share on Tumblr
Submit to reddi
Share on Twitter
Share on Facebook
Pin It
View as a single page
Next Page →
Step 9: Testing 1,2,3
← Previous Page
Step 7: You're SEW Negative!
Pages
Getting Started
Step 1: Positively Powerful
Step 2: Get Grounded
Step 3: First LED
Step 4: LED: the Sequel
Step 5: LED the Third
Step 6: Last LED!
Step 7: You're SEW Negative!
Step 8: Check Yourself
Step 9: Testing 1,2,3
Step 10: Cover it Up
Step 11: Put a Lid on It
Step 12: Let there be Light!
Further Reading
Comments
0
Single Page
Print
Tags
ATtiny
E-Textiles
Hookup
LilyPad
LilyTwinkle
License
Creative Commons
tutorials are
CC BY-SA 4.0