Exploring XBees and XCTU
 jimblom,
  Toni_K
Configuring Networks
XBees can be configured with few different modes to transmit/receive signals. These include:
- Transparent Mode
- API Mode
- I/O Line Passing
For simplicity, we will be using a pair of XBee Series 1 (or XBee Series 3 configured with the 802.15.4 protocol) set in transparent mode to replace a wired serial UART connection.
Transparent Mode
As we've mentioned, XBees are awesome because they're highly -- and easily -- configurable. Most of the XBee configuration settings come down to controlling which other XBees it can talk to. On this page, we'll show you how to configure three of the most important XBee settings there are for a point-to-point communication:
- PAN ID
- MY Address
- Destination Address
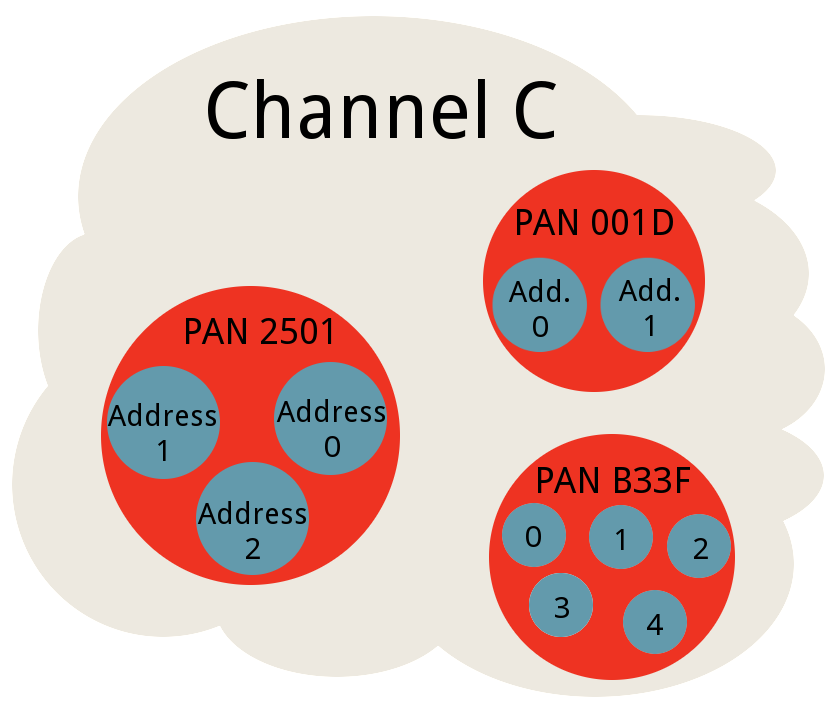
Channel (CH)
There are a few levels to XBee networks. First, there's the channel. This controls the frequency band that your XBee communicates over. Most XBee's operate on the 2.4GHz 802.15.4 band, and the channel further calibrates the operating frequency within that band. You can usually leave the channel setting alone, or at least make sure every XBee you want to have on the same network operates on the same channel.
PAN ID (ID)
The next level of an XBee network is the personal area network ID (PAN ID). The network ID is some hexadecimal value between 0 and 0xFFFF. XBees can only communicate with each other if they have the same network ID. There being 65536 possible ID's, there's a very small chance that your neighbor will be operating on the same network (as long as you change it from the default!).
Addresss (MY, DH, DL)
Finally there are MY and destination addresses. Each XBee in a network should be assigned a 16-bit address (again between 0 and 0xFFFF), which is referred to as MY address, or the "source" address. Another setting, the destination address, determines which source address an XBee can send data to. For one XBee to be able to send data to another, it must have the same destination address as the other XBee's source.
For example, if XBee 1 has a MY address of 0x1234, and XBee 2 has an equivalent destination address of 0x1234, then XBee 2 can send data to XBee 1. But if XBee 2 has a MY address of 0x5201, and XBee 1 has a destination address of 0x5200, then XBee 1 cannot send data to XBee 2. In this case, only one-way communication is enabled between the two XBee's (only XBee 2 can send data to XBee 1).
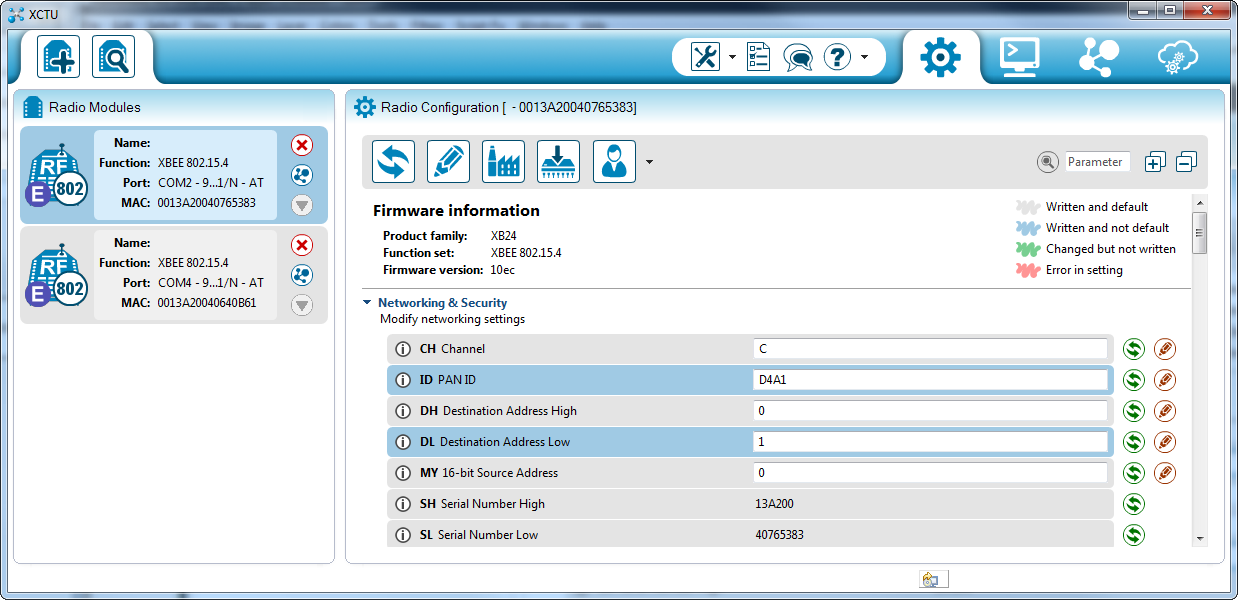
We can use X-CTU to easily configure each of those settings. Here's how:
Radio Configuration
After the last page, you should already have at least one XBee connected to X-CTU. If you're still over in the console tab, click back over to the Configuration tab -- ![]() . Take a peak at the very first handful of settings, and you should see some familiar acronyms: CH, ID, DH, DL, and MY. Beside each of those blocks is a text box -- that's where we'll type in our new settings.
. Take a peak at the very first handful of settings, and you should see some familiar acronyms: CH, ID, DH, DL, and MY. Beside each of those blocks is a text box -- that's where we'll type in our new settings.
Network ID (ID)
Begin by coming up with a unique network ID number. Think of your favorite number between 0 and 65535, consult your friends and neighbors to make sure your favorite isn't their favorite, then convert it to hexadecimal. Or if you don't want to put that much effort into it, use a random value like .
Type your 16-bit network ID into the white text box next to PAN ID.
MY Address (MY)
Your next job is to create addresses for each XBee in your network. These values should be unique to each XBee in a network. The MY address can be any value between 0x0000 and 0xFFFF. Type this address into the text box next to "MY 16-bit Source Address".
If you only have two XBees, you can assign the first an MY address of 0, and the other an address of 1.
Destination Address (DH & DL)
The destination address defines which XBee your source XBee is talking to. There are actually two values used to set the destination: destination high (DH) and destination low (DL). You can use that pair of values in one of two ways to set your XBee's mate:
- Leave DH set to 0, and set DL to the MY address of the receiving XBee.
- Set DH to the Serial Number High (SH) and DL to the Serial Number Low (SL) of your destination XBee.
Either method works, but the former -- setting DH to 0 and DL to the destination's MY address -- is usually easier.
Here's an example for setting up the ID, DH, DL, and MY values for a pair of XBees:
| Setting | Acronym | XBee Node1 | XBee Node 2 |
|---|---|---|---|
| Channel | CH | C | C |
| PAN ID | ID | ||
| Destination Address High | DH | 0 | 0 |
| Destination Address Low | DL | 1 | 0 |
| 16-bit Source Address | MY | 0 | 1 |
Notice how the only real differences are the DL and MY values, which are flip-flopped on each XBee.
Write Changes
Once you've made your changes to the text field, click the brown pencil icon (![]() ) to write your changes. The property background should turn from green to blue, indicating it has been written to a non-default value.
) to write your changes. The property background should turn from green to blue, indicating it has been written to a non-default value.
Now, just like last time, you can try to send data from one XBee to the other via the console. As long as the addresses and PAN ID's match up, you should have the same success as last time.
While it may seem like a lot of work to get right back to where you were, using a unique PAN ID and addressing scheme will make your data transfer more secure and reliable.