Experiment Guide for RedBot with Shadow Chassis
 bri_huang,
  Shawn Hymel,
  SFUptownMaker
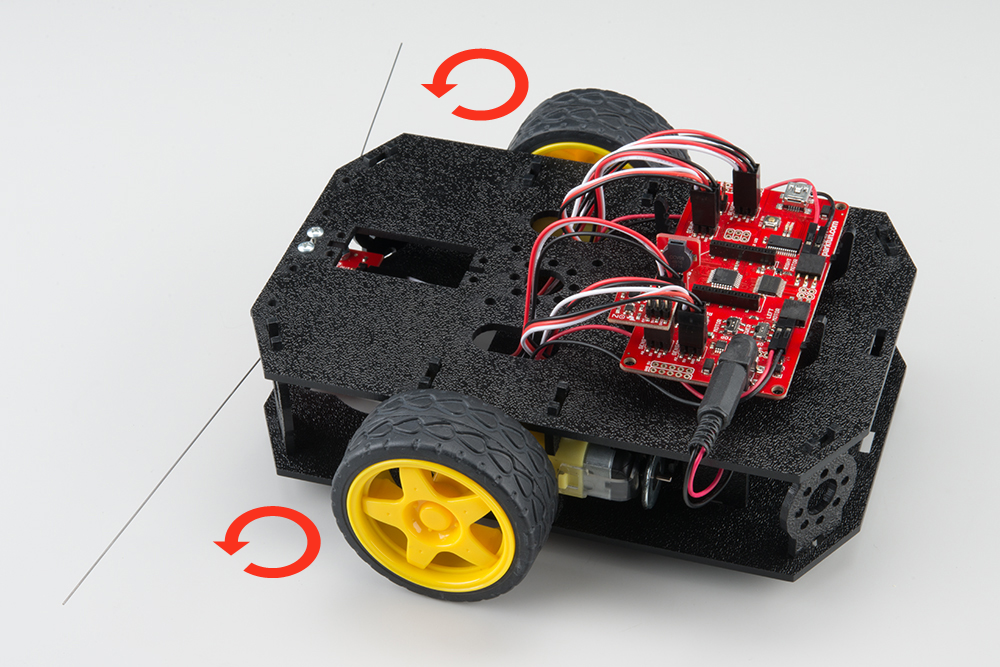
Experiment 3: Turning
In this experiment, we will look at how to fine-tune the control of the RedBot by controlling the right motor and the left motor separately. We will introduce a few new methods of the RedBotMotor class that will allow us to control the motors separately.
In this experiment, we will break-down the commands for the RedBot to drive forward, turn 90 degrees, drive forward again, and then stop.
Make sure RedBot is in safe location, or standing on the flat back edge of the chassis. This code requires only the most basic setup: the motors must be connected, and the board must be receiving power from the battery pack.
Let’s load this experiment onto the RedBot. Go to File > Examples > SparkFun RedBot Library > Exp3_Turning or copy and paste the example code below:
language:c
/***********************************************************************
 * Exp3_Turning -- RedBot Experiment 3
 *
 * Explore turning with the RedBot by controlling the Right and Left motors
 * separately.
 *
 * Hardware setup:
 * This code requires only the most basic setup: the motors must be
 * connected, and the board must be receiving power from the battery pack.
 *
 * 23 Sept 2013 N. Seidle/M. Hord
 * 04 Oct 2014 B. Huang
 ***********************************************************************/
#include <RedBot.h>  // This line "includes" the library into your sketch.

RedBotMotors motors; // Instantiate the motor control object.

void setup()
{
  // drive forward -- instead of using motors.drive(); Here is another way.
  motors.rightMotor(150); // Turn on right motor clockwise medium power (motorPower = 150)
  motors.leftMotor(-150); // Turn on left motor counter clockwise medium power (motorPower = 150)
  delay(1000);       // for 1000 ms.
  motors.brake();    // brake() motors

  // pivot -- spinning both motors CCW causes the RedBot to turn to the right
  motors.rightMotor(-100); // Turn CCW at motorPower of 100
  motors.leftMotor(-100);  // Turn CCW at motorPower of 100
  delay(500);        // for 500 ms.
  motors.brake();    // brake() motors
  delay(500);        // for 500 ms.

  // drive forward -- instead of using motors.drive(); Here is another way.
  motors.rightMotor(150); // Turn on right motor clockwise medium power (motorPower = 150)
  motors.leftMotor(-150); // Turn on left motor counter clockwise medium power (motorPower = 150)
  delay(1000);       // for 1000 ms.
  motors.brake();     // brake() motors
}

void loop()
{
  // Figure 8 pattern -- Turn Right, Turn Left, Repeat
  //  motors.leftMotor(-200);  // Left motor CCW at 200
  //  motors.rightMotor(80);   // Right motor CW at 80
  //  delay(2000);
  //  motors.leftMotor(-80);    // Left motor CCW at 80
  //  motors.rightMotor(200);   // Right motor CW at 200
  //  delay(2000);
}
What You Should See
After you upload this example code, you should see the wheels spin for a bit, change directions, and then stop. Unplug the USB cable from your RedBot and set the RedBot on the floor. Hit the reset button to manually restart your program. Watch your RedBot go!
On a nice flat surface, your RedBot should drive forward (in a straight line), turn 90 degrees to the right, and then drive forward again. If your RedBot isn't turning 90 degrees, there are two things you can adjust.
Try changing the turning time by changing the
delay(500);The default example is set for 500 ms.You can also try changing the motorPower during the pivot. Once you have your RedBot making a nice 90 degree turn.
Remember that turning with this system relies on an equal amount of traction on both wheels. Again, if the wheels are slipping or spinning out, you may need to slow down the speed.
Learn More: Turning
The way we turn with a two-wheel differential system is by spinning the right side at a different speed as the left side. In order to pivot to the right, we spin both the right and the left motors in opposite directions. This results in a nice tight turn.

Notice however, that to drive straight, the right side is usually spinning in the same direction as the left side.
While making the motor change directions may result in a tight turn, it is slow. Another way of turning to the right is by only driving the left motor and keeping the other side stopped. This gives us a turn radius pivoting about the non-driven wheel. While the turn may not be as tight, the momentum of the robot is kept going forward.

Code To Note
Clockwise or Counter-Clockwise
In the last example, to drive the RedBot forward, we used a single command motors.drive([speed]); Positive speeds cause the RedBot to go forward by spinning the right side clockwise and the left side counter-clockwise.
To control the individual motors, the RedBotMotors class has two methods that are used in this example.
  motors.rightMotor([motorPower]);  // controls the right motor
  motors.leftMotor([motorPower]);   // controls the left motor
Similar to the .drive([motorPower]) method, [motorPower] values can vary from -255 to +255. Positive values spin the motor in the clockwise direction and Negative values spin the motor in the counterclockwise direction.
The RedBot is pretty nimble, so we want to use a lower motorPowers for pivoting. In our example, we set the motorPower to 100 and the delay time to 0.5 seconds. Play around with this until you're able to get your robot to turn a nice 90 degree turn consistently.
Too abrupt of a turn? How can I turn more gradually? Play around with varying the power to the right side vs. the left side.
setup() vs. loop()
Up until this point, we have always had our code in the setup() portion of the code. Any code that we place in between the curly braces { and } after the setup() runs just once. This is convenient for testing single instructions or routines. But, what if we want our RedBot to repeat a pattern - like doing a figure-8? or a dance?
Any code that we place in the loop() repeats over and over. We have a simple example of a figure-8 pattern. The two forward slashes \\ in front of this code comments the code out from being run. To see un-comment these lines of code, simply remove the two \\.
The RedBot is instructed to turn right and then turn left. Notice that to soften the turn, the motors never change direction. The left motor continues to rotate counter clockwise and the right motor rotates clockwise. The difference in speeds causes the robot to turn.
//  motors.leftMotor(-200);  // Left motor CCW at 200
//  motors.rightMotor(80);   // Right motor CW at 80
//  delay(2000);
//  motors.leftMotor(-80);    // Left motor CCW at 80
//  motors.rightMotor(200);   // Right motor CW at 200
//  delay(2000);
You may need to adjust the speeds and the delay() times to get a good figure-8 pattern.
Going Further
Box step?
Now that you have fine-tuned a 90 degree turn, repeat this four times to see if you can get your RedBot to trace out a box. If you have whiteboard sheets, you can tape a dry-erase marker to the back of the RedBot to trace out your path.
Dance party
Adjust the figure-8 pattern until your RedBot is tracing out figure-8s on the floor. Now, plan out your own dance routine for your robot. See if you can choreograph it to music!
Experiment / Activity
Take the motorPower that you used above and the turningTime to calculate the "turningSpeed" of your RedBot. We define
turningSpeed = angle / time. In this case, it should be 90 degrees divided by the turningTime you used above. Write down your turningSpeed.turningSpeed = _______
Writing your own custom sub-routine \ function.
Similar to what we did in the DriveForward activity, we will write a sub-routine called turnAngle(). This function will use the the average turningSpeed you calculated above to make motion planning easier.
Copy and paste this block of code to the end of your program -- after the void loop(){}
language:c
void turnAngle(int angle)
{
  int turningSpeed = 180; // degreees / second

  long turningTime;
  turningTime = (long) 1000 * angle / turningSpeed;

  motors.rightMotor(-100); // Turn CCW at motorPower of 100
  motors.leftMotor(-100);  // Turn CCW at motorPower of 100
  delay(turningTime);      // turning Time
  motors.brake();     // brake() motors
}
Now, replace your turning code with a function call turnAngle(90); Upload and test. Your RedBot should still be turning 90 degrees. If it's turning too far or not far enough, then adjust the variable turningSpeed until your RedBot is turning a good 90 degrees. Use this with the driveDistance() function from before to trace out a triangle, a square, and a pentagon.
Troubleshooting
My wheels don’t turn but I hear a high-pitched noise.
The motors may not have enough torque at such a low speed. Try driving the motors at a higher speed, or reducing the weight on the RedBot.
Everytime I plug the USB cable in, the RedBot acts funny for a few seconds! What’s happening?
The RedBot will try to run its code every time it is reset. When you plug something into a computer the computer has to identify what it is. During this period, the computer resets the RedBot controller board multiple times. No harm will come to your RedBot. If it distracts you, switch the motor switch from RUN to STOP and the motors will be disabled.