ESP32 Thing Motion Shield Hookup Guide
 MTaylor
Using the I2C and SPI Buses
To demonstrate the attachment of additional I2C and SPI devices, a BME280 is used. This could be any device, but the BME280 has both ports and is pretty easy to work with. There is one catch though, the SPI bus is shared with the microSD card and it will limit in the microSD card's data rate to the lowest common speed.
The two examples shown are actually the same program, but with two lines which configure the BME280 for either I2C or SPI mode.
I2C
Hookup the I2C pins between the BME280 and the ESP32 Thing as shown below.
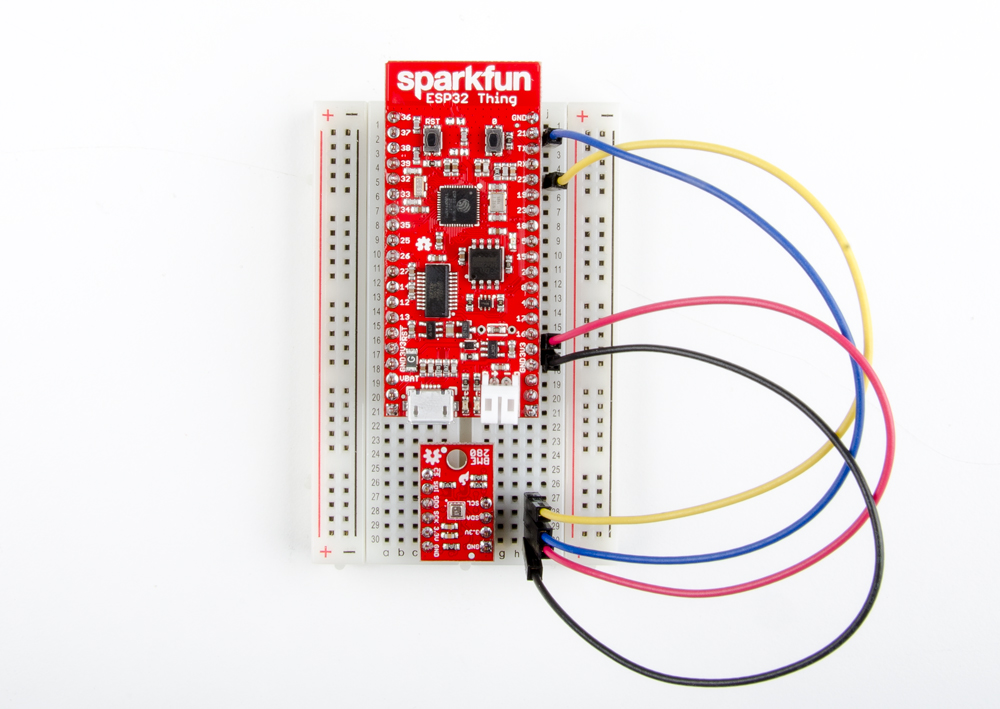
To connect the BME280 to the ESP32, wire up as follows:
| BME280 Pin |
ESP32 Pin |
|---|---|
| SCL | 22 |
| SDA | 21 |
| 3.3V | 3.3V |
| GND | GND |
Then, run the following example.
language:c
/******************************************************************************
BME280_I2C_SPI.ino
BME280 on the ESP32 Thing

Marshall Taylor @ SparkFun Electronics
Original creation date: May 20, 2015
Modified: Nov 6, 2017
https://github.com/sparkfun/ESP32_Motion_Shield

This sketch configures a BME280 to produce comma separated values for use
in generating spreadsheet graphs.

It has been modified from the original BME280 example to demonstrate I2C and
SPI operation on the ESP32 Motion board.

Original source:
https://github.com/sparkfun/SparkFun_BME280_Arduino_Library

Resources:
Uses Wire.h for I2C operation
Uses SPI.h for SPI operation

Development environment specifics:
Arduino IDE 1.8.2

This code is released under the [MIT License](http://opensource.org/licenses/MIT).
Please review the LICENSE.md file included with this example. If you have any questions
or concerns with licensing, please contact techsupport@sparkfun.com.
Distributed as-is; no warranty is given.
******************************************************************************/
#include <stdint.h>
#include "SparkFunBME280.h"

#include "Wire.h"
#include "SPI.h"

#define BME280_CS_PIN 17

//Global sensor object
BME280 mySensor;

unsigned int sampleNumber = 0; //For counting number of CSV rows

void setup()
{
Wire.begin();

// For SPI, enable the "mySensor.beginSPI(10)" line and disable the "mySensor.beginI2C()" line.
if (mySensor.beginI2C() == false) //Begin communication over I2C.
 //if (mySensor.beginSPI(17) == false) //Begin communication over SPI. Use pin 17 as Chip Select.
 {
   Serial.println("The sensor did not respond. Please check wiring.");
while(1); //Freeze
 }


    //***Operation settings*****************************//
    mySensor.settings.runMode = 3; //  3, Normal mode
    mySensor.settings.tStandby = 0; //  0, 0.5ms
    mySensor.settings.filter = 0; //  0, filter off
    //tempOverSample can be:
    //  0, skipped
    //  1 through 5, oversampling *1, *2, *4, *8, *16 respectively
    mySensor.settings.tempOverSample = 1;
    //pressOverSample can be:
    //  0, skipped
    //  1 through 5, oversampling *1, *2, *4, *8, *16 respectively
    mySensor.settings.pressOverSample = 1;
    //humidOverSample can be:
    //  0, skipped
    //  1 through 5, oversampling *1, *2, *4, *8, *16 respectively
    mySensor.settings.humidOverSample = 1;

    Serial.begin(115200);
    Serial.print("Program Started\n");
    Serial.print("Starting BME280... result of .begin(): 0x");
    delay(10);  //Make sure sensor had enough time to turn on. BME280 requires 2ms to start up.
    //Calling .begin() causes the settings to be loaded
    Serial.println(mySensor.begin(), HEX);

    //Build a first-row of column headers
    Serial.print("\n\n");
    Serial.print("Sample,");
    Serial.print("T(deg C),");
    Serial.print("T(deg F),");
    Serial.print("P(Pa),");
    Serial.print("Alt(m),");
    Serial.print("Alt(ft),");
    Serial.print("%RH");
    Serial.println("");

}

void loop()
{

    //Print each row in the loop
    //Start with temperature, as that data is needed for accurate compensation.
    //Reading the temperature updates the compensators of the other functions
    //in the background.
    Serial.print(sampleNumber);
    Serial.print(",");
    Serial.print(mySensor.readTempC(), 2);
    Serial.print(",");
    Serial.print(mySensor.readTempF(), 3);
    Serial.print(",");
    Serial.print(mySensor.readFloatPressure(), 0);
    Serial.print(",");
    Serial.print(mySensor.readFloatAltitudeMeters(), 3);
    Serial.print(",");
    Serial.print(mySensor.readFloatAltitudeFeet(), 3);
    Serial.print(",");
    Serial.print(mySensor.readFloatHumidity(), 0);
    Serial.println();

    sampleNumber++;

    delay(50);

}
SPI
Now wire the BME280 up to the ESP32's SPI port.
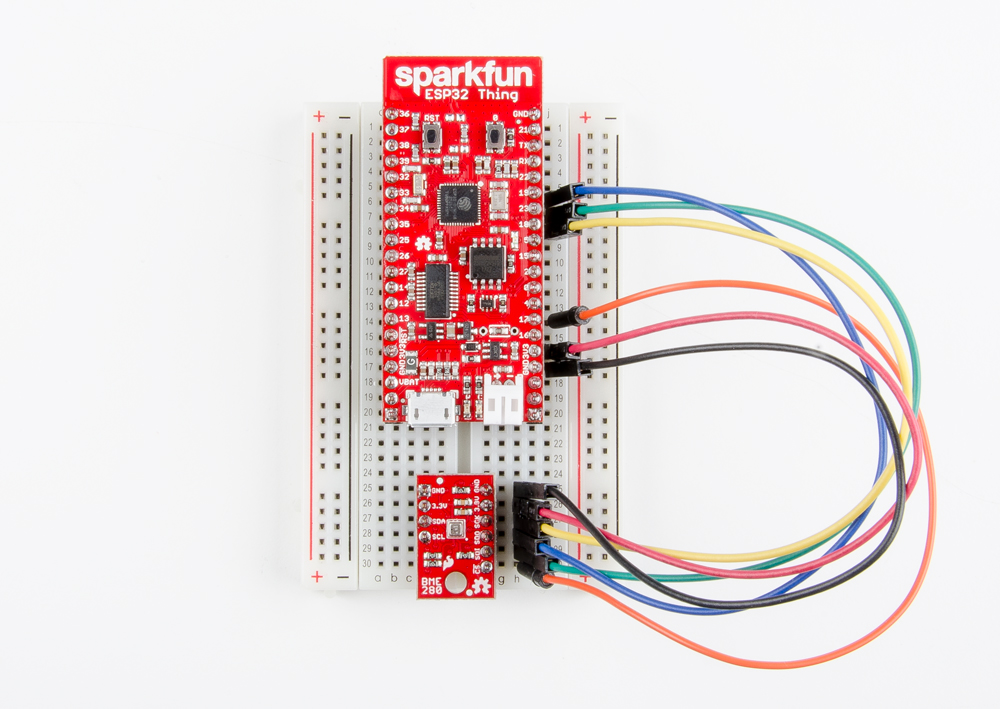
Here are the connections in the picture.
| BME280 Pin |
ESP32 Pin |
|---|---|
| CS | 17 |
| SDI |
23 |
| SDO | 19 |
| SCK |
18 |
| 3.3V | 3.3V |
| GND | GND |
To start the BME280 in SPI mode, we switch the configuration by commenting/uncommenting code as shown in the example below. Otherwise, the code is the same.
language:c
/******************************************************************************
BME280_I2C_SPI.ino
BME280 on the ESP32 Thing

Marshall Taylor @ SparkFun Electronics
Original creation date: May 20, 2015
Modified: Nov 6, 2017
https://github.com/sparkfun/ESP32_Motion_Shield

This sketch configures a BME280 to produce comma separated values for use
in generating spreadsheet graphs.

It has been modified from the original BME280 example to demonstrate I2C and
SPI operation on the ESP32 Motion board.

Original source:
https://github.com/sparkfun/SparkFun_BME280_Arduino_Library

Resources:
Uses Wire.h for I2C operation
Uses SPI.h for SPI operation

Development environment specifics:
Arduino IDE 1.8.2

This code is released under the [MIT License](http://opensource.org/licenses/MIT).
Please review the LICENSE.md file included with this example. If you have any questions
or concerns with licensing, please contact techsupport@sparkfun.com.
Distributed as-is; no warranty is given.
******************************************************************************/
#include <stdint.h>
#include "SparkFunBME280.h"

#include "Wire.h"
#include "SPI.h"

#define BME280_CS_PIN 17

//Global sensor object
BME280 mySensor;

unsigned int sampleNumber = 0; //For counting number of CSV rows

void setup()
{
Wire.begin();

// For SPI, enable the "mySensor.beginSPI(10)" line and disable the "mySensor.beginI2C()" line.
//if (mySensor.beginI2C() == false) //Begin communication over I2C.
if (mySensor.beginSPI(17) == false) //Begin communication over SPI. Use pin 17 as Chip Select.
  {
Serial.println("The sensor did not respond. Please check wiring.");
while(1); //Freeze
  }


    //***Operation settings*****************************//
    mySensor.settings.runMode = 3; //  3, Normal mode
    mySensor.settings.tStandby = 0; //  0, 0.5ms
    mySensor.settings.filter = 0; //  0, filter off
    //tempOverSample can be:
    //  0, skipped
    //  1 through 5, oversampling *1, *2, *4, *8, *16 respectively
    mySensor.settings.tempOverSample = 1;
    //pressOverSample can be:
    //  0, skipped
    //  1 through 5, oversampling *1, *2, *4, *8, *16 respectively
    mySensor.settings.pressOverSample = 1;
    //humidOverSample can be:
    //  0, skipped
    //  1 through 5, oversampling *1, *2, *4, *8, *16 respectively
    mySensor.settings.humidOverSample = 1;

    Serial.begin(115200);
    Serial.print("Program Started\n");
    Serial.print("Starting BME280... result of .begin(): 0x");
    delay(10);  //Make sure sensor had enough time to turn on. BME280 requires 2ms to start up.
    //Calling .begin() causes the settings to be loaded
    Serial.println(mySensor.begin(), HEX);

    //Build a first-row of column headers
    Serial.print("\n\n");
    Serial.print("Sample,");
    Serial.print("T(deg C),");
    Serial.print("T(deg F),");
    Serial.print("P(Pa),");
    Serial.print("Alt(m),");
    Serial.print("Alt(ft),");
    Serial.print("%RH");
    Serial.println("");

}

void loop()
{

    //Print each row in the loop
    //Start with temperature, as that data is needed for accurate compensation.
    //Reading the temperature updates the compensators of the other functions
    //in the background.
    Serial.print(sampleNumber);
    Serial.print(",");
    Serial.print(mySensor.readTempC(), 2);
    Serial.print(",");
    Serial.print(mySensor.readTempF(), 3);
    Serial.print(",");
    Serial.print(mySensor.readFloatPressure(), 0);
    Serial.print(",");
    Serial.print(mySensor.readFloatAltitudeMeters(), 3);
    Serial.print(",");
    Serial.print(mySensor.readFloatAltitudeFeet(), 3);
    Serial.print(",");
    Serial.print(mySensor.readFloatHumidity(), 0);
    Serial.println();

    sampleNumber++;

    delay(50);

}