E-Textiles ISTE Workshop
 Gella
Gella 
Activity 1: Blinking LEDs
It's time to upload your first program to the LilyMini! In this activity, you'll learn how to blink any of the many LEDs built into the LilyMini ProtoSnap.
Open the Blink Example
A handy feature of Arduino is that it contains many built in programming examples. We've put the example code for these activities under File > Examples > LilyMini_Guide:
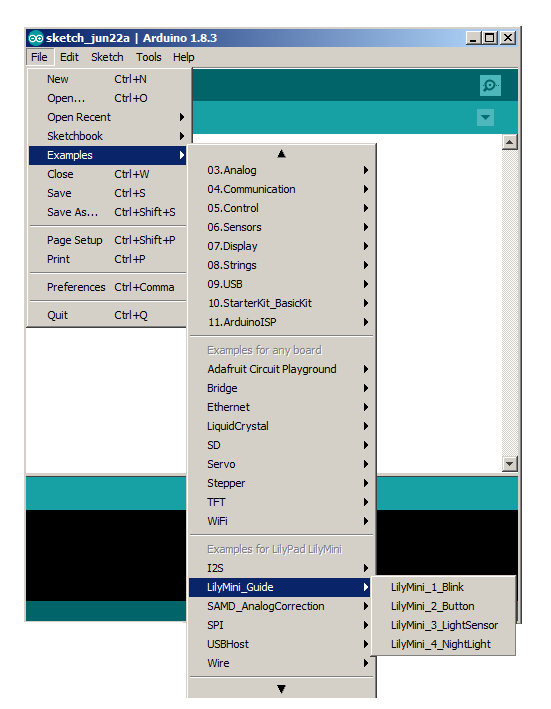
From the LilyMini_Guide submenu, open LilyMini_1_Blink. A window should pop up with that program:
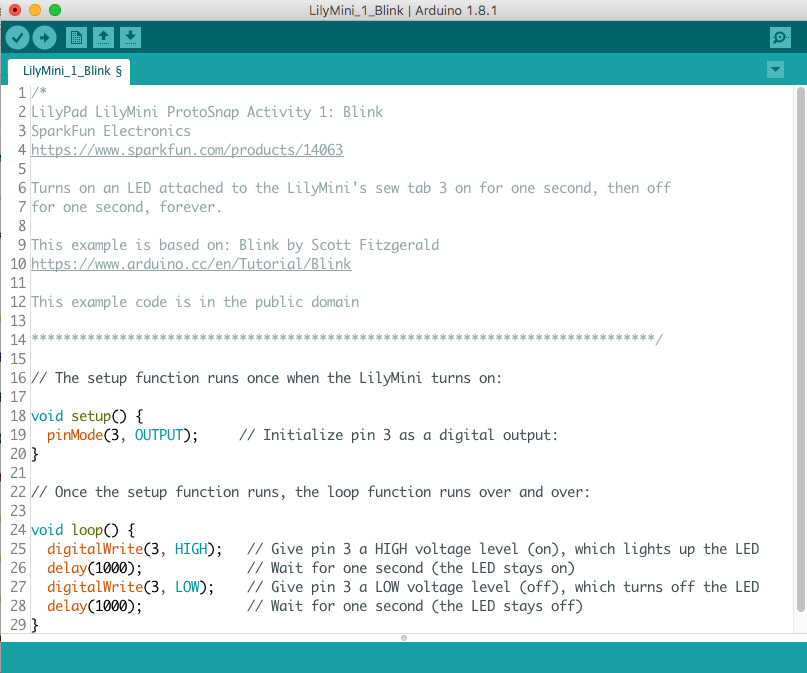
Alternatively, you can copy and paste the following code into Arduino. Be sure to completely clear the window first.
/*
LilyPad LilyMini ProtoSnap Activity 1: Blink
SparkFun Electronics
https://www.sparkfun.com/products/14063

Turns on an LED attached to the LilyMini's sew tab 3 on for one second, then off
for one second, forever.

This example is based on: Blink by Scott Fitzgerald
https://www.arduino.cc/en/Tutorial/Blink

This example code is in the public domain

******************************************************************************/

// The setup function runs once when the LilyMini turns on:

void setup() {
  pinMode(3, OUTPUT);     // Initialize pin 3 as a digital output:
}

// Once the setup function runs, the loop function runs over and over:

void loop() {
  digitalWrite(3, HIGH);   // Give pin 3 a HIGH voltage level (on), which lights up the LED
  delay(1000);             // Wait for one second (the LED stays on)
  digitalWrite(3, LOW);    // Give pin 3 a LOW voltage level (off), which turns off the LED
  delay(1000);             // Wait for one second (the LED stays off)
}
Uploading your Program to the LilyMini
To run this program on your LilyMini, click the round icon with the right arrow in it at the top of the window. Arduino will check the program for errors (and stop if it finds any), compile the code, converting it from human-readable text to machine readable instructions, and transfer it over the USB cable to the LilyMini.
While it's transferring, the LilyMini's RGB LED will blink different colors, and when the transfer is finished, the code will automatically begin running.
What You Should See
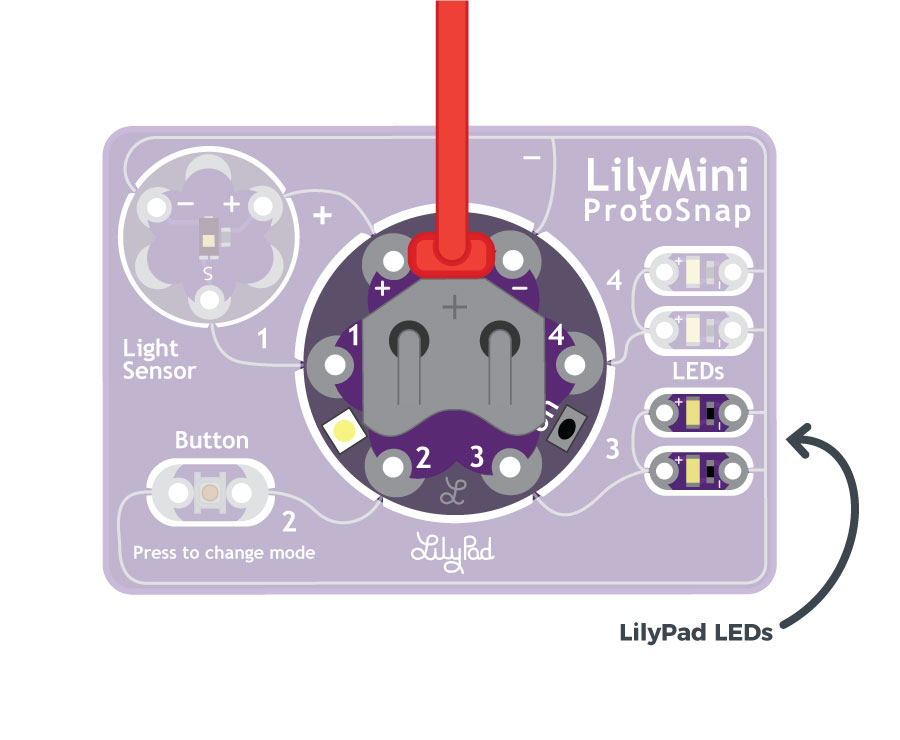
You should see the two LEDs attached to sew tab 3 blink on and off.
In the LilyMini ProtoSnap, the white LEDs are connected to the sew tabs in pairs; two to sew tab 3, and two to sew tab 4. This is known as a parallel circuit. If you turn on one of those sew tabs, you'll turn on both LEDs.
You may remember this type of circuit layout if you built the Illuminated Mask project. In that project, three LEDs shared the same power source.
Understanding Your Program
There's a lot to cover here, but don't get overwhelmed. This will all become second nature soon.
Every Arduino program has two specific functions (named sections of code): one named setup() and one named loop(). (You can add as many of your own functions as you like, but every Arduino program will have at least those two).
The setup() function runs once when your program starts up. It's a good place to put initialization steps that need to happen before the rest of your program runs. Often you'll configure the hardware to match your specific project here, telling pins to be inputs or outputs, etc.
The other function, loop() runs after setup() finishes, and runs over and over, forever. This is where most of your code that completes tasks will be stored. The fact that it loops is very handy - if you blink an LED once in loop(), it will blink on and off forever because loop() runs over and over.
Syntax
Computers are fast, but not very smart. They can only understand specific instructions written in a very standard way. Syntax is the set of rules and structure for a computer (or any other) language. For example, you'll notice that each line of code ends with a semicolon - ;. Much like the period at the end of a sentence, the semicolon helps the computer determine where each line of instructions ends.
When you start writing your own code it's easy to forget the semicolon, but the Arduino IDE will helpfully tell you with a red error message.
Configuring the Electrical Connections
Although we call the electrical connections on LilyPad products "sew tabs", the common name for such a connections is a "pin". Arduino uses the word "pin" to refer to electrical connections between the board running the code, and the outside world. There are a number of commands that let you do whatever you want with these pins.
Before you can use one of the LilyMini's pins or sew tabs, it needs to be configured as either an input or an output. This is from the point of view of the LilyMini: outputs are used to control things like LEDs, speakers, motors, etc. Inputs are used to gather information from the outside world, such as buttons, switches, and various sensors.
We use a built-in function called pinMode() to configure pins as inputs or outputs. pinMode() takes two parameters (pieces of information within the parentheses): the pin you'd like to affect, and whether you want that pin to be an INPUT or an OUTPUT. For example, the command:
pinMode(3, OUTPUT);
Tells the board to set pin 3 as an OUTPUT.
Commanding Pins
To actually send voltage to an output pin requires an additional command called digitalWrite(). DigitalWrite() takes two parameters; the pin number you'd like to affect, and whether you want the pin to be "on" (outputting voltage) or "off" (connected to ground). Instead of saying "on" and "off", we say "HIGH" and "LOW". For example, if you connect sew tab 3 to a LED, and want to turn the LED on, you would use the command:
digitalWrite(3, HIGH);
If you want to turn the LED off, you'd use the command:
digitalWrite(3, LOW);
Slowing Things Down
To make an LED blink, you turn it on (HIGH) then off (LOW), and repeat. This is exactly what our code is doing. However, the microcontroller operates so quickly (48 million instructions per second!) that to our eyes those changes would appear to be instantaneous, and the LED would look like it's always on. To slow things down, the program uses a handy command called delay() which stops and waits a certain amount of time:
delay(1000);
The delay() command takes one parameter, the number of milliseconds to wait. There are 1000 milliseconds in one second, so the above example will pause for one second. When you're blinking LEDs, don't forget that you will also need to delay() while the LED is turned off. This is why there are two delay()s in our code.
Further Reading:
The Arduino website has a great reference page for every available Arduino command. Here are the entries for the commands we just used:
- digitalWrite on Arduino Reference
- pinMode on Arduino Reference
- delay on Arduino Reference
Understanding Your Circuit
When you work with the LilyMini or any Arduino board, you're working with a combination of hardware and software. Neither one will work without the other! You write code that does various things to the pins, then you build projects that connect the pins to LEDs, sensors, speakers, etc.
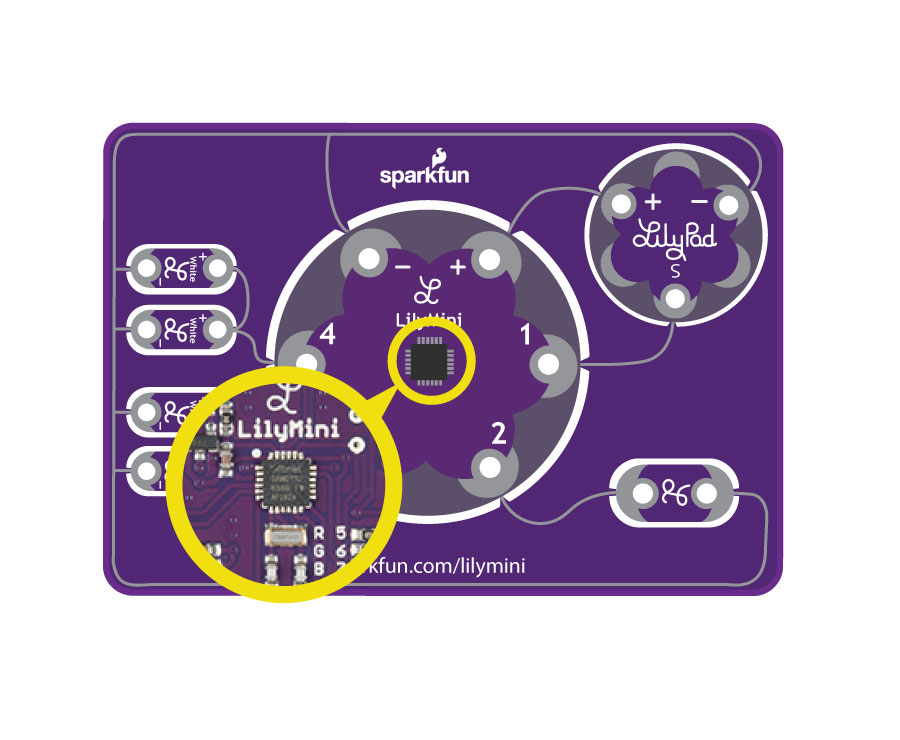
If you turn the ProtoSnap board over, you'll see the SAMD11 chip that stores your uploaded code and is the 'brains' of the LilyMini. Follow the purple lines coming from the chip's metal pins to see how they electrically connect to components on the LilyMini and its sew tabs, and further out into the larger ProtoSnap board. The conductive metal lines that connect everything together are called traces.
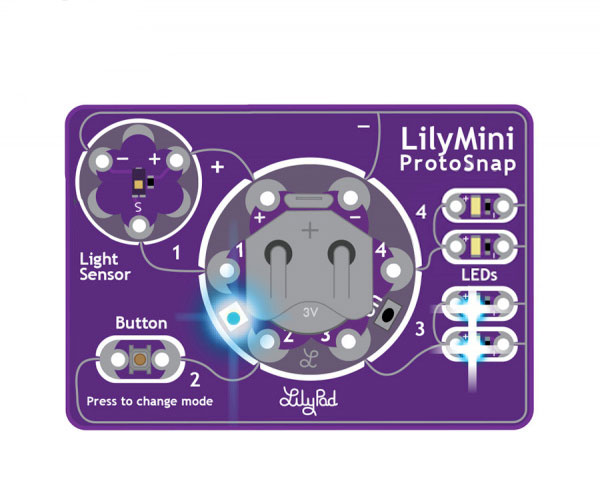
In the LilyMini ProtoSnap, sew tab 3 is connected to two white LEDs. The other side of the LEDs is connected to ground, which wraps around to the "-" sew tab on the LilyMini, completing the circuit. See the illustration below for a representation of current flowing through the LilyMini ProtoSnap.

In the blink program you just uploaded, the digitalWrite(3,HIGH); command applies voltage to sew tab 3, which lights up the LEDs. The digitalWrite(3,LOW); command turns off the voltage, which turns off the connected LEDs.
While the ProtoSnap board is in one piece, you can write programs that make all the connected pieces work together. Later on when you have your code working the way you want, you can snap the board apart, build your project, and re-connect everything with conductive thread. But for now, leave everything connected so we can do the other exercises in this guide.
Challenges and Going Further
- Can you change the code to control the LEDs connected to sew tab 4 on the LilyMini?
- What happens when you change the value in the delay() function?
- Can you add some lines of code so that both pairs of LEDs on sew tabs 3 and 4 light up simultaneously?
- How fast can you get the LEDs to blink before you can no longer tell they are blinking?