E-Textiles ISTE Workshop
 Gella
Gella 
Activity 3: Reading a Sensor
In the activities up until now, we've dealt with input and output that is either on or off, or in Arduino, HIGH or LOW. These are called digital signals because they only have two states - on and off. But the LilyMini and other microcontrollers can also send and receive what are called analog signals, which provide all the intermediate values between on and off. Analog signals are especially useful for sensors that look at the real world, like temperature, which can be many more values than just HOT or COLD.
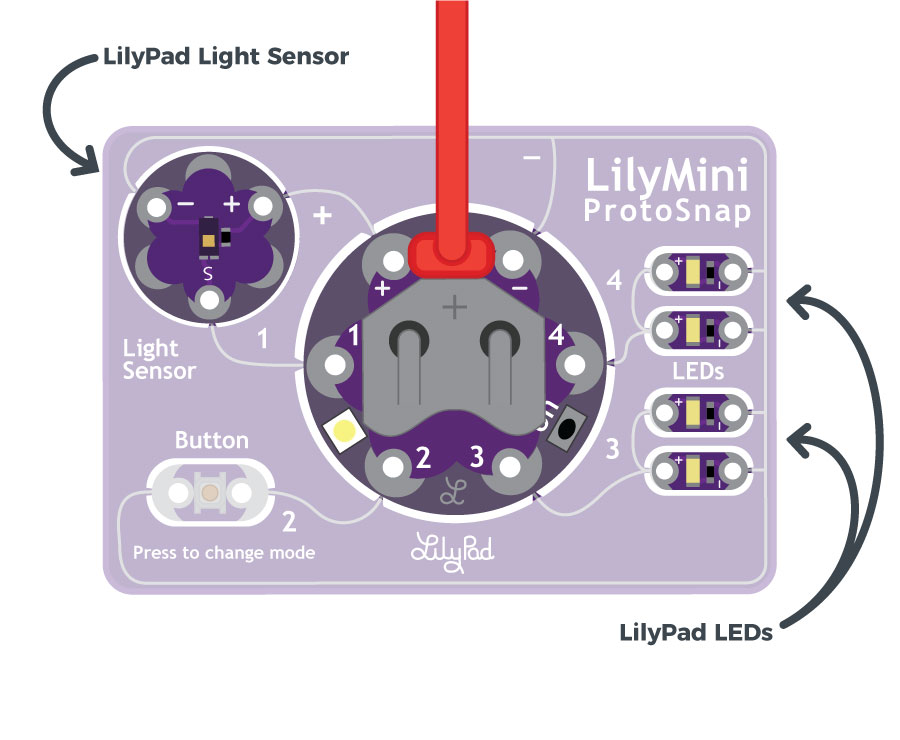
In this activity, we'll make use of the LilyPad Light Sensor in the upper-left hand corner of the ProtoSnap. It provides an analog output that we'll use to measure the amount of light present. Then we'll use our old friend the if statement to make a decision as to whether it's dark enough to turn on the LEDs as a night light.
We'll also show you how to use Arduino's Serial Monitor feature, which lets you send text and data from the LilyMini to your computer. This provides a new way to interact with the LilyMini that can make writing and debugging your programs much easier.
Open the Light Sensor Example
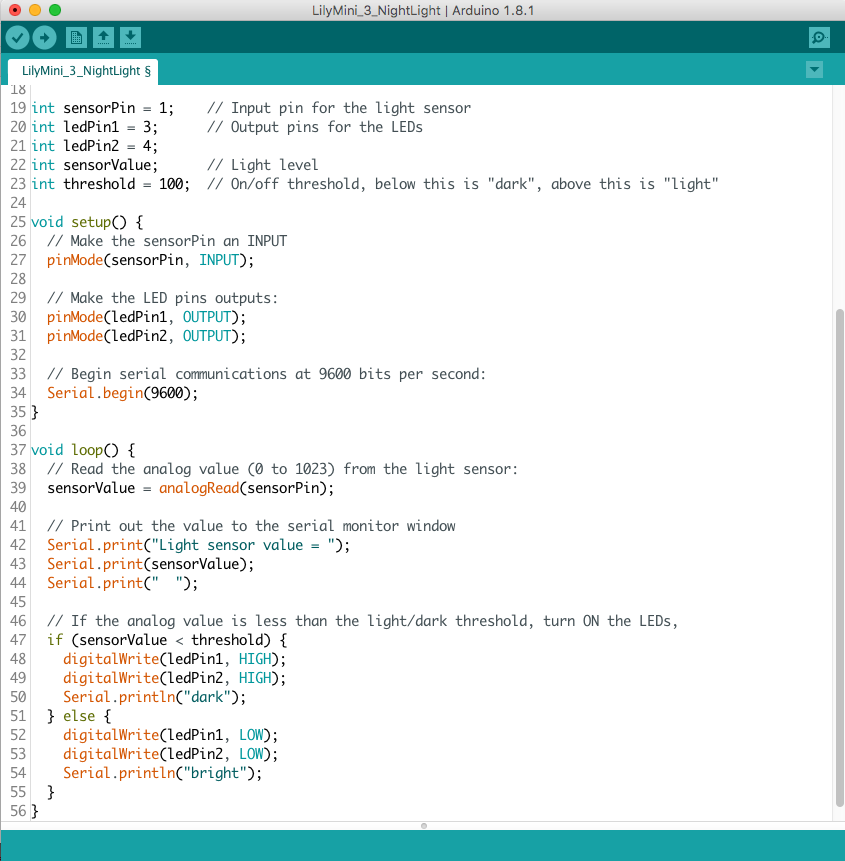
Open the file LilyMini_3_NightLight.ino
Alternatively, you can copy and paste the following code into Arduino. Hit upload, and see what happens!
/*
LilyPad LilyMini ProtoSnap Activity 8: Night-Light with Light Sensor
SparkFun Electronics
https://www.sparkfun.com/products/14063

Read the ambient light levels from the LilyPad Light Sensor attached to sew tab 1.
Turn on the LEDs on sew tabs 3 and 4 when the light level falls below a certain level.
Also print the light level to the serial monitor window.

This example is based on: If Statement by Tom Igoe
http://www.arduino.cc/en/Tutorial/IfStatement

This example code is in the public domain

******************************************************************************/

// Declare the variables we'll be using

int sensorPin = 1;    // Input pin for the light sensor
int ledPin1 = 3;      // Output pins for the LEDs
int ledPin2 = 4;
int sensorValue;      // Light level
int threshold = 100;  // On/off threshold, below this is "dark", above this is "light"

void setup() {

  // Make the sensorPin an INPUT:

  pinMode(sensorPin, INPUT);

  // Make the LED pins outputs:

  pinMode(ledPin1, OUTPUT);
  pinMode(ledPin2, OUTPUT);

  // Begin serial communications at 9600 bits per second:

  Serial.begin(9600);
}

void loop() {

  // Read the analog value (0 to 1023) from the light sensor:

  sensorValue = analogRead(sensorPin);

  // Print out the value to the serial monitor window
  // (Click the magnifying glass icon to open it)

  Serial.print("Light sensor value = ");
  Serial.print(sensorValue);
  Serial.print("  ");

  // If the analog value is less than the light/dark threshold, turn ON the LEDs,
  // otherwise turn them off. Also print out what we decided:

  if (sensorValue < threshold) {
    digitalWrite(ledPin1, HIGH);
    digitalWrite(ledPin2, HIGH);
    Serial.println("dark");
  } else {
    digitalWrite(ledPin1, LOW);
    digitalWrite(ledPin2, LOW);
    Serial.println("bright");
  }
}
What You Should See
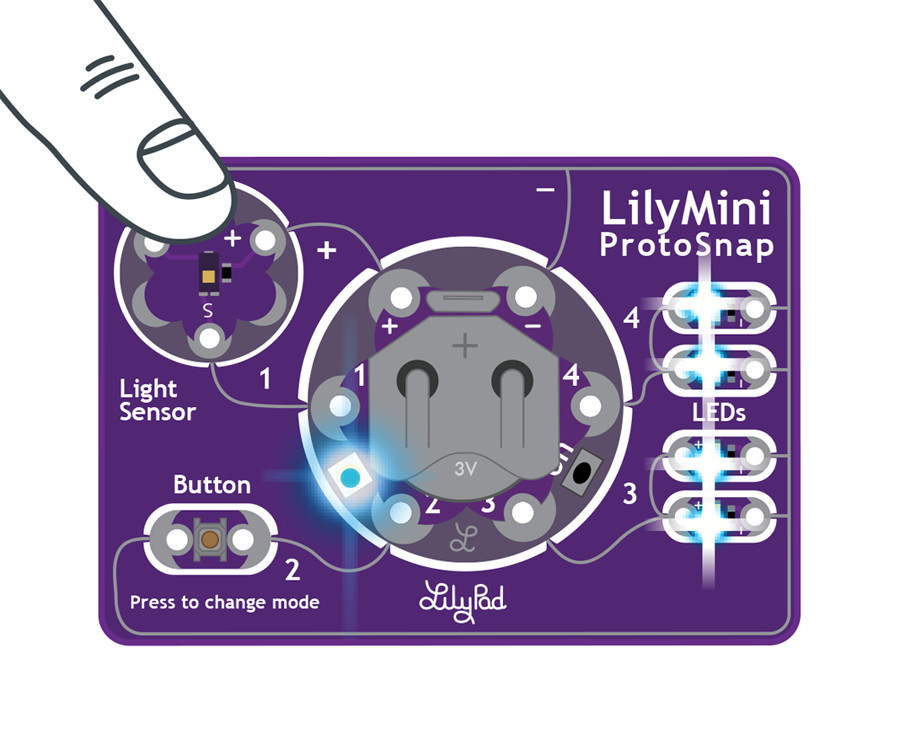
Cover the light sensor with your hand or an object to reduce the light that the sensor is reading. At a certain point the white LEDs should turn on. Remove your hand to allow more light to hit the sensor, and the white LEDs will turn off.
Next, click on the magnifying glass icon in the upper right of Arduino. This will open the Serial Monitor window. The Serial Monitor window shows everything that your program sends with a Serial.write() command. This program writes the values it's reading from the light sensor, and whether the value is above or below the light/dark threshold we've set. Observe the range of values that scroll by on the window. How low (dark) can you make the area above the sensor? What is the average brightness in the room?
Understanding Your Program
sensorValue = analogRead(sensorPin);
In the activity where you used the LilyPad Button, the program used digitalRead to read the button state as HIGH or LOW. The LilyPad Light Sensor functions differently; instead of being either on or off, it outputs a varying voltage depending on the light level. In the dark, the light sensor will output around 0 volts. In very bright light, it will output around 3 volts.
The LilyMini reads this varying voltage using the command analogRead. AnalogRead converts voltages from 0 to 3.3 volts, into the range 0 to 1023. Like the button examples, your program stores the reading in a variable (called sensorValue) to use later.
int threshold = 100;
As we just saw, our program will read the light sensor and return a number in the range 0 to 1023. If we want to make a night light, we need to decide where on this scale "dark" is. To do this, we've declared a variable named threshold, and given it a value of 100. We'll compare each light sensor reading to this threshold; if it's below the threshold ("dark") we'll turn on the LEDs. If it's above the threshold, we'll turn off the LEDs ("light"). The advantage of using a variable for the threshold, is that it's easy to change. If you think your night light is turning on when it's too light out, just reduce the number stored in threshold and try again.
Serial.begin(9600);
This command starts a serial communication connection between your LilyMini and Arduino software to allow you to view information as your program runs. ("9600" is the speed at which the serial communication occurs.) In this program, you'll use the Serial Monitor to view the light-level values as they are read from the light sensor. This will help you decide where to set the light/dark threshold.
You can read more about Arduino's Serial Communication functions at the Arduino website.
Serial.print("Light sensor value = ");
Serial.print(sensorValue);
These lines of code send data to the serial monitor window. Note that the first Serial.print prints a text label (to print text, enclose it with double-quotes), and the second prints the actual value. You can string together Serial.print statements in this way to label and format data just the way you want it.
if (sensorValue < threshold)
This if statement uses a < symbol instead of an == sign as in the button example. It compares the value in sensorValue to the predetermined threshold. If the number in sensorValue is less than the number in threshold, the code in the first section of the if statement runs (it's dark, so we turn on the LEDs). if the number in sensorValue is greater than the number in threshold, the code in the else section of the statement runs (it's light so we turn off the LEDs).
Serial.println("Dark");
Serial.println("Light");
In addition to turning the LEDs on and off, we've added some more Serial statements to the if statement. But wait! These are a little different.
There are two similar Serial print commands: Serial.print and Serial.println. Both of them will send numbers or text to the serial monitor windows. The difference between them is that Serial.println will append a new line (or if you're older, a carriage return) to whatever it prints, causing the next print statement to start on a new line. This lets you neatly format your Serial output.
Another benefit of adding these serial commands within the if statement is that it allows you to debug your code and make sure everything is working even if your LEDs are not connected. Don't hesitate to put Serial.print statements in your code to help debug it.
Further Reading:
- analogRead on Arduino Reference
- Conditionals in if statements on Arduino Reference
- Serial.print on Arduino Reference
- Serial.println on Arduino Reference
Understanding Your Circuit
Unlike the button, the light sensor has active circuitry on it. It needs to have power to operate, so it has (+) and ground (-) tabs connected to power on the LilyMini, and it has a third output tab labeled S for signal. The signal tab is connected to sew tab 1 on the LilyMini.
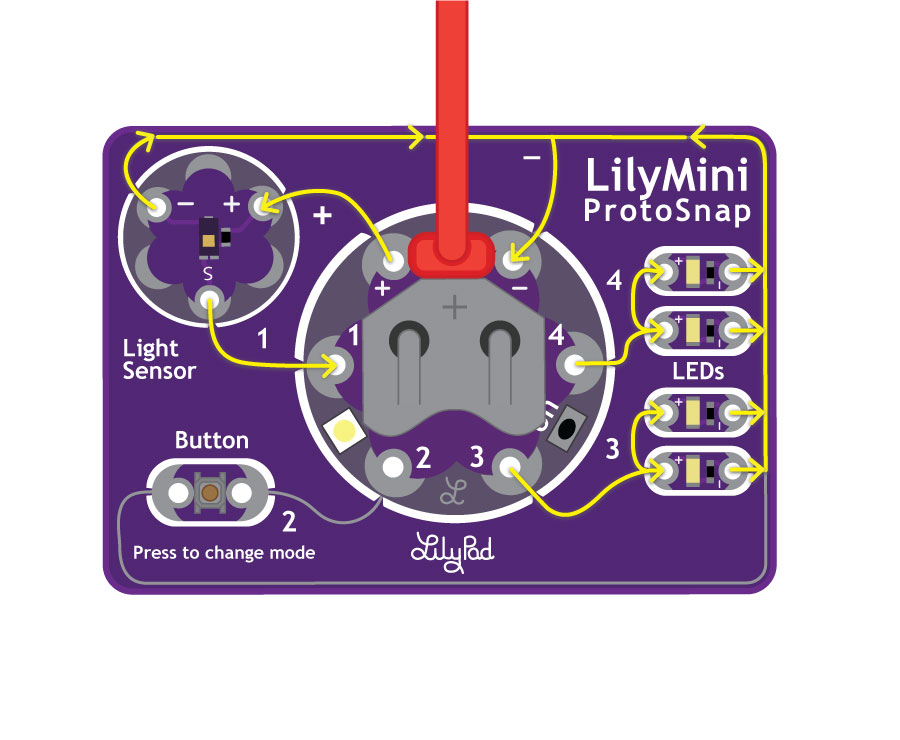
This sensor outputs a voltage that varies with the ambient light level. It ranges from 0 volts (very dark) to 3.3V (very bright). The output voltage is sent to the LilyMini, where it is measured by an analog to digital converter (ADC). The ADC returns a number from 0 (no voltage) to 1023 (maximum voltage). The LilyMini can measure analog voltages on any of its sew tabs.
Further Reading:
Challenges and Going Further
- Can you write some code so the LED blinks when it gets dark?
- Can you write some code so that the RGB shows one color when ‘light’ and one color when ‘dark’?
- Can you assign colors to different ranges of darkness?