E-Textiles ISTE Workshop
 Gella
Gella 
Activity 2: Using the LilyPad Button
In the last activity, you learned about output - making the LilyMini control things like LEDs. In this activity we'll learn about input, which lets the LilyMini react to the world around it. This is a very powerful concept; it's what has made computers so useful in our daily lives.
In this activity, we'll make the LilyPad button in the lower left of the ProtoSnap control the LEDs. We'll show you how to tell if a button connected to the LilyMini is being pressed, and then how to decide whether to light up the LEDs or not. Unlike simple projects where power is being turned on an off by a button (like the Light-Up Plush), we'll be doing this with software, which allows you to make more advanced decisions about what to do at the press of a button or other input.
Open the Button Example
Open the file named LilyMini_2_Button.ino
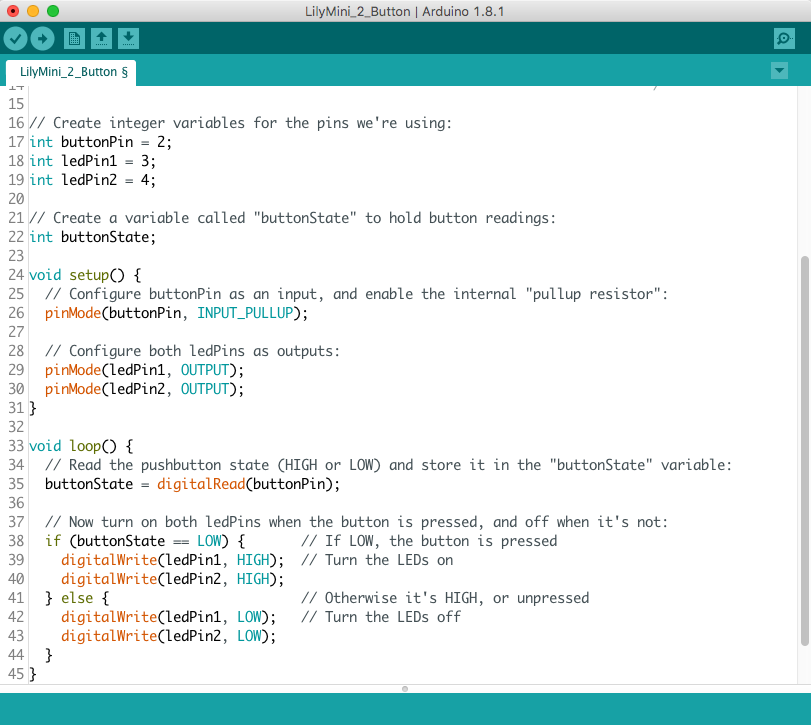
Alternatively, you can copy and paste the following code into Arduino. (Be sure to clear the window first). Click the upload button (the round button with the right arrow), and see what happens!
/*
LilyPad LilyMini ProtoSnap Activity 2: Button
SparkFun Electronics
https://www.sparkfun.com/products/14063

Read a button (digital input) on pin 2
Turn on the LED when pressed, and off when released.

This example is based on InputPullupSerial code by Scott Fitzgerald
http://www.arduino.cc/en/Tutorial/InputPullupSerial

This example code is in the public domain

******************************************************************************/

// Create integer variables for the pins we're using:

int buttonPin = 2;
int ledPin1 = 3;
int ledPin2 = 4;

// Create a variable called "buttonState" to hold button readings:

int buttonState;

void setup() {

  // Configure buttonPin as an input, and enable the internal "pullup resistor":

  pinMode(buttonPin, INPUT_PULLUP);

  // The pullup is a small internal resistor between the sewtab and HIGH voltage.
  // This weakly "pulls up" the input to HIGH if the button is not being pressed.
  // This keeps the input from "floating" (randomly reading either HIGH or LOW)
  // when the button is not being pressed.

  // Configure both ledPins as outputs:

  pinMode(ledPin1, OUTPUT);
  pinMode(ledPin2, OUTPUT);
}

void loop() {

  // Read the pushbutton state (HIGH or LOW) and store it in the "buttonState" variable:

  buttonState = digitalRead(buttonPin);

  // Note that LOW = pressed and HIGH = released, the opposite of what you might expect.
  // This is because the button is attached to ground, which is the LOW voltage level.
  // We use the pullup to weakly "pull up" the button to HIGH when it's not being pressed.
  // When the button is pressed, the strong ground signal overwhelms the weak pullup signal.

  // Now turn on both ledPins when the button is pressed, and off when it's not:

  if (buttonState == LOW) {       // If LOW, the button is pressed
    digitalWrite(ledPin1, HIGH);  // Turn the LEDs on
    digitalWrite(ledPin2, HIGH);
  } else {                        // Otherwise it's HIGH, or unpressed
    digitalWrite(ledPin1, LOW);   // Turn the LEDs off
    digitalWrite(ledPin2, LOW);
  }

  // The if statement turns the LEDs off (LOW) when the button is not being pressed (HIGH),
  // and on (HIGH) when the button is pressed (LOW).
}
What You Should See
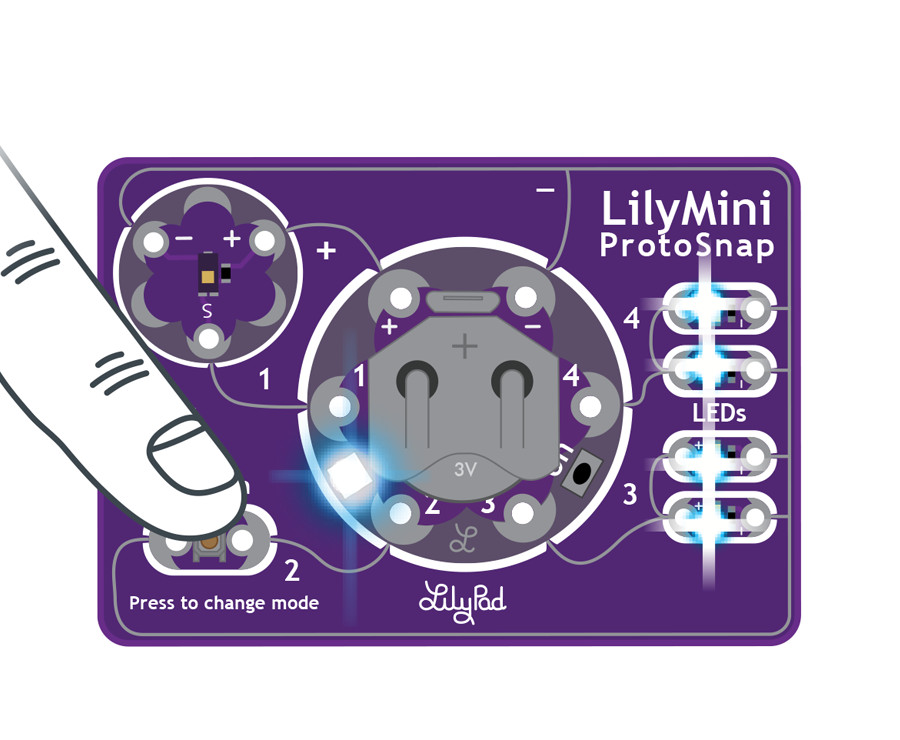
When you press the button on the LilyMini ProtoSnap, the LEDs should light up.
Understanding Your Program
int buttonPin = 2;
int ledPin = 3;
int ledPin = 4;
This example has a few additional lines of code before the setup and loop sections. Rather than assign pin numbers directly in pinMode or digitalWrite, you can create variables to store names or data. This makes your code easier to read and easier to change.
Everywhere buttonPin is used, the program will replace it with 2. If you decide to use a different pin to connect the button to in a future project, let's say tab 3, then you can replace the 2 with 3 at the start of your program instead of going through your code and manually replacing each instance.
You can see the program also uses variables to name the LEDs connected to sew tabs 3 and 4 of the LilyMini - ledPin1 and ledPin2. Notice how the buttonState does not have a number assigned to it. This variable will be used dynamically - the values assigned to it will change each time you press the button.
Before you use a variable, you must declare it - tell the computer what type of data it will be storing. Notice the "int" before all the variables used in this program - int is short for integer, which is defined as a whole number that can be positive or negative. In addition to declaring the name and type of a variable, we can also intialize it, or give it a starting value that you can change later or leave alone. For more information on all the variables Arduino understands, see their Language Reference Page.
pinMode(buttonPin, INPUT_PULLUP);
Before you can use any of the LilyMini's pins, you need to set whether it is an INPUT or OUTPUT. When controlling LEDs, we use OUTPUT, because we're sending voltage out of the LilyMini to the LEDs. This time we're reading voltage from an external component (a button), so we'll use INPUT_PULLUP.
When buttons and switches attached to an input are turned off, the input is not really connected to anything, which we call "floating". The input will not be HIGH or LOW, and will cause strange input readings. For this reason, we tell the LilyMini to connect a small internal resistor between the input pin and +. This "pulls up" the input to a solid HIGH when it's not connected to anything, which makes switches and buttons work properly. We call this a pullup resistor.
If a switch or button in your program ever behaves strangely, double-check that you used INPUT_PULLUP.
buttonState = digitalRead(buttonPin);
The next piece of code does the actual input - it reads the state of buttonPin and stores it the buttonState variable. This will be LOW if the button is pressed, and HIGH if it's released (more on this later).
Using if statements
The true power of tiny computers is that they can make decisions based on input. The if statement lets you do this. The structure of an if statement is:
Something to check
if (buttonState == LOW)What to do if it's true
{digitalWrite(ledPin1, HIGH);digitalWrite(ledPin2, HIGH);}(Optional) what to do if it's false
else{digitalWrite(ledPin1, LOW);digitalWrite(ledPin2, LOW);}
Here are a few notes about the above code:
In the
ifstatement, you can use standard math symbols to check if numbers are greater than, less than, or equals. But note that for equals, we're using two equals symbols==. This is because a single equals is already used for assignment likex = 3. To keep the computer from getting confused, we use two equals for comparisons likeif (x == 3).The
ifstatement usually lets you run one command if the statement is true, and (optionally) one command if the statement is false. If you want to run more than one command (like we did), you can put as many commands as you want in a set of curly brackets{ }.
Further Reading:
- Pull-up Resistors on SparkFun tutorials
- Declaring Variables on Arduino Reference
- If...else on Arduino Reference
Understanding Your Circuit
In the Blink example, you used digitalWrite to control whether the LilyMini was sending voltage to a sew tab or not. Now we're using digitalRead to checks a sew tab to see if voltage is present on it or not.
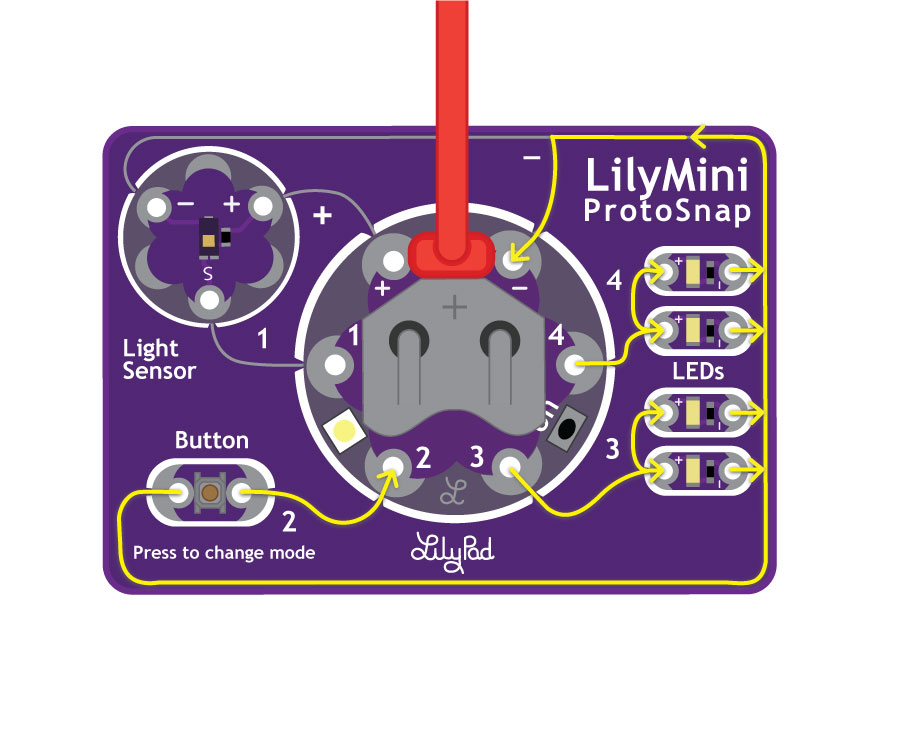
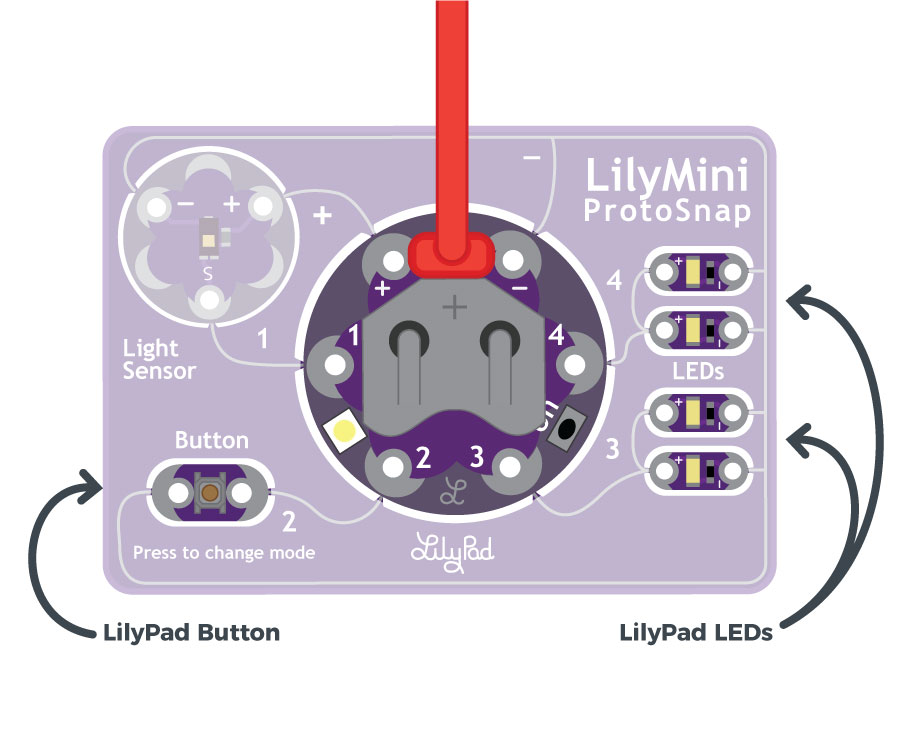
The button works by electrically connecting the two sides of the button board when you press it, and disconnecting them when you release it. The button is an example of a momentary switch – it is only active when an action is applied. On the ProtoSnap, the button is connected to sew tab 2. When you make your own projects, you could make any of the sew tabs an input, and connect them to buttons, switches, or other input devices.
One thing to note is that the other side of the button is connected to ground (marked as - or "minus" on the board). This means that when you press the button, sew tab 2 will be connected to ground, which reads as LOW, and when you release it, the pullup resistor will make it read as HIGH... This may be the opposite of what you expect! But since the if statement lets you check if something is true or false, and do whatever you want for either result, it's easy to make it do whatever you want. Try it!
Further Reading:
Challenges and Going Further
- Can you change the code to make both sets of LEDs light up?
- Can you change the code so that LEDs light up alternately (one LED lights up when pressed while the other turns off)?
- Can you add a delay so that the LED blinks when the button is held down?