Blynk Board Washer/Dryer Alarm
Program the Blynk Board
If you haven’t set your computer up to program the Blynk Board using Arduino yet, read through our Blynk Board Arduino Development Guide first. Following that, you should have the Blynk Board hardware definitions and most of the libraries you’ll need added to your Arduino IDE.
Install the SparkFun MMA8452Q Arduino Library
The latest version of our MMA8452Q Arduino library can be downloaded from the SparkFun_MMA8452Q_Arduino_Library GitHub repository (click the "Download ZIP" button there). Or you can skip the detour, by clicking the button below.
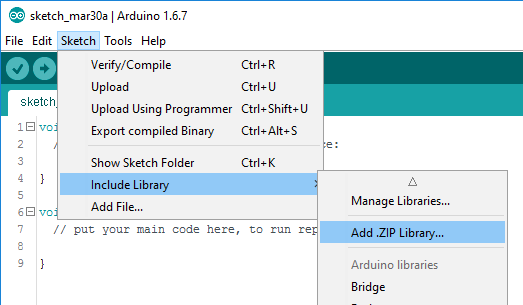
The library will be downloaded as a ZIP file. To install it in Arduino, navigate to Sketch > Include Library > Add .ZIP Library.... Then select the MMA8452Q ZIP folder you just downloaded.
Copy/Paste the Code
Our "Blynk Board Laundry Monitor" source code is also available on GitHub. Download it from there, or copy/paste from the box below:
language:c
#include <ESP8266WiFi.h>
#include <BlynkSimpleEsp8266.h>
#include <Wire.h> // Must include Wire library for I2C
#include <SparkFun_MMA8452Q.h> // Includes the SFE_MMA8452Q library
#include <Adafruit_NeoPixel.h>

//////////
// WiFi //
////////// // Enter your WiFi credentials here:
const char WiFiSSID[] = "WiFiNetworkName";
const char WiFiPSWD[] = "WiFiPassword";

///////////
// Blynk //
///////////             // Your Blynk auth token here
const char BlynkAuth[] = "0a1b2c3d4e5f";
bool notifyFlag = false;
#define VIRTUAL_ENABLE_PUSH     V0
#define VIRTUAL_SHAKE_THRESHOLD V1
#define VIRTUAL_START_TIME      V2
#define VIRTUAL_STOP_TIME       V3
#define VIRTUAL_LCD             V4
#define VIRTUAL_SHAKE_VALUE     V5
WidgetLCD lcd(VIRTUAL_LCD);
bool pushEnabled = false;
void printLaundryTime(void);

/////////////////////
// Shake Detection //
/////////////////////
unsigned int shakeThreshold = 50;
unsigned int shakeStartTimeHysteresis = 1000;
unsigned int shakeStopTimeHysteresis = 10;
unsigned long shakeStateChangeTime = 0;
unsigned long shakeStartTime = 0;
bool loadTimer = true;

enum {
  NO_SHAKING_LONG, // Haven't been shaking for a long time
  NO_SHAKING,  // Hasn't been any shaking
  PRE_SHAKING, // Started shaking, pre-hysteresis
  SHAKING,     // Currently shaking
  POST_SHAKING // Stopped shaking, pre-hysteresis
} shakingState = NO_SHAKING;

// Possible return values from the shake sensor
enum sensorShakeReturn {
  SENSOR_SHAKING,
  SENSOR_NOT_SHAKING,
  SENSOR_NOT_READY
};
sensorShakeReturn checkShake(void);
void shakeLoop(void);

////////////////////////////
// MMA8452Q Accelerometer //
////////////////////////////
MMA8452Q accel;
int16_t lastX, lastY, lastZ;
void initAccel(void);

//////////////////////////
// Hardware Definitions //
//////////////////////////
const int LED_PIN = 5;
const int RGB_PIN = 4;
Adafruit_NeoPixel rgb = Adafruit_NeoPixel(1, RGB_PIN, NEO_GRB + NEO_KHZ800);
void setLED(uint8_t red, uint8_t green, uint8_t blue);

void setup()
{
  Serial.begin(9600);

  pinMode(LED_PIN, OUTPUT);
  digitalWrite(LED_PIN, LOW); // Turn off blue LED
  rgb.begin(); // Set up WS2812
  initAccel(); // Set up accelerometer
  setLED(0, 0, 32); // LED blue

  // Initialize Blynk, and wait for a connection before doing anything else
  Serial.println("Connecting to WiFi and Blynk");
  Blynk.begin(BlynkAuth, WiFiSSID, WiFiPSWD);
  while (!Blynk.connected())
    Blynk.run();
  Serial.println("Blynk connected! Laundry monitor starting.");
  setLED(0, 32, 0); // LED green
}

void loop()
{
  shakeLoop(); // Check if we're shaking, and update variables accordingly
  Blynk.run(); // Blynk run as much as possible
}

bool firstConnect = true;
BLYNK_CONNECTED()
{
  if (firstConnect) // When we first connect to Blynk
  {
    // Two options here. Either sync values from phone to Blynk Board:
    //Blynk.syncAll(); // Uncomment to enable.
    // Or set phone variables to default values of the globals:
    Blynk.virtualWrite(VIRTUAL_SHAKE_THRESHOLD, shakeThreshold);
    Blynk.virtualWrite(VIRTUAL_STOP_TIME, shakeStopTimeHysteresis);
    Blynk.virtualWrite(VIRTUAL_START_TIME, shakeStartTimeHysteresis);
    Blynk.virtualWrite(VIRTUAL_ENABLE_PUSH, pushEnabled);

    // Print a splash screen:
    lcd.clear();
    lcd.print(0, 0, "Laundry Monitor ");
    lcd.print(0, 1, "     Ready      ");
  }
}

BLYNK_WRITE(VIRTUAL_ENABLE_PUSH)
{
  int enable = param.asInt();
  if (enable > 0)
  {
    pushEnabled = true;
    Serial.println("Push notification enabled");
  }
  else
  {
    pushEnabled = false;
    Serial.println("Push notification disabled");
  }
}

BLYNK_WRITE(VIRTUAL_SHAKE_THRESHOLD)
{
  int inputThreshold = param.asInt();

  shakeThreshold = constrain(inputThreshold, 1, 2048);

  Serial.println("Shake threshold set to: " + String(shakeThreshold));
}

BLYNK_WRITE(VIRTUAL_START_TIME)
{
  int inputStartTime = param.asInt();

  if (inputStartTime <= 0) inputStartTime = 1;
  shakeStartTimeHysteresis = inputStartTime;

  Serial.println("Shake start time set to: " + String(shakeStartTimeHysteresis) + " ms");
}

BLYNK_WRITE(VIRTUAL_STOP_TIME)
{
  int inputStopTime = param.asInt();

  if (inputStopTime <= 0) inputStopTime = 1;
  shakeStopTimeHysteresis = inputStopTime;

  Serial.println("Shake stop time set to: " + String(shakeStopTimeHysteresis) + " seconds");
}

void printLaundryTime(void)
{
  unsigned long runTime = millis() - shakeStartTime;
  int runSeconds = (runTime / 1000) % 60;
  int runMinutes = ((runTime / 1000) / 60) % 60;
  int runHours = ((runTime / 1000) / 60 ) / 60;

  // Create a string like HHHH:MM:SS
  String runTimeString = "   " + String(runHours) + ":";
  if (runMinutes < 10) runTimeString += "0"; // Leading 0 minutes
  runTimeString += String(runMinutes) + ":";
  if (runSeconds < 10) runTimeString += "0"; // Leading 0 seconds
  runTimeString += String(runSeconds);

  // Fill out the rest of the string to 16 chars
  int lineLength = runTimeString.length();
  for (int i=lineLength; i<16; i++)
  {
    runTimeString += " ";
  }

  if (shakingState == PRE_SHAKING)
    lcd.print(0, 0, "Laundry starting");
  else if (shakingState == SHAKING)
    lcd.print(0, 0, "Laundry running ");
  else if (shakingState == NO_SHAKING)
    lcd.print(0, 0, "Laundry stopping");
  else if (shakingState == NO_SHAKING_LONG)
    lcd.print(0, 0, "Laundry done!   ");
  lcd.print(0, 1, runTimeString);
}

void shakeLoop(void)
{
  sensorShakeReturn sensorState = checkShake();
  if (sensorState == SENSOR_SHAKING) // If the sensor is shaking
  {
    switch (shakingState)
    {
    case NO_SHAKING_LONG:
    case NO_SHAKING: // If we haven't been shaking
      setLED(32, 0, 32); // LED purple
      shakingState = PRE_SHAKING; // Set mode to pre-shaking
      shakeStateChangeTime = millis(); // Log state change time
      if (loadTimer)
      {
        loadTimer = false;
        shakeStartTime = millis(); // Log time we started shaking
      }
      printLaundryTime();
      break;
    case PRE_SHAKING: // If we're pre-hysteresis shaking
      if (millis() - shakeStateChangeTime >= shakeStartTimeHysteresis)
      { // If we've passed hysteresis time
        shakingState = SHAKING; // Set mode to shaking
        digitalWrite(LED_PIN, HIGH); // Turn blue LED on
        Serial.println("Shaking!");
        notifyFlag = true; // Flag that we need to notify when shaking stops
        setLED(32, 0, 0); // LED red
      }
      break;
    case SHAKING: // If we're already shaking
      printLaundryTime(); // Update laundry timer
      break; // Do nothing
    case POST_SHAKING: // If we didn't stop shaking before hysteresis
      shakingState = SHAKING; // Go back to shaking
      break;
    }
  }
  else if (sensorState == SENSOR_NOT_SHAKING) // If the sensor is not shaking
  {
    switch (shakingState)
    {
    case NO_SHAKING_LONG: // If we haven't been shaking for a long time
      break; // Do nothing
    case NO_SHAKING: // If we haven't been shaking
      if (millis() - shakeStateChangeTime >= (shakeStopTimeHysteresis * 1000))
      { // Check if it's been a long time
        setLED(0, 32, 0); // Turn LED green
        shakingState = NO_SHAKING_LONG;
        if (notifyFlag == true) // If notify flag was set during shaking
        {
          loadTimer = true;
          printLaundryTime(); // Update LCD
          notifyFlag = false; // Clear notify flag
          if (pushEnabled) // If push is enabled
            Blynk.notify("Washer/dryer is done!"); // Notify!
        }
      }
      break;
    case PRE_SHAKING: // If we're pre-hysteresis shaking
      shakingState = NO_SHAKING; // Go back to no shaking
      setLED(0, 32, 0);
      break;
    case SHAKING: // If we're already shaking
      shakingState = POST_SHAKING; // Go to hysteresis cooldown
      shakeStateChangeTime = millis();
      break; // Do nothing
    case POST_SHAKING: // If we're in the shake cooldown state
      if (millis() - shakeStateChangeTime >= shakeStartTimeHysteresis)
      {
        digitalWrite(5, LOW); // LED off
        shakingState = NO_SHAKING;
        printLaundryTime();
        setLED(32, 16, 0);
        Serial.println("Stopped.");
      }
      break;
    }
  }
}

sensorShakeReturn checkShake(void)
{
  static unsigned long lastShakeCheck = 0;
  float shake = 0;
  if (accel.available()) // If new accel data is available
  {
    int16_t x, y, z;

    accel.read(); // read the data in
    x = accel.x;
    y = accel.y;
    z = accel.z;

    // To determine if we're shaking, compare the sum of
    // x,y,z accels to the sum of the previous accels.
    shake = abs(x + y + z - lastX - lastY - lastZ);

    // Write the value to Blynk:
    Blynk.virtualWrite(VIRTUAL_SHAKE_VALUE, shake);

    // Update previous values:
    lastX = x;
    lastY = y;
    lastZ = z;
  }
  else // If sensore didn't have new data
  { // Return not ready
    return SENSOR_NOT_READY;
  }
  // If shake value exceeded threshold
  if (shake >= shakeThreshold)
    return SENSOR_SHAKING; // Return "shaking"
  else
    return SENSOR_NOT_SHAKING; // Or return "not shaking"
}

void initAccel(void)
{
  // Use a slow update rate to throttle the shake sensor.
  // ODR_6 will set the accelerometer's update rate to 6Hz
  // Use +/-2g scale -- the lowest -- to get most sensitivity
  accel.init(SCALE_2G, ODR_6); // Initialize accelerometer

  while (!accel.available()) // Wait for data to be available
    yield(); // Let the system do other things
  accel.read(); // Read data from accel
  lastX = accel.x; // Initialize last values
  lastY = accel.y;
  lastZ = accel.z;
}

void setLED(uint8_t red, uint8_t green, uint8_t blue)
{
  rgb.setPixelColor(0, rgb.Color(red, green, blue));
  rgb.show();
}
Before uploading, however, you'll need to adjust a few strings.
Configure Your WiFi Network
Near the top of the sketch, you'll find a couple string constants named WiFiSSID and WiFiPSWD. Change the WiFiNetworkName and WiFiPassword values to match your WiFi network name (SSID) and password.
language:c
const char WiFiSSID[] = "WiFiNetworkName";
const char WiFiPSWD[] = "WiFiPassword";
Configure Your Blynk Token
Next, you'll need to configure the BlynkAuth string to match your Blynk auth token. You can find this in the settings section of your Blynk project -- click the hexagon-shaped "nut" icon in the upper-right.
Use the E-Mail feature to send yourself a copy of the auth token, which you can copy and paste into the code:
language:c
const char BlynkAuth[] = "0a1b2c3d4e5f..."
Upload the Code
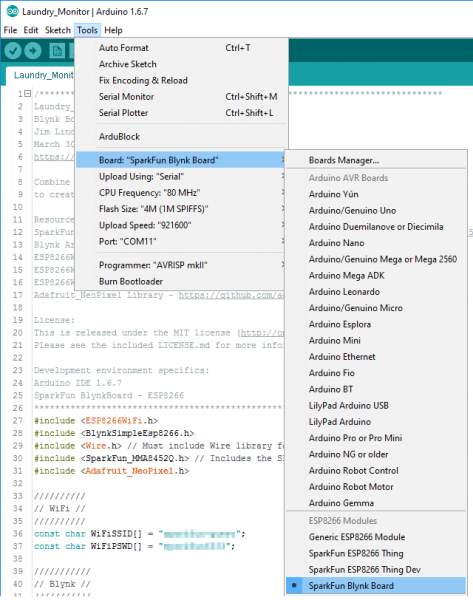
Finally, upload the code -- making sure your serial port is correctly selected and the board type is set to SparkFun Blynk Board.

