Are You Okay? Widget
Introduction
When Elizabeth and I got to talking about friends, neighbors, parents, and children we worry about, there was a theme: if we knew they were OK, it would be enough. The hard part is in not knowing if they came home last night or got up this morning. Elizabeth and I worked out what we wanted it to do on my embedded software podcast. We have the technology to alleviate such worries, such as the Are-You-OK? Widget. The Are-You-OK widget contains an Electric Imp, an accelerometer, and an RGB LED to connect to wireless networks to notify loved ones if you're ok or not.
If you put it in a stuffed animal, the person you care about can pat it every day. If they fail to do so, the Imp will tweet at you, send you email, and/or text your phone. Of course, you could put it on their refrigerator, so you’d know they were OK and eating.
This is definitely an advanced tutorial. I’ll show you how I put together the hardware and the software, but, if you haven’t tried Electric Imp before, this may not be the place to start.
Required Materials
The items you will need for this are:
I chose right angle connectors in the kit because it goes better into a box or stuffed animal. Your form factor may vary. I also really like jumper wires over soldering but, if you are more confident on the hardware side, I won’t stop you from soldering. If you are building a plush, you may want to locate the LED and accelerometer away from the main board and batteries.
You will also need this tools and supplies:
- 4x AA batteries
- Basic soldering tools -- a Soldering Iron and Solder
- Hot glue gun (OK, you don’t need one for this project but how can you live without it?)
Suggested Reading
Building The Hardware
Here's an overview of the hardware hookup:
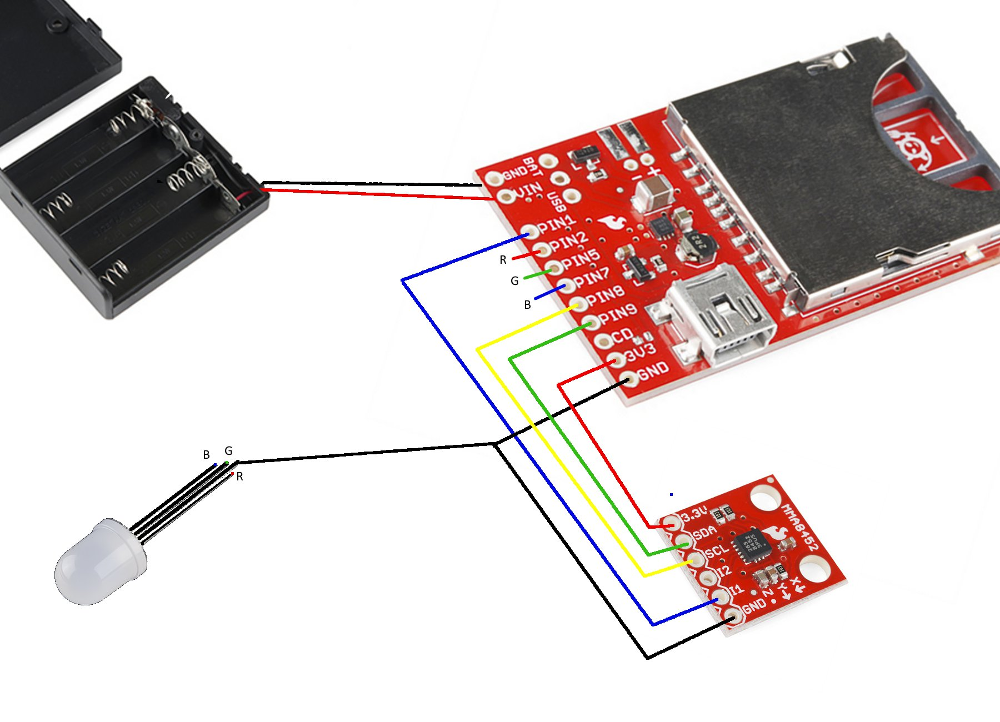
The build is fairly straight forward. We start with soldering:
- Attach a two pin header to the Electric Imp breakout board for GND and VIN. Solder on the battery wires. Hot glue them to reinforce the connection.
- Break off 9 pins from the header, and solder those to the Imp breakout board.
- Since you’ll need two ground wires (one for the accelerometer and one for the LED), cut the end off of one jumper wire, strip the coating, and solder it to the Imp breakout board. (We can wait to hot glue until the jumper wires are in place.)
- Solder a 6-pin header onto the accelerometer.
Now wire up the system:
| Imp Breakout Pin | Wire Color | Goes To | Use |
|---|---|---|---|
| PIN1 | Blue | Accel's I1 | Interrupt to wake up the Imp. |
| PIN2 | Red | LED's red leg | PWM red |
| PIN5 | Blue | LED's blue leg | PWM blue |
| PIN7 | Green | LED's green leg | PWM green |
| PIN8 | Yellow | Accel's SCL | I2C clock signal |
| PIN9 | Green | Accel's SDA | I2C data signal |
| 3V3 | Red | Accel's 3.3V | Power |
| GND | Black | Accel's GND | Ground |
| GND | Black | LED cathode (longest leg) | Ground |
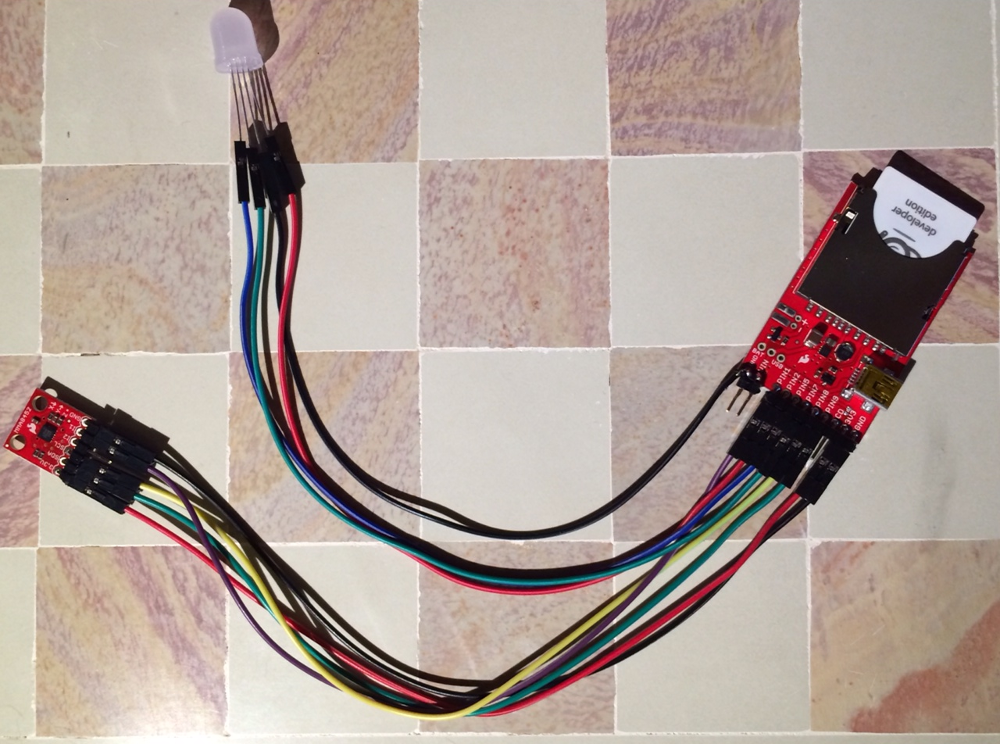
After you are done, the result should look something like this:
Note: the extra ground wire is soldered on the 2-pin power header and is ready for a battery connection to be soldered to it.
Loading the Code
As with any good Imp program, there are two halves to this code: the device (the Imp itself) and the agent (a server-side process that handles Internet requests and responses). Create a new model in the Imp IDE, and copy/paste the code below into the proper half of the IDE.
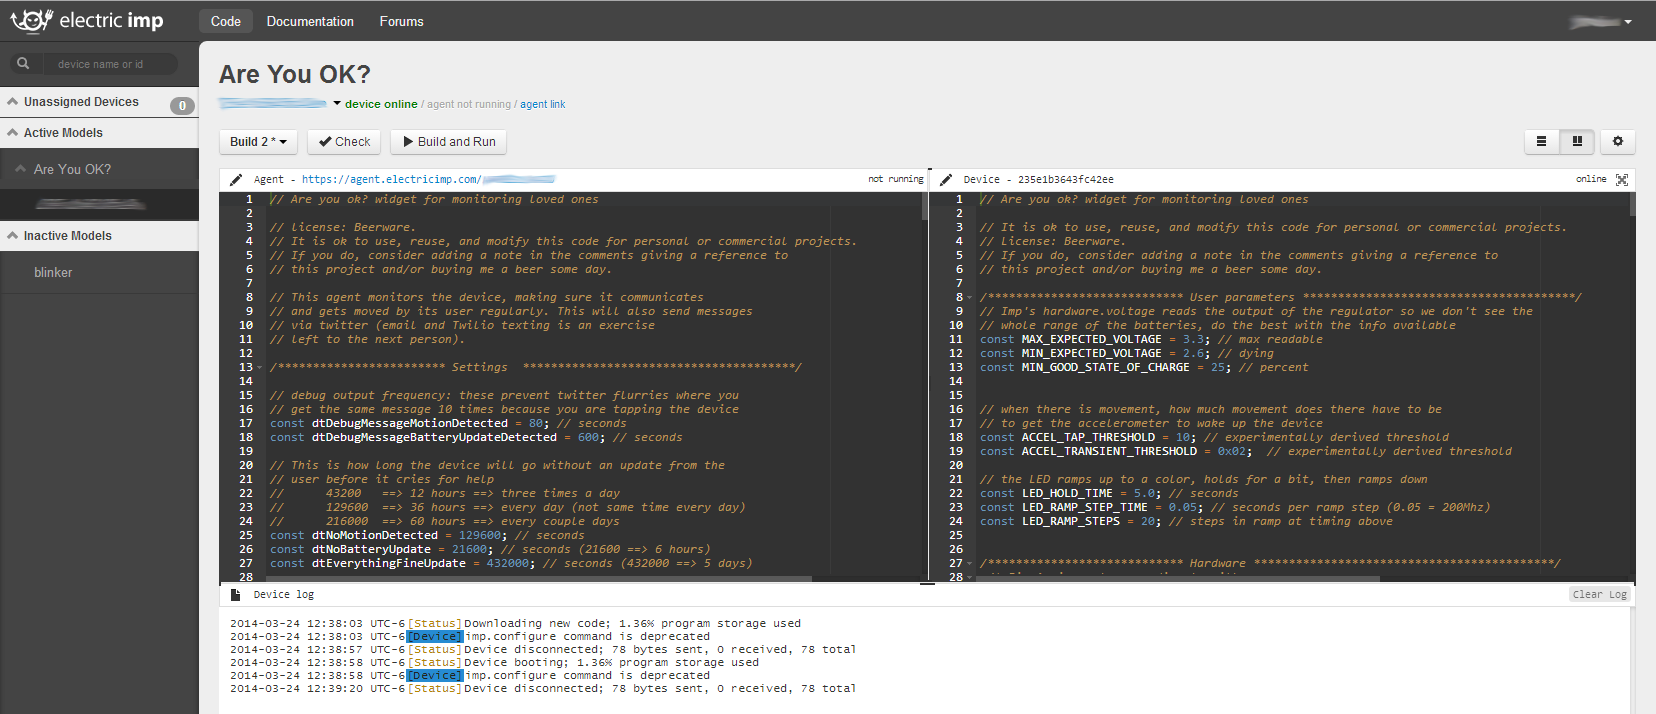
Then check out the next couple of pages, where we dissect each section of the code. You'll need to change some constants to make the code work for you.
Note: You can grab the most up-to-date agent and device codes here on GitHub.
Device Code
language:JavaScript
// Are you ok? widget for monitoring loved ones

// It is ok to use, reuse, and modify this code for personal or commercial projects.
// License: Beerware.
// If you do, consider adding a note in the comments giving a reference to
// this project and/or buying me a beer some day.

/**************************** User parameters ***************************************/
// Imp's hardware.voltage reads the output of the regulator so we don't see the
// whole range of the batteries, do the best with the info available
const MAX_EXPECTED_VOLTAGE = 3.3; // max readable
const MIN_EXPECTED_VOLTAGE = 2.6; // dying
const MIN_GOOD_STATE_OF_CHARGE = 25; // percent


// when there is movement, how much movement does there have to be
// to get the accelerometer to wake up the device
const ACCEL_TAP_THRESHOLD = 10; // experimentally derived threshold
const ACCEL_TRANSIENT_THRESHOLD = 0x02;  // experimentally derived threshold

// the LED ramps up to a color, holds for a bit, then ramps down
const LED_HOLD_TIME = 5.0; // seconds
const LED_RAMP_STEP_TIME = 0.05; // seconds per ramp step (0.05 = 200Mhz)
const LED_RAMP_STEPS = 20; // steps in ramp at timing above


/**************************** Hardware *******************************************/
 /* Pin Assignments according to silkscreen
 * Pin 1 = Input: wakeup interrupt from accelerometer
 * Pin 2 = PWM Red
 * Pin 5 = PWM Blue
 * Pin 7 = PWM Green
 * Pin 8 = I2C SCL  (yellow wire for me)
 * Pin 9 = I2C SDA  (green wire for me)
*/

wakeupPin <- hardware.pin1;
redHWPin <- hardware.pin2;
greenHWPin <- hardware.pin5;
blueHWPin <- hardware.pin7;
i2c <- hardware.i2c89;
i2c.configure(CLOCK_SPEED_400_KHZ);
/**************************** LED *******************************************/
// Variable to represent LED state
class LEDColor
{
    redPin = null
    greenPin = null
    bluePin = null

    goalLED = [0xFF, 0xFF, 0xFF]; // power on goal is white
    currentLED = [0, 0, 0];
    inLEDRamp = false; // prevents multiple LED flares

    constructor(redPin, greenPin, bluePin) {
        // PWM frequency in Hz
        local pwm_f = 500.0;
        redPin.configure(PWM_OUT, 1.0/pwm_f, 0.0);
        greenPin.configure(PWM_OUT, 1.0/pwm_f, 0.0);
        bluePin.configure(PWM_OUT, 1.0/pwm_f, 0.0);

        this.redPin = redPin
        this.greenPin = greenPin
        this.bluePin = bluePin
        this.off();
    }

    function update() {
        local div =  (1.0/255.0);
        this.redPin.write( currentLED[0] * div);
        this.greenPin.write( currentLED[1] * div);
        this.bluePin.write( currentLED[2] * div);
    }
    function off() {
        this.redPin.write(0);
        this.greenPin.write(0);
        this.bluePin.write(0);
    }

    function setGoalColor (red, green, blue)
    {
        if (inLEDRamp) {
            // not updating if we are already doing something
        } else {
            goalLED[0] = red;
            goalLED[1] = green;
            goalLED[2] = blue;

            ledRamp();
            inLEDRamp = true;
        }
    }
}
local rgbLed = LEDColor(redHWPin, greenHWPin, blueHWPin);

// this function looks at the difference between the goal LED
// and the actual LED and finds a way to smoothly transition
function ledRamp()
{
    local difference = [0, 0, 0];
    local totalDifference = 0;
    local i;
    for (i = 0; i < 3; i++) {
        difference[i] = rgbLed.goalLED[i] - rgbLed.currentLED[i];
        if (0 < difference[i] && difference[i] < LED_RAMP_STEPS) {
            difference[i] = LED_RAMP_STEPS; // will be 1 after divide

        } else if (0 > difference[i] && -difference[i] < LED_RAMP_STEPS) {
            difference[i] = -LED_RAMP_STEPS; // will be -1
        }
        rgbLed.currentLED[i] += (difference[i] / LED_RAMP_STEPS);
        totalDifference += difference[i];
    }
    if (-3 < totalDifference && totalDifference < 3) {
        local goal = 0;
        for (i = 0; i < 3; i++) {
            goal += rgbLed.goalLED[i];
            rgbLed.currentLED[i] = rgbLed.goalLED[i];
            rgbLed.goalLED[i] = 0;
        }
        if (goal == 0) {
            // finished
            rgbLed.inLEDRamp = false;
            rgbLed.off();
            GetReadyToSleep();

        } else {
            rgbLed.update();
            imp.wakeup(LED_HOLD_TIME, ledRamp);  // it will start ramping down
        }
    } else {
        rgbLed.update();
        imp.wakeup(LED_RAMP_STEP_TIME, ledRamp);
    }
}

/************************ Battery monitoring ***************************************/
// This project originally used a rechargeable battery with a MAX17043 LiPo fuel
// gauge to determine the state of charge (SOC). However, since the Impee is sleeping
// so much, we might get a reasonable battery life out of 4AAs. To get back to
// rechargeable, replace this code with that found in rechargeable_device.

function FuelGaugeResetFromBoot()
{
    // do nothing
}

function FuelGaugeReadSoC()
{
    local voltage = hardware.voltage();
    local normalizedVoltgage = (voltage - MIN_EXPECTED_VOLTAGE) / (MAX_EXPECTED_VOLTAGE - MIN_EXPECTED_VOLTAGE);
    if (normalizedVoltgage < 0) normalizedVoltgage = 0
    local percent = math.floor(100 * normalizedVoltgage);

    return percent;
}

/************************ Accelerometer ***************************************/
// Many thanks to https://gist.github.com/duppypro/7225636
// I mooched much of that code for the MMA8452Q accelerometer, though I made some
// changes for efficiency

const ACCEL_ADDR = 0x3A // 0x1D << 1
// Note: if your accelerometer has the SAO line pulled down
// (the resistor on the Sparkfun board), change the address to
/// const ACCEL_ADDR = 0x38 // 0x1C << 1

// MMA8452 register addresses and bitmasks
const STATUS        = 0x00
const OUT_X_MSB        = 0x01
const WHO_AM_I         = 0x0D
const I_AM_MMA8452Q    = 0x2A // read addr WHO_AM_I, expect I_AM_MMA8452Q
const INT_SOURCE       = 0x0C
    const SRC_ASLP_BIT        = 0x80
    const SRC_TRANSIENT_BIT   = 0x20
    const SRC_ORIENTATION_BIT = 0x10
    const SRC_PULSE_BIT       = 0x08
    const SRC_FF_MT_BIT       = 0x04
    const SRC_DRDY_BIT        = 0x01

const TRANSIENT_CFG = 0x1D
const TRANSIENT_SRC = 0x1E
const TRANSIENT_THRESHOLD = 0x1F
const TRANSIENT_COUNT = 0x20

const PULSE_CFG = 0x21
const PULSE_SRC = 0x22
const PULSE_THSX = 0x23
const PULSE_THSY = 0x24
const PULSE_THSZ = 0x25
const PULSE_TMLT = 0x26
const PULSE_LTCY = 0x27
const PULSE_WIND = 0x28


const CTRL_REG1         = 0x2A
    const GOAL_DATA_RATE = 0x20 // 100 Hz
    const CLEAR_DATA_RATE =0xC7
    const LNOISE_BIT       = 0x4
    const F_READ_BIT       = 0x2
    const ACTIVE_BIT       = 0x1

const CTRL_REG2        = 0x2B
    const ST_BIT           = 0x7
    const RST_BIT          = 0x6
    const SLEEP_OVERSAMPLE_CLEAR = 0xE7
    const SLEEP_OVERSAMPLE_SET = 0x18 // 11 = low power
    const AUTOSLEEP_BIT         = 0x4
    const NORMAL_OVERSAMPLE_CLEAR = 0xFC
    const NORMAL_OVERSAMPLE_SET = 0x03 // 11 = low power

const CTRL_REG3        = 0x2C
    const WAKE_TRANSIENT_BIT     = 0x40
    const WAKE_ORIENTATION_BIT   = 0x20
    const WAKE_PULSE_BIT         = 0x10
    const WAKE_FREEFALL_BIT      = 0x08
    const IPOL_BIT               = 0x02

const CTRL_REG4        = 0x2D
    const INT_EN_ASLP_BIT        = 0x80
    const INT_EN_TRANSIENT_BIT   = 0x20
    const INT_EN_ORIENTATION_BIT = 0x10
    const INT_EN_PULSE_BIT       = 0x08
    const INT_EN_FREEFALL_MT_BIT = 0x04
    const INT_EN_DRDY_BIT        = 0x01

const CTRL_REG5        = 0x2E


// Writes a single byte (dataToWrite) into addressToWrite.  Returns error code from i2c.write
// Continue retry until success.  Caller does not need to check error code
function writeReg(addressToWrite, dataToWrite) {
    local err = null
    while (err == null) {
        err = i2c.write(ACCEL_ADDR, format("%c%c", addressToWrite, dataToWrite))
        // server.log(format("i2c.write addr=0x%02x data=0x%02x", addressToWrite, dataToWrite))
        if (err == null) {
            server.error("i2c.write of value " + format("0x%02x", dataToWrite) + " to " + format("0x%02x", addressToWrite) + " failed.")
        }
    }
    return err

}

// Read numBytes sequentially, starting at addressToRead
// Continue retry until success.  Caller does not need to check error code
function readSequentialRegs(addressToRead, numBytes) {
    local data = null

    while (data == null) {
        data = i2c.read(ACCEL_ADDR, format("%c", addressToRead), numBytes)
        if (data == null) {
            server.error("i2c.read from " + format("0x%02x", addressToRead) + " of " + numBytes + " byte" + ((numBytes > 1) ? "s" : "") + " failed.")
        }
    }
    return data
}

function readReg(addressToRead) {
    return readSequentialRegs(addressToRead, 1)[0]
}
function AccelerometerSetActive(mode) {
    // Sets the MMA8452Q active mode.
    // 0 == STANDBY for changing registers
    // 1 == ACTIVE for outputting data
    if (mode) {
        writeReg(CTRL_REG1, readReg(CTRL_REG1) | ACTIVE_BIT)
    } else {
        writeReg(CTRL_REG1, readReg(CTRL_REG1) & ~ACTIVE_BIT)
    }
}
// Reset the accelerometer
function AccelerometerResetFromBoot() {
    local reg = null;

    server.log("Looking for accelerometer...")
    do {
        reg = readReg(WHO_AM_I)  // Read WHO_AM_I register
        if (reg == I_AM_MMA8452Q) {
            server.log("Found MMA8452Q.  Sending RST command...")
            break
        } else {
            server.error("Could not connect to MMA8452Q: WHO_AM_I reg == " + format("0x%02x", reg))
            imp.sleep(i2cRetryPeriod)
        }
    } while (true)

    // send reset command
    writeReg(CTRL_REG2, readReg(CTRL_REG2) | RST_BIT)

    do {
        reg = readReg(WHO_AM_I)  // Read WHO_AM_I register
        if (reg == I_AM_MMA8452Q) {
            server.log("Accelerometer found.")
            break
        } else {
            server.error("Could not connect to MMA8452Q: WHO_AM_I reg == " + format("0x%02x", reg))
            imp.sleep(i2cRetryPeriod)
        }
    } while (true)

    AccelerometerSetActive(false);
    writeReg(CTRL_REG1, 0x1A); // 100 Hz ODR + fast read + low noise

    // Set up accel for transient detection, see
    // http://cache.freescale.com/files/sensors/doc/app_note/AN4071.pdf
    writeReg(TRANSIENT_CFG, 0x1E); // Enable X Y Z Axes and enable the latch
    writeReg(TRANSIENT_THRESHOLD, ACCEL_TRANSIENT_THRESHOLD);
    writeReg(TRANSIENT_COUNT, 0x05); // 50ms
    reg = readReg(TRANSIENT_SRC) // this clears the register

    // Set up accel for single tap pulse detection, see
    // http://cache.freescale.com/files/sensors/doc/app_note/AN4072.pdf
    writeReg(PULSE_CFG, 0x55); // Enable X Y Z Axes and enable the latch
    writeReg(PULSE_THSX, ACCEL_TAP_THRESHOLD);
    writeReg(PULSE_THSY, ACCEL_TAP_THRESHOLD);
    writeReg(PULSE_THSZ, ACCEL_TAP_THRESHOLD);
    writeReg(PULSE_TMLT, 0x03); // 30ms at 100Hz ODR
    writeReg(PULSE_LTCY, 100);  // 100ms at 100Hz ODR
    reg = readReg(PULSE_SRC) // this clears the register

    writeReg(CTRL_REG4, INT_EN_TRANSIENT_BIT | INT_EN_PULSE_BIT);
    writeReg(CTRL_REG5, INT_EN_TRANSIENT_BIT | INT_EN_PULSE_BIT);

    writeReg(CTRL_REG3, WAKE_TRANSIENT_BIT | WAKE_PULSE_BIT | IPOL_BIT);  // move to int1

    AccelerometerSetActive(true);
}
function readAccelData() {
    local rawData = null // x/y/z accel register data stored here, 3 bytes
    rawData = readSequentialRegs(OUT_X_MSB, 3)  // Read the three raw data registers into data array
    return rawData;
}

function AccelerometerIRQ() {
    local reg = null


    if (wakeupPin.read() == 1) { // only react to low to high edge
        IndicateGoodInteraction();
        reg = readReg(INT_SOURCE)
        if (reg & SRC_TRANSIENT_BIT) {
            reg = readReg(TRANSIENT_SRC) // this clears SRC_TRANSIENT_BIT
            server.log(format("Transient src 0x%02x", reg))
            agent.send("motionDetected", "soft gentle motion.");
        }


        if (reg & SRC_PULSE_BIT) {
            reg = readReg(PULSE_SRC) // this clears SRC_PULSE_BIT
            server.log(format("Pulse src 0x%02x", reg))
            agent.send("motionDetected", "hard rapping.");
        }

    } else {
//        server.log("INT LOW")
    }
} // end AccelerometerIRQ

/************************ Device code  ***************************************/
function GetReadyToSleep()
{
    local sleepSeconds = 3600; // an hour
    // this will effectively reset the system when it comes back on
    server.sleepfor(sleepSeconds);
}

function CheckBatteryAndGoToSleep()
{
    agent.send("batteryUpdate", FuelGaugeReadSoC());
    server.log("going  to sleep");
    imp.onidle(GetReadyToSleep);
}

function IndicateGoodInteraction()
{
    rgbLed.setGoalColor(255, 255, 255); // white
}
function IndicateLowBattery()
{
    rgbLed.setGoalColor(200, 200, 0); // yellow
}
function IndicateNoWiFi()
{
    rgbLed.setGoalColor(255, 0, 0); // red
}

function HandleReasonForWakeup(unused = null)
{
    local reason = hardware.wakereason();
    local stateOfCharge = FuelGaugeReadSoC();
    local timeout = 30;


    if (reason == WAKEREASON_TIMER) {
        // quiet wakeup
        server.log("Timer wakeup")
        CheckBatteryAndGoToSleep();
    } else {
        if  (!server.isconnected()) {
            IndicateNoWiFi()
        }
        if (stateOfCharge < MIN_GOOD_STATE_OF_CHARGE)
        {
            server.log("Low battery " + stateOfCharge)
            IndicateLowBattery();
        }

        if (reason == WAKEREASON_PIN1) {
            server.log("PIN1 wakeup")
            AccelerometerIRQ();
        } else { // any other reason is a reset of sorts
            server.log("Reboot")
            AccelerometerResetFromBoot();
            FuelGaugeResetFromBoot();
        }
    }
}

// things to do on every time based wake up
imp.setpowersave(true);

// on error: don't try to reconnect, throw an error so we can indicate a
// problem to the user
server.setsendtimeoutpolicy(RETURN_ON_ERROR, WAIT_TIL_SENT, 30);

// Configure interrupt for wakeup.  Connect MMA8452Q INT1 pin to imp pin1.
wakeupPin.configure(DIGITAL_IN_WAKEUP, AccelerometerIRQ);

// figure out why we woke up
if  (!server.isconnected()) {
    // we probably can't get to the internet, try for
    // a little while (3 seconds), then get pushed to
    // HandleReasonForWakeup where IndicateNoWiFi will be called
    server.connect(HandleReasonForWakeup, 3)
} else {
    HandleReasonForWakeup();
}
Agent Code
language:JavaScript
// Are you ok? widget for monitoring loved ones

// license: Beerware.
// It is ok to use, reuse, and modify this code for personal or commercial projects.
// If you do, consider adding a note in the comments giving a reference to
// this project and/or buying me a beer some day.

// This agent monitors the device, making sure it communicates
// and gets moved by its user regularly. This will also send messages
// via twitter (email and Twilio texting is an exercise
// left to the next person).

/************************ Settings  ***************************************/

// debug output frequency: these prevent twitter flurries where you
// get the same message 10 times because you are tapping the device
const dtDebugMessageMotionDetected = 80; // seconds
const dtDebugMessageBatteryUpdateDetected = 600; // seconds

// This is how long the device will go without an update from the
// user before it cries for help
//      43200   ==> 12 hours ==> three times a day
//      129600  ==> 36 hours ==> every day (not same time every day)
//      216000  ==> 60 hours ==> every couple days
const dtNoMotionDetected = 129600; // seconds
const dtNoBatteryUpdate = 21600; // seconds (21600 ==> 6 hours)
const dtEverythingFineUpdate = 432000; // seconds (432000 ==> 5 days)

const MIN_GOOD_STATE_OF_CHARGE = 25; // percent

// Twitter permissions for @ayok_status
// It is ok to use this as long as you update the monitoredDevices
// so it prints your mane.
// Also note, it is for debug: if abused, the permissions will
// change (and remember others can see these tweets!).
_CONSUMER_KEY <- "HxwLkDWJTHDZo5z3nENPA"
_CONSUMER_SECRET <- "HvlmFx9dkp7j4odOIdfyD9Oc7C5RyJpI7HhEzHed4G8"
_ACCESS_TOKEN <- "2416179944-INBz613eTjbzJN4q4iymufCcEsP5XJ6xW5Lr8Kp"
_ACCESS_SECRET <- "1YdwAiJViQY45oP8tljdX0PGPyeL8G3tQHKtO43neBYqH"

// Twilio set up for texting
// http://forums.electricimp.com/discussion/comment/4736
// more extensive code https://github.com/joel-wehr/electric_imp_security_system/blob/master/agent.nut

// Mailgun for emailing
// http://captain-slow.dk/2014/01/07/using-mailgun-with-electric-imp/

/************************ Handle setting the device's name ***************************************/
// You have to set up your unit the first time by putting in a URL:
// https://agent.electricimp.com/{agentUrl}/settings?name={nameValue}&attn={attnValue}
// Look at the top of the Imp editor for you agent URL, you'll see something like
//    https://agent.electricimp.com/abce1235  <-- random string numbers and letters
// So you'll build up one that looks like
// https://agent.electricimp.com/abce1235/settings?name={Maxwell}&attn={@logicalelegance}
// Where Maxwell is the name of the unit and @logicalelegance is where I want messages to be sent.

// default settings
settings <- {
    name = "Unknown",   // name of the unit
    attn = ""           // who to send messages to
};

// Loads settings, if they exist
function loadSettings() {
    // load data
    local data = server.load();

    // if there are settings
    if ("settings" in data) {
        settings.name = data.settings.name;
        settings.attn = data.settings.attn;
    }
}

// Load settings on agent start/restart
loadSettings();

// Saves the settings with server.save
function saveSettings(newName, newAttn) {
    // load settings
    local data = server.load();

    // if settings isn't in the stored data
    if (!("settings" in data)) {
        // create settings table in data
        data["settings"] <- { name = "", attn = "" };
    }

    // set new values
    settings.name = newName;
    settings.attn = newAttn;

    // save values
    data.settings.name = newName;
    data.settings.attn = newAttn;
    server.save(data);
}


function httpHandler(req, resp) {
    // grab the path the request was made to
    local path = req.path.tolower();
    // if they made a request to /settings:
    if (path == "/settings" || path == "/settings/") {
        // grab query parameters we need
        if ("name" in req.query && "attn" in req.query) {
            // save them
            saveSettings(req.query.name, req.query.attn);
            // respond with the new settings
            resp.send(200, http.jsonencode(settings));
            return;
        }
    }
    // if they didn't send settings pass back a 200, OK
    resp.send(200, "OK");
}

// attach httpHandler to onrequest event
http.onrequest(httpHandler);


/************************ Twitter ***************************************/
// from: github.com/electricimp/reference/tree/master/webservices/twitter
helper <- {
    function encode(str) {
        return http.urlencode({ s = str }).slice(2);
    }
}

class TwitterClient {
    consumerKey = null;
    consumerSecret = null;
    accessToken = null;
    accessSecret = null;

    baseUrl = "https://api.twitter.com/";

    constructor (_consumerKey, _consumerSecret, _accessToken, _accessSecret) {
        this.consumerKey = _consumerKey;
        this.consumerSecret = _consumerSecret;
        this.accessToken = _accessToken;
        this.accessSecret = _accessSecret;
    }

    function post_oauth1(postUrl, headers, post) {
        local time = time();
        local nonce = time;

        local parm_string = http.urlencode({ oauth_consumer_key = consumerKey });
        parm_string += "&" + http.urlencode({ oauth_nonce = nonce });
        parm_string += "&" + http.urlencode({ oauth_signature_method = "HMAC-SHA1" });
        parm_string += "&" + http.urlencode({ oauth_timestamp = time });
        parm_string += "&" + http.urlencode({ oauth_token = accessToken });
        parm_string += "&" + http.urlencode({ oauth_version = "1.0" });
        parm_string += "&" + http.urlencode({ status = post });

        local signature_string = "POST&" + helper.encode(postUrl) + "&" + helper.encode(parm_string)

        local key = format("%s&%s", helper.encode(consumerSecret), helper.encode(accessSecret));
        local sha1 = helper.encode(http.base64encode(http.hash.hmacsha1(signature_string, key)));

        local auth_header = "oauth_consumer_key=\""+consumerKey+"\", ";
        auth_header += "oauth_nonce=\""+nonce+"\", ";
        auth_header += "oauth_signature=\""+sha1+"\", ";
        auth_header += "oauth_signature_method=\""+"HMAC-SHA1"+"\", ";
        auth_header += "oauth_timestamp=\""+time+"\", ";
        auth_header += "oauth_token=\""+accessToken+"\", ";
        auth_header += "oauth_version=\"1.0\"";

        local headers = {
            "Authorization": "OAuth " + auth_header,
        };

        local response = http.post(postUrl + "?status=" + helper.encode(post), headers, "").sendsync();
        return response
    }

    function Tweet(_status) {
        local postUrl = baseUrl + "1.1/statuses/update.json";
        local headers = { };

        local response = post_oauth1(postUrl, headers, _status)
        if (response && response.statuscode != 200) {
            twitterDebug("Error updating_status tweet. HTTP Status Code " + response.statuscode);
            twitterDebug(response.body);
            return null;
        } else {
           twitterDebug("Tweet Successful!");
        }
    }
}

function twitterDebug(string)
{
    // when debugging twitter, turn on the server logging
    // server.log(string)
}

twitter <- TwitterClient(_CONSUMER_KEY, _CONSUMER_SECRET, _ACCESS_TOKEN, _ACCESS_SECRET);
/**************************** End twitter block  *******************************************/


/**************************** Message block  *******************************************/
// Returns a preformated DateTime string.
// Helper function for debugMessage
function GetDateTimeStr(timestamp) {
    local d = date(timestamp, 'u'); // UTC time
    local day = ["Sun", "Mon", "Tues", "Wed", "Thurs", "Fri", "Sat"];

    return format("%s %02d:%02d:%02d", day[d.wday], d.hour,  d.min, d.sec)
}

// These are the messages you use when bringing up the device,
// for checking that the battery is draining slowly and
// testing taps. These don't use the attn string so on
// Twitter they are relatively quiet
function debugMessage(string)
{
    local message = settings.name + ": " + string;

    twitter.Tweet(message);
    server.log(message)
}


// These are the important messages:
// 1) No user motion
// 2) Batteries are low
// 3) Intermittent, everything is fine
function caregiverMessage(string)
{
    local message = settings.name + ": " + string;

    twitter.Tweet(attn + " " message);
    server.log("!!!!" + message);
}


/**************************** Device handling  *******************************************/
local lastTimeMotionDetected = 0;
local lastTimeBatteryUpdate = 0;
local lastBatteryReading = 0;
local batteryUpdateFromDeviceTimer;
local motionUpdateFromDeviceTimer;
local everythingIsFineDeviceTimer;

// This creates a debug string if motion is sent from the device
// More importantly, it resets the timer so we don't send an "I'm lonely" message
function motionOnDevice(type)
{
    local thisCheckInTime = time();
    if ((lastTimeMotionDetected != 0) &&
        ((thisCheckInTime - lastTimeMotionDetected) > dtDebugMessageMotionDetected)) {

        local datestr = GetDateTimeString(thisCheckInTime);
        local sendStr = datestr + " I felt movement. It was a " + type;
        debugMessage(sendStr);
    }
    lastTimeMotionDetected = thisCheckInTime;
    imp.cancelwakeup(motionUpdateFromDeviceTimer);
    motionUpdateFromDeviceTimer = imp.wakeup(dtNoMotionDetected, noMotionFromDevice);

}

function noMotionFromDevice()
{
    local stringOptions = [
        "No one has played with me since ",
        "I need to be pet but haven't been since ",
        "The last time someone filled my cuddle tank was ",
        "It's been eons since my last hug: ",
        "I'm so lonely, no one has paid attention to me for so long: ",
        "I'm hungry, hungry for hugs! Last feeding was "
        ];

    if (lastTimeMotionDetected) {

        local datestr = GetDateTimeString(lastTimeMotionDetected);
        local choice  = math.rand() % stringOptions.len();
        local sendStr = stringOptions[choice] + datestr;
        caregiverMessage(sendStr)
    } else {
        sendStr = "No movement since device turned on!"
        caregiverMessage(sendStr)
    }
    motionUpdateFromDeviceTimer = imp.wakeup(dtNoMotionDetected, noMotionFromDevice);

    eveverythingNotFine();
}

function noBatteryUpdateFromDevice()
{
    local sendStr;
    if (lastTimeBatteryUpdate) {
        local stringOptions = [
            "Device did not check in, last check in at ",
            ];

        local datestr = GetDateTimeStr(lastTimeBatterUpdate);
        local choice  = math.rand() % stringOptions.len();
        sendStr = stringOptions[choice] + datestr +
              " battery then: " + lastBatteryReading +
            ", minutes " + (time() - lastTimeBatteryUpdate)/60;
    } else {
        sendStr = "Device has not checked in since server restart."
    }
    caregiverMessage(sendStr)

    batteryUpdateFromDeviceTimer = imp.wakeup(dtNoBatteryUpdate, noBatteryUpdateFromDevice);
    eveverythingNotFine();
}
function eveverythingNotFine()
{
    // everything is not fine, reset counter to happy message
    imp.cancelwakeup(everythingIsFineDeviceTimer);
    everythingIsFineDeviceTimer = imp.wakeup(dtEverythingFineUpdate, everythingFineUpdate);
}

function everythingFineUpdate()
{
    local sendStr;
    if (lastBatteryReading > MIN_GOOD_STATE_OF_CHARGE) {
        local stringOptions = [
            "Nothing to be concerned about, everything is going really well! Battery at %d %%",
            ];

        local choice  = math.rand() % stringOptions.len();
        sendStr = stringOptions[choice];
    } else {
        local stringOptions = [
            "Things are going fine but my batteries are getting low: %d %%",
            ];

        local choice  = math.rand() % stringOptions.len();
        sendStr = stringOptions[choice];
    }

    caregiverMessage(format(sendStr, lastBatteryReading));

    everythingIsFineDeviceTimer = imp.wakeup(dtEverythingFineUpdate, everythingFineUpdate);
}

function batteryUpdateFromDevice(percentFull)
{
    local thisCheckInTime = time();
    if ((thisCheckInTime - lastTimeBatteryUpdate) > dtDebugMessageBatteryUpdateDetected) {
        local datestr = GetDateTimeStr(thisCheckInTime);
        local sendStr = datestr + " battery update: " + percentFull ;
        debugMessage(sendStr)
    }
    // update the device timer
    imp.cancelwakeup(batteryUpdateFromDeviceTimer);
    batteryUpdateFromDeviceTimer = imp.wakeup(dtNoBatteryUpdate, noBatteryUpdateFromDevice);
    lastTimeBatteryUpdate = thisCheckInTime;
    lastBatteryReading = percentFull;
}

// register the device actions. It will wake up with the accelerometer says
// to (motion). It will also wake up on a timer to read the battery.
device.on("motionDetected", motionOnDevice);
device.on("batteryUpdate", batteryUpdateFromDevice);

// This timer is to complain if we haven't heard anything from the device.
// We should be getting ~ hourly battery updates. If we miss more than one
// or two, then the device is having trouble with communication (or its
// batteries are dead). We need to fuss because the regular monitoring is
// therefore also offline.
batteryUpdateFromDeviceTimer = imp.wakeup(dtNoBatteryUpdate, noBatteryUpdateFromDevice);

// This is the critical timer, if the device does not sense motion in this
// time it will fuss
motionUpdateFromDeviceTimer = imp.wakeup(dtNoMotionDetected, noMotionFromDevice);

// Everyone needs to know things are ok. So every few days, we'll send an
// all clear to indicate everything is functioning normally.
everythingIsFineDeviceTimer = imp.wakeup(dtEverythingFineUpdate, everythingFineUpdate);
What The Software Does (Device)
If you haven’t used the Electric Imp, have a look at the Electric Imp Hookup Guide. You can use the Hello, World code with this system set up as described. It will blink red if you change all instances of hardware.pin1 to hardware.pin2 in the device code.
However, once your have your Electric Imp talking to your network and downloading code, we can do a lot more. Our device is going to be a bit more complex, as it:
- Controls an RGB LED via PWM to do dimming
- Configures the accelerometer to interrupt when movement exceeds a threshold
- Goes to deep sleep to conserve battery
- On regular wake-ups, reads the battery voltage
Constants
At the top of the file are parameters for you to change.
language:JavaScript
/**************************** User parameters ***************************************/
// Imp's hardware.voltage reads the output of the regulator so we don't see the
// whole range of the batteries, do the best with the info available
const MAX_EXPECTED_VOLTAGE = 3.3; // max readable
const MIN_EXPECTED_VOLTAGE = 2.6; // dying
const MIN_GOOD_STATE_OF_CHARGE = 25; // percent

// when there is movement, how much movement does there have to be
// to get the accelerometer to wake up the device
const ACCEL_TAP_THRESHOLD = 10; // experimentally derived threshold
const ACCEL_TRANSIENT_THRESHOLD = 0x02;  // experimentally derived threshold

// the LED ramps up to a color, holds for a bit, then ramps down
const LED_HOLD_TIME = 5.0; // seconds
const LED_RAMP_STEP_TIME = 0.05; // seconds per ramp step (0.05 = 200Mhz)
const LED_RAMP_STEPS = 20; // steps in ramp at timing above
Setup
First, set up the hardware to match the hookup instructions.
language:JavaScript
/**************************** Hardware *******************************************/
 /* Pin Assignments according to silkscreen
 * Pin 1 = Input: wakeup interrupt from accelerometer
 * Pin 2 = PWM Red
 * Pin 5 = PWM Blue
 * Pin 7 = PWM Green
 * Pin 8 = I2C SCL  (yellow wire for me)
 * Pin 9 = I2C SDA  (green wire for me)
*/

wakeupPin <- hardware.pin1;
redHWPin <- hardware.pin2;
greenHWPin <- hardware.pin5;
blueHWPin <- hardware.pin7;
i2c <- hardware.i2c89;
i2c.configure(CLOCK_SPEED_400_KHZ);
LED Ramping
The ramp up and down, is done via the class LEDColor. Its functions are:
constructor(redPin, greenPin, bluePin)-- initial creation, this is called with:local rgbLed = LEDColor(redHWPin, greenHWPin, blueHWPin);.- function
setGoalColor (red, green, blue)-- sets the state variablegoalLEDto the values passed in. - function
update()-- writes to the LED with the values incurrentLED. - function
off()-- turns the LED off.
This is used in conjunction with ledRamp function to make the LED come up softly, hold for a few seconds, then dim softly. The parameters can be reconfigured, if you want a different profile.
Battery Monitoring
The battery monitoring subsystem is straightforward for AA batteries: read the Imp’s voltage and compare it against expected.
FuelGaugeResetFromBoot-- no initialization is needed for this monitoring.FuelGaugeReadSoC-- does a bit of math to move from reading to percentage. It depends on the constantsMIN_EXPECTED_VOLTAGEandMAX_EXPECTED_VOLTAGEto be set at the top of the file.
In the Going Further section, there is the option of using rechargeable LiPo batteries and monitoring them with a Fuel Gauge board. In that instance, these functions are replaced with more complex ones that speak to another chip via I2C.
Accelerometer
Adding an MMA8452Q to an Electric Imp is pretty common, so I used the code available from duppypro, making minor modification changes to the configuration (and some of the code).
The stock Sparkfun MMA8452Q has the address line pulled HIGH, so the I2C address is:
language:JavaScript
const ACCEL_ADDR = 0x3A // 0x1D << 1
If your accelerometer has the SAO line pulled LOW (the resistor in place on the back of on the Sparkfun board), change the address to
language:JavaScript
const ACCEL_ADDR = 0x38 // 0x1C << 1
The accelerometer has a few functions you probably won’t need to call directly (they are internal to the subsystem):
writeReg(addressToWrite, dataToWrite)-- writes to accel’s address via I2C.readSequentialRegs(addressToRead, numBytes)-- readsnumBytesfrom accel’s address over I2C.readReg(addressToRead)-- calls the above function but for one byte at a time.AccelerometerSetActive(mode)-- sets the accelerometer into register modification mode or normal (active) mode.
The functions you may want to look at further are:
AccelerometerResetFromBoot()– verifies accel’s existence and configures interrupts and thresholds for the systemAccelerometerIRQ()– called after the accelerometer creates an interrupt.
There in one unused function, there for debugging and amusement:
readAccelData()– get the data from accelerometer.
If you haven’t played with an accelerometer before, they can be fun. Change IndicateGoodInteraction() to something like this:
language:JavaScript
// Get values that are absolute value, 0 to 255, and proportional to 1G
local data = [0,0,0];
local rawData = readAccelData()
foreach (i, val in rawData) {
    val = (val < 128 ? val : val - 256); // set val range -128 to 128
    val = (val < 0 ? -val : val);        // positive only
    val = val * 2;                       // brighter light
    data [i] = (val > 256 ? 255 : val);
}
setGoalColor (data[0], data[1], data[2])
Now, the LED will indicate the orientation of the accelerometer every time you move or tap it.
AYOK Code
While the code thus far has been for different subsystems, this is the new code for making the Are-You-OK widget do its thing.
GetReadyToSleep()-- sends the Imp to deep sleep. When it restarts, it will resume from the top of the program (so it is different than theledRamp’simp.wakeup).CheckBatteryAndGoToSleep()-- every hour the Imp wakes up to check battery status and send a note to the server.IndicateGoodInteraction()-- sets the LED to white and starts a ramp.IndicateLowBattery()-- sets LED to yellow, starts a ramp.IndicateNoWiFi()-- sets LED to red, starts a ramp.HandleReasonForWakeup(unused = null)-- the state machine of the device, it looks at the reason for wakeup and acts appropriately.
When the Imp comes back from deep sleep, it runs this code:
language:JavaScript
imp.setpowersave(true);
Before we get very far into the code, we want the Imp to send this code an error if it has trouble connecting:
language:JavaScript
server.setsendtimeoutpolicy(RETURN_ON_ERROR, WAIT_TIL_SENT, 30);
The important part there is the RETURN_ON_ERROR portion. Without this line, the Imp will try to connect but won’t let the device code run. We’ll turn the LED to red if we can’t get connected.
Next, we need to make sure the accelerometer will wake the system up after it goes to sleep:
language:JavaScript
// Configure pin1 for wakeup.  Connect MMA8452Q INT1 pin to imp pin1.
wakeupPin.configure(DIGITAL_IN_WAKEUP, AccelerometerIRQ);
Note that since the Imp is usually in deep sleep, the AccelerometerIRQ seldom gets called directld. Instead HandleReasonForWakeup notes that wakeup reason is WAKEREASON_PIN1. If the system is not, then this code is responsible for calling HandleReasonForWakeup. It starts by verifying the system is connected to WiFi. If not, then it tries for 3s before calling HandleReasonForWakeup. (If the imp is connected, then it immediately calls HandleReasonForWakeup.)
language:JavaScript
if  (!server.isconnected()) {
    // we probably can't get to the internet, try for
    // a little while (3 seconds), then get pushed to
    // HandleReasonForWakeup where IndicateNoWiFi will be called
    server.connect(HandleReasonForWakeup, 3)
} else {
    HandleReasonForWakeup();
}
Much of the complexity here is due to the goal of having low power usage -- ideally to make the system last for 6 months (or more) on four AAs.
What The Software Does (Agent)
The goal of the agent software is to send user messages if the device fails in some way. For debugging, it is often easier to get messages when something does happen. Thus, there are two output message methodologies.
Settings
When debugging, you don’t necessarily want to flood your debug mechanism. If you keep tapping on the unit because you are fine tuning the color of the LED, you don’t want to get 1000 emails or twitter messages.
These next settings control how often you get messages and prevent message flurries:
language:JavaScript
// debug output frequency: these prevent twitter flurries where you
// get the same message 10 times because you are tapping the device
const dtDebugMessageMotionDetected = 80; // seconds
const dtDebugMessageBatteryUpdateDetected = 600; // seconds
The next setting is the most important.
language:JavaScript
// This is how long the device will go without an update from the
// user before it cries for help
const dtNoMotionDetected = 129600;
These should be set according to how often your device needs attention before it sends you email. If you set it to be too frequent, the person you are monitoring will find it intrusive. If you set it too long, you may not be able to alleviate your worry. Here are some settings I like:
| User needs to move it | Hours | dtNoMotionDetected Setting |
|---|---|---|
| Three times a day | 12 | 43200 |
| Every day | 36 | 129600 |
| Every couple days | 60 | 216000 |
With the most frequent setting, remember the user needs to sleep so 12 hours represents a couple hours on either side of night’s rest. As for “every day”, it isn’t 24 hours because that would require the user to interact with the device every day at the same time (or a minute earlier). Using 36 hours instead means that one day can be 8am but the next can be 8pm. The “every couple days” has a similar buffer.
The next setting configures how long the device can fail to communicate before you get an error message. This is likely because the device has lost power or its WiFi is not available.
language:JavaScript
const dtNoBatteryUpdate = 21600; // seconds (21600 ==> 6 hours)
Peace of mind sometimes means knowing that everything is still working. I updated my system to send a note every few days to say everything is ok.
language:JavaScript
const dtEverythingFineUpdate = 432000; // seconds (432000 ==> 5 days)
Actually, everything may be working fine but you should know the device’s batteries are getting low. To that end, we have to decide when the “everything is fine” messages should include “but my battery is getting low”:
language:JavaScript
const MIN_GOOD_STATE_OF_CHARGE = 25; // percent
Communicating With the Caregiver
The different ways to communicate with the device require permissions. Electric Imp has example code for a number of web services: Xively, Twillio, Twitter, etc. I used the agent code from their repository. For twitter, you’ll need to use the Twitter Developer Center. Then you’ll need the keys to work:
language:JavaScript
_CONSUMER_KEY <- "YOUR KEY"
_CONSUMER_SECRET <- "YOUR SECRET"
_ACCESS_TOKEN <- "YOUR TOKEN"
_ACCESS_SECRET <- "YOUR SECRET"
These are at the top of my agent.nut but the code is a little further down (marked with a section break). It’s relevant function is twitter.Tweet(string).
Note: if you have trouble with twitter, modify the twitterDebug function to output messages to the Electric Imp server.log. Those messages get tedious to look at but are nice when starting out.
Monitoring Multiple Devices
Once you have one of these devices, you may want another. Right after the Settings sections, there is an area to help with monitoring multiple devices:
language:JavaScript
/******************** Handle setting the device's name ******************************/
If you only want one unit, and you want to skip the next steps, edit the code directly and fix the name of the unit and where to send caregiver messages.
language:JavaScript
settings <- {
    name = "Maxwell",         // name of the unit
    attn = "@logicalelegance" // who to send messages to
};
The other way to set these server-stored variables is to set up your unit the first time by putting the information in a URL of the form:
language:JavaScript
https://agent.electricimp.com/{agentUrl}/settings?name={nameValue}&attn={attnValue}
If you look at the top of the Imp editor for you agent URL, you'll see something like:

Copy the URL from the editor and add the necessary information in place of the curly braces, so it looks like: https://agent.electricimp.com/abcd1234/settings?name={Maxwell}&attn={@logicalelegance}.
Again, Maxwell is the name of the unit and @logicalelegance is where I want messages to be sent.
Once the agent code is running, put that URL into a browser and it will write the information into server storage. The next block of code handles the HTTP interaction. After that is the twitter-handling code.
Messages to the User
As noted above, there are two types of output: debugMessage and userMessage. You may turn off debugMessage entirely once you are happy with how it is working.
For me, debug messages go to the server log and to my general account at twitter. User messages are called out in the server log (prefaced with "!!!!") and go to the attn in twitter.
Since these functions are separated, it is straightforward to modify them to email, text, or use another media to inform you of events.
Device Handling
There are three asynchronous timers, each monitoring for things to happen (or not):
- Battery update -- If this times out, we received no battery update: something is wrong since the device isn’t communicating.
- Motion update -- If this times out, the user has not moved the device: send a message to the caregiver to check on their loved one.
- Everything is fine -- If this times out, no errors occurred: send a reassurance message to the caregiver that all is working normally.
These all have the same elements:
- Modifiable timeout from the settings section on the top of the file (
dtNoMotionDetected). - Timer variable used to start and stop the timer (
motionUpdateFromDeviceTimer). - Function that is called when something happens that resets the timer, such as a motion is received from the device (
motionOnDevice), this often causes a debug message. - Callback when the timer expires (
noMotionFromDevice), this causes a user message. - Timer creation (
motionUpdateFromDeviceTimer = imp.wakeup(dtNoMotionDetected, noMotionFromDevice);).
Once you see the symmetry between them, it is less of an impenetrable wall of code
Making It Look Good
The technology is interesting, lots of pieces hooked together to make a whole that is greater than its parts. However, the social engineering on this device is critical to its real world use.
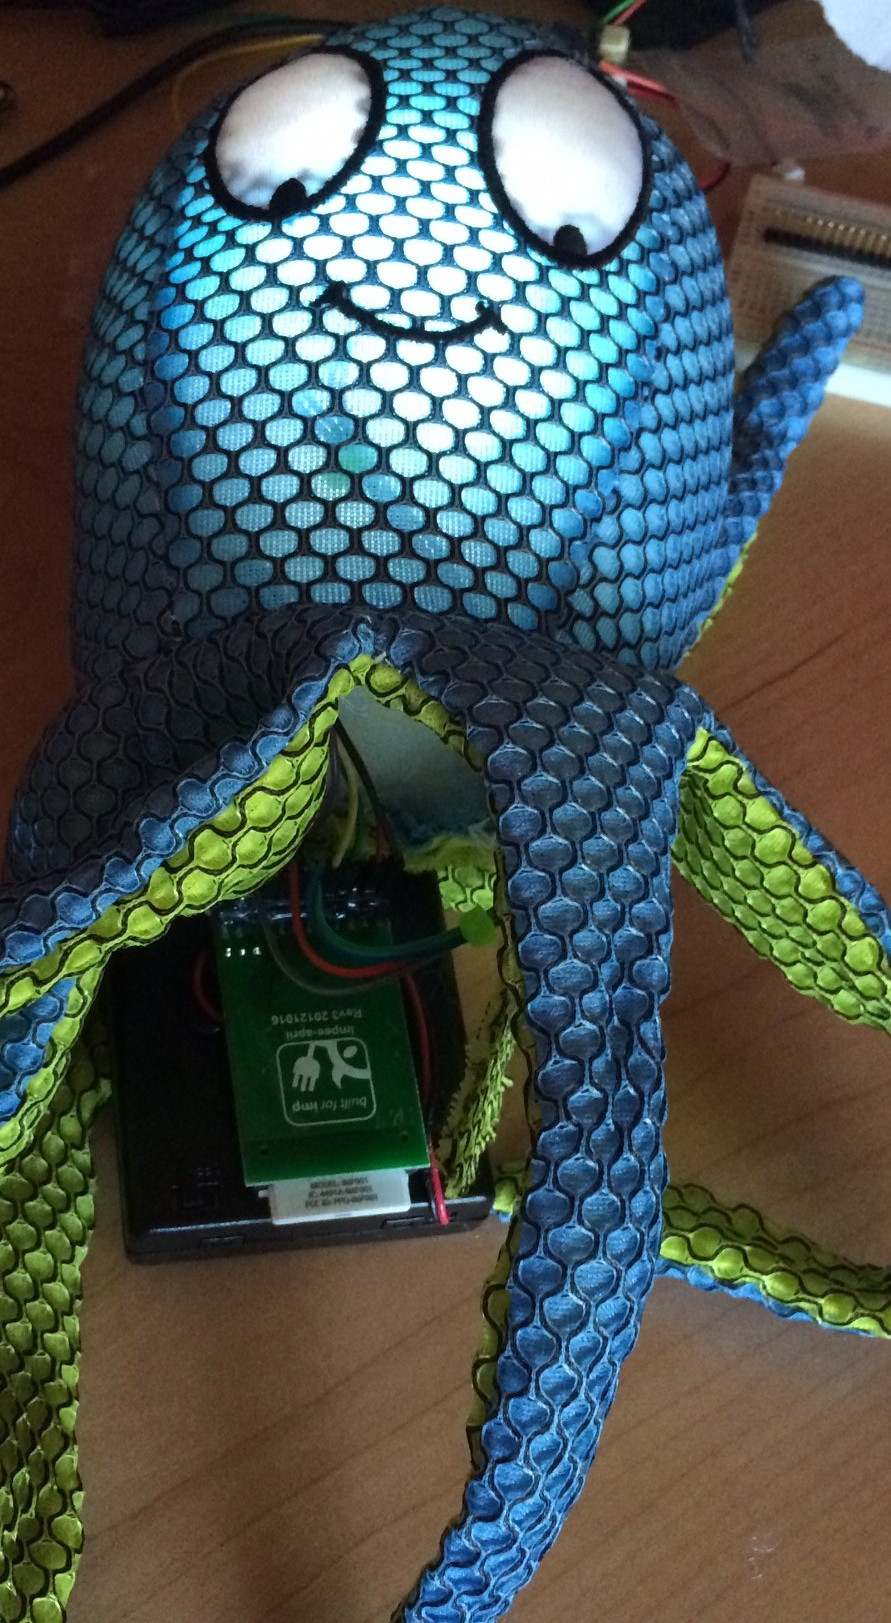
I like stuffed animals for the cuteness factor. But putting this in a box on a refrigerator requires less interaction from the person being monitored. In the end, I went for the stuffed animal, modifying an off the shelf plush octopus.

I clipped the LED leads then glued the jumper cables to the leads. I used fishing line to hang the LED in the octopus head.
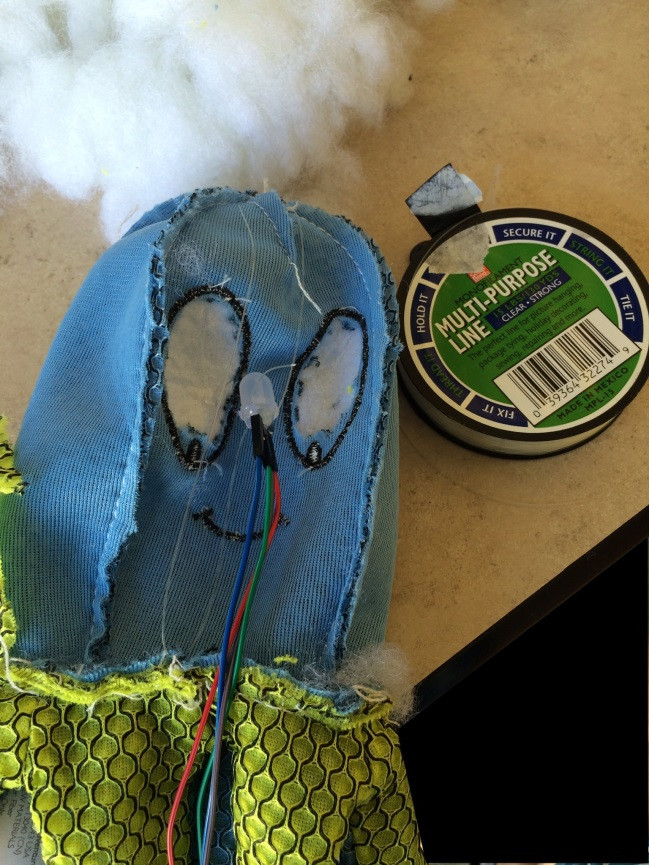
A little more fishing line attached the accelerometer (which has mounting holes) to the very top of the head. The next step is to attach all of that to the Electric Imp to the battery compartment.
Note that the Imp has to be accessible to the caregiver to set the WiFi information (via the Electric Imp Blink Up method with a smart phone). The batteries themselves should be changeable by the user (i.e. elderly neighbor). Organizing those two goals and getting all the cables to go in correct direction can be tricky. It is a matter of trying it before taping and hot-gluing it together. Of course, I recommend testing before putting it all together.
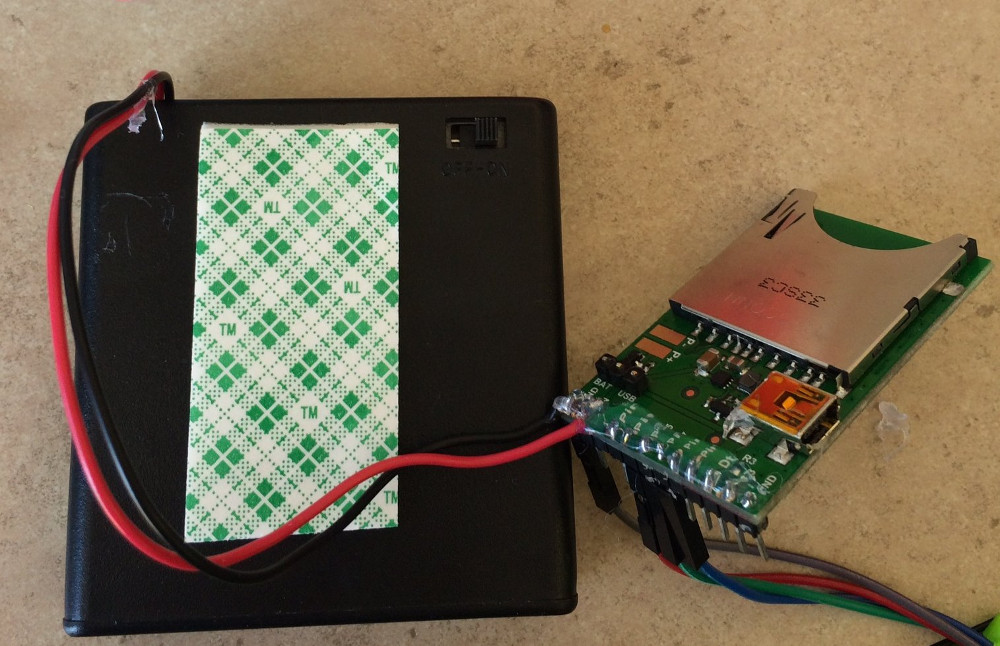
In the end, I’m pleased with how it turned out. But this is my first one (ahem, this is my first time adding electronics to a plush).
I have plans for the little dog stuffed animal. The first step is to choose a battery module that works for the end device:
Resources and Going Further
The Electric Imp is so flexible that staying on topic can be tough. Once you’ve built one thing, it is easy to think of more features. Here are some ideas for taking this project further.
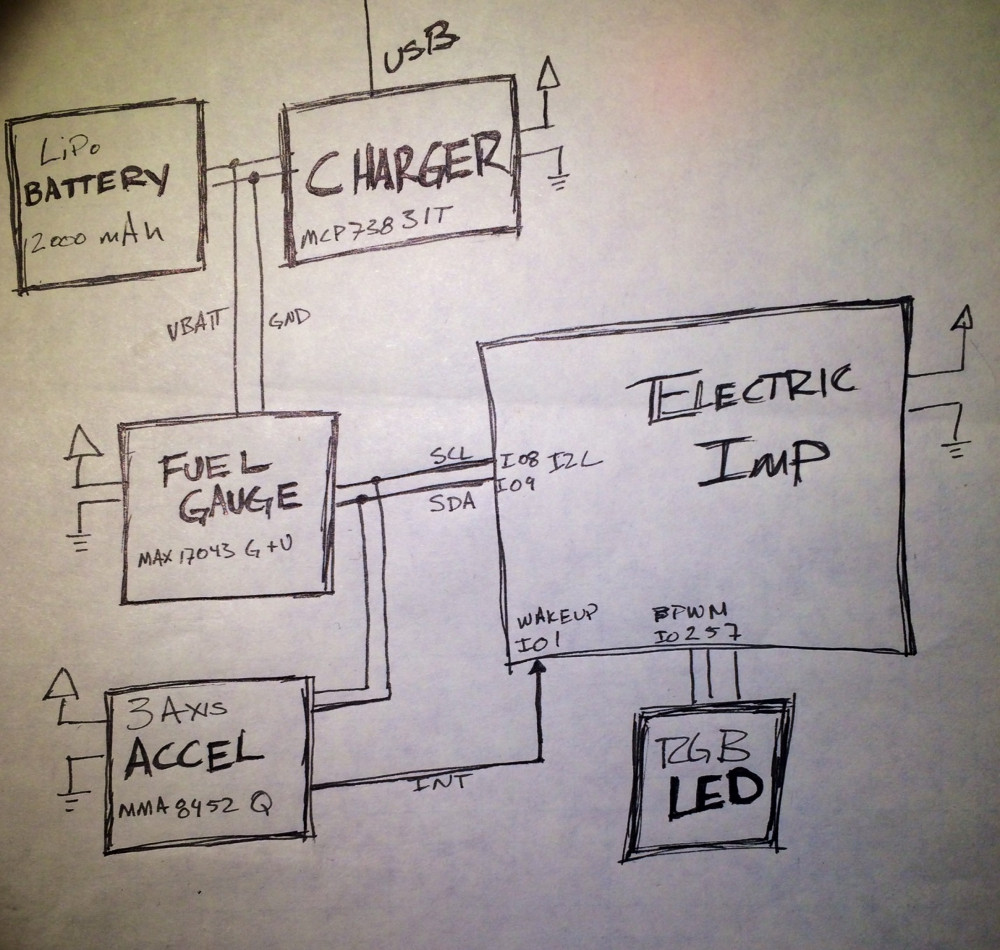
Make It Rechargeable
An easy modification is to switch to rechargeable batteries. A 2000mAh LiPo battery will last almost a year, assuming you don’t update the code a lot.
Get a LiPo charger with mini USB or micro USB.
Since LiPo batteries are tough to monitor based on voltage along, use a fuel gauge board to do the monitoring.
I created code to make that work with the Are-You-OK system, it drops in to replace the battery monitoring on the device. The hard part is splitting the I2C wires so they go to both the accelerometer or and the fuel gauge. Here is the hook up sketch.
Make It Cheaper
If the price is too high, you can make the system cheaper by replace the accelerometer with a switch: either something the user presses or a motion based switch.
You will be able to remove the accelerometer code, only using the wakeup (pin 1). However, make sure you wire this so that the interrupt doesn’t happen (and the LED doesn’t show) until after the user has released the button.
Another cost cutting area is to replace the beautiful, diffuse LED with individual LEDs and control them directly. Of course, the diffuse one is only $0.95 so to make it cheaper, you may need to buy LEDs in bulk. I’ve ignored the intricacies of LED resistors but you might want to check out the LED tutorial.
Texting and Emailing
Right now the system uses twitter but that lacks privacy (and many people don’t use twitter). However, the Electric Imp already has information and code available for texting via Twilio.
Email is also a good solution and there is a great description on how to set that up on the Imp.
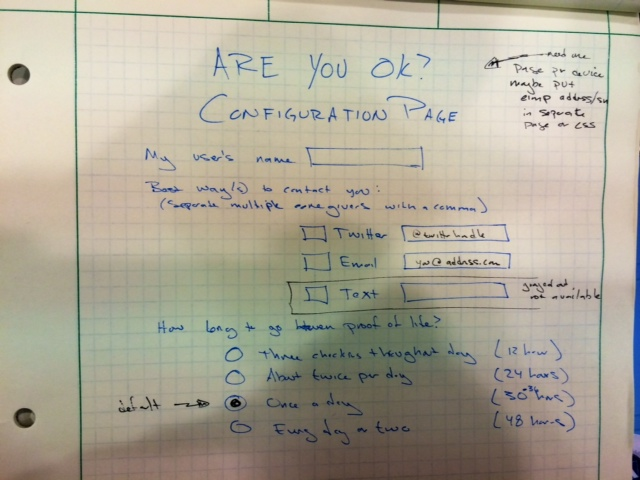
Configuration Webpage
While creating a device specific HTTP URL is great for setting the only two parameters, there are others we may want to set which means doing configuration via webpage.
It is pretty silly to set up the frequency of interaction in the code. Also, it would be pretty easy to set the caregiver information and contact methodology in a webpage.
Here, I’ve made a sketch of what I want. Let me know when you are finished, all right?