Electric Imp Breakout Hookup Guide
 jimblom,
  Shawn Hymel
Example 0: Hello World
Now that your imp is commissioned, it's time to upload your first bit of code!
As with any new development platform, our first goal is to make sure we can make an LED blink. If you can make an LED blink, you're well on your way to spinning motors or communicating with sensors.
Using the IDE
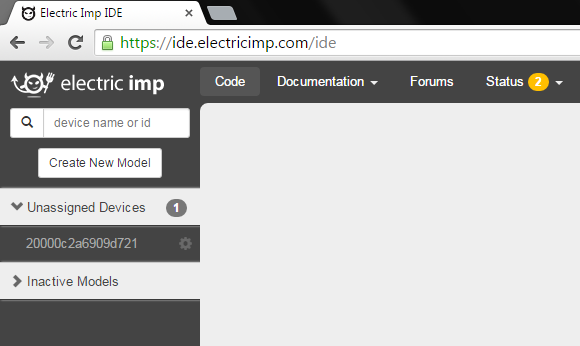
To begin, go to Electric Imp IDE, and log in if you haven't already.
If your Electric Imp was successfully commissioned, you should see your imp device appear under Unassigned Devices on the left-hand side.
Click the Create New Model button.
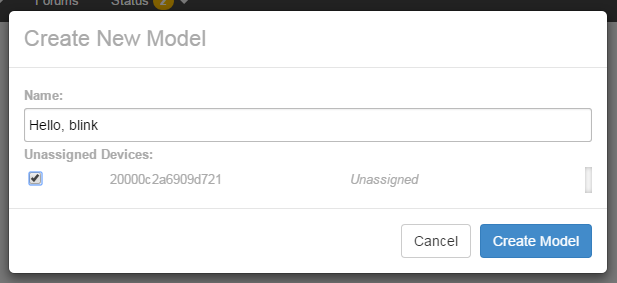
In the name field, type "Hello, blink" for the name of our model. Check the box next to our device under Unassigned Devices. Click Create Model.
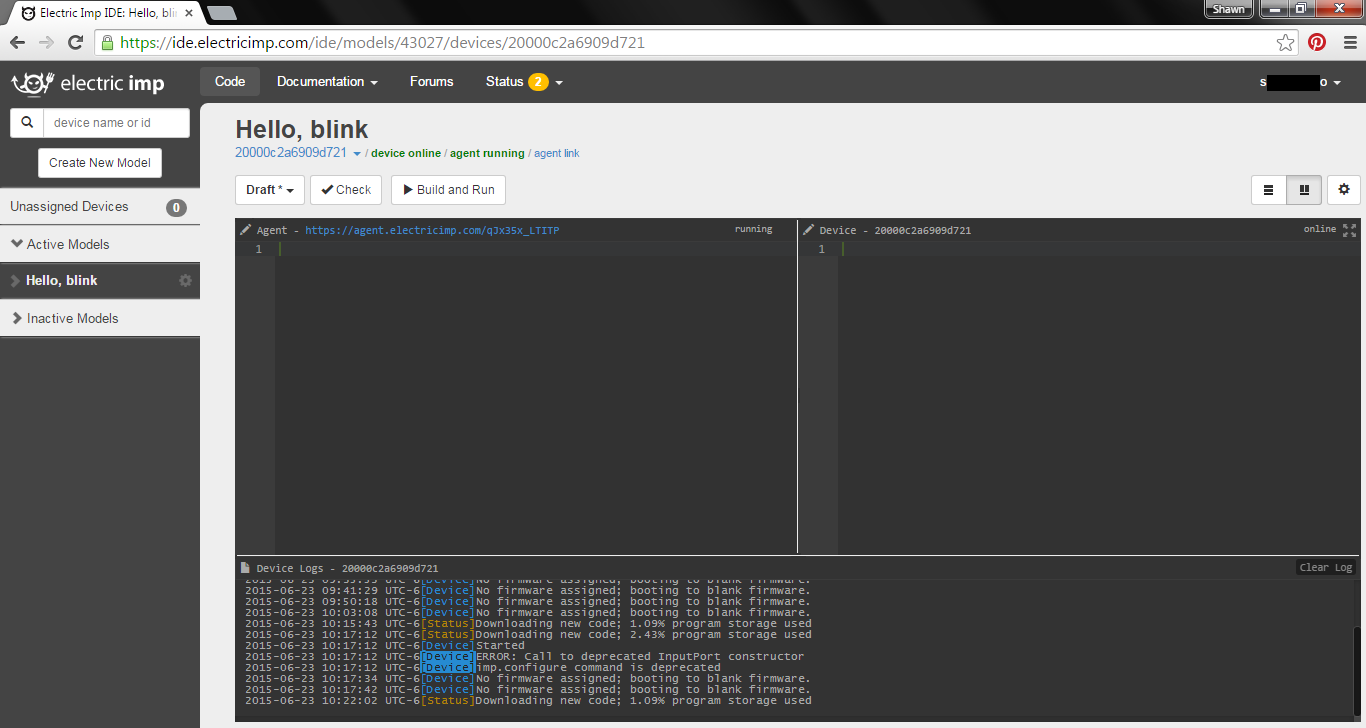
Now, on the left side, you should see a new tab called Hello, blink. Select than, then click your imp name. This is the standard view of the imp IDE. It's split into three sections:
- Agent -- This is code that runs external to your imp, in the cloud. You can offload server tasks, like HTTP requests, here. There are built in functions to aid in communication between imp and agent.
- Device -- This is the code that your imp runs. This is where you do all of your hardware control, like writing pins high and low, or reading inputs.
- Log -- This is where messages and errors are printed (using the
server.log()function).
Now we're ready to load some code and blink some LEDs!
The Circuit
The circuit for this example is very simple. We only need to connect an LED to pin 1. Don't forget your current-limiting resistor (330 Ω)!

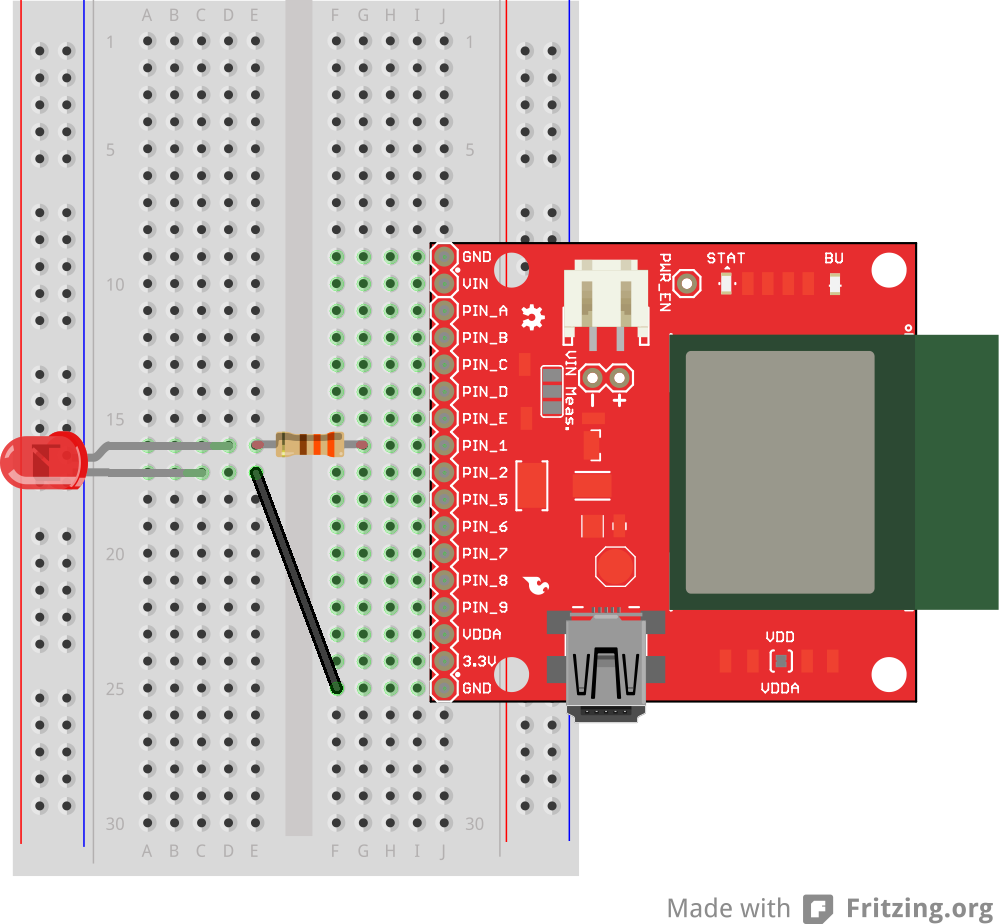
Any of the imp's I/O pins would work for this example. After working with the code, see if you can modify it to blink on other pins (or all of them!).
Hello, blink Code
We'll only be working with the Device portion of the IDE right now. Copy and paste the code below into the middle section of your window.
language:squirrel
/* Hello, Blink
   by: Jim Lindblom
   SparkFun Electronics
   date: October 31, 2013
   license: Beerware. Use, reuse, and modify this code however you see fit.
   If you find it useful, buy me a beer some day!

   This is an Electric Imp hello, world blink sketch. It'll blink an LED
   connected to pin 1, once every second.
*/

////////////////////////////////////////
// Global Variables                   //
////////////////////////////////////////
ledState <- 0;

////////////////////////////////////////
// Function definitions               //
////////////////////////////////////////

// Loop constantly updates the LED. If ledState is 1, we'll turn the LED on and
// set ledState to 0. Vice-versa is ledState is 0 coming in. This function
// schedules a wakeup in 1 second, and calls itself again.
function loop()
{
    if (ledState)
    {
        hardware.pin1.write(1); // Write pin 1 high
        ledState = 0; // Flip ledState
    }
    else
    {
        hardware.pin1.write(0); // Write pin 1 low
        ledState = 1; // Flip ledState
    }

    // This must be called at the end. This'll call loop() again in 1s, that way
    // it'll actually loop!
    imp.wakeup(1.00, loop);
}

////////////////////////////////////////
// Setup Stuff: Runs first at startup //
////////////////////////////////////////
hardware.pin1.configure(DIGITAL_OUT);   // Configure Pin 1 as digital output

loop(); // Call loop, and let the program go!
Then hit the >Build and Run button up top, and enjoy the blinks.
Shortcut heads up! If you're a neurotic CTRL+S saver, the standard save shortcut does save, but it also attempts to build and run your code. If successful, it'll upload the code and immediately start running on your imp. If there's an error, you'll start hearing about it in the log window.
Into the Code
If you’re only used to working with Arduino sketches, this code may make very little sense, Electric Imp programs have a very different “flow” to them. Begin by looking at the 2 lines of code at the bottom (under the “Setup Stuff” header). This is actually where our imp starts when it begins to run it’s program. Everything above is simply a function or variable definition.
The majority of this code deals with the imp’s pin class, which handles all of the I/O control. If you’re used to using Arduino GPIO’s, the imp’s API isn’t too different. You have to set the pin up as either an input or output, analog or digital. Then write or read to the pin accordingly.
At the end of the setup, we make a call to a loop() function, which is defined above. loop() is simple, it checks a global variable named ledState. If ledState is 1 we turn the LED on, if it's 0 we turn the LED off.
To write a pin high or low, we call the hardware.pin1.write([0:1]) function. You can probably extrapolate from that how to control the other five pins.
The special sauce making loop actually loop is the last line of code in the function: imp.wakeup(1.00, loop). The imp.wakeup function puts the imp to sleep, but sets a timer. When the timer goes off, the requested function (loop in this case) function is called from its beginning. In this case we set the timer to 1.00 seconds, so loop() should run once a second. This is really the only way to make the imp “loop” like an Arduino might.
Check out the comments in the code for a more in-depth overview of each function call. Or, for more information, check out Electric Imp’s API reference.