Air Quality Sensor - SGP40 (Qwiic) Hookup Guide
Introduction
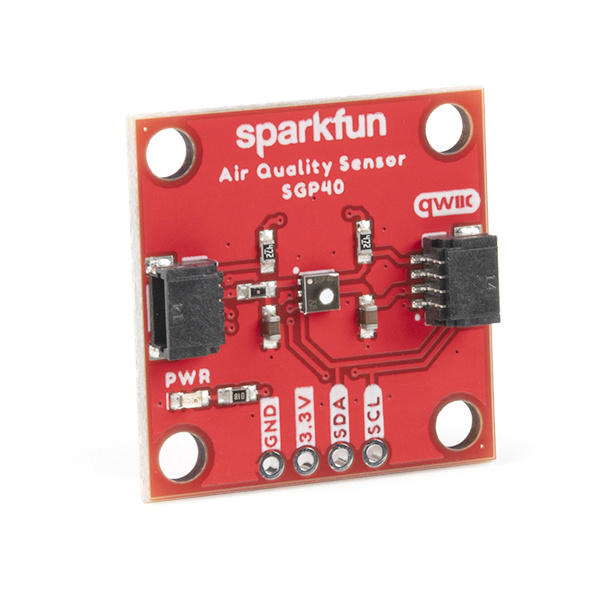
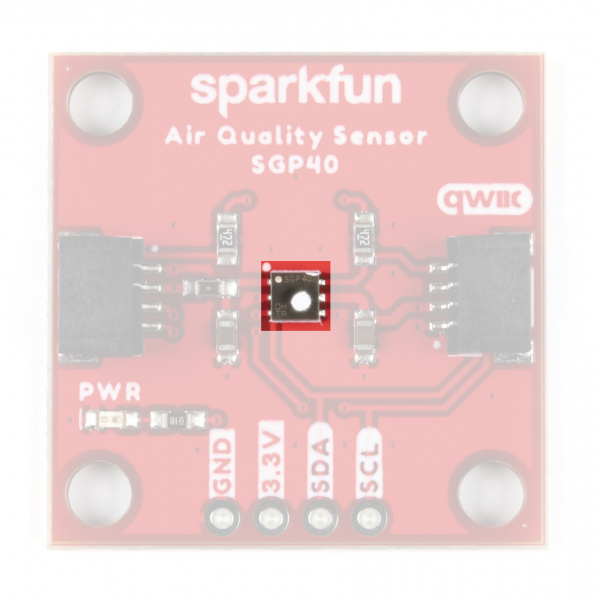
The SparkFun Air Quality Sensor - SGP40 (Qwiic) is a robust metal oxide (MOx) based indoor air-quality measurement tool using the SGP40 gas sensor from Sensirion. The SGP40 is based on Sensirion's CMOSens® technology that uses a MOx sensor with a temperature controlled micro hotplate and a humidity-compensated indoor air quality signal. The SGP40 is highly responsive and reports valid volatile organic compount (VOC) data within minutes of powering on the sensor.
The SGP40 outputs a digital value based on all VOC gases typically present in an indoor environment and this value can be combined with Sensirion's VOC Index Algorithm to provide responsive indoor air quality data. The SGP40 detects the relative intensity of VOC events in relation to the average readings in a 24hr period but does not return specific concentrations of VOC gases. Think of the SGP40 as a sensitive electronic nose for detecting VOCs in a room.
Users looking to measure specific gas concentrations may want to use the SparkFun Air Quality Sensor - SGP30 (Qwiic) instead.
This guide will cover the SGP40 sensor and other hardware present on this breakout, how to connect it to a microcontroller and use the Arduino and Python libraries so by the end you'll be able to easily monitor VOC events indoors.
Required Materials
To follow along with this guide you will need a microcontroller to communicate with the SGP40. Below are a few options that come Qwiic-enabled out of the box:
If your chosen microcontroller is not already Qwiic-enabled, you can add that functionality with one or more of the following items:
You will also need at least one Qwiic cable to connect your sensor to your microcontroller.
Qwiic Cable - 100mm
PRT-14427Qwiic Cable - 50mm
PRT-14426Qwiic Cable - 200mm
PRT-14428Qwiic Cable - 500mm
PRT-14429Suggested Reading
If you aren't familiar with the Qwiic system, take a look here for an overview.
 |
We also recommend taking a look at the following tutorials if you aren't familiar with the concepts covered in them. If you are using one of the Qwiic Shields listed above, you may want to read through their respective Hookup Guides as well before you get started with the SparkFun Air Quality Sensor - SGP40 (Qwiic).
I2C
Serial Terminal Basics
Qwiic Shield for Arduino & Photon Hookup Guide
SparkFun Qwiic Shield for Arduino Nano Hookup Guide
Hardware Overview
In this section we'll cover the features and specifications of the SGP40 Air Quality Sensor as well as highlight other hardware present on this Qwiic breakout.
SGP40 Gas Sensor
The SGP40 air quality gas sensor from Sensirion offers an easy-to-integrate indoor air quality monitoring system with Sensirion's VOC Index. The SGP40 is an I2C device that outputs either a raw digital signal of all typical VOC gases present in an indoor environment or a processed VOC index value.
The SGP40's broad spectrum of sensing means it does not measure specific concentrations of individual VOC gases. Instead, the sensor outputs a digital signal sensitive to common indoor air pollutants/VOC gases[1]. Some common air pollutants the SGP40 detects are:
- Acetone
- Toluene
- Ethanol
- Hydrogen Sulfide & Volatile Sulfuric Compounds
- Ammonia & Amines
- Benzene & Nitrosamines
The raw signal can be read on its own but for best results, Sensirion's VOC Algorithm processes the signal to output VOC Index data. The processed VOC Index value ranges from 0 to 500 index points. The data is relative to the history of the monitored room where 100 is the average reading reported over the last 24 hours. Values above 100 signify a VOC event or worse-than-average air quality and values below indicate better-than-average air quality. The rate and intensity of change help identify the severity of the event to trigger actions such as turning on fans to ventilate the area until the signal stabilizes again.
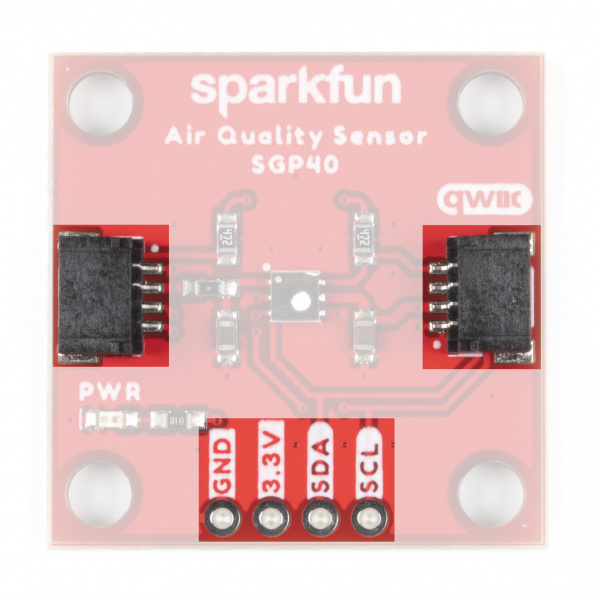
The SGP40 accepts a supply voltage between 1.7V and 3.6V with this breakout intended to run at 3.3V to work with the Qwiic system. The SGP40 draws 34µA (typ.) while idling and 2.6mA@3.3V (typ.) during operation. Power is provied either over the Qwiic interface or through the pins labeled 3.3V and Ground on the 0.1"-spaced plated through hole (PTH) header.
I2C and Qwiic Interface
The SGP40 communicates via I2C so naturally we've routed that interface to a pair of Qwiic connectors for easy integration into SparkFun's Qwiic system. For users who prefer a more traditional interface, the SDA and SCL pins are routed to the same 0.1"-spaced PTH header as the 3.3V and GND pins.
The SGP40's I2C address is 0x59 and the IC supports both "standard-mode" and "fast-mode" with max clock frequencies of 100 or 400kHz, respectively.
Solder Jumpers
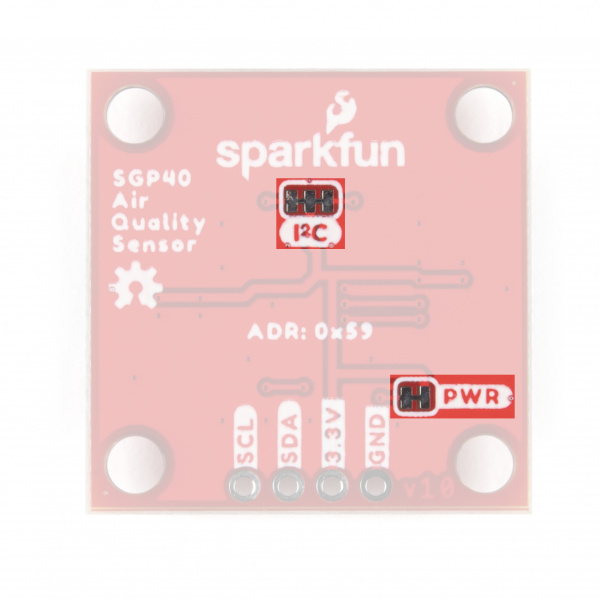
This breakout has two solder jumpers labeled PWR and I2C. The PWR jumper completes the power LED circuit and the I2C jumper pulls the SDA/SCL lines to 3.3V via a pair of 1kΩ resistors. Both jumpers' default state is CLOSED.
Disable the Power LED by severing the trace between the two pads. Opening this jumper helps reduce the total current draw of the breakout for low-power applications. Similarly, disable the pull-up resistors for the SDA/SCL lines by severing the trace between the three pads.
Board Dimensions
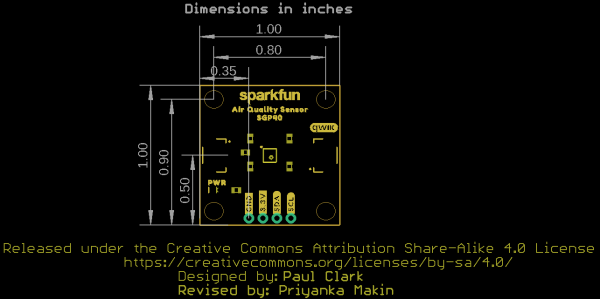
The Air Quality Sensor - SGP40 (Qwiic) matches the 1.0" x 1.0" (25.4mm x 25.4mm) standard of Qwiic breakouts and has two mounting holes that fit a 4-40 screw.
Hardware Assembly
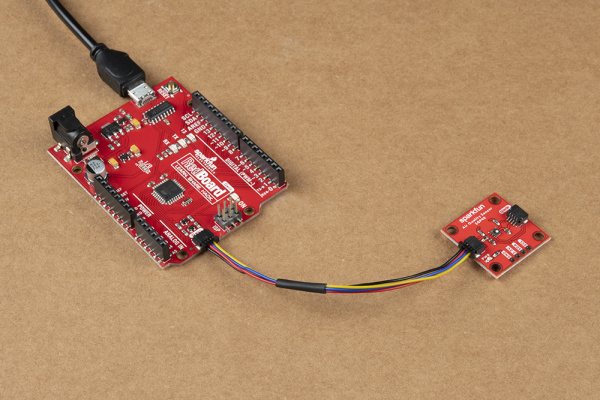
With the SparkFun Qwiic system, assembling the your sensor circuit is easy! All you need to do is connect your SparkFun Air Quality Sensor - SGP40 (Qwiic) to your chosen development board with a Qwiic cable or adapter cable. If you would prefer to not use the Qwiic connectors, you can connect to the 0.1" header pins broken out on bottom of the board.
If you decide to use the PTH pins broken out on the Air Quality Sensor you need to solder to them or if you want a temporary connection for prototyping, these IC Hooks are a great option to make that connection. If you are not familiar with through-hole soldering take a look at this tutorial:
How to Solder: Through-Hole Soldering
With the SGP40 connected to your microcontroller it's time to get some code uploaded and start taking measurements!
SGP40 Arduino Library
We've written a simple Arduino library to quickly get started reading data from the SGP40. Install the library through the Arduino Library Manager tool by searching for "SparkFun SGP40". Users who prefer to manually install it can get the library from the GitHub Repository or download the ZIP by clicking the button below:
Library Functions
The list below outlines all of the functions of the library with some quick descriptions of what they do.
Class
Construct the SGP40 object in the global scope. mySensor is used as the SGP40 object in the example.
SGP40 mySensor;
Device Setup and Settings
bool SGP40::begin(TwoWire &wirePort);- Initialize I2C communication with the SGP40 on the defined port. If no port is specified, Wire is used. This function also initializes the VOC index parameters.void enableDebugging(Stream &debugPort = Serial);- Turn debug printouts and select the Serial port used for prints. If no port is defined, Serial is used.SGP40ERR measureTest(void);- Run a self test of the SGP40 chip. ReturnsSUCCESS (0)on pass or specific error code on fail when debugging prints are enabled. Primarily used during manufacturing but can be helpful for debugging.SGP40ERR softReset(void);- Trigger a soft reset of the SGP40. ReturnsSUCCESS (0)if reset is successful with debugging enabled.SGP40ERR heaterOff(void);- Turn the heater off. ReturnsSUCCESS (0)if heater is successfully disabled with debugging enabled.
SGP40 VOC Data
Both of these data outputs have default values set for relative humidity percentage and temperature (in °C) that can be adjusted to new static values or fed a live humidity and temperature data from an external sensor.
SGP40ERR measureRaw(uint16_t *SRAW_ticks, float RH = 50, float T = 25);- Returns the raw signal from the SGP40 inSRAW_ticks. If debugging statements are on, returnsSUCCESS (0)on pass.int32_t getVOCindex(float RH = 50, float T = 25);- Return the processed VOC index data from the SGP40. Returns-100on error. Refer to the VOC Index app note document for more information on the Sensirion VOC Index.
Arduino Example
The SGP40 Arduino Library includes a single example demonstrating how to get the processed VOC Index data from the sensor. Let's take a closer look at this example.
Example 1 - Get VOC Index
Open this example by navigating to File > Examples > SparkFun SGP40 Arduino Library > Example1_GetVOCIndex. Next, open the Tools menu and select the Board (in our case, SparkFun RedBoard) and the Port the board enumerated on.
Upload the code and open the Arduino Serial Monitor with the baud set to 115200. The code starts both the Wire and Serial ports and initializes the SGP40 on the I2C bus. If the SGP40 is not detected at the default address, the code will print out SGP40 not detected. Check connections. Freezing... and will stop. If this error prints, double check the connections between the breakout and development board and reset it.
After initalizing, the code calls the getVOCIndex(); function and prints out the value every second. The SGP40 takes about 30 to 60 seconds to warm up and return valid VOC readings. The printed data starts at "0" and increases for about a minute as it acclimates to the room and stabilizes around 100 VOC index. Also, the SGP40 refers to VOC Index readings from the history of the room over the past 24 hours so the longer the sensor remains running in the room, the more accurate the data becomes.
Try creating VOC events by putting something like isopropyl alcohol or a permanent marker near the sensor and then pull it away after a few seconds. The VOC Index should rise significantly depending on the intensity of the event and after a couple of minutes the output should drop back towards 100 as the gases dissipate.
SGP40 Python Package
The SparkFun SGP40 Python package is a simple module to get you started getting VOC data from the sensor. The Sensirion VOC Index algorithm is written for C/C++ so the Qwiic SGP40 Python package uses a similar algorithm for Python from DFRobot.
The package is hosted on PyPi so it can be installed using the command interface with some simple commands. If you prefer to manually install the package you can find it on the Github repository or download the ZIP of it by clicking the button below:
(*Please be aware this package depends on the Qwiic I2C Driver. You can also check out the repository documentation page, hosted on Read the Docs.)
Qwiic SGP40 Py Installation
Now let's go over both ways of installing the Qwiic SGP40 Python package.
Note: Don't forget to double check that the hardware I2C connection is enabled on your Raspberry Pi or other single board computer. The Raspberry Pi tutorials linked in the note above cover how to enable the Pi's I2C bus.
PyPi Installation
Since this repository is hosted on PyPi installation is simple on systems that support PyPi installation via pip3 (use pip for Python 2). Open a command interface and install the package using the following commands:
For all users (The user must have sudo privileges):
language:bash
sudo pip3 install sparkfun-qwiic-sgp40
For the current user:
language:bash
pip3 install sparkfun-qwiic-sgp40
Local Installation
Follow these instructions for a local installation. Make sure to install the setuptools package prior to installing the Qwiic SGP40 package.
Use the following command for direct installation at the command line (use python for Python 2):
language:bash
python3 setup.py install
To build a package for use with pip3:
language:bash
python setup.py sdist
This builds and places a subdirectory called "dist". Install the package using pip3 with this command making sure to fill in the correct version number:
langauge:bash
cd dist
pip3 install sparkfun_qwiic_sgp40-<version>.targ.gz
Qwiic SGP40 Python Package Operation
A complete overview of all the functions included in the Qwiic SGP40 Py is hosted on the ReadtheDocs. You can also take a look at the source code.
Upgrading the SGP40 Python Package
In case the package is updated in the future, you may need to upgrade it. Upgrade the package using the following commands:
For all users (The user must have sudo privileges):
language:bash
sudo pip3 install --upgrade sparkfun-qwiic-sgp40
For the current user:
language:bash
pip3 install --upgrade sparkfun-qwiic-sgp40
Python Example
The Qwiic SGP40 Python package includes one example to demonstrate how to get VOC Index data from the sensor. Open the example from the Qwiic SGP40 Py location or copy the code into your preferred Python interpreter.
Example 1 - VOC Index
This simple example initializes the SGP40 on the I2C bus and uses the get_VOC_index() function to, well, get the VOC index from the sensor. Take note, polling the VOC index should occur at 1Hz (once per second) for accurate results.
language:python
from __future__ import print_function
import qwiic_sgp40
import time
import sys

def run_example():

    print("\nSparkFun Qwiic Air Quality Sensor - SGP40, Example 1\n")
    my_sgp40 = qwiic_sgp40.QwiicSGP40()

    if my_sgp40.begin() != 0:
        print("\nThe Qwiic SGP40 isn't connected to the system. Please check your connection", \
            file=sys.stderr)
        return

    print("\nSGP40 ready!")

    while True:

        print("\nVOC Index is: " + str(my_sgp40.get_VOC_index()))

        time.sleep(1)

if __name__ == '__main__':
    try:
        run_example()
    except (KeyboardInterrupt, SystemExit) as exErr:
        print("\nEnding Example 1")
        sys.exit(0)
Run the example and let the sensor warm up for ~60 seconds and the readings should stabilize to around 100. Try creating VOC events by putting something like isopropyl alcohol or a permanent marker near the sensor and then pull it away. You should see the VOC index rise significantly and then return back to the "norm" of ~100 after a minute or so. For the best results, let the SGP40 run for 24hrs to generate a "history" of the average VOC gas concentration in the room.
Troubleshooting
VOC Index Data
The example in the Arduino library returns values processed through Sensirion's VOC Index which returns qualitative data based on the history of the room. While the sensor reports valid VOC readings within a minute of power up, leaving it running to gain a "history" of the room will provide more accurate data from the sensor when VOC events occur. In our testing we found the longer the SGP40 remains in the room it monitors, the more reliable the data becomes.
After acclimating to the room it is monitoring, the SGP40 should report "100" or close to it for the normal VOC Index for the room. Values below that indicate a lower concentration and values above indicate a higher concentration. Refer to Sensirion's VOC Index for Experts document as well as the SGP40 Datasheet for more information on how to interpret and use that data in your air quality measurement application.
Quick SGP40 Test
If you're looking for more accurate testing than using common household items like isopropyl alcohol or a permanent marker, Sensirion has a quick test document for testing the SGP40 is operating within specifications here: SGP40 Quick Testing Guide
General Troubleshooting and Technical Support
If you need technical assistance and more information on a product that is not working as you expected, we recommend heading on over to the SparkFun Technical Assistance page for some initial troubleshooting.
If you don't find what you need there, the SparkFun Forums are a great place to find and ask for help. If this is your first visit, you'll need to create a Forum Account to search product forums and post questions.
Resources and Going Further
That wraps up this Hookup Guide for the SparkFun Air Quality Sensor - SGP40 (Qwiic). For further information regarding this breakout, take a look at the links below:
- Schematic (PDF)
- Eagle Files (ZIP)
- Dimensional Drawing (PNG)
- Datasheet - SGP40 (PDF)
- Sensirion VOC Index for Experts (PDF)
- Sensirion SGP40 Design In Guide (PDF)
- SGP40 Quick Testing Guide
- Hardware GitHub Repository
- SGP40 Arduino Library
- Qwiic SGP40 Python Package
- Qwiic Info Page
Looking for some inspiration for an air quality sensing project or an air quality sensor that monitors specific gases and concentrations? Check out these tutorials:
