SparkFun Air Quality Sensor - SGP30 (Qwiic) Hookup Guide
Introduction
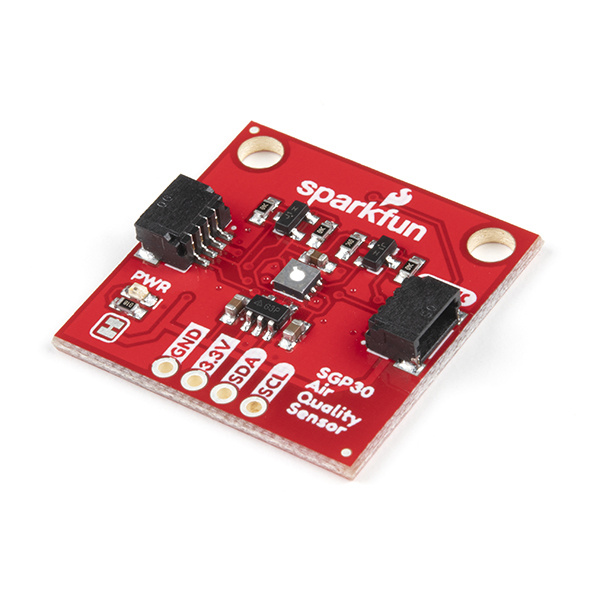
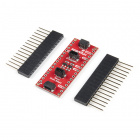
Do you want to know the quality of the air in your room or house? Maybe you need to monitor the volatile organic compounds emitted during a 3D Print so you know when to turn on some ventilation (or leave the room!). The SparkFun Air Quality Sensor - SGP30 (Qwiic) may be just the sensor you need! Indoor air quality (referred to as IAQ) sensors are great for measuring CO2 and volatile organic compounts (commonly referred to as VOCs) but some of them like the CCS811 require a burn-in time of 48 hours and a 20-min start up time. By comparison, the SGP30 can return valid IAQ readings within 15 seconds of powering up!
Along with a very quick start-up time, the SGP30 is very resistant to contamination from other gases to ensure low drift and long-term stability for extremely reliable results. To cap it all off, you can also read the SGP30's raw measurements of ethanol and H2. The SGP30 communicates via I2C so naturally we broke out the pins on the sensor to Qwiic connectors so you can easily connect it to SparkFun's ever growing Qwiic Ecosystem!
In this guide we will go over the features of the SGP30, how to connect and use it as well as an Arduino library with examples to get you started monitoring your indoor air quality.
Required Materials
To follow along with this guide you will need a microcontroller to communicate with the SGP30. Below are a few options that come Qwiic-enabled out of the box:
If your chosen microcontroller is not already Qwiic-enabled, you can add that functionality with one or more of the following items:
You will also need at least one Qwiic cable to connect your sensor to your microcontroller.
Qwiic Cable - 100mm
PRT-14427Qwiic Cable - 50mm
PRT-14426Qwiic Cable - 200mm
PRT-14428Qwiic Cable - 500mm
PRT-14429Suggested Reading
If you aren't familiar with the Qwiic system, take a look here for an overview.
 |
We also recommend taking a look at the following tutorials if you aren't familiar with the concepts covered in them. If you are using one of the Qwiic Shields listed above, you may want to read through their respective Hookup Guides as well before you get started with the SparkFun Air Quality Sensor - SGP30 (Qwiic).
I2C
Serial Terminal Basics
Qwiic Shield for Arduino & Photon Hookup Guide
SparkFun Qwiic Shield for Arduino Nano Hookup Guide
Hardware Overview
The brains of this breakout is the excellent SGP30 gas sensor from Sensirion. In this section we will cover some of the features and characteristics of the SGP30 as well as the hardware present on this breakout.
As we mentioned in the Introduction, the SGP30 gas sensor outputs measurements of total VOCs (TVOC) in parts per billion (ppb), carbon dioxide (CO2) equivalent in parts per million (ppm) as well as raw gas readings of ethanol and hydrogen (H2). The ethanol and H2 readings are primarily intended for the SGP30's on-chip calibration and baseline compensation algorithms but they can be useful for rough measurements of both compounds. Refer to page 8 of the datasheet for more information on these raw signals.
The table below outlines the basic parameters of each sensing output. For a detailed description of these and all other aspects of the sensor, review the datasheet.
| Sensing Parameter | Value |
|---|---|
| TVOC Output Signal Range | 0 to 60,000 ppb |
| CO2eq Output Signal Range | 400 to 60,000 ppm |
| Ethanol Signal Measurement Range | 0 to 1,000 ppm |
| H2 Signal Measurement Range | 0 to 1,000 ppm |
Power
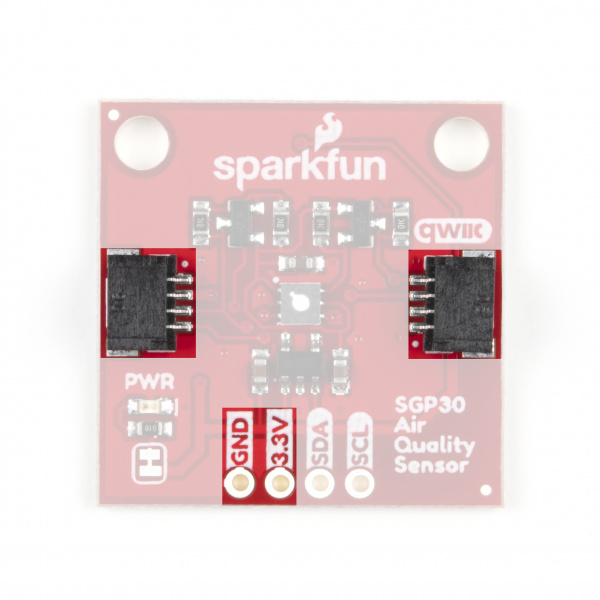
The SGP30 accepts a supply voltage between 1.62-1.98V so to work with the 3.3V standard for the Qwiic ecosystem, we added a voltage regulator to, well, regulate that 3.3V down to 1.8V. Power can be provided via the Qwiic connectors or through the labeled 3.3V and GND pins broken out to 0.1" header pins on this board.
Qwiic and I2C Interface
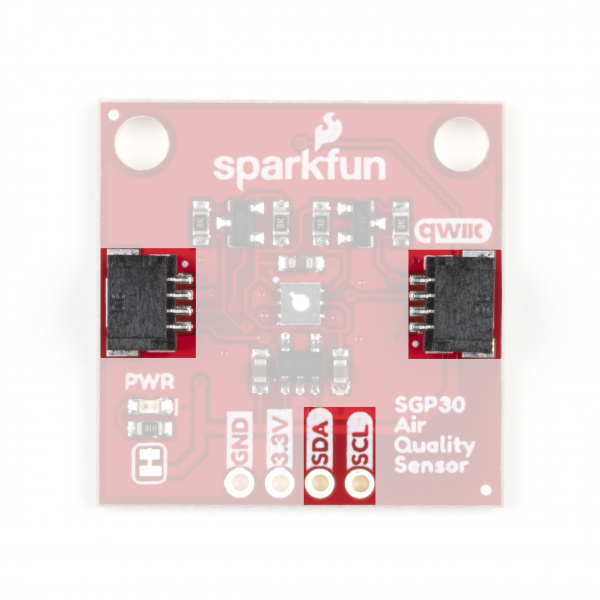
The SGP30 communicates via I2C so of course we broke out these pins to two Qwiic connectors as well as 0.1"-spaced header pins if you would prefer to use standard PTH connections. Since the sensor operates at 1.8V we have added transistors to both the SDA and SCL lines to level shift them from 3.3V so you can use it without issue with other Qwiic devices. Note, the HIGH side of this level circuit is tied directly to your power input so, as the note above regarding supply voltage warns, we recommend to power the board with 3.3V.
The SGP30's I2C address is 0x58 (1011000 bin) and is hardware-set. If you have other devices that share the same address as the SGP30 or need to use multiple SGP30 sensors on a single I2C bus, you will want to use a multiplexer/mux like the Qwiic Mux Breakout 8-Channel.
Jumpers
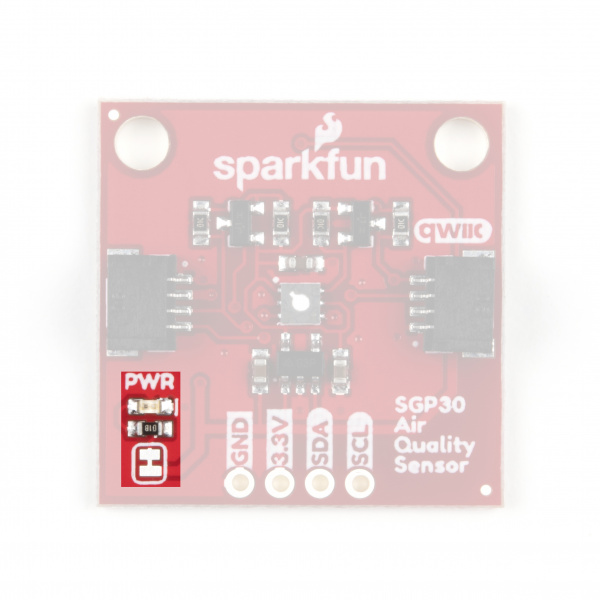
This breakout has two jumpers; one controls the power LED and the other enables the two 10K Ohm pull-up resistors on the SDA and SCL traces. Both are closed by default. To disable either of the jumpers, simply sever the trace between the pads. Disabling the power LED is particularly helpful for low-power applications to help reduce total current draw of the board. Note, if you disable the pull-up resistors, make sure the other devices on your I2C bus are running at 3.3V to avoid damaging the SGP30.
 |
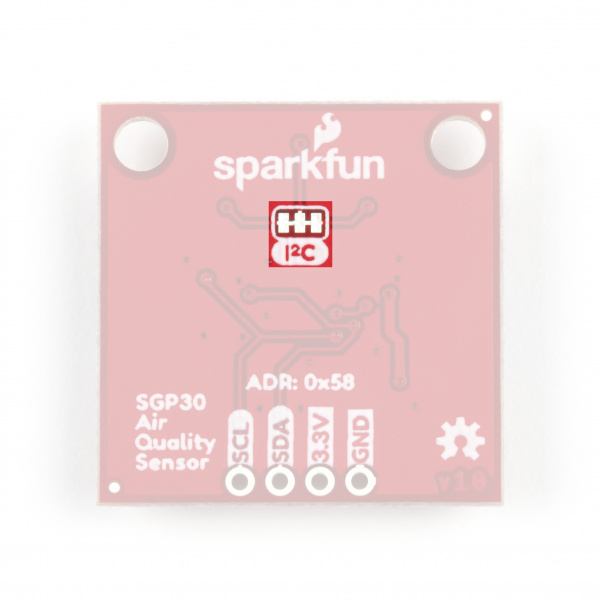 |
| Power LED Jumper | I2C Pull-Up Resistor Jumper |
Board Dimensions
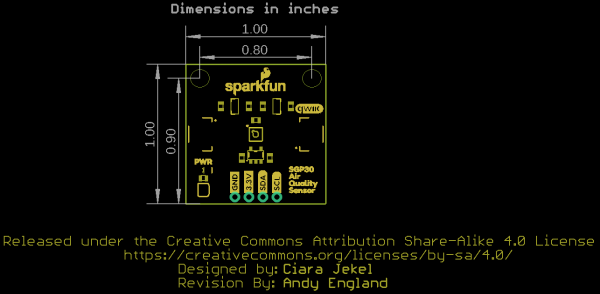
We've designed the SparkFun Air Quality Sensor to match our Qwiic breakout standard. The board measures 1" x 1" and has two mounting holes that fit a 4-40 screw. For specific spacing measurements, take a look at the dimensional photo below.
Hardware Assembly
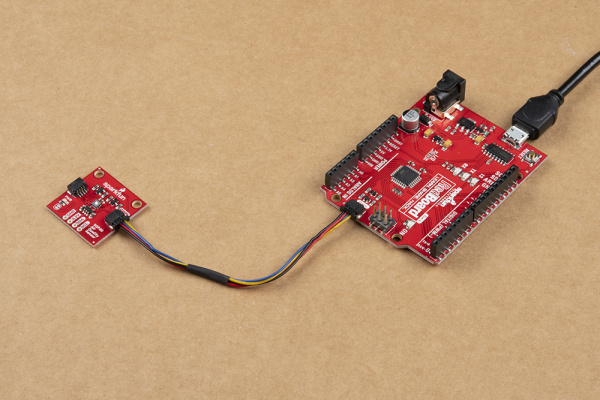
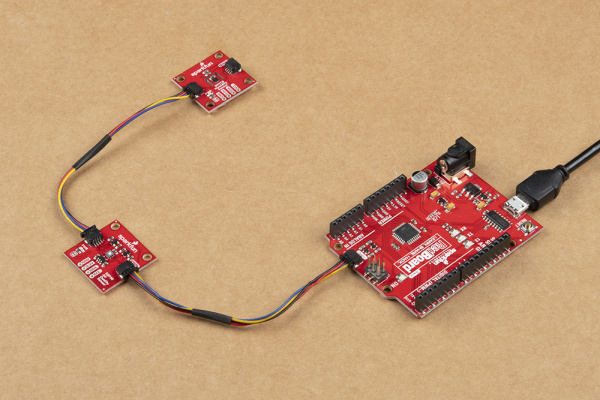
Using the Qwiic system, assembling the hardware is a breeze. All you need to do is connect your SparkFun Air Quality Sensor - SGP30 (Qwiic) to your chosen development board with a Qwiic cable or adapter cable. If you would prefer to not use the Qwiic connectors, you can connect to the 0.1" header pins broken out on bottom of the board.
If you decide to use the PTH pins broken out on the Air Quality Sensor you will need to solder to them. Alternatively, if you want a temporary connection for prototyping, these IC Hooks are a great option to make that connection. If you are not familiar with through-hole soldering take a look at this tutorial:
How to Solder: Through-Hole Soldering
With the SGP30 connected to your microcontroller it's time to get some code uploaded and start taking measurements!
SGP30 Arduino Library
The SparkFun SGP30 Arduino library can be downloaded with the Arduino library manager by searching 'SparkFun SGP30' or you can grab the zip here from the GitHub repository:
Library Functions
The list below outlines all of the functions of the library with some quick descriptions of what they do. The examples cover most of the functions so take a look at those for demonstrations of how to integrate them in your code.
Before we get into the heart of the functions, we'll first cover a setup type definition that helps with debugging. This enum parses the four integer values returned by the SGP30 to a more "human readable" way.
language:c
typedef enum {
SUCCESS = 0,
ERR_BAD_CRC,
ERR_I2C_TIMEOUT,
SELF_TEST_FAIL
} SGP30ERR;
This enum allows us to simply tell what error code was returned by its description instead of getting a number for an error which you would then have to "decode". For example, instead of returning error == 0 an error check returns error == SUCCESS. Now, on to the rest of the functions.
Device Setup & Settings
bool begin(TwoWire &wirePort);- Initializes the sensor on the I2C bus and selects the wire port.void initAirQuality(void);- Initializes air quality measurements on the SGP30. Must be called prior to callingmeasureAirQuality.void generalCallReset(void);- Performs a soft reset of the SGP30. Not device specific and this call can reset any attached device that support the General Call Mode.getFeatureSetVersion(void);- Returns a readout of the feature set version number. Refer to page 8 of the datasheet for more information.getSerialID(void);- Returns a readout of the serial ID register to identify the chip and verify the sensor is connected.measureTest(void);- Runs a self test on the SGP30. This function is primarily used by the manufacturer for testing.
Measurement Functions
measureAirQuality(void);- Returns CO2 values in ppm and TVOC values in ppb. Call in regular 1 second intervals to maintain baseline calculations.setBaseline(void);- Updates the baseline values to a previous baseline. Recommended to only use previously retrieved baselines to maintain accuracy.getBaseline(void);- Returns the current calculated baseline from the SGP30's dynamic baseline calculations.setHumidity(uint16_t humidity);- Set a humidity value for compensation. Default is 15.5g/m3 and if modified, the new humidity value should be taken from a humidity sensor like the SHTC3. Sending0x0000resets to default and turns off humidity compensation. Refer to "Example3_Humidity" in our Arduino library for more information on calculating and sending this value.measureRawSignals(void);- Returns raw signals for H2 and ethanol. These values are used as inputs for on-chip calibration and baseline compensation algorithms. Refer to page 8 of the datasheet for more information.
With the core functions of this Arduino library outlined and explained, it's time to start putting them together in some example code.
Arduino Examples
The SGP30 Arduino Library includes nine examples to get you started. For the scope of this tutorial, we'll just cover the first three as they demonstrate the basics of setting up and reading from the SGP30.
Example 1 - Basic Readings
A basic example to get you started reading TVOC and CO2 readings from the SGP30. To open this example, navigate to File > Examples > SparkFun SGP30 Arduino Library > Example1_BasicReadings. Next, open the Tools menu and select your board (in our case, Arduino Uno) and the correct Port your board enumerated on.
Upload the code, open the Arduino Serial Monitor and set your baud rate to 9600. If the sensor initialization returns false, the code will print out "No SGP30 Detected. Check connections." via serial. That error will almost certainly be the result of a bad connection to the SGP30. After successful initialization, it will start to print out TVOC and CO2 readings. Take note that for the first 15 seconds after sensor power up or reset, the readings will be: CO2 : 400 ppm and TVOC : 0 ppb so if you are logging the data using, say, the OpenLog Artemis, you will want to ignore these first 15 readings.
After the first 15 readings have passed, try breathing lightly near the sensor and you should see the CO2 readings jump significantly from the 400 ppm baseline. These basic readings are good to get started and making sure your sensor is connected and functioning, but for more accurate readings, you'll probably want to include a compensation value from a humidity sensor like we demonstrate in Example 3 - Humidity.
Example 2 - Raw Signals
This example includes both the TVOC and CO2 readings from the SGP30 along with raw readings for ethanol and H2. The Ethanol and H2 values are primarily for internal processing on the SGP30 but you can use them for rough measurements of both gases.
Open the example from the Examples menu as we did above and select Example2_RawSignals. Select your Board and Port and upload the code. Open the Arduino Serial Monitor again and set your baud to 9600. You should see readings for CO2, TVOC, Raw H2 and Raw Ethanol every second.
Example 3 - Humidity
This example demonstrates how to pass humidity data from an external sensor (in this case, the SparkFun Humidity Sensor Breakout - SHTC3 (Qwiic)) to modify the SGP30's humidity compensation with an actual absolute humidity value. Passing an actual humidity value to the SGP30's humidity compensation will help increase the accuracy and reliability of the sensor.
In order to use this example as is you will need to also have the SparkFun SHTC3 Arduino Library installed. With both libraries installed, simply connect an SHTC3 Breakout to your Qwiic chain and upload the example to add a humidity compensation value to your SGP30's readings!
This example initializes both sensors and, in the setup, takes a temperature and humidity reading from the SHTC3. The code then converts those readings to absolute humidity, parses that into a fixed 8.8 bit value the SGP30 can accept for humidity compensation and then sends that data to the SGP30 using the setHumidity function. After this value is set, the code runs through the primary routine of reading CO2 and TVOC values and printing them over serial.
The value stored for the on-chip humidity compensation will remain static until a new value is sent or the SGP30 is reset. We have included an option to send the letter "H" (upper or lower case) through your serial monitor to adjust the humidity compensation value to a new reading from the SHTC3 to avoid having to reset the circuit.
To update the compensation value, open the Serial Monitor at any time after initialization and set the baud to 9600. Type in "H", hit enter and the code will reset the humidity compensation value using an updated reading from the SHTC3. The code will also print out the new value in g/m3 and then resume taking CO2 and TVOC readings from the SGP30. The code below shows that if statement and how the humidity value is calculated from the SHTC3's temperature and humidity data:
language:c
if (Serial.available())
{
char ch = Serial.read();
if (ch == 'H' || ch == 'h')
{
  SHTC3_Status_TypeDef result = hSensor.update();
  delay(190);
  // Measure Relative Humidity from the Si7021
  float humidity = hSensor.toPercent();

  //Measure temperature (in C) from the Si7021
  float temperature = hSensor.toDegC();

  //Convert relative humidity to absolute humidity
  double absHumidity = RHtoAbsolute(humidity, temperature);

  //Convert the double type humidity to a fixed point 8.8bit number
  uint16_t sensHumidity = doubleToFixedPoint(absHumidity);

  //Set the humidity compensation on the SGP30 to the measured value
  //If no humidity sensor attached, sensHumidity should be 0 and sensor will use default
  mySensor.setHumidity(sensHumidity);
  Serial.print("Absolute Humidity compensation value set to: ");
  Serial.print(absHumidity);
  Serial.println("g/m^3 ");
  delay(100);
Resources and Going Further
That's all for this guide. Hopefully after reading this and following along with the Arduino examples you are ready to integrate your SparkFun Air Quality Sensor -SGP30 (Qwiic) into your next air quality monitoring project!
For more information, take a look at the resources below:
- Schematic (PDF)
- Eagle Files (ZIP)
- Board Dimensions (PNG)
- Arduino Library GitHub Repository
- Hardware GitHub Repository
- SGP30 Datasheet
Looking to add more sensors to your indoor air quality project or simply want more weather and environmental-related tutorials? Check these out:
micro:climate Kit Experiment Guide
ESP32 Environment Sensor Shield Hookup Guide
SparkFun gator:soil Hookup Guide
SparkFun Humidity Sensor Breakout - SHTC3 (Qwiic) Hookup Guide
Not sure what type of air quality project you want to start? These blog posts might give you some inspiration:
